En este tutorial, le mostraremos cómo instalar Ntopng en Ubuntu 14.04. Para aquellos de ustedes que no sabían, Ntopng es una herramienta relativamente útil si está buscando monitorear diferentes redes protocolos en sus servidores. Proporciona un montón de herramientas para monitorear varios protocolos, variantes de tráfico y sí, ancho de banda en múltiples marcos de tiempo. Ntopng se basa en libpcap y se ha escrito de manera portátil para ejecutarse virtualmente en todos los Unix plataforma, macOS y también en Win32.
Este artículo asume que tiene al menos conocimientos básicos de Linux, sabe cómo usar el shell y, lo que es más importante, aloja su sitio en su propio VPS. La instalación es bastante simple. mostrarle la instalación paso a paso de Ntopng en Ubuntu 14.04.
Instalar Ntopng en Ubuntu 14.04
Paso 1. Primero, agregue el repositorio Ntopng a nuestra lista de repositorios.
sudo nano /etc/apt/sources.list.d/ntop.list
Luego agrega esta línea:
deb http://www.nmon.net/apt-stable/12.04/ x64/
deb http://www.nmon.net/apt-stable/12.04/ all/
Agregue la clave y luego ejecute la actualización:
wget -qO - http://www.nmon.net/apt-stable/ntop.key | sudo apt-key add -
sudo apt-get update
Paso 2. Instalar Ntopng y dependencias.
sudo apt-get install libpcap-dev libglib2.0-dev libgeoip-dev redis-server libxml2-dev libnl1
sudo apt-get install ntopng pfring nprobe ntopng-data n2disk nbox
Paso 3. Configurar Ntopng.
Cree un archivo de configuración de Ntopng. En este artículo, usamos nano como editor de texto. Puede usar su editor de texto favorito para crear archivos de configuración de Ntopng:
sudo nano /etc/ntopng/ntopng.conf
# /etc/ntopng/ntopng.conf
#
#        The  configuration  file is similar to the command line, with the exception that an equal
#        sign '=' must be used between key and value. Example:  -i=p1p2  or  --interface=p1p2  For
#        options with no value (e.g. -v) the equal is also necessary. Example: "-v=" must be used.
#
#
#       -G|--pid-path
#        Specifies the path where the PID (process ID) is saved.
#
-G=/var/tmp/ntopng.pid
#
#       -e|--daemon
#        This  parameter  causes ntop to become a daemon, i.e. a task which runs in the background
#        without connection to a specific terminal. To use ntop other than as a casual  monitoring
#        tool, you probably will want to use this option.
#
-e=
#
#       -i|--interface
#        Specifies  the  network  interface or collector endpoint to be used by ntopng for network
#        monitoring. On Unix you can specify both the interface name  (e.g.  lo)  or  the  numeric
#        interface id as shown by ntopng -h. On Windows you must use the interface number instead.
#        Note that you can specify -i multiple times in order to instruct ntopng to create  multi‐
#        ple interfaces.
#
-i=1
#
#       -w|--http-port
#        Sets the HTTP port of the embedded web server.
#
-w=3000
#
#       -m|--local-networks
#        ntopng determines the ip addresses and netmasks for each active interface. Any traffic on
#        those  networks  is considered local. This parameter allows the user to define additional
#        networks and subnetworks whose traffic is also considered local in  ntopng  reports.  All
#        other hosts are considered remote. If not specified the default is set to 192.168.1.0/24.
#
#        Commas  separate  multiple  network  values.  Both netmask and CIDR notation may be used,
#        even mixed together, for instance "131.114.21.0/24,10.0.0.0/255.0.0.0".
#
-m=192.168.1.0/24
#
#       -n|--dns-mode
#        Sets the DNS address resolution mode: 0 - Decode DNS responses  and  resolve  only  local
#        (-m)  numeric  IPs  1  -  Decode DNS responses and resolve all numeric IPs 2 - Decode DNS
#        responses and don't resolve numeric IPs 3 - Don't decode DNS responses and don't  resolve
#
-n=1
#
#       -S|--sticky-hosts
#        ntopng  periodically purges idle hosts. With this option you can modify this behaviour by
#        telling ntopng not to purge the hosts specified by -S. This parameter requires  an  argu‐
#        ment  that  can  be  "all"  (Keep  all hosts in memory), "local" (Keep only local hosts),
#        "remote" (Keep only remote hosts), "none" (Flush hosts when idle).
#
-S=
#
#       -d|--data-dir
#        Specifies the data directory (it must be writable). Default directory is ./data
#
-d=/var/tmp/ntopng
#
#       -q|--disable-autologout
#        Disable web interface logout for inactivity.
#
-q=
Crear archivo ntopng.start:
sudo nano /etc/ntopng/ntopng.start

##Add this line##

--local-networks "192.168.0.0/24"  ## give your local IP Ranges here.
--interface 1
Para ver todas las interfaces y opciones disponibles, use ntopng -h opción:
sudo ntopng -h
Paso 4. Inicie el demonio del servidor Ntopng y Redis.
sudo service redis-server start
sudo service ntopng start
Paso 5. Pruebe Ntopng.
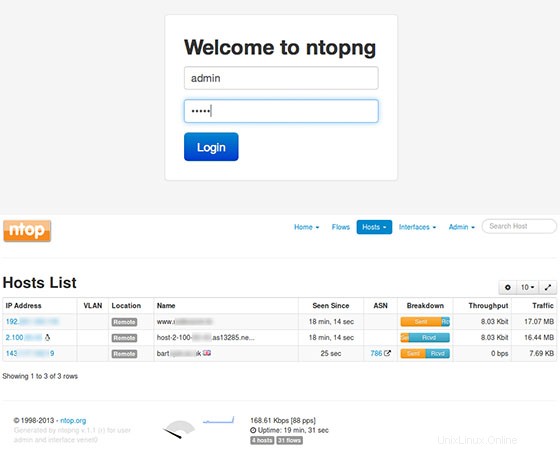
Ahora puede probar su aplicación Ntopng escribiendo http://yourserver.name:3000. Verá la interfaz de la página de inicio de sesión de Ntopng. Por primera vez, puede usar el usuario 'admin' y la contraseña 'admin'.

¡Felicitaciones! Ha instalado Ntopng con éxito. Gracias por usar este tutorial para instalar el monitoreo del servidor Ntopng en sistemas Ubuntu 14.04. Para obtener ayuda adicional o información útil, le recomendamos que visite el sitio web oficial de Ntopng.