ERPNext es un software ERP gratuito y de código abierto escrito en Python sobre el marco Frappe e incluye contabilidad, inventario, fabricación, CRM, ventas, compras, gestión de proyectos, HRMS y más. ERPNext es un sistema ERP simple, potente y fácil de usar. Viene con una hermosa interfaz web que se puede usar para administrar las tareas diarias desde una ubicación central.
En este tutorial, aprenderemos cómo instalar el software ERPNext en el servidor Debian 9.
Requisitos
- Un servidor que ejecuta Debian 9.
- Un usuario no root con privilegios sudo.
Cómo empezar
Antes de comenzar, se recomienda actualizar su repositorio de paquetes a la última versión. Puede hacerlo ejecutando el siguiente comando:
sudo apt-get update -y
sudo apt-get upgrade -y
A continuación, reinicie el sistema para aplicar todos los cambios.
Instalar dependencias
ERPNext requiere la versión 2.7 de Python para funcionar correctamente. Puede instalar Python y otros paquetes necesarios ejecutando el siguiente comando:
sudo apt-get install python-minimal git build-essential python-setuptools python-dev libffi-dev libssl-dev curl -y
También deberá instalar la herramienta pip de Python para instalar las dependencias de Python. Puede hacerlo ejecutando el siguiente comando:
wget https://bootstrap.pypa.io/get-pip.py
sudo python get-pip.py
Luego, instale ansible usando el comando pip:
sudo pip install ansible
Instalar Node.js, Redis y Nginx
De forma predeterminada, la última versión de Node.js no está disponible en Debian 9. Por lo tanto, deberá agregar el repositorio Nodesource para Node.js 8.x. Puede hacerlo ejecutando el siguiente comando:
sudo curl --silent --location https://deb.nodesource.com/setup_8.x | sudo bash -
A continuación, instale Node.js, Nginx y Redis ejecutando el siguiente comando:
sudo apt-get install nodejs redis-server nginx -y
Una vez que todos los paquetes estén instalados, inicie el servicio Nginx y Redis y habilítelos para que se inicien en el arranque con el siguiente comando:
sudo systemctl start nginx
sudo systemctl enable nginx
sudo systemctl start redis-server
sudo systemctl enable redis-server
Instalar y configurar MariaDB
De forma predeterminada, la última versión de MariaDB no está disponible en el repositorio de Debian 9. Por lo tanto, deberá agregar el repositorio MariaDB para eso.
Primero, descargue y agregue la clave de firma a su sistema con el siguiente comando:
sudo apt-get install software-properties-common dirmngr
sudo apt-key adv --recv-keys --keyserver keyserver.ubuntu.com 0xF1656F24C74CD1D8
Luego, agregue el repositorio de MariaDB usando el siguiente comando:
sudo add-apt-repository 'deb [arch=amd64,i386,ppc64el] http://ftp.utexas.edu/mariadb/repo/10.2/debian stretch main'
Finalmente, instale el servidor MariaDB con el siguiente comando:
sudo apt-get update -y
sudo apt-get install mariadb-server libmysqlclient-dev -y
A continuación, deberá agregar el motor de almacenamiento Barracuda al archivo de configuración de MariaDB para la creación de bases de datos ERPNext. Puede hacerlo editando el archivo my.cnf:
sudo nano /etc/mysql/my.cnf
agregue las siguientes líneas:
[mysqld]

innodb-file-format=barracuda
innodb-file-per-table=1
innodb-large-prefix=1
character-set-client-handshake = FALSE
character-set-server = utf8mb4
collation-server = utf8mb4_unicode_ci

[mysql]

default-character-set = utf8mb4
Guarde y cierre el archivo cuando haya terminado, luego inicie el servicio MariaDB y habilítelo para que se inicie en el arranque con el siguiente comando:
sudo systemctl restart mysql
sudo systemctl enable mysql
A continuación, asegure MariaDB ejecutando el script mysql_secure_installation:
sudo mysql_secure_installation
Este script establecerá la contraseña de root, eliminará a los usuarios anónimos, no permitirá el inicio de sesión de root remoto y eliminará la base de datos de prueba y accederá a MariaDB segura como se muestra a continuación:
Set root password? [Y/n] y
Remove anonymous users? [Y/n] y
Disallow root login remotely? [Y/n] y
Remove test database and access to it? [Y/n] y
Reload privilege tables now? [Y/n] y
Instalar PDF Converter
También deberá instalar wkhtmltopdf para convertir HTML en PDF utilizando el motor de renderizado QT Webkit. Primero, instale las dependencias requeridas usando el siguiente comando:
sudo apt-get install libxext6 xfonts-75dpi xfonts-base libxrender1 -y
A continuación, descargue la última versión de wkhtmltopdf usando el siguiente comando:
wget https://github.com/wkhtmltopdf/wkhtmltopdf/releases/download/0.12.4/wkhtmltox-0.12.4_linux-generic-amd64.tar.xz
A continuación, extraiga el archivo descargado en el directorio /opt:
sudo tar -xvf wkhtmltox-0.12.4_linux-generic-amd64.tar.xz -C /opt
Luego, cree un enlace suave para wkhtmltopdf usando el siguiente comando:
sudo ln -s /opt/wkhtmltox/bin/wkhtmltopdf /usr/bin/wkhtmltopdf
sudo ln -s /opt/wkhtmltox/bin/wkhtmltopdf /usr/bin/wkhtmltopdf
Instalar Banco
A continuación, deberá instalar Bench para instalar y administrar la aplicación ERPNext en su sistema. Bench también se usa para crear y administrar Nginx y configuraciones de supervisor.
Antes de instalar Bench, deberá agregar un usuario para Bench.
Primero, cree un usuario de Bench con el siguiente comando:
sudo adduser bench
A continuación, proporcione permisos de sudo al usuario del banco.
sudo usermod -aG sudo bench
A continuación, inicie sesión con el usuario de Bench y clone el repositorio de Bench con el siguiente comando:
su - bench
git clone https://github.com/frappe/bench bench-repo
Finalmente, instale Bench usando el comando pip:
sudo pip install -e bench-repo
Instalar ERPNext
A continuación, inicialice un directorio de banco con frappe framework instalado.
bench init erpnext
A continuación, cambie el directorio a erpnext y cree un nuevo sitio de Frappe con el siguiente comando:
cd erpnext
bench new-site test.example.com
El comando anterior le pedirá que proporcione la contraseña raíz de MySQL y le pedirá que establezca una nueva contraseña para la cuenta de administrador. La contraseña del administrador deberá iniciar sesión en el panel del administrador más tarde.
A continuación, descargue los archivos de instalación de ERPNext desde el repositorio de Git con el siguiente comando:
bench get-app erpnext https://github.com/frappe/erpnext
A continuación, instale ERPNext en su sitio recién creado.
bench --site test.example.com install-app erpnext
Finalmente, inicie la aplicación Bench con el siguiente comando:
bench start
Una vez que la aplicación se inició correctamente, debería ver el siguiente resultado:
13:40:10 system           | redis_socketio.1 started (pid=2618)
13:40:10 system           | worker_long.1 started (pid=2625)
13:40:10 system           | watch.1 started (pid=2619)
13:40:10 system           | redis_queue.1 started (pid=2626)
13:40:10 redis_socketio.1 | 2630:M 24 Feb 13:40:10.939 * Increased maximum number of open files to 10032 (it was originally set to 1024).
13:40:10 system           | web.1 started (pid=2629)
13:40:11 system           | schedule.1 started (pid=2634)
13:40:10 redis_socketio.1 |                 _._
13:40:10 redis_socketio.1 |            _.-``__ ''-._
13:40:10 redis_socketio.1 |       _.-``    `.  `_.  ''-._           Redis 3.0.6 (00000000/0) 64 bit
13:40:10 redis_socketio.1 |   .-`` .-```.  ```\/    _.,_ ''-._
13:40:10 redis_socketio.1 |  (    '      ,       .-`  | `,    )     Running in standalone mode
13:40:10 redis_socketio.1 |  |`-._`-...-` __...-.``-._|'` _.-'|     Port: 12000
13:40:10 redis_socketio.1 |  |    `-._   `._    /     _.-'    |     PID: 2630
13:40:10 redis_socketio.1 |   `-._    `-._  `-./  _.-'    _.-'
13:40:10 redis_socketio.1 |  |`-._`-._    `-.__.-'    _.-'_.-'|
13:40:10 redis_socketio.1 |  |    `-._`-._        _.-'_.-'    |           http://redis.io
13:40:10 redis_socketio.1 |   `-._    `-._`-.__.-'_.-'    _.-'
13:40:10 redis_socketio.1 |  |`-._`-._    `-.__.-'    _.-'_.-'|
13:40:10 redis_socketio.1 |  |    `-._`-._        _.-'_.-'    |
13:40:10 redis_socketio.1 |   `-._    `-._`-.__.-'_.-'    _.-'
13:40:10 redis_socketio.1 |       `-._    `-.__.-'    _.-'
13:40:10 redis_socketio.1 |           `-._        _.-'
13:40:10 redis_socketio.1 |               `-.__.-'
13:40:10 redis_socketio.1 |
13:40:11 system           | worker_default.1 started (pid=2639)
13:40:10 redis_socketio.1 | 2630:M 24 Feb 13:40:10.973 # WARNING: The TCP backlog setting of 511 cannot be enforced because /proc/sys/net/core/somaxconn is set to the lower value of 128.
13:40:10 redis_socketio.1 | 2630:M 24 Feb 13:40:10.974 # Server started, Redis version 3.0.6
13:40:10 redis_socketio.1 | 2630:M 24 Feb 13:40:10.974 # WARNING overcommit_memory is set to 0! Background save may fail under low memory condition. To fix this issue add 'vm.overcommit_memory = 1' to /etc/sysctl.conf and then reboot or run the command 'sysctl vm.overcommit_memory=1' for this to take effect.
13:40:10 redis_socketio.1 | 2630:M 24 Feb 13:40:10.974 # WARNING you have Transparent Huge Pages (THP) support enabled in your kernel. This will create latency and memory usage issues with Redis. To fix this issue run the command 'echo never > /sys/kernel/mm/transparent_hugepage/enabled' as root, and add it to your /etc/rc.local in order to retain the setting after a reboot. Redis must be restarted after THP is disabled.
13:40:10 redis_queue.1    | 2635:M 24 Feb 13:40:10.976 * Increased maximum number of open files to 10032 (it was originally set to 1024).
13:40:10 redis_queue.1    |                 _._
13:40:10 redis_queue.1    |            _.-``__ ''-._
13:40:10 redis_queue.1    |       _.-``    `.  `_.  ''-._           Redis 3.0.6 (00000000/0) 64 bit
13:40:10 redis_queue.1    |   .-`` .-```.  ```\/    _.,_ ''-._
13:40:10 redis_queue.1    |  (    '      ,       .-`  | `,    )     Running in standalone mode
13:40:10 redis_queue.1    |  |`-._`-...-` __...-.``-._|'` _.-'|     Port: 11000
13:40:10 redis_queue.1    |  |    `-._   `._    /     _.-'    |     PID: 2635
13:40:10 redis_queue.1    |   `-._    `-._  `-./  _.-'    _.-'
13:40:10 redis_queue.1    |  |`-._`-._    `-.__.-'    _.-'_.-'|
13:40:10 redis_queue.1    |  |    `-._`-._        _.-'_.-'    |           http://redis.io
13:40:10 redis_queue.1    |   `-._    `-._`-.__.-'_.-'    _.-'
13:40:10 redis_queue.1    |  |`-._`-._    `-.__.-'    _.-'_.-'|
13:40:10 redis_queue.1    |  |    `-._`-._        _.-'_.-'    |
13:40:10 redis_queue.1    |   `-._    `-._`-.__.-'_.-'    _.-'
13:40:10 redis_queue.1    |       `-._    `-.__.-'    _.-'
13:40:10 redis_queue.1    |           `-._        _.-'
13:40:10 redis_queue.1    |               `-.__.-'
13:40:10 redis_queue.1    |
13:40:10 redis_queue.1    | 2635:M 24 Feb 13:40:10.998 # WARNING: The TCP backlog setting of 511 cannot be enforced because /proc/sys/net/core/somaxconn is set to the lower value of 128.
13:40:10 redis_queue.1    | 2635:M 24 Feb 13:40:10.999 # Server started, Redis version 3.0.6
13:40:11 redis_queue.1    | 2635:M 24 Feb 13:40:11.000 # WARNING overcommit_memory is set to 0! Background save may fail under low memory condition. To fix this issue add 'vm.overcommit_memory = 1' to /etc/sysctl.conf and then reboot or run the command 'sysctl vm.overcommit_memory=1' for this to take effect.
13:40:11 redis_socketio.1 | 2630:M 24 Feb 13:40:11.000 * The server is now ready to accept connections on port 12000
13:40:11 system           | socketio.1 started (pid=2637)
13:40:11 redis_queue.1    | 2635:M 24 Feb 13:40:11.029 # WARNING you have Transparent Huge Pages (THP) support enabled in your kernel. This will create latency and memory usage issues with Redis. To fix this issue run the command 'echo never > /sys/kernel/mm/transparent_hugepage/enabled' as root, and add it to your /etc/rc.local in order to retain the setting after a reboot. Redis must be restarted after THP is disabled.
13:40:11 redis_queue.1    | 2635:M 24 Feb 13:40:11.029 * The server is now ready to accept connections on port 11000
13:40:11 system           | redis_cache.1 started (pid=2652)
13:40:11 system           | worker_short.1 started (pid=2651)
13:40:11 redis_cache.1    | 2660:M 24 Feb 13:40:11.100 * Increased maximum number of open files to 10032 (it was originally set to 1024).
13:40:11 redis_cache.1    |                 _._
13:40:11 redis_cache.1    |            _.-``__ ''-._
13:40:11 redis_cache.1    |       _.-``    `.  `_.  ''-._           Redis 3.0.6 (00000000/0) 64 bit
13:40:11 redis_cache.1    |   .-`` .-```.  ```\/    _.,_ ''-._
13:40:11 redis_cache.1    |  (    '      ,       .-`  | `,    )     Running in standalone mode
13:40:11 redis_cache.1    |  |`-._`-...-` __...-.``-._|'` _.-'|     Port: 13000
13:40:11 redis_cache.1    |  |    `-._   `._    /     _.-'    |     PID: 2660
13:40:11 redis_cache.1    |   `-._    `-._  `-./  _.-'    _.-'
13:40:11 redis_cache.1    |  |`-._`-._    `-.__.-'    _.-'_.-'|
13:40:11 redis_cache.1    |  |    `-._`-._        _.-'_.-'    |           http://redis.io
13:40:11 redis_cache.1    |   `-._    `-._`-.__.-'_.-'    _.-'
13:40:11 redis_cache.1    |  |`-._`-._    `-.__.-'    _.-'_.-'|
13:40:11 redis_cache.1    |  |    `-._`-._        _.-'_.-'    |
13:40:11 redis_cache.1    |   `-._    `-._`-.__.-'_.-'    _.-'
13:40:11 redis_cache.1    |       `-._    `-.__.-'    _.-'
13:40:11 redis_cache.1    |           `-._        _.-'
13:40:11 redis_cache.1    |               `-.__.-'
13:40:11 redis_cache.1    |
13:40:11 redis_cache.1    | 2660:M 24 Feb 13:40:11.115 # WARNING: The TCP backlog setting of 511 cannot be enforced because /proc/sys/net/core/somaxconn is set to the lower value of 128.
13:40:11 redis_cache.1    | 2660:M 24 Feb 13:40:11.115 # Server started, Redis version 3.0.6
13:40:11 redis_cache.1    | 2660:M 24 Feb 13:40:11.115 # WARNING overcommit_memory is set to 0! Background save may fail under low memory condition. To fix this issue add 'vm.overcommit_memory = 1' to /etc/sysctl.conf and then reboot or run the command 'sysctl vm.overcommit_memory=1' for this to take effect.
13:40:11 redis_cache.1    | 2660:M 24 Feb 13:40:11.116 # WARNING you have Transparent Huge Pages (THP) support enabled in your kernel. This will create latency and memory usage issues with Redis. To fix this issue run the command 'echo never > /sys/kernel/mm/transparent_hugepage/enabled' as root, and add it to your /etc/rc.local in order to retain the setting after a reboot. Redis must be restarted after THP is disabled.
13:40:11 redis_cache.1    | 2660:M 24 Feb 13:40:11.116 * The server is now ready to accept connections on port 13000
13:40:16 socketio.1       | listening on *: 9000
13:40:34 worker_long.1    | 13:40:34 RQ worker u'rq:worker:Node1.2632.long' started, version 0.10.0
13:40:34 worker_long.1    | 13:40:34 *** Listening on long...
13:40:34 worker_long.1    | 13:40:34 Cleaning registries for queue: long
13:40:34 worker_default.1 | 13:40:34 RQ worker u'rq:worker:Node1.2646.default' started, version 0.10.0
13:40:34 worker_default.1 | 13:40:34 *** Listening on default...
13:40:34 worker_default.1 | 13:40:34 Cleaning registries for queue: default
13:40:34 worker_short.1   | 13:40:34 RQ worker u'rq:worker:Node1.2661.short' started, version 0.10.0
13:40:34 worker_short.1   | 13:40:34 *** Listening on short...
13:40:34 worker_short.1   | 13:40:34 Cleaning registries for queue: short
13:40:34 web.1            |  * Running on http://0.0.0.0:8000/ (Press CTRL+C to quit)
Acceder a la interfaz web de ERPNext
ERPNext ahora está instalado y se ejecuta en el puerto 8000 . Es hora de acceder a la interfaz web de ERPNext.
Abra su navegador web y escriba la URL http://test.exaple.com:8000 , será redirigido a la siguiente página:
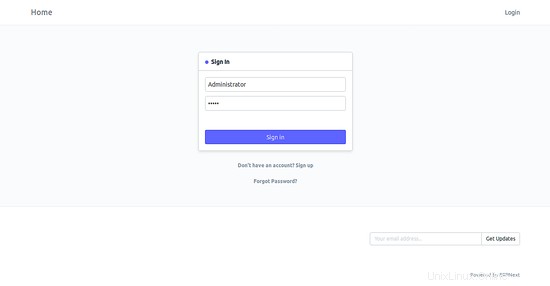
Aquí, proporcione la credencial de su cuenta de administrador y haga clic en Iniciar sesión botón, debería ver la siguiente página:

Aquí, elija el idioma inglés y haga clic en Siguiente botón, debería ver la siguiente página:

Aquí, elija su país, zona horaria y moneda, luego haga clic en Siguiente botón, debería ver la siguiente página:

Aquí, proporcione su nombre, correo electrónico y contraseña, luego haga clic en Siguiente botón, debería ver la siguiente página:

Aquí, seleccione su Dominio como desee, luego haga clic en Siguiente botón, debería ver la siguiente página:

Aquí, proporcione el nombre de su empresa y la abreviatura, luego haga clic en Siguiente botón, debería ver la siguiente página:
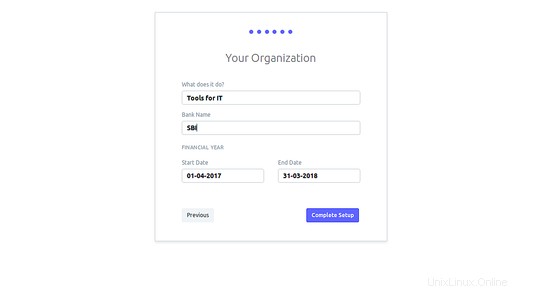
Aquí, proporcione los detalles de su organización y haga clic en Configuración completa botón, debería ver la siguiente página:

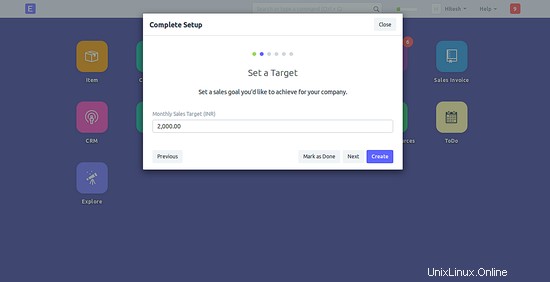
Aquí, establezca un objetivo que le gustaría lograr para su empresa, luego haga clic en Crear botón, debería ver la siguiente página:
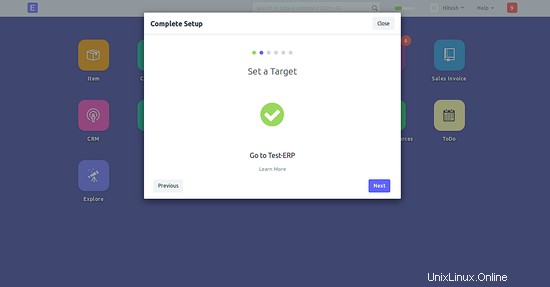
Aquí, haga clic en Siguiente para continuar, debería ver la siguiente página:
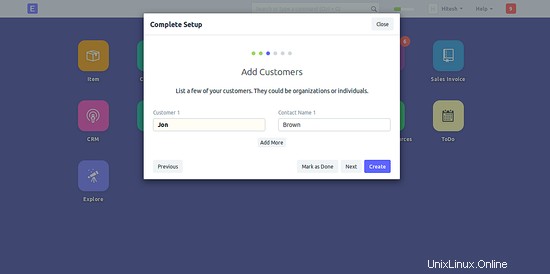
Aquí, agregue los clientes que le gustaría agregar, luego haga clic en Crear botón, debería ver la siguiente página:
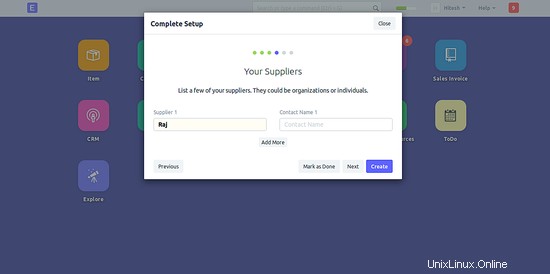
Aquí, haga clic en Siguiente para continuar, debería ver la siguiente página:

Aquí, agregue los proveedores que le gustaría agregar, luego haga clic en Crear botón, debería ver la siguiente página:
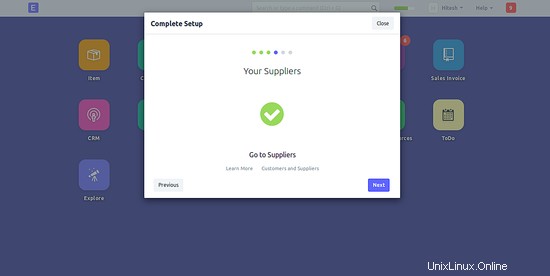
Aquí, haga clic en Siguiente para continuar, debería ver la siguiente página:
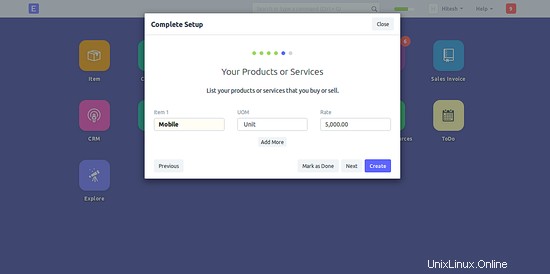
Aquí, agregue los productos y servicios que le gustaría comprar o vender, luego haga clic en Crear botón, debería ver la siguiente página:
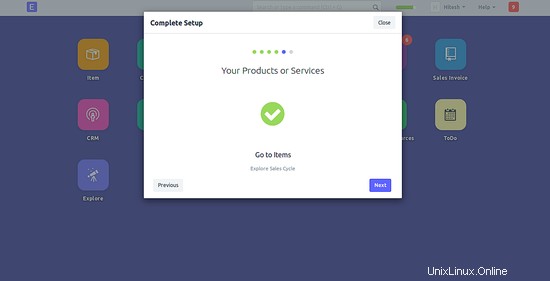
Aquí, haga clic en Siguiente para continuar, debería ver la siguiente página:
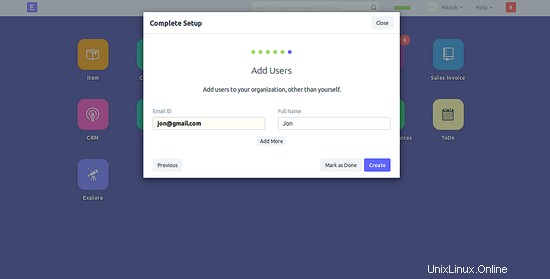
Aquí, agregue usuarios a su organización, luego haga clic en Crear botón, debería ver el panel de control ERPNext siguiente página:
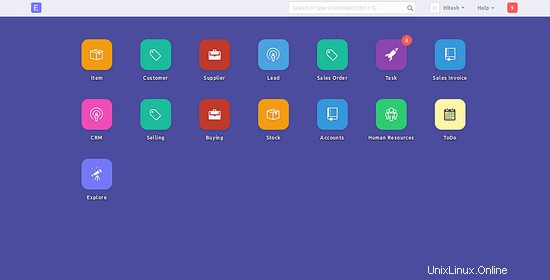
Conclusión
¡Felicitaciones! ha instalado y configurado con éxito ERPNext en el servidor Debian 9. Ahora puede usar fácilmente la aplicación para administrar su empresa. Para obtener más información, consulte la página de documentación oficial de ERPNext en Doc.