LiteCart es una plataforma de comercio electrónico liviana y de código abierto escrita en PHP, HTML 5 y CSS 3. Es simple, fácil de usar y tiene un diseño elegante y panel de administración sencillo. LiteCart es más rápido que el 99% de todos los sitios web del mundo. Viene con un amplio conjunto de características que incluyen complementos innovadores, de alto rendimiento, Plug and Play, compatible con SEO, pago en un solo paso, compatibilidad con múltiples juegos de caracteres y mucho más.
En este tutorial, le mostraremos cómo instalar la plataforma de carrito de compras LiteCart en Ubuntu 20.04.
Requisitos
- Un servidor con Ubuntu 20.04.
- Un nombre de dominio válido apuntado con su servidor.
- Se ha configurado una contraseña raíz en su servidor.
Cómo empezar
Antes de comenzar, se recomienda actualizar su sistema con la última versión estable. Puede actualizarlo con el siguiente comando:
apt-get update -y
apt-get upgrade -y
Una vez que su sistema esté actualizado, reinícielo para aplicar los cambios:
Instalar servidor LAMP
Primero, deberá instalar el servidor web Apache, el servidor MariaDB, PHP y otras bibliotecas PHP requeridas en su sistema. Puede instalarlos todos con el siguiente comando:
apt-get install apache2 mariadb-server php7.4 libapache2-mod-php7.4 php7.4-common php7.4-mbstring php7.4-xmlrpc php7.4-soap php7.4-gd php7.4-xml php7.4-intl php7.4-mysql php7.4-cli php7.4-zip php7.4-curl php7.4-soap unzip -y
Una vez que todos los paquetes estén instalados, edite el archivo php.ini y modifique algunas configuraciones deseadas:
nano /etc/php/7.4/apache2/php.ini
Cambie las siguientes líneas:
memory_limit = 256M
upload_max_filesize = 150M
max_execution_time = 360
date.timezone = Asia/Kolkata
Guarde y cierre el archivo cuando haya terminado. Luego, reinicie el servicio Apache para aplicar los cambios:
systemctl restart apache2
Configurar base de datos MariaDB
Primero, deberá proteger MariaDB y configurar la contraseña raíz de MariaDB. Puedes hacerlo con el siguiente comando:
mysql_secure_installation
Responda todas las preguntas como se muestra a continuación:
   Enter current password for root (enter for none):
    Set root password? [Y/n]: N
    Remove anonymous users? [Y/n]: Y
    Disallow root login remotely? [Y/n]: Y
    Remove test database and access to it? [Y/n]:  Y
    Reload privilege tables now? [Y/n]:  Y
Una vez que haya terminado, inicie sesión en el shell de MariaDB con el siguiente comando:
mysql -u root -p
Proporcione su contraseña raíz cuando se le solicite y luego cree una base de datos y un usuario para LiteCart con el siguiente comando:
MariaDB [(none)]> CREATE DATABASE litecartdb;
MariaDB [(none)]> CREATE USER 'litecart'@'localhost' IDENTIFIED BY 'password';
A continuación, otorgue todos los privilegios a litecartdb con el siguiente comando:
MariaDB [(none)]> GRANT ALL PRIVILEGES ON litecartdb.* TO 'litecart'@'localhost' IDENTIFIED BY 'password' WITH GRANT OPTION;
A continuación, elimine los privilegios y salga del shell de MariaDB con el siguiente comando:
MariaDB [(none)]> FLUSH PRIVILEGES;
MariaDB [(none)]> EXIT;
Una vez que su base de datos esté configurada, puede continuar con el siguiente paso.
Descargar LiteCart
Al momento de escribir este tutorial, la última versión de LiteCart es 2.2.3. Puedes descargarlo desde su sitio web oficial. Después de la descarga, extraiga el archivo descargado al directorio raíz web de Apache con el siguiente comando:
mkdir /var/www/html/litecart
unzip litecart-2.2.3.1.zip -d /var/www/html/litecart
A continuación, cambie la propiedad del directorio litecart a www-data y otorgue los permisos adecuados con el siguiente comando:
chown -R www-data:www-data /var/www/html/litecart/
chmod -R 755 /var/www/html/litecart/
Una vez que haya terminado, puede continuar con el siguiente paso.
Configurar Apache para LiteCart
Primero, cree un nuevo archivo de configuración de host virtual de Apache con el siguiente comando:
nano /etc/apache2/sites-available/litecart.conf
Agregue las siguientes líneas:
<VirtualHost *:80>
     ServerAdmin [email protected]
     ServerName litecart.linuxbuz.com
     DocumentRoot /var/www/html/litecart/public_html/

     <Directory /var/www/html/litecart/>
        AllowOverride All
        allow from all
     </Directory>

     ErrorLog /var/log/apache2/litecart_error.log
     CustomLog /var/log/apache2/litecart_access.log combined
</VirtualHost>
Guarde y cierre el archivo cuando haya terminado. Luego, habilite el módulo de sitio, reescritura y encabezados de LiteCart con el siguiente comando:
a2ensite litecart.conf
a2enmod rewrite
a2enmod headers
Finalmente, reinicie el servicio Apache para aplicar los cambios:
systemctl restart apache2
En este punto, su servidor web Apache está configurado para servir LiteCart.
LiteCart seguro con Let's Encrypt SSL
Se recomienda proteger el sitio web de LiteCart con SSL gratuito de Let's Encrypt. Para hacerlo, instale Certbot Let's Encrypt Client con el siguiente comando:
apt-get install certbot python3-certbot-apache -y
Una vez que Certbot esté instalado, ejecute el siguiente comando para instalar Let's Encrypt SSL para su dominio:
certbot --apache -d litecart.linuxbuz.com
Deberá proporcionar su dirección de correo electrónico y aceptar el término del servicio como se muestra a continuación:
Saving debug log to /var/log/letsencrypt/letsencrypt.log
Plugins selected: Authenticator apache, Installer apache
Enter email address (used for urgent renewal and security notices) (Enter 'c' to
cancel): [email protected]

- - - - - - - - - - - - - - - - - - - - - - - - - - - - - - - - - - - - - - - -
Please read the Terms of Service at
https://letsencrypt.org/documents/LE-SA-v1.2-November-15-2017.pdf. You must
agree in order to register with the ACME server at
https://acme-v02.api.letsencrypt.org/directory
- - - - - - - - - - - - - - - - - - - - - - - - - - - - - - - - - - - - - - - -
(A)gree/(C)ancel: A

- - - - - - - - - - - - - - - - - - - - - - - - - - - - - - - - - - - - - - - -
Would you be willing to share your email address with the Electronic Frontier
Foundation, a founding partner of the Let's Encrypt project and the non-profit
organization that develops Certbot? We'd like to send you email about our work
encrypting the web, EFF news, campaigns, and ways to support digital freedom.
- - - - - - - - - - - - - - - - - - - - - - - - - - - - - - - - - - - - - - - -
(Y)es/(N)o: Y
Obtaining a new certificate
Performing the following challenges:
http-01 challenge for litecart.linuxbuz.com
Waiting for verification...
Cleaning up challenges
Created an SSL vhost at /etc/apache2/sites-available/litecart-le-ssl.conf
Enabled Apache socache_shmcb module
Enabled Apache ssl module
Deploying Certificate to VirtualHost /etc/apache2/sites-available/litecart-le-ssl.conf
Enabling available site: /etc/apache2/sites-available/litecart-le-ssl.conf
A continuación, deberá elegir si desea redirigir el tráfico HTTP a HTTPS o no, como se muestra a continuación:
Please choose whether or not to redirect HTTP traffic to HTTPS, removing HTTP access.
- - - - - - - - - - - - - - - - - - - - - - - - - - - - - - - - - - - - - - - -
1: No redirect - Make no further changes to the webserver configuration.
2: Redirect - Make all requests redirect to secure HTTPS access. Choose this for
new sites, or if you're confident your site works on HTTPS. You can undo this
change by editing your web server's configuration.
- - - - - - - - - - - - - - - - - - - - - - - - - - - - - - - - - - - - - - - -
Select the appropriate number [1-2] then [enter] (press 'c' to cancel): 2
Seleccione la opción 2 y presione Entrar para finalizar la instalación como se muestra a continuación:
Redirecting vhost in /etc/apache2/sites-enabled/litecart.conf to ssl vhost in /etc/apache2/sites-available/litecart-le-ssl.conf

- - - - - - - - - - - - - - - - - - - - - - - - - - - - - - - - - - - - - - - -
Congratulations! You have successfully enabled https://litecart.linuxbuz.com

You should test your configuration at:
https://www.ssllabs.com/ssltest/analyze.html?d=litecart.linuxbuz.com
- - - - - - - - - - - - - - - - - - - - - - - - - - - - - - - - - - - - - - - -

IMPORTANT NOTES:
 - Congratulations! Your certificate and chain have been saved at:
   /etc/letsencrypt/live/litecart.linuxbuz.com/fullchain.pem
   Your key file has been saved at:
   /etc/letsencrypt/live/litecart.linuxbuz.com/privkey.pem
   Your cert will expire on 2020-09-12. To obtain a new or tweaked
   version of this certificate in the future, simply run certbot again
   with the "certonly" option. To non-interactively renew *all* of
   your certificates, run "certbot renew"
 - Your account credentials have been saved in your Certbot
   configuration directory at /etc/letsencrypt. You should make a
   secure backup of this folder now. This configuration directory will
   also contain certificates and private keys obtained by Certbot so
   making regular backups of this folder is ideal.
 - If you like Certbot, please consider supporting our work by:

   Donating to ISRG / Let's Encrypt:   https://letsencrypt.org/donate
   Donating to EFF:                    https://eff.org/donate-le
En este punto, su sitio web LiteCart está protegido con Let's Encrypt SSL. Ahora puede continuar con el siguiente paso.
Acceso a LiteCart
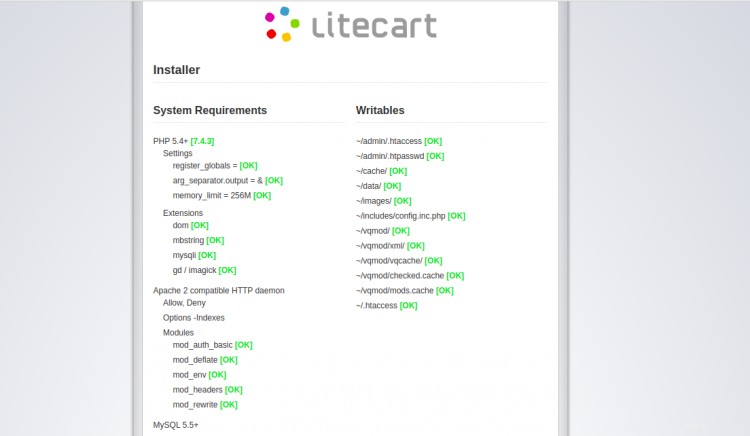
Ahora, abra su navegador web y escriba la URL https://litecart.linuxbuz.com. Será redirigido a la siguiente página:
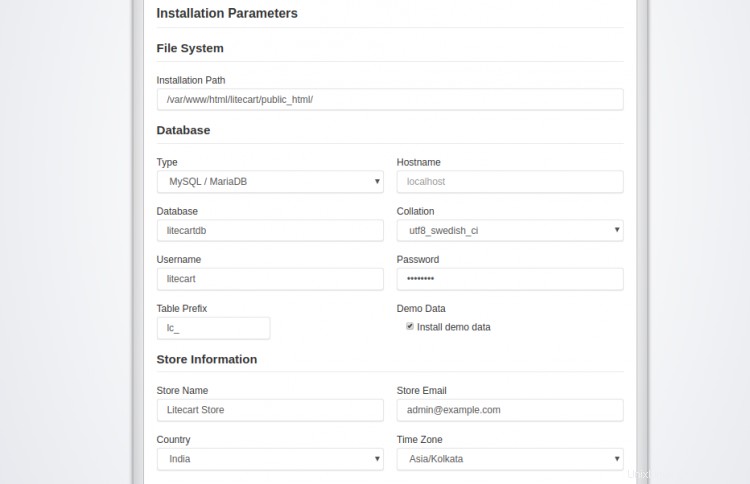
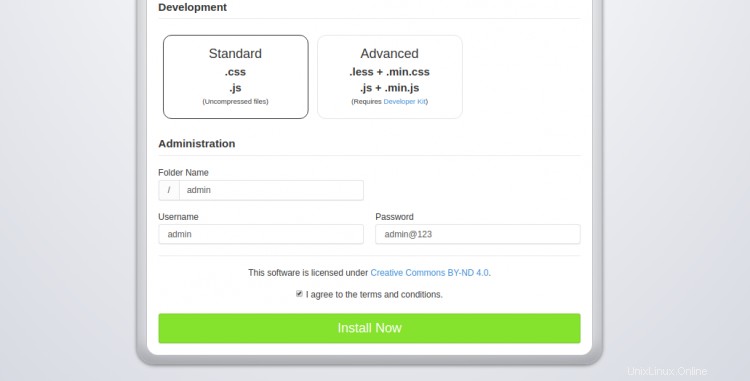
Proporcione su ruta de instalación, los detalles de la base de datos, la información de la tienda, el nombre de usuario del administrador, la contraseña y haga clic en Instalar Ahora botón. Una vez que la instalación se haya completado con éxito, debería ver la siguiente página:
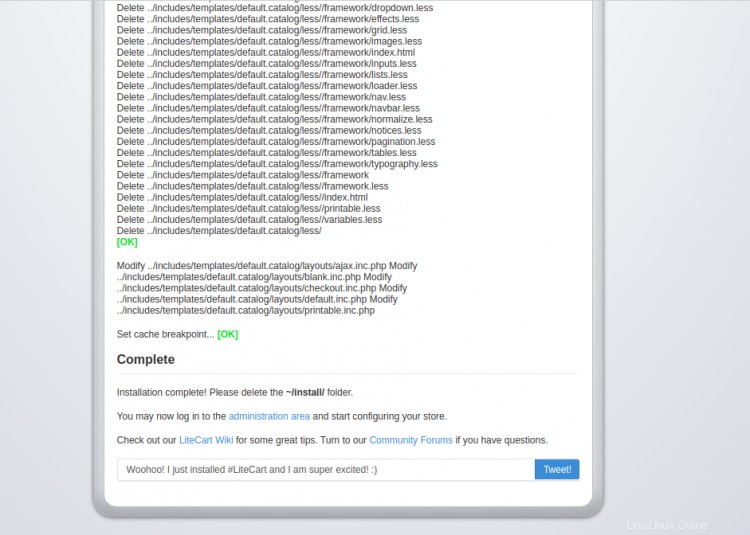
A continuación, elimine el directorio de instalación con el siguiente comando:
rm -rf /var/www/html/litecart/public_html/install/
Haga clic en administración área botón. Será redirigido a la página de inicio de sesión de LiteCart como se muestra a continuación:
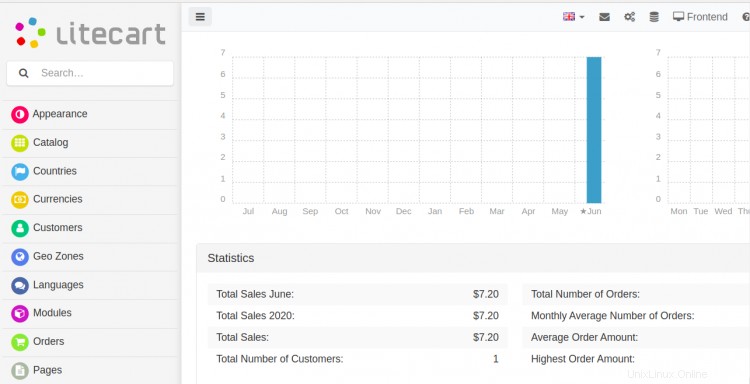
Proporcione su nombre de usuario y contraseña de administrador y haga clic en Iniciar sesión botón. Debería ver el tablero de LiteCart en la siguiente página:
Conclusión
En la guía anterior, aprendió cómo instalar y asegurar el carrito de compras LiteCart en Ubuntu 20.04. También aprendió cómo protegerlo con SSL gratuito de Let's Encrypt. Espero que ahora pueda alojar su propia aplicación de carrito de compras con LiteCart.