Plex es un servidor de transmisión de medios poderoso y rico en funciones que se puede usar para organizar su video, música y fotos, y transmitirlos a dispositivos remotos remotos desde cualquier lugar. Es compatible con muchos sistemas operativos, incluidos Linux, Windows, FreeBSD, macOS y muchos más. Puede acceder a los medios almacenados en el servidor Plex desde un televisor inteligente, un teléfono inteligente y una caja de transmisión mediante el cliente de medios Plex.
Plex tiene muchas características, algunas de ellas se enumeran a continuación:
- TV en vivo y DVR.
- Sincronización móvil.
- Sincronización en la nube.
- Características de música premium.
- Bibliotecas de fotos premium.
- Transmisión acelerada por hardware.
- Controles para padres.
- Carga de cámara.
- Límites de ancho de banda y transcodificación.
En este tutorial, explicaremos cómo instalar el servidor multimedia Plex con Nginx como proxy inverso en el servidor Ubuntu 20.04.
Requisitos
- Un servidor con Ubuntu 20.04.
- Se configuró una contraseña de root.
Cómo empezar
Primero, deberá actualizar los paquetes de su sistema a la última versión. Puede actualizarlos con el siguiente comando:
apt-get update -y
Una vez que sus paquetes estén actualizados, puede continuar con el siguiente paso.
Instalar Plex Media Server
Primero, deberá descargar la última versión del servidor de medios Plex del sitio web oficial de Plex. Puedes descargarlo con el siguiente comando:
wget https://downloads.plex.tv/plex-media-server-new/1.20.1.3252-a78fef9a9/debian/plexmediaserver_1.20.1.3252-a78fef9a9_amd64.deb
Una vez que se descarga el paquete del servidor de medios Plex, puede instalarlo con el siguiente comando:
dpkg -i plexmediaserver_1.20.1.3252-a78fef9a9_amd64.deb
Una vez que el servidor de medios Plex esté instalado, inicie el servicio Plex y habilítelo para que se inicie al reiniciar el sistema con el siguiente comando:
systemctl start plexmediaserver
systemctl enable plexmediaserver
A continuación, puede verificar el estado del servicio Plex con el siguiente comando:
systemctl status plexmediaserver
Debería ver el siguiente resultado:
? plexmediaserver.service - Plex Media Server
     Loaded: loaded (/lib/systemd/system/plexmediaserver.service; enabled; vendor preset: enabled)
     Active: active (running) since Sat 2020-09-05 06:48:06 UTC; 17s ago
    Process: 38369 ExecStartPre=/bin/sh -c /usr/bin/test -d "${PLEX_MEDIA_SERVER_APPLICATION_SUPPORT_DIR}" || /bin/mkdir -p "${PLEX_MEDIA_SERV>
   Main PID: 38371 (Plex Media Serv)
      Tasks: 120 (limit: 2353)
     Memory: 215.0M
     CGroup: /system.slice/plexmediaserver.service
             ??38371 /usr/lib/plexmediaserver/Plex Media Server
             ??38405 Plex Plug-in [com.plexapp.system] /usr/lib/plexmediaserver/Resources/Plug-ins-a78fef9a9/Framework.bundle/Contents/Resourc>
             ??38451 /usr/lib/plexmediaserver/Plex Tuner Service /usr/lib/plexmediaserver/Resources/Tuner/Private /usr/lib/plexmediaserver/Res>
             ??38474 Plex Plug-in [com.plexapp.agents.plexthememusic] /usr/lib/plexmediaserver/Resources/Plug-ins-a78fef9a9/Framework.bundle/C>
             ??38477 Plex Plug-in [com.plexapp.agents.themoviedb] /usr/lib/plexmediaserver/Resources/Plug-ins-a78fef9a9/Framework.bundle/Conte>
             ??38533 Plex Plug-in [org.musicbrainz.agents.music] /usr/lib/plexmediaserver/Resources/Plug-ins-a78fef9a9/Framework.bundle/Conten>
             ??38544 Plex Plug-in [com.plexapp.agents.thetvdb] /usr/lib/plexmediaserver/Resources/Plug-ins-a78fef9a9/Framework.bundle/Contents>
             ??38638 Plex Plug-in [com.plexapp.agents.opensubtitles] /usr/lib/plexmediaserver/Resources/Plug-ins-a78fef9a9/Framework.bundle/Co>
             ??38710 Plex Plug-in [com.plexapp.agents.fanarttv] /usr/lib/plexmediaserver/Resources/Plug-ins-a78fef9a9/Framework.bundle/Content>

Sep 05 06:48:06 ubuntu2004 systemd[1]: Starting Plex Media Server...
Sep 05 06:48:06 ubuntu2004 systemd[1]: Started Plex Media Server.
En este punto, el servidor de medios Plex se inicia y escucha en el puerto 32400. Puede verificarlo con el siguiente comando:
ss -lnpt | grep Plex
Debería ver el siguiente resultado:
LISTEN    0         128              127.0.0.1:39851            0.0.0.0:*        users:(("Plex Script Hos",pid=38739,fd=4))
LISTEN    0         128              127.0.0.1:46031            0.0.0.0:*        users:(("Plex Script Hos",pid=38779,fd=4))
LISTEN    0         1024             127.0.0.1:32401            0.0.0.0:*        users:(("Plex Media Serv",pid=38371,fd=61))
LISTEN    0         128              127.0.0.1:44661            0.0.0.0:*        users:(("Plex Script Hos",pid=38533,fd=4))
LISTEN    0         128              127.0.0.1:32600            0.0.0.0:*        users:(("Plex Tuner Serv",pid=38451,fd=13))
LISTEN    0         128              127.0.0.1:36637            0.0.0.0:*        users:(("Plex Script Hos",pid=38544,fd=4))
LISTEN    0         128              127.0.0.1:42973            0.0.0.0:*        users:(("Plex Script Hos",pid=38405,fd=10))
LISTEN    0         128              127.0.0.1:38467            0.0.0.0:*        users:(("Plex Script Hos",pid=38824,fd=4))
LISTEN    0         128              127.0.0.1:40035            0.0.0.0:*        users:(("Plex Script Hos",pid=38477,fd=4))
LISTEN    0         1024                     *:32400                  *:*        users:(("Plex Media Serv",pid=38371,fd=60))
Una vez que haya terminado, puede continuar con el siguiente paso.
Habilitar el repositorio del servidor de medios Plex
De forma predeterminada, el repositorio del servidor de medios Plex está deshabilitado en APT. Por lo tanto, se recomienda habilitarlo para que pueda actualizar el servidor de medios Plex usando el comando APT. Puede habilitarlo editando el siguiente archivo:
nano /etc/apt/sources.list.d/plexmediaserver.list
Descomente la siguiente línea:
deb https://downloads.plex.tv/repo/deb/ public main
Guarde y cierre el archivo, luego agregue la clave Plex GPG con el siguiente comando:
wget -q https://downloads.plex.tv/plex-keys/PlexSign.key -O - | apt-key add -
Ahora, actualice el repositorio con el siguiente comando para aplicar los cambios:
apt-get update -y
Una vez que se actualice el repositorio, puede continuar con el siguiente paso.
Configurar Nginx para Plex
A continuación, se recomienda instalar y configurar Nginx como proxy inverso para Plex. Entonces puede acceder al servidor de medios Plex usando el puerto 80.
Primero, instale el servidor web Nginx con el siguiente comando:
apt-get install nginx -y
Una vez que el servidor web Nginx esté instalado, cree un nuevo archivo de configuración de host virtual Nginx con el siguiente comando:
nano /etc/nginx/sites-available/plex.conf
Agregue las siguientes líneas:
upstream plex_backend {
        server 127.0.0.1:32400;
        keepalive 32;
}

server {
        listen 80;
        server_name plex.example.com;

        send_timeout 100m; #Some players don't reopen a socket and playback stops totally instead of resuming after an extended pause (e.g. Ch$

       	#Plex has A LOT of javascript, xml and html. This helps a lot, but if it causes playback issues with devices turn it off. (Haven't enc$
        gzip on;
        gzip_vary on;
        gzip_min_length 1000;
        gzip_proxied any;
        gzip_types text/plain text/css text/xml application/xml text/javascript application/x-javascript image/svg+xml;
        gzip_disable "MSIE [1-6]\.";

       	#Nginx default client_max_body_size is 1MB, which breaks Camera Upload feature from the phones.
       	#Increasing the limit fixes the issue. Anyhow, if 4K videos are expected to be uploaded, the size might need to be increased even more
        client_max_body_size 100M;

       	#Forward real ip and host to Plex
        proxy_set_header Host $host;
        proxy_set_header X-Real-IP $remote_addr;
        proxy_set_header X-Forwarded-For $proxy_add_x_forwarded_for;
        proxy_set_header X-Forwarded-Proto $scheme;
        proxy_set_header Sec-WebSocket-Extensions $http_sec_websocket_extensions;
        proxy_set_header Sec-WebSocket-Key $http_sec_websocket_key;
        proxy_set_header Sec-WebSocket-Version $http_sec_websocket_version;
       	#Websockets
        proxy_http_version 1.1;
        proxy_set_header Upgrade $http_upgrade;
        proxy_set_header Connection "Upgrade";

       	#Buffering off send to the client as soon as the data is received from Plex.
        proxy_redirect off;
        proxy_buffering off;

        location / {
                proxy_pass http://plex_backend;
        }
}
Guarde y cierre el archivo, luego verifique el Nginx para cualquier error de sintaxis con el siguiente comando:
nginx -t
Deberías obtener el siguiente resultado:
nginx: the configuration file /etc/nginx/nginx.conf syntax is ok
nginx: configuration file /etc/nginx/nginx.conf test is successful
A continuación, habilite el archivo de configuración del host virtual de Nginx con el siguiente comando:
ln -s nano /etc/nginx/sites-available/plex.conf /etc/nginx/sites-enabled/
Finalmente, reinicie el servicio Nginx para aplicar los cambios de configuración:
systemctl restart nginx
Ahora puede verificar el estado de Nginx con el siguiente comando:
systemctl status nginx
Deberías obtener el siguiente resultado:
? nginx.service - A high performance web server and a reverse proxy server
     Loaded: loaded (/lib/systemd/system/nginx.service; enabled; vendor preset: enabled)
     Active: active (running) since Sat 2020-09-05 06:57:20 UTC; 1min 47s ago
       Docs: man:nginx(8)
    Process: 40059 ExecStartPre=/usr/sbin/nginx -t -q -g daemon on; master_process on; (code=exited, status=0/SUCCESS)
    Process: 40070 ExecStart=/usr/sbin/nginx -g daemon on; master_process on; (code=exited, status=0/SUCCESS)
   Main PID: 40072 (nginx)
      Tasks: 3 (limit: 2353)
     Memory: 3.6M
     CGroup: /system.slice/nginx.service
             ??40072 nginx: master process /usr/sbin/nginx -g daemon on; master_process on;
             ??40073 nginx: worker process
             ??40074 nginx: worker process

Sep 05 06:57:20 ubuntu2004 systemd[1]: Starting A high performance web server and a reverse proxy server...
Sep 05 06:57:20 ubuntu2004 systemd[1]: Started A high performance web server and a reverse proxy server.
Una vez que haya terminado, puede continuar con el siguiente paso.
Acceder al servidor de medios Plex
En este punto, el servicio multimedia Plex está instalado y configurado con Nginx. Ahora, abra su navegador web y acceda al servidor de medios Plex usando la URL http://plex.example.com. Debería ver la siguiente página:
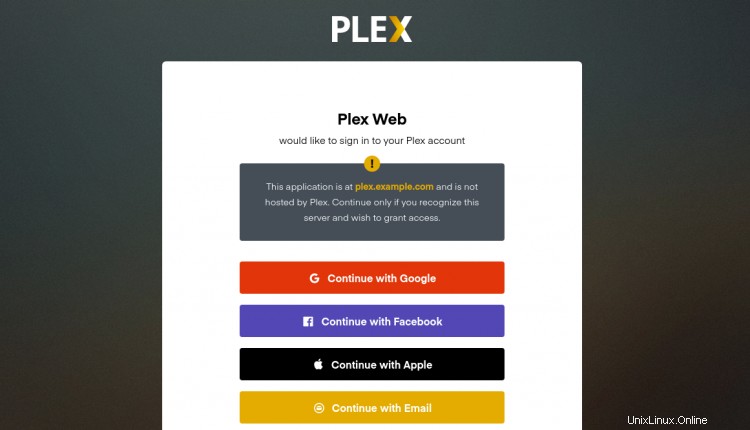
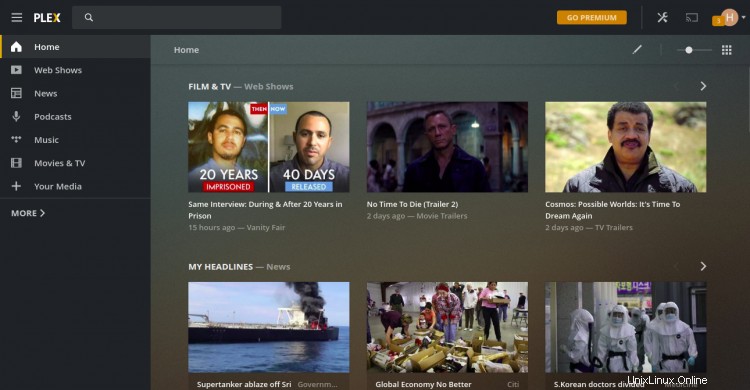
Ahora, inicia sesión con tu Google o Facebook cuenta. Debería ver el panel del servidor de medios Plex en la siguiente página:
Asegure Plex con Let's Encrypt SSL
A continuación, se recomienda asegurar Plex con Let's Encrypt SSL. Primero, deberá instalar el cliente Certbot Let's Encrypt en su servidor para instalar y administrar SSL. Puede instalarlo con el siguiente comando:
apt-get install python3-certbot-nginx -y
Después de instalar Certbot, ejecute el siguiente comando para instalar Let's Encrypt SSL en su dominio:
certbot --nginx -d plex.example.com
Se le pedirá que proporcione una dirección de correo electrónico válida y acepte el término de servicio como se muestra a continuación:
Saving debug log to /var/log/letsencrypt/letsencrypt.log
Plugins selected: Authenticator nginx, Installer nginx
Enter email address (used for urgent renewal and security notices) (Enter 'c' to
cancel): [email protected]

- - - - - - - - - - - - - - - - - - - - - - - - - - - - - - - - - - - - - - - -
Please read the Terms of Service at
https://letsencrypt.org/documents/LE-SA-v1.2-November-15-2017.pdf. You must
agree in order to register with the ACME server at
https://acme-v02.api.letsencrypt.org/directory
- - - - - - - - - - - - - - - - - - - - - - - - - - - - - - - - - - - - - - - -
(A)gree/(C)ancel: A

- - - - - - - - - - - - - - - - - - - - - - - - - - - - - - - - - - - - - - - -
Would you be willing to share your email address with the Electronic Frontier
Foundation, a founding partner of the Let's Encrypt project and the non-profit
organization that develops Certbot? We'd like to send you email about our work
encrypting the web, EFF news, campaigns, and ways to support digital freedom.
- - - - - - - - - - - - - - - - - - - - - - - - - - - - - - - - - - - - - - - -
(Y)es/(N)o: Y
Obtaining a new certificate
Performing the following challenges:
http-01 challenge for plex.example.com
Waiting for verification...
Cleaning up challenges
Deploying Certificate to VirtualHost /etc/nginx/sites-enabled/plex.conf
A continuación, elija si desea o no redirigir el tráfico HTTP a HTTPS como se muestra a continuación:
- - - - - - - - - - - - - - - - - - - - - - - - - - - - - - - - - - - - - - - -
1: No redirect - Make no further changes to the webserver configuration.
2: Redirect - Make all requests redirect to secure HTTPS access. Choose this for
new sites, or if you're confident your site works on HTTPS. You can undo this
change by editing your web server's configuration.
- - - - - - - - - - - - - - - - - - - - - - - - - - - - - - - - - - - - - - - -
Select the appropriate number [1-2] then [enter] (press 'c' to cancel): 2
Escriba 2 y presione Entrar para finalizar la instalación. Debería ver el siguiente resultado:
Redirecting all traffic on port 80 to ssl in /etc/nginx/sites-enabled/plex.conf

- - - - - - - - - - - - - - - - - - - - - - - - - - - - - - - - - - - - - - - -
Congratulations! You have successfully enabled https://plex.example.com

You should test your configuration at:
https://www.ssllabs.com/ssltest/analyze.html?d=plex.example.com
- - - - - - - - - - - - - - - - - - - - - - - - - - - - - - - - - - - - - - - -

IMPORTANT NOTES:
 - Congratulations! Your certificate and chain have been saved at:
   /etc/letsencrypt/live/plex.example.com/fullchain.pem
   Your key file has been saved at:
   /etc/letsencrypt/live/plex.example.com/privkey.pem
   Your cert will expire on 2020-10-30. To obtain a new or tweaked
   version of this certificate in the future, simply run certbot again
   with the "certonly" option. To non-interactively renew *all* of
   your certificates, run "certbot renew"
 - Your account credentials have been saved in your Certbot
   configuration directory at /etc/letsencrypt. You should make a
   secure backup of this folder now. This configuration directory will
   also contain certificates and private keys obtained by Certbot so
   making regular backups of this folder is ideal.
 - If you like Certbot, please consider supporting our work by:

   Donating to ISRG / Let's Encrypt:   https://letsencrypt.org/donate
   Donating to EFF:                    https://eff.org/donate-le

 - We were unable to subscribe you the EFF mailing list because your
   e-mail address appears to be invalid. You can try again later by
   visiting https://act.eff.org.
Ahora puede acceder a su servidor de medios Plex de forma segura utilizando la URL https://plex.example.com.
Conclusión
¡Felicidades! Ha instalado con éxito el servidor multimedia Plex con Nginx como proxy inverso en el servidor Ubuntu 20.04. Ahora puede cargar sus medios, música y fotos y acceder a ellos desde el teléfono inteligente, TV u otras cajas de transmisión. Siéntase libre de preguntarme si tiene alguna pregunta.