RavenDB es una base de datos NoSQL orientada a documentos, gratuita y de código abierto, diseñada para la plataforma .NET/Windows. RavenDB admite múltiples bases de datos, fragmentación o partición de datos en múltiples servidores. Tiene la capacidad de manejar cientos o miles de bases de datos en la misma instancia. RavenDB usa JSON para almacenar documentos y no requiere que se declare un esquema y permite a los desarrolladores trabajar con datos de forma más natural.
En este tutorial, aprenderemos cómo instalar RavenDB en el servidor Ubuntu 20.04.
Requisitos
- Un servidor con Ubuntu 20.04.
- Se configura una contraseña de root en el servidor.
Instalar dependencias requeridas
Antes de comenzar, deberá instalar el tiempo de ejecución de NET Core en su sistema. Primero, descargue e instale el repositorio de paquetes con el siguiente comando:
wget https://packages.microsoft.com/config/ubuntu/20.04/packages-microsoft-prod.deb -O packages-microsoft-prod.deb
dpkg -i packages-microsoft-prod.deb
Deberías obtener el siguiente resultado:
Selecting previously unselected package packages-microsoft-prod.
(Reading database ... 91134 files and directories currently installed.)
Preparing to unpack packages-microsoft-prod.deb ...
Unpacking packages-microsoft-prod (1.0-ubuntu20.04.1) ...
Setting up packages-microsoft-prod (1.0-ubuntu20.04.1) ...
A continuación, actualice el repositorio con el siguiente comando:
apt-get install apt-transport-https -y
apt-get update -y
Una vez que se actualice el repositorio, instale el tiempo de ejecución de .Net Core con el siguiente comando:
apt-get install aspnetcore-runtime-3.1 -y
Una vez que se haya completado la instalación, puede continuar con el siguiente paso.
Instalar RavenDB
Primero, descargue la última versión de RavenDB ejecutando el siguiente comando:
wget -O ravendb.tar.bz2 https://hibernatingrhinos.com/downloads/RavenDB%20for%20Linux%20x64/latest
Una vez que se complete la descarga, extraiga el archivo descargado con el siguiente comando:
tar xvjf ravendb.tar.bz2
A continuación, el permiso adecuado para RavenDB con el siguiente comando:
chmod -R 755 ~/RavenDB
A continuación, cambie el directorio a RavenDB y ejecute el script de configuración como se muestra a continuación:
cd ~/RavenDB
./run.sh
Debería ver el siguiente resultado:
./run.sh: line 24: xdg-open: command not found
       _____                       _____  ____
      |  __ \                     |  __ \|  _ \
      | |__) |__ ___   _____ _ __ | |  | | |_) |
      |  _  // _` \ \ / / _ \ '_ \| |  | |  _ <
      | | \ \ (_| |\ V /  __/ | | | |__| | |_) |
      |_|  \_\__,_| \_/ \___|_| |_|_____/|____/


      Safe by default, optimized for efficiency

 Build 50005, Version 5.0, SemVer 5.0.0, Commit a8d3f94
 PID 23883, 64 bits, 2 Cores, Phys Mem 1.941 GBytes, Arch: X64
 Source Code (git repo): https://github.com/ravendb/ravendb
 Built with love by Hibernating Rhinos and awesome contributors!
+---------------------------------------------------------------+
Using GC in server concurrent mode retaining memory from the OS.
Could not start browser: System.ComponentModel.Win32Exception (2): No such file or directory
   at System.Diagnostics.Process.ForkAndExecProcess(String filename, String[] argv, String[] envp, String cwd, Boolean redirectStdin, Boolean redirectStdout, Boolean redirectStderr, Boolean setCredentials, UInt32 userId, UInt32 groupId, UInt32[] groups, Int32& stdinFd, Int32& stdoutFd, Int32& stderrFd, Boolean usesTerminal, Boolean throwOnNoExec)
   at System.Diagnostics.Process.StartCore(ProcessStartInfo startInfo)
   at System.Diagnostics.Process.Start()
   at System.Diagnostics.Process.Start(ProcessStartInfo startInfo)
   at System.Diagnostics.Process.Start(String fileName, String arguments)
   at Raven.Server.Utils.Cli.BrowserHelper.OpenStudioInBrowser(String url, Action`1 onError) in C:\Builds\RavenDB-Stable-5.0\50005\src\Raven.Server\Utils\Cli\BrowserHelper.cs:line 26
Server available on: http://127.0.0.1:43241
Server started, listening to requests...
TIP: type 'help' to list the available commands.
Running non-interactive.
En este punto, RavenDB se inicia y escucha en el puerto 43241. Ahora, presione CTRL + C para salir.
Configurar RavenDB
De forma predeterminada, solo se puede acceder a RavenDB desde el host local. Por lo tanto, deberá configurarlo para acceder desde el host remoto.
Puede configurarlo editando el archivo settings.json:
nano ~/RavenDB/Server/settings.json
Agregue/Modifique las siguientes líneas:
{
    "ServerUrl": "http://your-server-ip:8080",
    "Setup.Mode": "Initial",
    "DataDir": "RavenData",
    "Security.UnsecuredAccessAllowed": "PrivateNetwork"

}
Guarde y cierre el archivo cuando haya terminado.
Crear un archivo de servicio de Systemd para RavenDB
A continuación, deberá crear un archivo de servicio systemd para administrar RavenDB. Puedes crearlo con el siguiente comando:
nano /etc/systemd/system/ravendb.service
Agregue las siguientes líneas:
[Unit]
Description=RavenDB v4.0
After=network.target

[Service]
LimitCORE=infinity
LimitNOFILE=65536
LimitRSS=infinity
LimitAS=infinity
User=root
Restart=on-failure
Type=simple
ExecStart=/root/RavenDB/run.sh

[Install]
WantedBy=multi-user.target
Guarde y cierre el archivo. Luego, vuelva a cargar el demonio systemd con el siguiente comando:
systemctl daemon-reload
A continuación, inicie RavenDB y habilítelo para que se inicie al reiniciar el sistema con el siguiente comando:
systemctl start ravendb
systemctl enable ravendb
Ahora puede verificar el estado de RavenDB con el siguiente comando:
systemctl status ravendb
Deberías obtener el siguiente resultado:
? ravendb.service - RavenDB v4.0
     Loaded: loaded (/etc/systemd/system/ravendb.service; enabled; vendor preset: enabled)
     Active: active (running) since Sat 2020-08-01 11:25:12 UTC; 7min ago
   Main PID: 30833 (run.sh)
      Tasks: 32 (limit: 2353)
     Memory: 157.0M
     CGroup: /system.slice/ravendb.service
             ??30833 /bin/bash /root/RavenDB/run.sh
             ??30871 ./Raven.Server --browser

Aug 01 11:30:19 ubuntu2004 run.sh[30871]: Starting shut down...
Aug 01 11:30:21 ubuntu2004 run.sh[30871]: Shutdown completed
Aug 01 11:30:21 ubuntu2004 run.sh[30871]: Restarting Server...
Aug 01 11:30:21 ubuntu2004 run.sh[30871]: Using GC in server concurrent mode retaining memory from the OS.
Aug 01 11:30:21 ubuntu2004 run.sh[30871]: Server available on: http://69.87.218.19:8080
Aug 01 11:30:21 ubuntu2004 run.sh[30871]: Tcp listening on 69.87.218.19:38888
Aug 01 11:30:21 ubuntu2004 run.sh[30871]: Server started, listening to requests...
Aug 01 11:30:21 ubuntu2004 run.sh[30871]: TIP: type 'help' to list the available commands.
Aug 01 11:30:21 ubuntu2004 run.sh[30871]: ravendb> End of standard input detected, switching to server mode...
Aug 01 11:30:21 ubuntu2004 run.sh[30871]: Running non-interactive.
En este punto, RavenDB se inicia y escucha en el puerto 8080.
Acceder a la interfaz web de RavenDB
Ahora, abra su navegador web y escriba la URL http://your-server-ip:8080. Debería ver la siguiente pantalla:
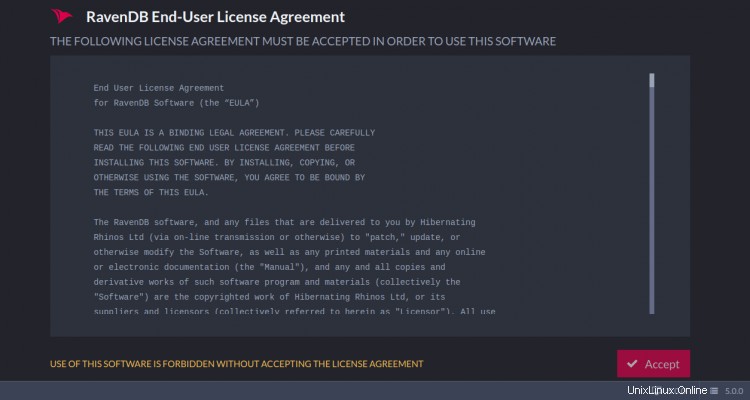
Haga clic en Aceptar botón para aceptar el Acuerdo de licencia. Debería ver la siguiente pantalla:
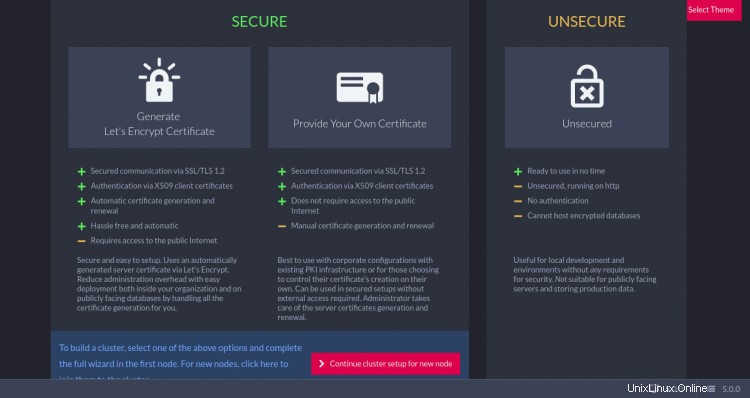
Aquí, hay tres opciones para configurar RavenDB. Seleccione el No seguro opción. Debería ver la siguiente pantalla:
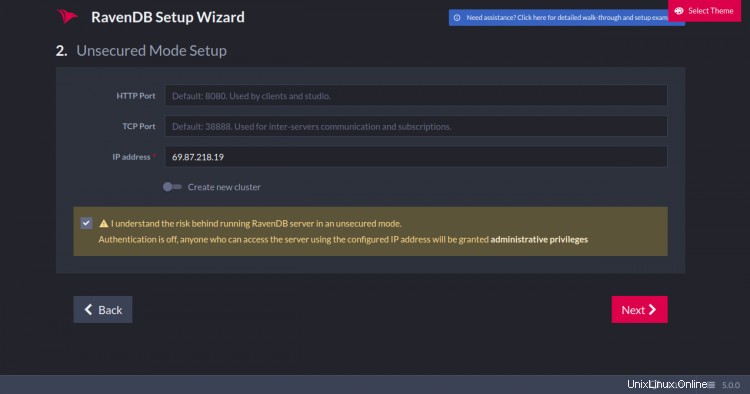
Proporcione el puerto HTTP, la dirección IP y haga clic en Siguiente botón. Debería ver la siguiente pantalla:
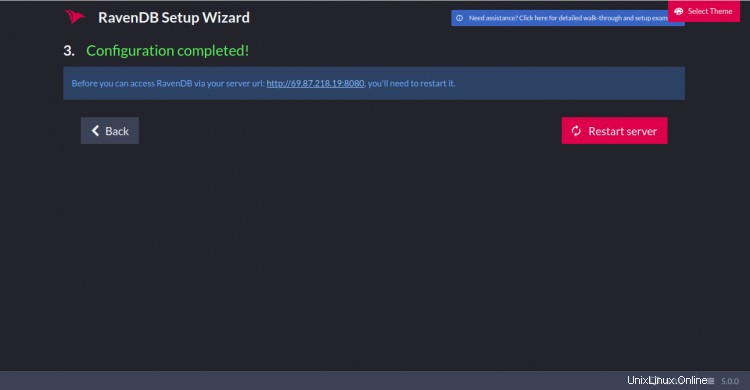
Haga clic en Reiniciar servidor para reiniciar su sistema. Después de un reinicio exitoso, será redirigido al panel de RavenDB como se muestra a continuación:

Haga clic en CREAR BASE DE DATOS botón. Debería ver la siguiente pantalla:
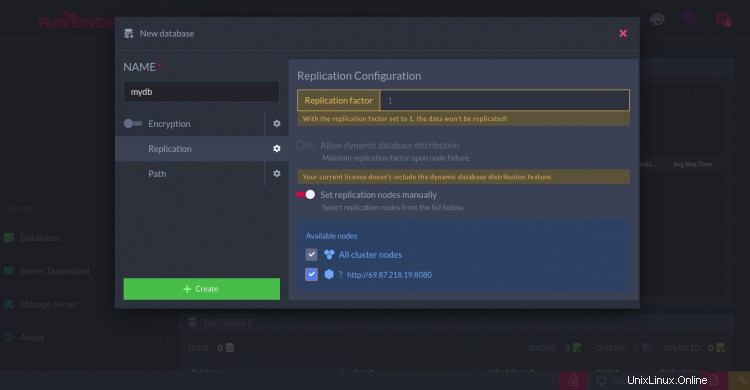
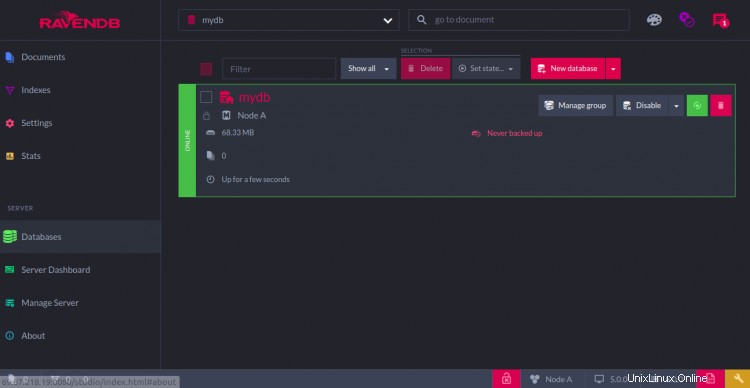
Proporcione el nombre de su base de datos y haga clic en Crear botón. Debería ver su base de datos recién creada en la siguiente pantalla:
Conclusión
¡Felicidades! Ha instalado con éxito RavenDB en Ubuntu 20.04. Ahora puede comenzar a explorar RavenDB para familiarizarse con él. Siéntase libre de preguntarme si tiene alguna pregunta.