La suite de colaboración Zimbra tiene dos sabores:edición de red y edición de código abierto. En este tutorial, exploraremos la forma más rápida y sencilla de instalar el servidor de correo zimbra (edición gratuita) junto con otros componentes como LDAP, antivirus, antispam, Amavis (amavisd-new) - Verificador de contenido, Aspell - Corrector ortográfico, MySQL y otras funciones de colaboración y un cliente de correo web ajax. Zimbra recomienda deshabilitar el firewall en el proceso de instalación, una vez que la instalación se haya completado con éxito, habilite el firewall y agregue las reglas del firewall para permitir el tráfico al servidor de correo de Zimbra. También se recomienda instalar ZCS en un sistema nuevo.
Requisitos del sistema
Ubuntu 16.04 con al menos 4 GB de RAM
Servidor Ubuntu IP - 172.31.26.109
Servidor Ubuntu FQDN - mail.zimbra-demo.com
Servidor DNS IP - 172.31.26.109 ( Mismo servidor , recomendable mantenerlo en un servidor separado en su red )
Puerta de enlace IP - 172.31.0.2
Nombre de dominio - zimbra-demo.com
1. Configurar nombre de host
Edite /etc/hosts y agregue la línea 172.31.26.109 mail.zimbra-demo.com mail. Cambia 172.31.26.109 con la IP que quieras usar.
root@mail:~# cat /etc/hosts
127.0.0.1 localhost
172.31.26.109 mail.zimbra-demo.com mail
Edite también /etc/hostname y la línea 'mail'
root@mail:~# cat /etc/hostname
mail
Reinicie el sistema y pruebe el FQDN de su servidor con el comando hostname -f y hostname.
root@mail:~# hostname -f
mail.zimbra-demo.com

root@mail:~# hostname
mail
Si está utilizando cualquier servicio de alojamiento basado en la nube, asegúrese de haber establecido el valor del parámetro preserve_hostname en verdadero.
2. Instalar/Configurar BIND DNS
Instalaremos el servidor de nombres BIND en el mismo sistema donde se instalará ZCS. Puede instalar el servidor de nombres BIND en otro sistema de su red interna.
Instale bind9 ejecutando el siguiente comando en la terminal.
# sudo apt-get install bind9 bind9utilsAhora edite el archivo /etc/bind/named.conf y elimine '//' de los reenviadores y agregue la dirección IP del servidor DNS como se muestra a continuación.
forwarders {
8.8.8.8; 8.8.4.4;
};
raíz@correo:~# cat /etc/bind/named.conf.options
options {
directory "/var/cache/bind";

forwarders {
8.8.8.8; 8.8.4.4;
};

dnssec-validation auto;

auth-nxdomain no;    # conform to RFC1035
listen-on-v6 { any; };
};
Edite /etc/bind/named.conf.local y agrega lo siguiente.
zone "zimbra-demo.com" {
type master;
file "/etc/bind/db.zimbra-demo.com";
};

zone "1.31.172.in-addr.arpa" {
type master;
file "/etc/bind/db.1.31.172";
};

zone "0.0.127.in-addr.arpa" {
type master;
file "/etc/bind/db.0.0.127";
};
Cree y edite el archivo /etc/bind/db.zimbra-demo.com y agrega lo siguiente. Cambie el nombre del archivo de acuerdo con su nombre de dominio.
$TTL    604800
@       IN      SOA     mail.zimbra-demo.com. admin.zimbra-demo.com.        (
030512  ; Serial
604800  ; Refresh
86400   ; Retry
2419200 ; Expire
604800 ); Negative Cache TTL
;
@                 IN      NS              mail
IN                MX    10               mail
IN                A                           172.31.26.109
mail            IN       A                172.31.26.109
Cree y edite el archivo /etc/bind/db.0.0.127 y agregue lo siguiente.
$TTL 3D
@         IN      SOA    mail.zimbra-demo.com. admin.zimbra-demo.com. (
2         ; Serial
8H      ; Refresh
2H       ; Retry
4W      ; Expire
1D)      ; Minimum TTL
NS       mail.zimbra-demo.com.
1         PTR     localhost.
Cree y edite el archivo /etc/bind/db.1.31.172 y agrega lo siguiente.
$TTL 3D
@               IN       SOA    mail.zimbra-demo.com.  admin.zimbra-demo.com. (
1           ; Serial
8H       ; Refresh
2H       ; Retry
4W       ; Expire
1D)       ; Minimum TTL
NS        zimbra-demo.com.
10         PTR    zimbra-demo.com.
Reiniciar servicio de vinculación
# /etc/init.d/bind9 restartPara configurar una IP estática, edite /etc/network/interfaces y agrega lo siguiente. Cambie los valores según la configuración de su red.
source /etc/network/interfaces.d/*.cfg

auto eth0
iface eth0 inet static
address 172.31.26.109
netmask 255.255.255.0
network 172.31.0.0
broadcast 172.31.0.255
gateway 172.31.0.2
dns-search zimbra-demo.com
dns-nameservers 172.31.26.109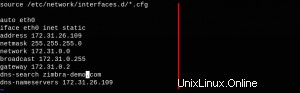
Edite también el archivo /etc/resolv.conf y agrega lo siguiente.
nameserver 172.31.26.109
search zimbra-demo.com
Ahora pruebe el registro dns de sus servidores de nombres con dig
root@correo:~# excavar zimbra-demo.com
; <<>> DiG 9.10.3-P4-Ubuntu <<>> zimbra-demo.com
;; global options: +cmd
;; Got answer:
;; ->>HEADER<<- opcode: QUERY, status: NOERROR, id: 33646
;; flags: qr aa rd ra; QUERY: 1, ANSWER: 1, AUTHORITY: 1, ADDITIONAL: 2

;; OPT PSEUDOSECTION:
; EDNS: version: 0, flags:; udp: 4096
;; QUESTION SECTION:
;zimbra-demo.com.               IN      A

;; ANSWER SECTION:
zimbra-demo.com.                604800  IN      A       172.31.26.109

;; AUTHORITY SECTION:
zimbra-demo.com.                604800  IN      NS      mail.zimbra-demo.com.

;; ADDITIONAL SECTION:
mail.zimbra-demo.com.        604800  IN      A       172.31.26.109

;; Query time: 1 msec
;; SERVER: 172.31.26.109#53(172.31.26.109)
;; WHEN: Thu Aug 04 04:30:43 UTC 2016
;; MSG SIZE  rcvd: 95
raíz@correo:~# cavar facebook.com
; <<>> DiG 9.10.3-P4-Ubuntu <<>> facebook.com
;; global options: +cmd
;; Got answer:
;; ->>HEADER<<- opcode: QUERY, status: NOERROR, id: 22708
;; flags: qr rd ra; QUERY: 1, ANSWER: 1, AUTHORITY: 13, ADDITIONAL: 1

;; OPT PSEUDOSECTION:
; EDNS: version: 0, flags:; udp: 4096
;; QUESTION SECTION:
;facebook.com.                   IN      A

;; ANSWER SECTION:
facebook.com.           27      IN      A       173.252.89.132

;; AUTHORITY SECTION:
.                       2574    IN      NS      g.root-servers.net.
.                       2574    IN      NS      e.root-servers.net.
.                       2574    IN      NS      a.root-servers.net.
.                       2574    IN      NS      m.root-servers.net.
.                       2574    IN      NS      i.root-servers.net.
.                       2574    IN      NS      h.root-servers.net.
.                       2574    IN      NS      d.root-servers.net.
.                       2574    IN      NS      c.root-servers.net.
.                       2574    IN      NS      b.root-servers.net.
.                       2574    IN      NS      k.root-servers.net.
.                       2574    IN      NS      f.root-servers.net.
.                       2574    IN      NS      l.root-servers.net.
.                       2574    IN      NS      j.root-servers.net.

;; Query time: 11 msec
;; SERVER: 172.31.26.109#53(172.31.26.109)
;; WHEN: Thu Aug 04 04:32:04 UTC 2016
;; MSG SIZE  rcvd: 268
Hasta este punto, hemos configurado el FQDN del servidor y un servidor de nombres.
3. Descargar/Instalar Zimbra
Primero deshabilite el firewall ejecutando el siguiente comando en la terminal..
# sudo service ufw disable
OR
# sudo service iptables stop
Descarga Zimbra usando wget, extráelo y ejecuta el instalador dentro del directorio extraído.
# cd ~
# wget https://files.zimbra.com/downloads/8.7.0_GA/zcs-8.7.0_GA_1659.UBUNTU16_64.20160628202554.tgz
# tar xf zcs-8.7.0_GA_1659.UBUNTU16_64.20160628202554.tgz
# cd zcs-8.7.0_GA_1659.UBUNTU16_64.20160628202554/
# ./install.sh
Ahora comenzará la instalación. Lea atentamente y responda Sí/No u otros valores según su configuración.
WARNING: ZCS is currently only supported on Ubuntu Server 12.04 and 14.04 LTS. You are attempting to install on Ubuntu 16.04.1 LTS which may not work. Support will not be provided if you choose to continue.

Do you wish to continue? [N] y

Operations logged to /tmp/install.log.4P2y60cn
Checking for existing installation...
zimbra-ldap...NOT FOUND
zimbra-logger...NOT FOUND
zimbra-mta...NOT FOUND
zimbra-dnscache...NOT FOUND
zimbra-snmp...NOT FOUND
zimbra-store...NOT FOUND
zimbra-apache...NOT FOUND
zimbra-spell...NOT FOUND
zimbra-convertd...NOT FOUND
zimbra-memcached...NOT FOUND
zimbra-proxy...NOT FOUND
zimbra-archiving...NOT FOUND
zimbra-core...NOT FOUND

----------------------------------------------------------------------
PLEASE READ THIS AGREEMENT CAREFULLY BEFORE USING THE SOFTWARE.
SYNACOR, INC. ("SYNACOR") WILL ONLY LICENSE THIS SOFTWARE TO YOU IF YOU
FIRST ACCEPT THE TERMS OF THIS AGREEMENT. BY DOWNLOADING OR INSTALLING
THE SOFTWARE, OR USING THE PRODUCT, YOU ARE CONSENTING TO BE BOUND BY
THIS AGREEMENT. IF YOU DO NOT AGREE TO ALL OF THE TERMS OF THIS
AGREEMENT, THEN DO NOT DOWNLOAD, INSTALL OR USE THE PRODUCT.

License Terms for this Zimbra Collaboration Suite Software:
https://www.zimbra.com/license/zimbra-public-eula-2-6.html
----------------------------------------------------------------------

Do you agree with the terms of the software license agreement? [N] y

Checking for installable packages

Found zimbra-core
Found zimbra-ldap
Found zimbra-logger
Found zimbra-mta
Found zimbra-dnscache
Found zimbra-snmp
Found zimbra-store
Found zimbra-apache
Found zimbra-spell
Found zimbra-memcached
Found zimbra-proxy

Use Zimbra's package repository [Y] y
Configuring package repository

Select the packages to install

Install zimbra-ldap [Y] y

Install zimbra-logger [Y] y

Install zimbra-mta [Y] y

Install zimbra-dnscache [Y] n

Install zimbra-snmp [Y] y

Install zimbra-store [Y] y

Install zimbra-apache [Y] y

Install zimbra-spell [Y] y

Install zimbra-memcached [Y] y

Install zimbra-proxy [Y] y
Checking required space for zimbra-core
Checking space for zimbra-store
Checking required packages for zimbra-store
zimbra-store package check complete.

Installing:
zimbra-core
zimbra-ldap
zimbra-logger
zimbra-mta
zimbra-snmp
zimbra-store
zimbra-apache
zimbra-spell
zimbra-memcached
zimbra-proxy

The system will be modified.  Continue? [N] y

Removing /opt/zimbra
Removing zimbra crontab entry...done.
Cleaning up zimbra init scripts...done.
Cleaning up /etc/security/limits.conf...done.

Finished removing Zimbra Collaboration Server.

Installing packages

Local packages  zimbra-core zimbra-ldap zimbra-logger zimbra-mta zimbra-snmp zimbra-store zimbra-apache zimbra-spell zimbra-proxy selected for installation
Monitor /tmp/install.log.4P2y60cn for package installation progress
Remote package installation started
Installing zimbra-core-components  zimbra-ldap-components zimbra-mta-components zimbra-snmp-components zimbra-store-components zimbra-apache-components zimbra-spell-components zimbra-memcached zimbra-proxy-components....
Local package installation started
Installing  zimbra-core zimbra-ldap zimbra-logger zimbra-mta zimbra-snmp zimbra-store zimbra-apache zimbra-spell zimbra-proxy...

done
Unescaped left brace in regex is deprecated, passed through in regex; marked by <-- HERE in m/\${ <-- HERE zimbra_home}/ at /opt/zimbra/libexec/zmupgrade.pm line 1514, <DATA> line 755.
Unescaped left brace in regex is deprecated, passed through in regex; marked by <-- HERE in m/\${ <-- HERE zimbra_home}/ at /opt/zimbra/libexec/zmupgrade.pm line 1557, <DATA> line 755.
Unescaped left brace in regex is deprecated, passed through in regex; marked by <-- HERE in m/\${ <-- HERE zimbra_home}/ at /opt/zimbra/libexec/zmupgrade.pm line 1686, <DATA> line 755.
Unescaped left brace in regex is deprecated, passed through in regex; marked by <-- HERE in m/\${ <-- HERE zimbra_home}/ at /opt/zimbra/libexec/zmupgrade.pm line 1727, <DATA> line 755.
Unescaped left brace in regex is deprecated, passed through in regex; marked by <-- HERE in m/\${ <-- HERE zimbra_home}/ at /opt/zimbra/libexec/zmupgrade.pm line 1736, <DATA> line 755.
Unescaped left brace in regex is deprecated, passed through in regex; marked by <-- HERE in m/\${ <-- HERE zimbra_home}/ at /opt/zimbra/libexec/zmupgrade.pm line 1745, <DATA> line 755.
Unescaped left brace in regex is deprecated, passed through in regex; marked by <-- HERE in m/\${ <-- HERE zimbra_home}/ at /opt/zimbra/libexec/zmupgrade.pm line 1754, <DATA> line 755.
Unescaped left brace in regex is deprecated, passed through in regex; marked by <-- HERE in m/\${ <-- HERE zimbra_home}/ at /opt/zimbra/libexec/zmupgrade.pm line 1763, <DATA> line 755.
Operations logged to /tmp/zmsetup.20160804-170455.log
Installing LDAP configuration database...done.
Setting defaults...

DNS ERROR resolving MX for mail.zimbra-demo.com
It is suggested that the domain name have an MX record configured in DNS
Re-Enter domain name? [Yes] yes
Create domain: [mail.zimbra-demo.com] zimbra-demo.com
MX: mail.zimbra-demo.com (172.31.26.109)

Interface: 172.31.26.109
Interface: 127.0.0.1
Interface: ::1
done.
Checking for port conflicts

Main menu

1) Common Configuration:
2) zimbra-ldap:                                                 Enabled
3) zimbra-logger:                                              Enabled
4) zimbra-mta:                                                  Enabled
5) zimbra-snmp:                                               Enabled
6) zimbra-store:                                                Enabled
+Create Admin User:                                       yes
+Admin user to create:                                    admin@zimbra-demo.com
******* +Admin Password                             UNSET
+Anti-virus quarantine user:                          virus-quarantine.h4n6gggw@zimbra-demo.com
+Enable automated spam training:                yes
+Spam training user:                                        spam.wv02wfpi@zimbra-demo.com
+Non-spam(Ham) training user:                    ham.c4zyg7r9m@zimbra-demo.com
+SMTP host:                                                      mail.zimbra-demo.com
+Web server HTTP port:                                 8080
+Web server HTTPS port:                               8443
+Web server mode:                                           https
+IMAP server port:                                           7143
+IMAP server SSL port:                                   7993
+POP server port:                                              7110
+POP server SSL port:                                      7995
+Use spell check server:                                    yes
+Spell server URL:                                             http://mail.zimbra-demo.com:7780/aspell.php
+Enable version update checks:                       TRUE
+Enable version update notifications:            TRUE
+Version update notification email:                admin@zimbra-demo.com
+Version update source email:                         admin@zimbra-demo.com
+Install mailstore (service webapp):               yes
+Install UI (zimbra,zimbraAdmin webapps): yes

7) zimbra-spell:                                                   Enabled
8) zimbra-proxy:                                                 Enabled
9) Default Class of Service Configuration:
s) Save config to file
x) Expand menu
q) Quit

Address unconfigured (**) items  (? - help) 6
Ahora, debe configurar los elementos marcados con un par de estrellas (****) delante de ellos. Como puede ver en el resultado anterior, el elemento 'contraseña de administrador' no está configurado. Este elemento se encuentra en el módulo Zimbra Store, que es el número 6. Para configurar la contraseña de administrador, ingrese el número 6.
Configuración de la tienda
1) Estado:Habilitado
2) Crear usuario administrador:sí
3) Usuario administrador para crear:admin@zimbra-demo.com
** 4) Contraseña de administrador DESCONFIGURADA
5) Usuario de cuarentena antivirus:virus-quarantine.h4n6gggw@zimbra-demo.com
6) Habilitar el entrenamiento automatizado de spam:sí
7) Usuario de formación sobre spam:spam.wv02wfpi@zimbra-demo.com
8) Usuario de formación no spam (Ham):ham.c4zyg7r9m@zimbra-demo.com
9) Servidor SMTP:mail.zimbra-demo.com
10) Puerto HTTP del servidor web:8080
11) Puerto HTTPS del servidor web:8443
12) Modo de servidor web:https
13) Puerto del servidor IMAP:7143
14) Puerto SSL del servidor IMAP:7993
15) Puerto del servidor POP:7110
16) Puerto SSL del servidor POP:7995
17) Usar servidor de revisión ortográfica:sí
18) URL del servidor de ortografía:http://mail.zimbra-demo.com:7780/aspell.php
19) Habilitar comprobaciones de actualización de versión:VERDADERO
20) Habilitar notificaciones de actualización de versión:VERDADERO
21) Correo electrónico de notificación de actualización de versión:admin@zimbra-demo.com
22) Correo electrónico fuente de actualización de la versión:admin@zimbra-demo.com
23) Instalar mailstore (aplicación web de servicio):sí
24) Instalar interfaz de usuario (zimbra, zimbraAdmin webapps):sí
Seleccione, o 'r' para el menú anterior [r] 4
Ahora configure la contraseña para el usuario administrador.
Password for admin@zimbra-demo.com (min 6 characters): [gbjep4Py1] zimbra.123
Store configuration

1) Status:                                             Enabled
2) Create Admin User:                                  yes
3) Admin user to create:                               admin@zimbra-demo.com
4) Admin Password                                      set
5) Anti-virus quarantine user:                         virus-quarantine.h4n6gggw@zimbra-demo.com
6) Enable automated spam training:                  yes
7) Spam training user:                                 spam.wv02wfpi@zimbra-demo.com
8) Non-spam(Ham) training user:                     ham.c4zyg7r9m@zimbra-demo.com
9) SMTP host:                                          mail.zimbra-demo.com
10) Web server HTTP port:                              8080
11) Web server HTTPS port:                             8443
12) Web server mode:                                   https
13) IMAP server port:                                  7143
14) IMAP server SSL port:                              7993
15) POP server port:                                   7110
16) POP server SSL port:                               7995
17) Use spell check server:                            yes
18) Spell server URL:                                  http://mail.zimbra-demo.com:7780/aspell.php
19) Enable version update checks:                      TRUE
20) Enable version update notifications:            TRUE
21) Version update notification email:                admin@zimbra-demo.com
22) Version update source email:                       admin@zimbra-demo.com
23) Install mailstore (service webapp):                yes
24) Install UI (zimbra,zimbraAdmin webapps):  yes

Select, or 'r' for previous menu [r] r
Ahora, ingrese 'r' para volver al menú anterior.
Main menu

1) Common Configuration:
2) zimbra-ldap:                              Enabled
3) zimbra-logger:                            Enabled
4) zimbra-mta:                               Enabled
5) zimbra-snmp:                             Enabled
6) zimbra-store:                             Enabled
7) zimbra-spell:                             Enabled
8) zimbra-proxy:                            Enabled
9) Default Class of Service Configuration:
s) Save config to file
x) Expand menu
q) Quit
La configuración está completa ahora. Presione 'a' para aplicar y escriba 'sí' para completar la configuración.
*** CONFIGURATION COMPLETE - press 'a' to apply
Select from menu, or press 'a' to apply config (? - help) a
Save configuration data to a file? [Yes] yes
Save config in file: [/opt/zimbra/config.31029]
Saving config in /opt/zimbra/config.31029...done.
The system will be modified - continue? [No] yes
Operations logged to /tmp/zmsetup.20160804-170455.log
Setting local config values...done.
Initializing core config...Setting up CA...done.
Deploying CA to /opt/zimbra/conf/ca ...done.
Creating SSL zimbra-store certificate...done.
Creating new zimbra-ldap SSL certificate...done.
Creating new zimbra-mta SSL certificate...done.
Creating new zimbra-proxy SSL certificate...done.
Installing mailboxd SSL certificates...done.
Installing MTA SSL certificates...done.
Installing LDAP SSL certificate...done.
Installing Proxy SSL certificate...done.
Initializing ldap...done.
Setting replication password...done.
Setting Postfix password...done.
Setting amavis password...done.
Setting nginx password...done.
Setting BES searcher password...done.
Creating server entry for mail.zimbra-demo.com...done.
Setting Zimbra IP Mode...done.
Saving CA in ldap...done.
Saving SSL Certificate in ldap...done.
Setting spell check URL...done.
Setting service ports on mail.zimbra-demo.com...done.
Setting zimbraFeatureTasksEnabled=TRUE...done.
Setting zimbraFeatureBriefcasesEnabled=TRUE...done.
Checking current setting of zimbraReverseProxyAvailableLookupTargets
Querying LDAP for other mailstores
Searching LDAP for reverseProxyLookupTargets...done.
Adding mail.zimbra-demo.com to zimbraReverseProxyAvailableLookupTargets
Setting TimeZone Preference...done.
Initializing mta config...done.
Setting services on mail.zimbra-demo.com...done.
Adding mail.zimbra-demo.com to zimbraMailHostPool in default COS...done.
Creating domain zimbra-demo.com...done.
Setting default domain name...done.
Creating domain zimbra-demo.com...already exists.
Creating admin account admin@zimbra-demo.com...done.
Creating root alias...done.
Creating postmaster alias...done.
Creating user spam.wv02wfpi@zimbra-demo.com...done.
Creating user ham.c4zyg7r9m@zimbra-demo.com...done.
Creating user virus-quarantine.h4n6gggw@zimbra-demo.com...done.
Setting spam training and Anti-virus quarantine accounts...done.
Initializing store sql database...done.
Setting zimbraSmtpHostname for mail.zimbra-demo.com...done.
Configuring SNMP...done.
Setting up syslog.conf...done.
Starting servers...done.
Installing common zimlets...
com_zimbra_mailarchive...done.
com_zimbra_srchhighlighter...done.
com_zimbra_viewmail...done.
com_zimbra_attachmail...done.
com_zimbra_url...done.
com_zimbra_ymemoticons...done.
com_zimbra_cert_manager...done.
com_zimbra_proxy_config...
com_zimbra_url...done.
com_zimbra_ymemoticons...done.
com_zimbra_cert_manager...done.
com_zimbra_proxy_config...done.
com_zimbra_adminversioncheck...done.
com_zimbra_tooltip...done.
com_zimbra_date...done.
com_zimbra_webex...done.
com_zimbra_email...done.
com_zimbra_bulkprovision...done.
com_zimbra_attachcontacts...done.
com_zimbra_phone...done.
com_zimbra_clientuploader...done.
Finished installing common zimlets.
Restarting mailboxd...done.
Creating galsync account for default domain...done.

You have the option of notifying Zimbra of your installation.
This helps us to track the uptake of the Zimbra Collaboration Server.
The only information that will be transmitted is:
The VERSION of zcs installed (8.7.0_GA_1659_UBUNTU16_64)
The ADMIN EMAIL ADDRESS created (admin@zimbra-demo.com)

Notify Zimbra of your installation? [Yes] Notifying Zimbra of installation via http://www.zimbra.com/cgi-bin/notify.cgi?VER=8.7.0_GA_1659_UBUNTU16_64&MAIL=admin@zimbra-demo.com

Notification complete
Setting up zimbra crontab...done.
Moving /tmp/zmsetup.20160804-154559.log to /opt/zimbra/log
Configuration complete - press return to exit
La instalación de Zimbra ahora está completa. Acceda a la consola de administración usando su navegador web favorito en https://mail.zimbra-demo.com:7071
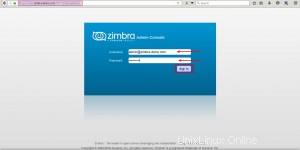
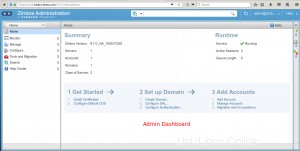
Haga clic en 'Iniciar sesión', será redirigido al panel de administración de Zimbra.
Acceda a la consola web utilizando su navegador web favorito en https://mail.zimbra-demo.com:7071
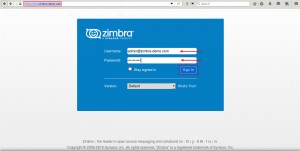
Haga clic en 'Iniciar sesión', estará dentro del buzón de administración.
Es posible que obtenga el siguiente error al intentar acceder a las URL anteriores.
Problem accessing ZCS upstream server. Reason: Cannot connect to the ZCS upstream server. Connection timeout.
Possible reasons:

upstream server is blocked by a firewall

upstream server is failing to send back the response in time

upstream server is down

Please contact your ZCS administrator to fix the problem.
Powered by Nginx-Zimbra://
Acceda a la URL utilizando los resultados de curl en el mismo error de tiempo de espera de la puerta de enlace 504
zimbra@mail:/root$ curl -I -k https://mail.zimbra-demo.com
HTTP/1.1 504 Gateway Time-out
Server: nginx
Date: Fri, 05 Aug 2016 01:45:12 GMT
Content-Type: text/html
Content-Length: 1193
Connection: keep-alive
ETag: "5760599a-4a9"
Esto se debe a que el servidor ascendente está tardando más tiempo que el valor de tiempo de espera configurado y, como resultado, el cliente cerró la conexión ascendente. Cambie los valores de tiempo de espera a un valor más alto. Ejecute los siguientes dos comandos para ignorar las fallas que desconectan a los servidores de buzones y también para volver a conectarse inmediatamente a todos los servidores de buzones en caso de falla.
root@mail:~$ su zimbra
zimbra@mail:~$ cd /opt/zimbra/bin
zimbra@mail:~/bin$ ./zmprov mcf zimbraMailProxyReconnectTimeout 0
zimbra@mail:~/bin$ ./zmprov mcf zimbraMailProxyMaxFails 0
Reinicie los proxies para regenerar los archivos de configuración de nginx con los valores actualizados para 'fail_timeout' y 'max_fails'.
zimbra@mail:~/bin$ zmproxyctl restart
Deteniendo el proxy... hecho.
Iniciando proxy... listo.

Intente acceder a la URL del correo mediante CURL.
zimbra@mail:~/bin$ curl -I -k https://mail.zimbra-demo.com
HTTP/1.1 200 OK
Server: nginx
Date: Fri, 05 Aug 2016 02:17:16 GMT
Content-Type: text/html;charset=utf-8
Content-Length: 0
Connection: keep-alive
X-Frame-Options: SAMEORIGIN
Expires: -1
Cache-Control: no-store, no-cache, must-revalidate, max-age=0
Pragma: no-cache
Content-Language: en-US
Set-Cookie: ZM_TEST=true;Secure
Vary: User-Agent
X-UA-Compatible: IE=edge
Ahora podrá conectarse al servidor de correo.
4. Configurar cortafuegos
ZCS utiliza muchos puertos para ofrecer sus servicios. Depende de usted decidir qué servicios desea restringir del dominio público o cuáles se ofrecen al público. Puede encontrar una lista completa del número de puerto utilizado por ZCS aquí https://wiki.zimbra.com/wiki/Ports Digamos que desea acceder a la consola de administración de Zimbra desde fuera de su red, es decir, desde el dominio público, luego agregará el siguiendo las reglas según el cortafuegos que esté utilizando.
# sudo ufw allow 7071/tcp
OR
# sudo iptables -A INPUT -m state --state NEW -p tcp --dport 7071 -j ACCEPT
De forma predeterminada, desea abrir los siguientes puertos para el acceso público.
25 80 110 143 443 465 587 993 995 3443 9071
Ahora inicie el cortafuegos.
# service ufw enable
OR
# service iptables start
5. Comandos Zimbra
Puede controlar el servidor Zimbra usando el comando zmcontrol para iniciar/detener el servidor Zimbra.
Detenga el servidor usando el siguiente comando.
zimbra@mail:~$ zmcontrol stop

Host mail.zimbra-demo.com
Stopping zmconfigd...Done.
Stopping zimlet webapp...Done.
Stopping zimbraAdmin webapp...Done.
Stopping zimbra webapp...Done.
Stopping service webapp...Done.
Stopping stats...Done.
Stopping mta...Done.
Stopping spell...Done.
Stopping snmp...Done.
Stopping cbpolicyd...Done.
Stopping archiving...Done.
Stopping opendkim...Done.
Stopping amavis...Done.
Stopping antivirus...Done.
Stopping antispam...Done.
Stopping proxy...Done.
Stopping memcached...Done.
Stopping mailbox...Done.
Stopping logger...Done.
Stopping dnscache...Done.
Stopping ldap...Done.
Inicie el servidor usando el siguiente comando.
root@mail:~# su zimbra
zimbra@mail:/root$ zmcontrol inicio
Host mail.zimbra-demo.com
Starting ldap...Done.
Starting zmconfigd...Done.
Starting logger...Done.
Starting mailbox...Done.
Starting memcached...Done.
Starting proxy...Done.
Starting amavis...Done.
Starting antispam...Done.
Starting antivirus...Done.
Starting opendkim...Done.
Starting snmp...Done.
Starting spell...Done.
Starting mta...Done.
Starting stats...Done.
Starting service webapp...Done.
Starting zimbra webapp...Done.
Starting zimbraAdmin webapp...Done.
Starting zimlet webapp...Done.
Encuentre el estado del servidor Zimbra.
zimbra@mail:/root$ zmcontrol status
Host mail.zimbra-demo.com
amavis                   Running
antispam               Running
antivirus                Running
ldap                      Running
logger                    Running
mailbox                 Running
memcached           Running
mta                       Running
opendkim              Running
proxy                     Running
service webapp      Running
snmp                      Stopped
zmswatch is not running.
spell                     Running
stats                     Running
zimbra webapp       Running
zimbraAdmin webapp      Running
zimlet webapp           Running
zmconfigd               Running
zmbackup – Takes full backups and incremental backups of mail host.
zmclamdctl – Start, stop and find the status of Clam AV.
zmlocalconfig – To set or get the local configuration of a Zimbra server for tuning zimbra.
zmloggerctl – Start, stop, reload and find the status of the Zimbra logger service.
Conclusión
Although zimbra comes with lot of features, it consumes a lot of server resources. So it is advisable to install it in a server that matches the basic requirements like at least 4GB RAM, 2GHz. processor speed etc. The advantages of using zimbra are many - zimbra is open source, it has powerful admin tool, reliable message threading, BES support, extends zimbras's functionality with zimlets, spam protection, virus protection and above all you are retaining the data. So whatever is the requirement for mail server in a business environment, zimbra is likely to deliver efficiently.