MySQL fue la principal aplicación de base de datos para el sistema operativo Linux hasta MariaDB , una bifurcación de MySQL, entró en escena.
En esta guía, veremos los pasos para instalar MySQL 8 en Ubuntu 18.04.
Novedades de MySQL 8.0
- MySQL ahora incorpora un diccionario de datos transaccionales
- Admite roles, una colección de privilegios.
- Almacena el historial de contraseñas
- El conjunto de caracteres predeterminado ha cambiado de latin1 a utf8mb4.
- Mejoras en InnoDB y JSON
- Mejor gestión de recursos
- El registro de errores se ha reescrito para usar la arquitectura de componentes de MySQL
- Mejoras en la replicación de MySQL
Instalar MySQL 8.0 en Ubuntu 18.04
Como ya sabe, el servidor MySQL ya no se distribuye a través de la imagen del sistema operativo base o los repositorios del sistema operativo debido a problemas de licencia.
Como primer paso, configuraremos el repositorio oficial de MySQL en el sistema.
wget https://dev.mysql.com/get/mysql-apt-config_0.8.10-1_all.deb
Instale el paquete del repositorio usando dpkg comando.
sudo dpkg -i mysql-apt-config_0.8.10-1_all.deb
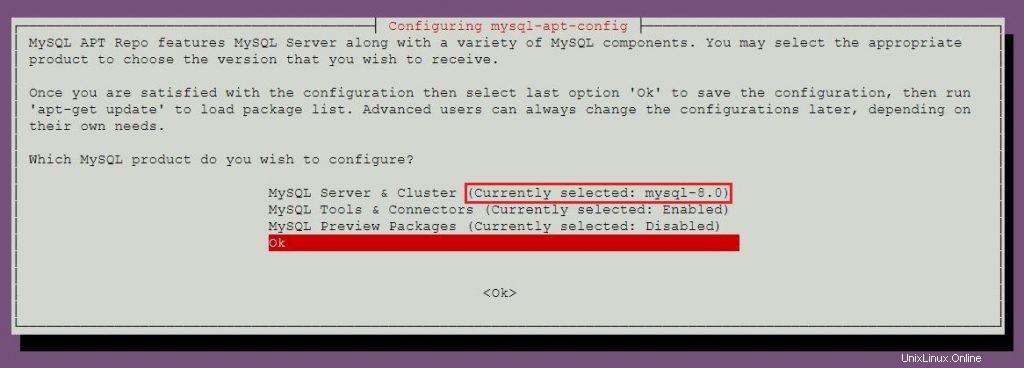
El instalador de MYSQL le pedirá que seleccione el repositorio de MySQL. Según su selección, el instalador configurará repositorios en el sistema para recibir la versión adecuada de MySQL.
Aquí, elegiré el MySQL 8.0 cuál es el predeterminado. Luego seleccione Aceptar y luego presione enter.

Para instalar MySQL 5.7, vaya a la sección de instalación de MySQL 5.7 para obtener más información sobre cómo seleccionar el repositorio de MySQL 5.7.
Actualice el índice del repositorio usando apt-get update comando.
sudo apt-get update
Usa el apt comando para instalar la última versión estable de MySQL .
sudo apt-get -y install mysql-server
El instalador del paquete le pedirá que configure la contraseña raíz de MySQL.

Vuelva a introducir la contraseña.

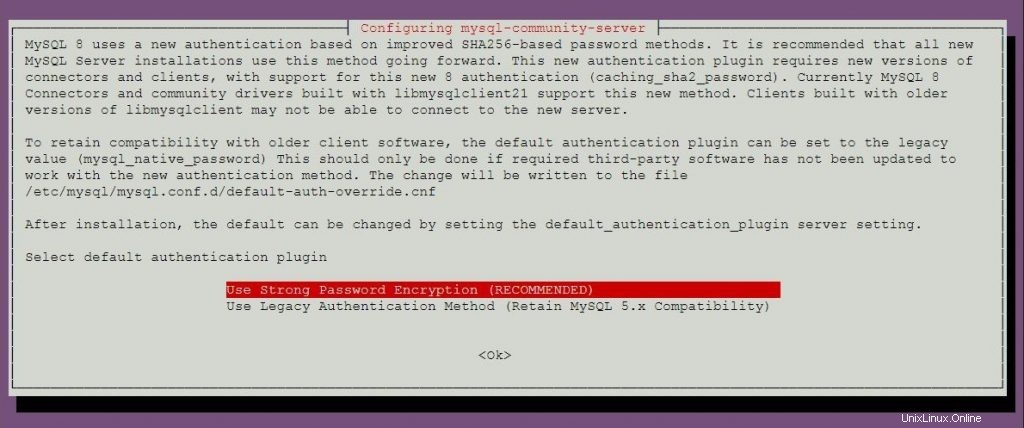
MySQL 8.0 utiliza una nueva autenticación basada en métodos mejorados de contraseña SHA 256. Si elige esta opción, es posible que los clientes antiguos no puedan conectarse al servidor. Puede cambiar la autenticación predeterminada en cualquier momento configurando default-authentication-plugin = mysql_native_password en el archivo de configuración.
Seleccione el complemento de autenticación predeterminado.

Instalar MySQL 5.7 en Ubuntu 18.04
Ahora configuraremos el repositorio oficial de MySQL en el sistema.
wget https://dev.mysql.com/get/mysql-apt-config_0.8.10-1_all.deb
Instale el paquete del repositorio usando dpkg comando.
sudo dpkg -i mysql-apt-config_0.8.10-1_all.deb
O
En caso de que el sistema ya tenga el paquete de repositorio de MySQL y desee instalar MySQL 5.7 en el sistema.
sudo dpkg-reconfigure mysql-apt-config
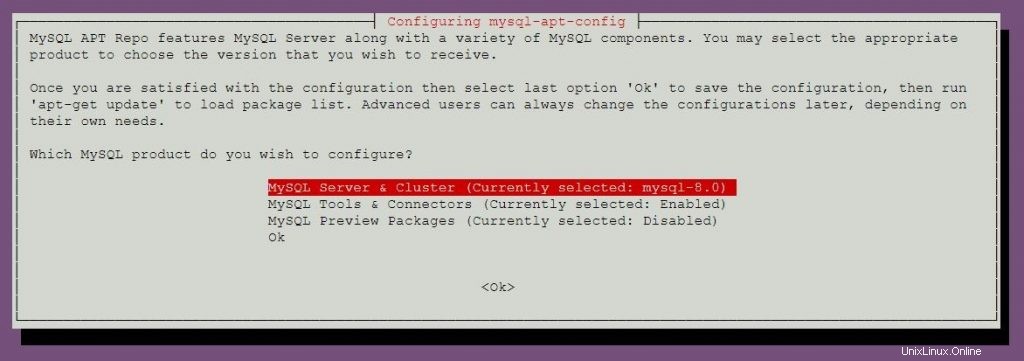
El instalador del paquete MySQL le pedirá que seleccione el repositorio MySQL. Según su selección, el instalador configurará los repositorios para recibir la versión adecuada de MySQL.
Presione la tecla Intro para cambiar la versión de MySQL en esta ventana.

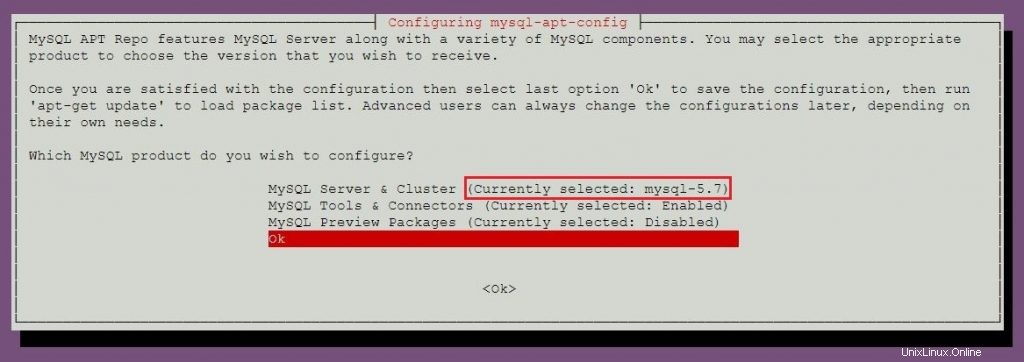
Elija el mysql-5.7 y luego presione enter.

Elija Aceptar y luego presione enter.

Actualice el índice del repositorio usando el comando apt.
sudo apt-get update
Ejecute el siguiente comando para instalar MySQL 5.7 en su máquina.
sudo apt-get -y install mysql-server
El instalador del paquete le pedirá que configure la contraseña raíz de MySQL.

Vuelva a introducir la contraseña.

Iniciar servidor MySQL
Después de la instalación de MySQL, puede iniciar el servidor MySQL usando el siguiente comando.
sudo systemctl start mysql
Habilite el servidor MySQL al iniciar el sistema.
sudo systemctl enable mysql
Verifique que el servicio del servidor MySQL se inicie con el siguiente comando.
sudo systemctl status mysql
Salida:
● mysql.service - MySQL Community Server
   Loaded: loaded (/lib/systemd/system/mysql.service; enabled; vendor preset: enabled)
   Active: active (running) since Mon 2018-05-14 11:15:52 UTC; 27min ago
 Main PID: 3269 (mysqld)
    Tasks: 27 (limit: 1997)
   CGroup: /system.slice/mysql.service
           └─3269 /usr/sbin/mysqld --daemonize --pid-file=/var/run/mysqld/mysqld.pid

May 14 11:15:51 mysqlub18 systemd[1]: Starting MySQL Community Server...
May 14 11:15:52 mysqlub18 systemd[1]: Started MySQL Community Server.
Servidor MySQL seguro
Como primer paso después de la instalación, debemos ejecutar el script seguro de MySQL que viene con el paquete para hacer que esta instancia de MySQL sea más segura.
sudo mysql_secure_installation
Este comando requiere la contraseña de root de MySQL.
Securing the MySQL server deployment.

Enter password for user root: <-- Enter MySQL root password

VALIDATE PASSWORD PLUGIN can be used to test passwords
and improve security. It checks the strength of password
and allows the users to set only those passwords which are
secure enough. Would you like to setup VALIDATE PASSWORD plugin?

Press y|Y for Yes, any other key for No: n <-- N for not to validate the password
Using existing password for root.
Change the password for root ? ((Press y|Y for Yes, any other key for No) : no <-- No, as we have already set root password

 ... skipping.
By default, a MySQL installation has an anonymous user,
allowing anyone to log into MySQL without having to have
a user account created for them. This is intended only for
testing, and to make the installation go a bit smoother.
You should remove them before moving into a production
environment.

Remove anonymous users? (Press y|Y for Yes, any other key for No) : y <-- Remove anonymous users
Success.


Normally, root should only be allowed to connect from
'localhost'. This ensures that someone cannot guess at
the root password from the network.

Disallow root login remotely? (Press y|Y for Yes, any other key for No) : y <-- Disallow root login
Success.

By default, MySQL comes with a database named 'test' that
anyone can access. This is also intended only for testing,
and should be removed before moving into a production
environment.


Remove test database and access to it? (Press y|Y for Yes, any other key for No) : y <-- Remove test database
 - Dropping test database...
Success.

 - Removing privileges on test database...
Success.

Reloading the privilege tables will ensure that all changes
made so far will take effect immediately.

Reload privilege tables now? (Press y|Y for Yes, any other key for No) : y <-- Reload privilege table
Success.

All done!
Trabajar con el servidor MySQL
Inicie sesión en el servidor MySQL con el usuario raíz y la contraseña que estableció durante la instalación de MySQL.
mysql -u root -p
Enter password:
Welcome to the MySQL monitor.  Commands end with ; or \g.
Your MySQL connection id is 8
Server version: 8.0.11 MySQL Community Server - GPL

Copyright (c) 2000, 2018, Oracle and/or its affiliates. All rights reserved.

Oracle is a registered trademark of Oracle Corporation and/or its
affiliates. Other names may be trademarks of their respective
owners.

Type 'help;' or '\h' for help. Type '\c' to clear the current input statement.

mysql>
Enter password:
Welcome to the MySQL monitor.  Commands end with ; or \g.
Your MySQL connection id is 4
Server version: 5.7.21 MySQL Community Server (GPL)

Copyright (c) 2000, 2018, Oracle and/or its affiliates. All rights reserved.

Oracle is a registered trademark of Oracle Corporation and/or its
affiliates. Other names may be trademarks of their respective
owners.

Type 'help;' or '\h' for help. Type '\c' to clear the current input statement.

mysql>
Eso es todo.