OTRS (software de sistema de tickets de problemas de código abierto) es un sofisticado software de código abierto utilizado por las empresas para mejorar sus operaciones relacionadas con la atención al cliente, la mesa de ayuda, los centros de llamadas y más. OTRS está escrito en PERL y ofrece las siguientes funciones importantes:
- Los clientes pueden registrarse y crear/interactuar con un Ticket a través del portal de clientes y por correo electrónico, teléfono y fax con cada cola (casilla de correo de Asistentes/Técnicos).
- Los tickets se pueden gestionar por su prioridad, asignación, transmisión y seguimiento. Un ticket se puede dividir, fusionar, se pueden aplicar acciones masivas y se pueden establecer enlaces entre sí y notificaciones. Los servicios se pueden configurar a través del catálogo de servicios.
- Para aumentar la capacidad del equipo, se pueden configurar correos electrónicos automáticos (respuestas automáticas), plantillas de texto y firmas. El sistema admite notas y archivos adjuntos en los tickets.
- Otras capacidades incluyen:estadísticas e informes (CSV/PDF), SLA y muchas otras funciones.
El Medio Ambiente
Este artículo cubre la instalación y configuración básica de OTRS 5. Este artículo se escribió en base al siguiente entorno:una máquina virtual Virtual Box con CENTOS 7 Minimal, 2 GB de RAM, 8 GB de disco duro y 2 interfaces de red (solo host y NAT).
Preparación
Suponiendo que utiliza una instalación nueva de Centos 7 Minimal, antes de instalar OTRS, ejecute el siguiente comando para actualizar el sistema e instalar paquetes adicionales:
yum update
Transaction Summary ================================================================================ Install 1 Package Upgrade 39 Packages Total download size: 91 M Is this ok [y/d/N]: y
Instale un editor de texto o use VI. En este artículo usamos VIM, ejecute el siguiente comando para instalarlo:
yum install vim
Para instalar el paquete WGET, ejecute el siguiente comando:
yum install wget
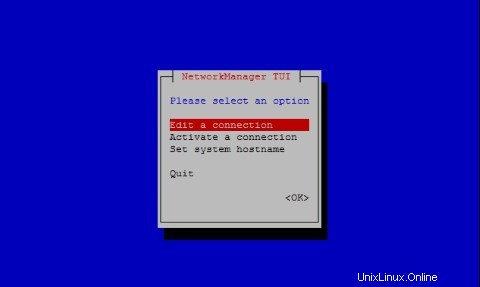
Para configurar la red Centos 7, ejecute el siguiente comando para abrir la herramienta NMTUI (Network Manager Text User Interface) y edite las interfaces y el nombre de host si es necesario:
nmtui
Después de configurar la configuración de red y el nombre de host en CentOS 7, ejecute el siguiente comando para aplicar los cambios:
service networks restart
Para verificar la información de la red, ejecute el siguiente comando:
ip addr
El resultado se ve así en mi sistema:
1: lo: <LOOPBACK,UP,LOWER_UP> mtu 65536 qdisc noqueue state UNKNOWN qlen 1
    link/loopback 00:00:00:00:00:00 brd 00:00:00:00:00:00
    inet 127.0.0.1/8 scope host lo
       valid_lft forever preferred_lft forever
    inet6 ::1/128 scope host
       valid_lft forever preferred_lft forever
2: enp0s3: <BROADCAST,MULTICAST,UP,LOWER_UP> mtu 1500 qdisc pfifo_fast state UP qlen 1000
    link/ether 08:00:27:67:bc:73 brd ff:ff:ff:ff:ff:ff
    inet 10.0.2.15/24 brd 10.0.2.255 scope global dynamic enp0s3
       valid_lft 84631sec preferred_lft 84631sec
    inet6 fe80::9e25:c982:1091:90eb/64 scope link
       valid_lft forever preferred_lft forever
3: enp0s8: <BROADCAST,MULTICAST,UP,LOWER_UP> mtu 1500 qdisc pfifo_fast state UP qlen 1000
    link/ether 08:00:27:68:88:f3 brd ff:ff:ff:ff:ff:ff
    inet 192.168.56.101/24 brd 192.168.56.255 scope global dynamic enp0s8
       valid_lft 1044sec preferred_lft 1044sec
    inet6 fe80::a00:27ff:fe68:88f3/64 scope link
       valid_lft forever preferred_lft forever
Deshabilite SELINUX (Security Enhanced Linux) en Centos 7, edite el siguiente archivo de configuración:
vim /etc/selinux/config
"/etc/selinux/config" 14L, 547C# This file controls the state of SELinux on the system.
# SELINUX= can take one of these three values:
#     enforcing - SELinux security policy is enforced.
#     permissive - SELinux prints warnings instead of enforcing.
#     disabled - No SELinux policy is loaded.
SELINUX=enforcing
# SELINUXTYPE= can take one of three two values:
#     targeted - Targeted processes are protected,
#     minimum - Modification of targeted policy. Only selected processes are prootected.
#     mls - Multi Level Security protection.
SELINUXTYPE=targeted
Cambie el valor aplicar de la directiva SELINUX a discapacitados , guarde el archivo y reinicie el servidor.
Para verificar el estado de SELinux en Centos 7, ejecute el siguiente comando:
getenforce
La salida debe ser:
Disabled
Instalar MariaDB en Centos 7
Para instalar MariaDB en Centos 7, ejecute el siguiente comando:
yum -y install mariadb-server
Cree el archivo con el nombre zotrs.cnf en el siguiente directorio:
/etc/my.cnf.d/
Para crear y editar el archivo, ejecute el siguiente comando:
vim /etc/my.cnf.d/zotrs.cnf
Rellene el archivo con el siguiente contenido y guárdelo:
max_allowed_packet = 20M
query_cache_size = 32M
innodb_log_file_size = 256M
Para iniciar MariaDB, ejecute el siguiente comando:
systemctl start mariadb
Para aumentar la seguridad de MariaDB, ejecute el siguiente comando:
/usr/bin/mysql_secure_installation
Configure las opciones de acuerdo con el siguiente resultado:
NOTE: RUNNING ALL PARTS OF THIS SCRIPT IS RECOMMENDED FOR ALL MariaDB
      SERVERS IN PRODUCTION USE!  PLEASE READ EACH STEP CAREFULLY!

In order to log into MariaDB to secure it, we'll need the current
password for the root user.  If you've just installed MariaDB, and
you haven't set the root password yet, the password will be blank,
so you should just press enter here.

Enter current password for root (enter for none):<Press Enter>
OK, successfully used password, moving on... Setting the root password ensures that nobody can log into the MariaDB root user without the proper authorisation. Set root password? [Y/n] <Press Y>
Establezca la contraseña raíz:
New password:
Re-enter new password:
Password updated successfully!
Reloading privilege tables..
 ... Success!

By default, a MariaDB installation has an anonymous user, allowing anyone
to log into MariaDB without having to have a user account created for
them.  This is intended only for testing, and to make the installation
go a bit smoother.  You should remove them before moving into a
production environment.

Remove anonymous users? [Y/n] <Press Y>
 ... Success!

Normally, root should only be allowed to connect from 'localhost'.  This
ensures that someone cannot guess at the root password from the network.

Disallow root login remotely? [Y/n] <Choose acording your needs>
 ... Success!

By default, MariaDB comes with a database named 'test' that anyone can
access.  This is also intended only for testing, and should be removed
before moving into a production environment.

Remove test database and access to it? [Y/n] <Press Y>
 - Dropping test database...
 ... Success!
 - Removing privileges on test database...
 ... Success!

Reloading the privilege tables will ensure that all changes made so far
will take effect immediately.

Reload privilege tables now? [Y/n] <Press Y>
 ... Success!

Cleaning up...

All done!  If you've completed all of the above steps, your MariaDB
installation should now be secure.

Thanks for using MariaDB!
Configure MariaDB para que se inicie automáticamente en el momento del arranque:
systemctl enable mariadb.service
Para descargar OTRS, ejecute el siguiente comando:
wget http://ftp.otrs.org/pub/otrs/RPMS/rhel/7/otrs-5.0.15-01.n oarch.rpm
Instalar EPEL
Antes de instalar OTRS, configure el repositorio EPEL en Centos 7. Ejecute el siguiente comando para hacerlo:
[[email protected] ~]# yum -y http://mirror.globo.com/epel/7/x86_64/e/epel-r release-7-9.noarch.rpm
Instalar OTRS
Instale OTRS con el siguiente comando:
yum install -nogpgcheck otrs-5.0.15-01.noarch.rpm
Se instalará una lista de paquetes de software, p. Apache y todas las dependencias se resolverán automáticamente, al final de la salida, presione Y:
Transaction Summary
================================================================================
Install  1 Package (+143 Dependent packages)

Total size: 148 M
Total download size: 23 M
Installed size: 181 M
Is this ok [y/d/N]: y
Para iniciar Apache (httpd), ejecute el siguiente comando:
systemctl start httpd.service
Para habilitar el inicio de Apache (httpd) con systemd en Centos7, ejecute el siguiente comando:
systemctl enable httpd.service
Habilite SSL en Apache y configure un certificado autofirmado. Instale el módulo Mod_SSL para el servidor Apache HTTP, ejecute el siguiente comando:
yum -y install mod_ssl
Para generar un certificado SSL autofirmado, vaya al siguiente directorio:
cd /etc/pki/tls/certs/
Y ejecute el siguiente comando para generar la clave (centos7.key es el nombre de mi certificado, siéntase libre de cambiarlo):
make centos7.key
umask 77 ; \ /usr/bin/openssl genrsa -aes128 2048 > centos7.key Generating RSA private key, 2048 bit long modulus .+++ .........................................................................................+++ e is 65537 (0x10001) Enter pass phrase: <Insert your Own Password>
Verifying - Enter pass phrase:<Retype the Password>
Para generar la clave privada SSL del servidor con OpenSSL, ejecute el siguiente comando:
openssl rsa -in centos7.key -out centos7.key
Enter pass phrase for centos7.key: <Type the Password> writing RSA key
Ejecute el siguiente comando para crear el archivo CSR (Solicitud de firma de certificado) (centos7.csr es el nombre de mi certificado, no dude en cambiarlo):
make centos7.csr
Complete las preguntas según sus necesidades:
umask 77 ; \ /usr/bin/openssl req -utf8 -new -key centos7.key -out centos7.csr You are about to be asked to enter information that will be incorporated into your certificate request. What you are about to enter is what is called a Distinguished Name or a DN. There are quite a few fields but you can leave some blank For some fields there will be a default value, If you enter '.', the field will be left blank. -----
Country Name (2 letter code) [XX]:
State or Province Name (full name) []:
Locality Name (eg, city) [Default City]:
Organization Name (eg, company) [Default Company Ltd]:
Organizational Unit Name (eg, section) []:
Centos7 Common Name (eg, your name or your server's hostname) []:
Email Address []:
Please enter the following 'extra' attributes to be sent with your certificate request A challenge password []: <press enter>
An optional company name []:
Genere una CSR (Solicitud de firma de certificado) para el servidor con la herramienta OpenSSL:
openssl x509 -in centos7.csr -out centos7.crt -req -signkey centos7.key
La salida es:
Signature ok subject=/C=BR/ST=SP/L=Campinas/O=Centos7/OU=Centos7/CN=centos7.local Getting Private key
Antes de editar el archivo ssl.conf, haga una copia del archivo con el siguiente comando:
cp /etc/httpd/conf.d/ssl.conf /etc/httpd/conf.d/ssl.conf.old
Luego edite el archivo:
vim /etc/httpd/conf.d/ssl.conf
Encuentre las siguientes directivas, descomente cada una y edítelas así:
SSLCertificateKeyFile /etc/pki/tls/certs/centos7.key
SSLCertificateFile /etc/pki/tls/certs/centos7.csr
SSLProtocol -All +TLSv1 +TLSv1.1 +TLSv1.2
ServerName centos7.local:443
Reinicie Apache con el siguiente comando:
systemctl restart httpd
Para obligar a OTRS a ejecutarse en modo https, edite el siguiente archivo:
vim /etc/httpd/conf/httpd.conf
Al final del archivo, descomente la siguiente directiva:
IncludeOptional conf.d/*.conf
Edite el archivo zzz_otrs.conf:
vim /etc/httpd/conf.d/zzz_otrs.conf
Después de la línea 26 (antes del módulo de línea mod_version.c) agregue las siguientes directivas:
RewriteEngine On
RewriteCond %{HTTPS} off
RewriteRule (.*) https://%{HTTP_HOST}%{REQUEST_URI}
Reiniciar Apache:
[[email protected] ~]# systemctl restart httpd
Para usar funciones extendidas en OTRS, tenemos que instalar algunos módulos PERL. Ejecute el siguiente comando para instalarlos:
yum -y install "perl(Text::CSV_XS)" "perl(Crypt::Eksblowfish::Bcrypt)" "perl(YAML::XS)" "perl(JSON::XS)" "perl(Encode::HanExtra)" "perl(Mail::IMAPClient)" "perl(ModPerl::Util)"
El sistema OTRS tiene una herramienta para verificar los módulos PERL, ejecútela así para verificar los requisitos del sistema:
cd /opt/otrs/bin
y ejecuta:
./otrs.CheckModules.pl
El resultado de nuestra configuración debe ser:
o Apache::DBI......................ok (v1.12) o Apache2::Reload..................ok (v0.13) o Archive::Tar.....................ok (v1.92) o Archive::Zip.....................ok (v1.30) o Crypt::Eksblowfish::Bcrypt.......ok (v0.009) o Crypt::SSLeay....................ok (v0.64) o Date::Format.....................ok (v2.24) o DBI..............................ok (v1.627) o DBD::mysql.......................ok (v4.023) o DBD::ODBC........................Not installed! (optional - Required to connect to a MS-SQL database.) o DBD::Oracle......................Not installed! (optional - Required to connect to a Oracle database.) o DBD::Pg..........................Not installed! Use: 'yum install "perl(DBD::Pg)"' (optional - Required to connect to a PostgreSQL database.) o Digest::SHA......................ok (v5.85) o Encode::HanExtra.................ok (v0.23) o IO::Socket::SSL..................ok (v1.94) o JSON::XS.........................ok (v3.01) o List::Util::XS...................ok (v1.27) o LWP::UserAgent...................ok (v6.13) o Mail::IMAPClient.................ok (v3.37) o IO::Socket::SSL................ok (v1.94) o ModPerl::Util....................ok (v2.000010) o Net::DNS.........................ok (v0.72) o Net::LDAP........................ok (v0.56) o Template.........................ok (v2.24) o Template::Stash::XS..............ok (undef) o Text::CSV_XS.....................ok (v1.00) o Time::HiRes......................ok (v1.9725) o Time::Piece......................ok (v1.20_01) o XML::LibXML......................ok (v2.0018) o XML::LibXSLT.....................ok (v1.80) o XML::Parser......................ok (v2.41) o YAML::XS.........................ok (v0.54)
Para iniciar el Demonio OTRS con el usuario "otrs", ejecute el siguiente comando:
su -c "/opt/otrs/bin/otrs.Daemon.pl start" -s /bin/bash otrs
Para deshabilitar el firewall de CentOS 7, ejecute el siguiente comando:
systemctl stop firewalld
Para deshabilitar CentOS 7 Firewall para que se inicie automáticamente, ejecute:
systemctl disable firewalld.service
Inicie el Demonio OTRS con:
su -c "/opt/otrs/bin/otrs.Daemon.pl start" -s /bin/bash otrsCron.sh
La salida del comando debe ser:
/opt/otrs/bin Cron.sh - start/stop OTRS cronjobs Copyright (C) 2001-2012 OTRS AG, http://otrs.org/ (using /opt/otrs) done
Si desea comprobar el estado de OTRS Daemon, ejecute el siguiente comando:
su -c "/opt/otrs/bin/otrs.Daemon.pl status" -s /bin/bash otrsCron.sh
Configurando OTRS en el crontab. Cambie la raíz del usuario a otrs y comience a editar el crontab:
su otrs
crontab -e
Rellene el crontab con el siguiente contenido y guárdelo:
# --
# Copyright (C) 2001-2016 OTRS AG, http://otrs.com/
# --
# This software comes with ABSOLUTELY NO WARRANTY. For details, see
# the enclosed file COPYING for license information (AGPL). If you
# did not receive this file, see http://www.gnu.org/licenses/agpl.txt.
# --

# Who gets the cron emails?
MAILTO="[email protected]"
# --
# Copyright (C) 2001-2016 OTRS AG, http://otrs.com/
# --
# This software comes with ABSOLUTELY NO WARRANTY. For details, see
# the enclosed file COPYING for license information (AGPL). If you
# did not receive this file, see http://www.gnu.org/licenses/agpl.txt.
# --

# check OTRS daemon status
*/5 * * * *    $HOME/bin/otrs.Daemon.pl start >> /dev/null
Configurar OTRS en CentOS 7
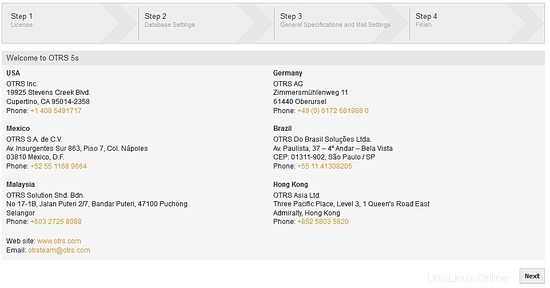
Abra un navegador web y abra la URL https://centos7.local/otrs/installer.pl. Recuerde, centos7.local es el nombre de mi servidor, inserte su nombre de host o dirección IP. La primera pantalla muestra los 4 pasos para concluir la instalación de OTRS, presione Siguiente.
Licencia:para continuar, lea y acepte la licencia para continuar:

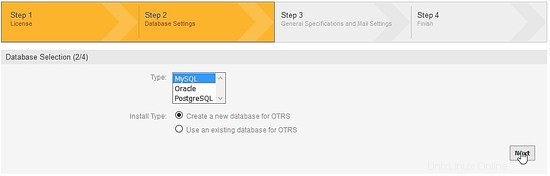
Selección de base de datos:seleccione la opción MySQL y en Tipo de instalación, marque la opción Crear una nueva base de datos para OTRS y haga clic en el siguiente botón:
Configure MySQL:complete los campos Usuario, Contraseña y Host (recuerde los datos de la configuración de MariaDB que realizamos) y presione verificar la configuración de la base de datos:

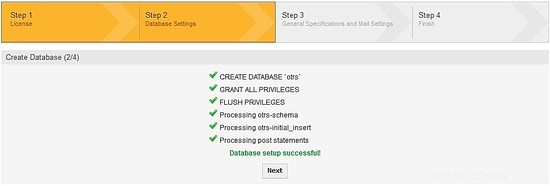
El instalador de OTRS creará la base de datos en MariaDB, presione el siguiente botón:
La base de datos de OTRS se creó correctamente:
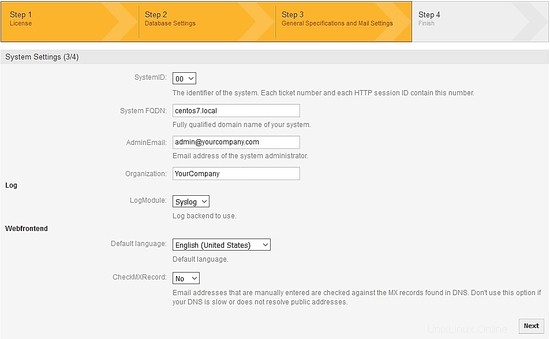
Configurar los ajustes del sistema:complete los campos con su propia información y presione siguiente:
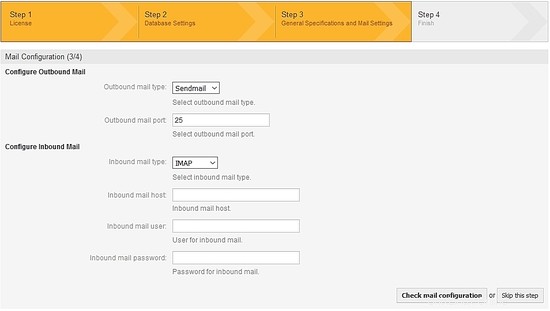
Configuración de correo electrónico OTRS:complete los campos de acuerdo con su servidor de correo electrónico. En mi configuración, para el correo electrónico saliente uso SMPTTLS y el puerto 587, para el correo electrónico entrante, uso pop3, necesitará una cuenta de correo electrónico. Verifique la configuración del correo u omita este paso:
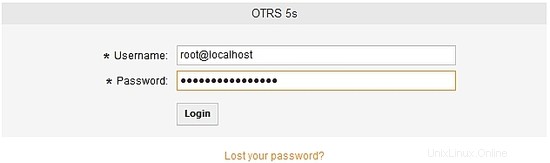
Para terminar, toma nota del usuario y contraseña para acceder a la OTRS, luego de iniciar sesión puedes cambiar la contraseña:
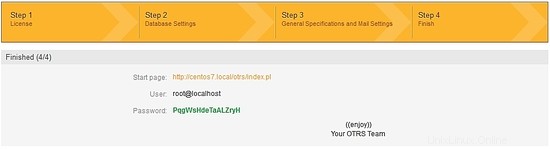
El inicio de sesión de URL de OTRS es https://centos7.local/otrs/index.pl?. Recuerde, centos7.local es el nombre de mi servidor, inserte su nombre de host o dirección IP.:
Inicie sesión en la OTRS:
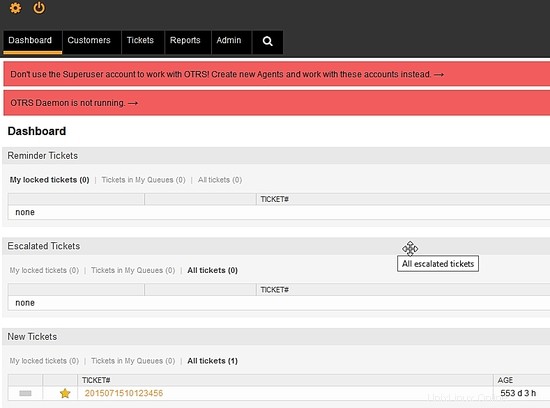
OTRS está instalado y listo para configurarse con sus reglas de soporte o modelo de negocio.