En el mundo empresarial actual, cada vez es más necesario compartir espacios de trabajo, laboratorios, herramientas y cualquier otro tipo de recursos. Aprovechar al máximo los recursos disponibles se ha convertido en una ventaja competitiva para las empresas modernas.
Toda empresa tiene recursos finitos, por lo que existe una disputa sobre el uso de estos recursos por parte de todos los miembros, ese es el punto, la disputa de estos recursos puede causar problemas entre los empleados, desgaste en las relaciones e improductividad en la organización.
Esta discusión parece estar lejos de la tecnología, sin embargo, para resolver este tipo de problemas, muchos Softwares libres están disponibles y en este artículo, escribo sobre una herramienta corporativa capaz de ayudar a organizar el uso de los recursos de una manera justa y efectiva. camino.
Descripción general del software
Booked es un software de código abierto escrito en PHP y MySQL que ayuda a las organizaciones y grupos a administrar, registrar y rastrear recursos de cualquier tipo de manera eficiente. Le permite crear horarios para que los usuarios puedan encontrar horarios disponibles para el uso de recursos.
Booked permite que los recursos se distribuyan de manera justa mediante el uso de cuotas. También le permite controlar el uso de los recursos a través de las aprobaciones de reservas. También se puede configurar un rango automático entre las reservas de un recurso.
Booked incluye excelentes funciones empresariales, como compatibilidad con muchos idiomas, basado en la web, primero móvil, sistema de informes, recordatorios, LDAP, Active Directory, archivos ical para integrar con clientes de correo electrónico y más.
El Medio Ambiente
Este artículo cubre la instalación y la configuración básica de Booked. Este artículo se escribió en base al siguiente entorno:una máquina virtual Virtual Box con CENTOS 7 Minimal, 2 GB de RAM, 8 GB de HD y 2 interfaces de red (solo host y NAT).
Seguridad
Este artículo no cubre completamente este tema que es complejo y extenso. Puso el foco en el simple S.O. configuración y configuración del sistema Reservado.
Preparación
Suponiendo que utiliza una instalación nueva de Centos 7 Minimal, antes de instalar Booked, ejecute el siguiente comando para actualizar el sistema e instalar paquetes adicionales:
yum update
Transaction Summary ================================================================================ Install 1 Package Upgrade 39 Packages Total download size: 91 M Is this ok [y/d/N]: y
Instale su editor de texto favorito o use VI. En este artículo uso VIM, para instalarlo, ejecute el siguiente comando:
yum install vim
Instale el paquete WGET, ejecute el siguiente comando:
yum install wget
Instale el paquete UNZIP, ejecute el siguiente comando:
yum install unzip
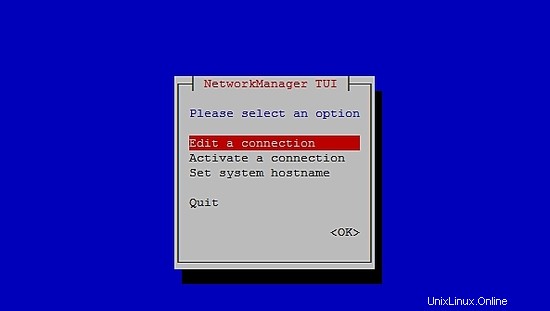
Para configurar la red, ejecute el siguiente comando para abrir la herramienta NMTUI (Network Manager Text User Interface) y edite las interfaces de red y el nombre de host como desee:
nmtui
Después de configurar la configuración de red y el nombre de host en CentOS 7, ejecute el siguiente comando para aplicar los cambios:
service networks restart
Para verificar la información de la red, ejecute el siguiente comando:
ip addr
La salida se ve así:
1: lo: <LOOPBACK,UP,LOWER_UP> mtu 65536 qdisc noqueue state UNKNOWN qlen 1
link/loopback 00:00:00:00:00:00 brd 00:00:00:00:00:00
inet 127.0.0.1/8 scope host lo
valid_lft forever preferred_lft forever
inet6 ::1/128 scope host
valid_lft forever preferred_lft forever
2: enp0s3: <BROADCAST,MULTICAST,UP,LOWER_UP> mtu 1500 qdisc pfifo_fast state UP qlen 1000
link/ether 08:00:27:67:bc:73 brd ff:ff:ff:ff:ff:ff
inet 10.0.2.15/24 brd 10.0.2.255 scope global dynamic enp0s3
valid_lft 84631sec preferred_lft 84631sec
inet6 fe80::9e25:c982:1091:90eb/64 scope link
valid_lft forever preferred_lft forever
3: enp0s8: <BROADCAST,MULTICAST,UP,LOWER_UP> mtu 1500 qdisc pfifo_fast state UP qlen 1000
link/ether 08:00:27:68:88:f3 brd ff:ff:ff:ff:ff:ff
inet 192.168.56.101/24 brd 192.168.56.255 scope global dynamic enp0s8
valid_lft 1044sec preferred_lft 1044sec
inet6 fe80::a00:27ff:fe68:88f3/64 scope link
valid_lft forever preferred_lft forever
Deshabilite SELINUX (Security Enhanced Linux) en Centos 7, edite el siguiente archivo de configuración:
vim /etc/selinux/config
"/etc/selinux/config" 14L, 547C# This file controls the state of SELinux on the system.
# SELINUX= can take one of these three values:
#     enforcing - SELinux security policy is enforced.
#     permissive - SELinux prints warnings instead of enforcing.
#     disabled - No SELinux policy is loaded.
SELINUX=enforcing
# SELINUXTYPE= can take one of three two values:
#     targeted - Targeted processes are protected,
#     minimum - Modification of targeted policy. Only selected processes are prootected.
#     mls - Multi Level Security protection.
SELINUXTYPE=targeted
Cambie el valor aplicar de la directiva SELINUX a discapacitados , guarde el archivo y reinicie el servidor.
Para verificar el estado de SELinux en Centos 7, ejecute el siguiente comando:
getenforce
La salida debe ser:
Disabled
Para deshabilitar FirewallD en Centos 7, ejecute los siguientes comandos:
systemctl disable firewalld
systemctl stop firewalld
Para verificar el estado del firewall en Centos 7, ejecute el siguiente comando:
systemctl status firewalld
Instalar MariaDB, Apache y PHP en Centos 7
Para instalar MariaDB en Centos 7, ejecute el siguiente comando:
yum -y install mariadb-server
Para iniciar MariaDB, ejecute el siguiente comando:
systemctl start mariadb
Para aumentar la seguridad de MariaDB, ejecute el siguiente comando:
/usr/bin/mysql_secure_installation
Configure las opciones de acuerdo con el siguiente resultado o utilice sus propias preferencias:
NOTE: RUNNING ALL PARTS OF THIS SCRIPT IS RECOMMENDED FOR ALL MariaDB
      SERVERS IN PRODUCTION USE!  PLEASE READ EACH STEP CAREFULLY!

In order to log into MariaDB to secure it, we'll need the current
password for the root user.  If you've just installed MariaDB, and
you haven't set the root password yet, the password will be blank,
so you should just press enter here.

Enter current password for root (enter for none):<Press Enter>

OK, successfully used password, moving on...

Setting the root password ensures that nobody can log into the MariaDB
root user without the proper authorisation.

Set root password? [Y/n] <Press Y>
Configurar contraseña raíz:
New password: *******
Re-enter new password: *******
Password updated successfully!
Reloading privilege tables..
 ... Success!

By default, a MariaDB installation has an anonymous user, allowing anyone
to log into MariaDB without having to have a user account created for
them.  This is intended only for testing, and to make the installation
go a bit smoother.  You should remove them before moving into a
production environment.

Remove anonymous users? [Y/n] <Press Y>

... Success!

Normally, root should only be allowed to connect from 'localhost'. This
ensures that someone cannot guess at the root password from the network.

Disallow root login remotely? [Y/n] <Choose acording your needs>

... Success!

By default, MariaDB comes with a database named 'test' that anyone can
access. This is also intended only for testing, and should be removed
before moving into a production environment.

Remove test database and access to it? [Y/n] <Press Y>


- Dropping test database...
 ... Success!
 - Removing privileges on test database...
 ... Success!

Reloading the privilege tables will ensure that all changes made so far
will take effect immediately.

Reload privilege tables now? [Y/n] <Press Y>

... Success!

Cleaning up...

All done! If you've completed all of the above steps, your MariaDB
installation should now be secure.

Thanks for using MariaDB!
Configure MariaDB para que se inicie automáticamente con Centos 7:
systemctl enable mariadb.service
Para instalar Apache, ejecute el siguiente comando:
yum install httpd
Para iniciar Apache, ejecute el siguiente comando:
systemctl start httpd.service
Configure Apache para que se inicie automáticamente con Centos 7:
systemctl enable httpd.service
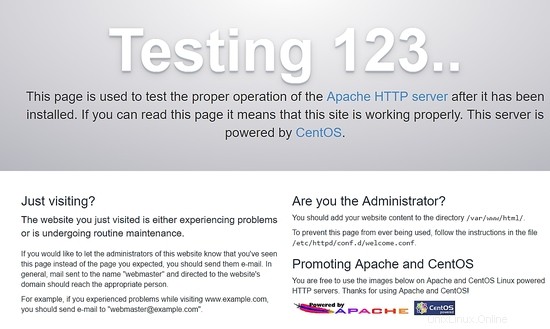
Para probar Apache, en su navegador web, escriba la dirección IP de su servidor. Si todo está bien, puede ver una página de prueba:
Para instalar PHP, ejecute el siguiente comando:
yum install php php-mysql
Reinicie Apache, ejecute el siguiente comando:
systemctl restart httpd.service
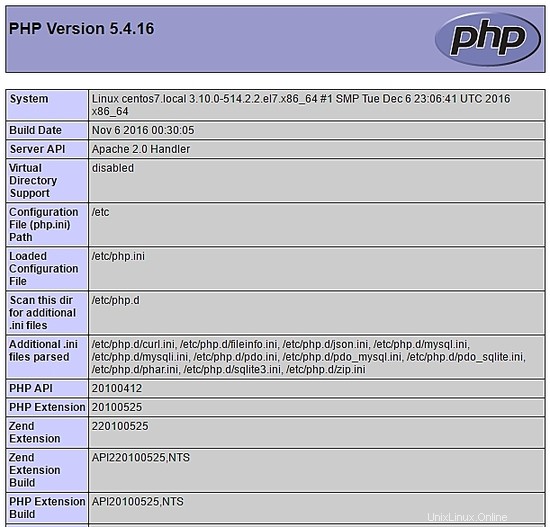
Para probar PHP, cree un archivo phpinfo.php dentro del directorio /var/www/html con el siguiente contenido:
<?php phpinfo(); ?>
Ahora puede acceder a phpinfo.php a través del navegador con la siguiente URL: http://[your-ip-adres]/phpinfo.php. Si todo está bien, puede ver la siguiente página:
Configurar la base de datos a través de la terminal
Acceda a MariaDB a través de la terminal y cree la base de datos bookedscheduler y el usuario booked_user con derechos suficientes para administrar esta base de datos. Ejecute los siguientes comandos para hacerlo a través de la terminal:
mysql -u root -p
Crear programador reservado base de datos:
MariaDB [(none)]> create database bookedscheduler;
Crear usuario_reservado en MariaDB:
CREATE USER 'booked_user'@'localhost' IDENTIFIED BY 'your_password';
Otorgar permisos al usuario booked_user a bookedscheduler base de datos:
GRANT ALL PRIVILEGES ON database.bookedscheduler TO 'booked_user'@'localhost';
Importe el esquema y los datos de la base de datos reservada, desde el directorio /var/www/html/booked/database_schema/, se deben importar los siguientes archivos sql, create_schema.sql y crear-datos.sql :
mysql -u root -p bookedscheduler < create-schema.sql
mysql -u root -p bookedscheduler < create-data.sql
Configurar la base de datos a través de PHPMyAdmin
Instalar PHPMyAdmin en Centos 7 (opcional)
PHPMyAdmin es una herramienta para administrar bases de datos mysql (mariaDB) de forma amigable a través de un navegador. Para instalar phpmyadmin automáticamente, debe instalar el repositorio de Epel, ejecute el siguiente comando:
yum install epel-release
Ahora puede ejecutar el siguiente comando:
yum install phpmyadmin
Después de la instalación de PHPMyAdmin, debemos configurarlo. En primer lugar, haga una copia del archivo de configuración y edite el archivo phpMyAdmin.conf en /etc/httpd/conf.d/:
cp /etc/httpd/conf.d/phpMyAdmin.conf /etc/httpd/conf.d/phpMyAdmin.conf.old
vim /etc/httpd/conf.d/phpMyAdmin.conf
Cambie los valores de acuerdo a su entorno de red, en mi caso cambié las siguientes líneas (17, 25, 34, 42). Mi archivo de configuración se ve así:
# phpMyAdmin - Web based MySQL browser written in php
#
# Allows only localhost by default
#
# But allowing phpMyAdmin to anyone other than localhost should be considered
# dangerous unless properly secured by SSL
Alias /phpMyAdmin /usr/share/phpMyAdmin
Alias /phpmyadmin /usr/share/phpMyAdmin

<IfModule mod_authz_core.c>
# Apache 2.4
<RequireAny>
Require ip 127.0.0.1
Require ip 192.168.56.1
Require ip ::1
</RequireAny>
</IfModule>
 <IfModule !mod_authz_core.c>
 # Apache 2.2
 Order Deny,Allow
 Deny from All
 Allow from 192.168.56.1
 Allow from ::1
 </IfModule>
<Directory /usr/share/phpMyAdmin/setup/>
 <IfModule mod_authz_core.c>
 # Apache 2.4
 <RequireAny>
 Require ip 127.0.0.1
 Require ip ::1
 </RequireAny>
 </IfModule>
<IfModule !mod_authz_core.c>
 # Apache 2.2
 Order Deny,Allow
 Deny from All
 Allow from 192.168.56.1
 Allow from ::1
 </IfModule>
</Directory>
# These directories do not require access over HTTP - taken from the original
# phpMyAdmin upstream tarball
#
<Directory /usr/share/phpMyAdmin/libraries/>
 Order Deny,Allow
 Deny from All
 Allow from None
</Directory>
<Directory /usr/share/phpMyAdmin/setup/lib/>
 Order Deny,Allow
 Deny from All
 Allow from None
</Directory>
<Directory /usr/share/phpMyAdmin/setup/frames/>
 Order Deny,Allow
 Deny from All
 Allow from None
</Directory>
# This configuration prevents mod_security at phpMyAdmin directories from
# filtering SQL etc. This may break your mod_security implementation.
#
#<IfModule mod_security.c>
# <Directory /usr/share/phpMyAdmin/>
# SecRuleInheritance Off
# </Directory>
#</IfModule>
Reinicie Apache, ejecute el siguiente comando:
systemctl restart httpd.service
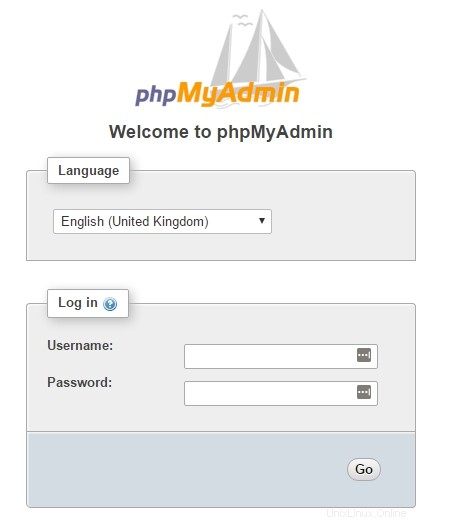
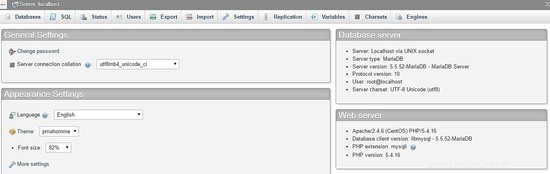
Ahora puede acceder a PHPMyAdmin a través del navegador con la siguiente URL: http://[your-ip-adres]/phpMyAdmin/
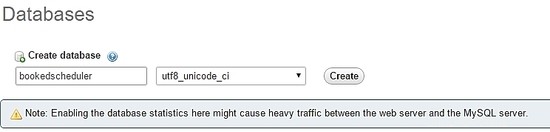
Usa tu raíz cuenta y la contraseña definida previamente en la instalación de MariaDB para crear la base de datos y el usuario. En el panel, seleccione Bases de datos opción para crear una nueva base de datos:
Complete el formulario con el nombre de la base de datos y seleccione crear .
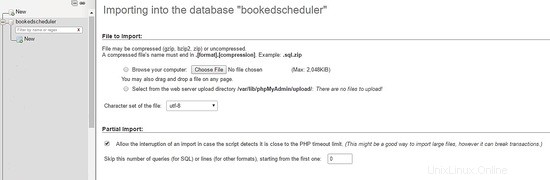
Para importar los datos de la base de datos, en el menú de la izquierda, seleccione bookedscheduler base de datos y Importar desde el panel de PHPMyAdmin, elija los siguientes archivos, create-schema.sql (1) y create-data.sql (2), desde los archivos de instalación e impórtelos.
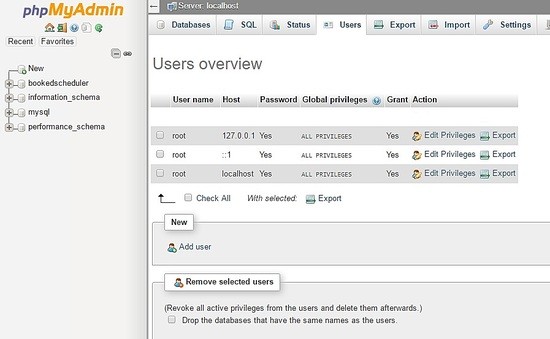
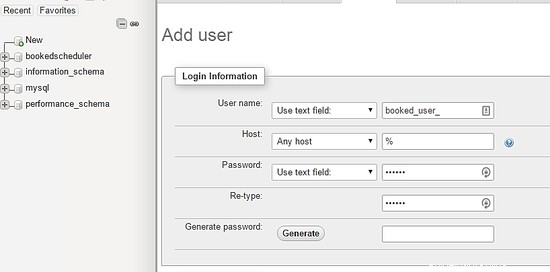
Crea el usuario booked_user con los permisos para administrar bookedscheduler base de datos. En el panel de PHPMyAdmin, seleccione Usuarios y Añadir :
En la pantalla de creación de usuario, complete los campos con la base de datos del usuario (booked_user), configure una contraseña y seleccione IR al final de la página:
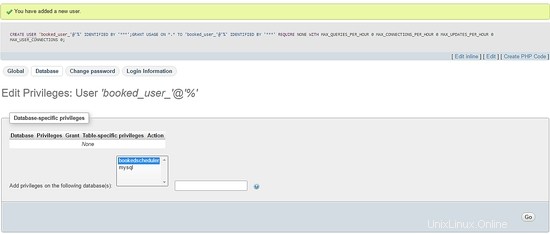
Para configurar privilegios para booked_user en bookedscheduler base de datos, seleccione bookedscheduler de una lista de bases de datos y seleccione Ir:
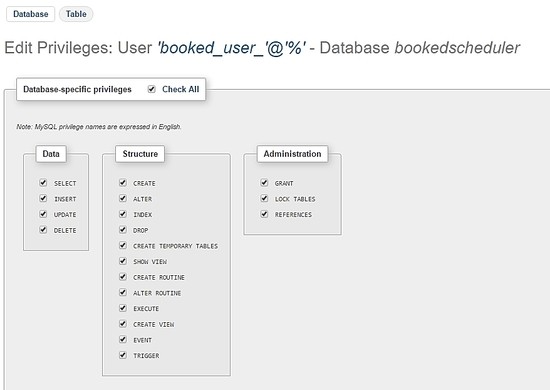
En la pantalla de privilegios, seleccione la opción Marcar todo y ir :
Instalando Booked Scheduler Centos 7
Tenemos dos formas de instalar Booked Scheduler, manual o automáticamente. Este artículo cubre solo la instalación manual. Para instalar Booked Scheduler en Centos 7, vaya al directorio /tmp y descargue el código fuente:
wget https://ufpr.dl.sourceforge.net/project/phpscheduleit/Booked/2.6/booked-2.6.5.zip
Descomprima el archivo en el directorio /var/www/html, ejecute el siguiente comando:
unzip booked-2.6.5.zip -d /var/www/html/
Cambie los permisos del archivo descomprimido.
cd /var/www/html/
chown -R apache:apache /booked
Configure el archivo de configuración en /var/www/html/booked/config. Haga una copia del archivo config.dist.php a config.php y edite los bloques del archivo de configuración (es mi archivo de configuración):
cp config.dist.php config.php
Cambie los valores de acuerdo a nuestro entorno, aquí presento las configuraciones principales para cambiar, y esté informado, la dirección de correo electrónico será el administrador del sistema después del primer registro:
<?php
/**
Copyright 2011-2016 Nick Korbel
This file is part of Booked Scheduler.
Booked Scheduler is free software: you can redistribute it and/or modify
it under the terms of the GNU General Public License as published by
the Free Software Foundation, either version 3 of the License, or
(at your option) any later version.
Booked Scheduler is distributed in the hope that it will be useful,
but WITHOUT ANY WARRANTY; without even the implied warranty of
MERCHANTABILITY or FITNESS FOR A PARTICULAR PURPOSE. See the
GNU General Public License for more details.
You should have received a copy of the GNU General Public License
along with Booked Scheduler. If not, see <http://www.gnu.org/licenses/>.
*/
error_reporting(E_ALL & ~E_NOTICE & ~E_STRICT);
//ini_set('display_errors', 1);
//ini_set('display_startup_errors', 1);
/**
* Application configuration
*/
$conf['settings']['app.title'] = 'Booked Scheduler'; // application title
$conf['settings']['default.timezone'] = 'America/Chicago'; // Change your time zone - look up here http://php.net/manual/en/timezones.php
$conf['settings']['allow.self.registration'] = 'true'; // if users can register themselves
$conf['settings']['admin.email'] = '[email protected]'; // fill with the email address of admin user
$conf['settings']['admin.email.name'] = 'Booked Administrator'; // name to be used in From: field when sending automatic emails
$conf['settings']['default.page.size'] = '50'; // number of records per page
$conf['settings']['enable.email'] = 'true'; // global configuration to enable if any emails will be sent
$conf['settings']['default.language'] = 'en_us'; Change acording to your language // find your language in the lang directory
$conf['settings']['script.url'] = 'http://[your-ip-address]/Web'; // public URL to the Web directory of this instance. this is the URL that appears when you are logging in. leave http: or https: off to auto-detect
$conf['settings']['image.upload.directory'] = 'Web/uploads/images'; // full or relative path to where images will be stored
$conf['settings']['image.upload.url'] = 'uploads/images'; // full or relative path to show uploaded images from
$conf['settings']['cache.templates'] = 'true'; // true recommended, caching template files helps web pages render faster
$conf['settings']['use.local.jquery'] = 'false'; // false recommended, delivers jQuery from Google CDN, uses less bandwidth
$conf['settings']['registration.captcha.enabled'] = 'true'; // recommended. unless using recaptcha this requires php_gd2 enabled in php.ini
$conf['settings']['registration.require.email.activation'] = 'true'; // requires enable.email = true
$conf['settings']['registration.auto.subscribe.email'] = 'false'; // requires enable.email = true
$conf['settings']['registration.notify.admin'] = 'true'; // whether the registration of a new user sends an email to the admin (ala phpScheduleIt 1.2)
$conf['settings']['inactivity.timeout'] = '30'; // minutes before the user is automatically logged out
$conf['settings']['name.format'] = '{first} {last}'; // display format when showing user names
$conf['settings']['css.extension.file'] = ''; // full or relative url to an additional css file to include. this can be used to override the default style
$conf['settings']['disable.password.reset'] = 'false'; // if the password reset functionality should be disabled
$conf['settings']['home.url'] = 'your-intranet-portal-url'; // the url to open when the logo is clicked
$conf['settings']['logout.url'] = 'your-intranet-portal-url'; // the url to be directed to after logging out
$conf['settings']['default.homepage'] = '1'; // the default homepage to use when new users register (1 = Dashboard, 2 = Schedule, 3 = My Calendar, 4 = Resource Calendar)
$conf['settings']['schedule']['use.per.user.colors'] = 'false'; // color reservations by user
$conf['settings']['schedule']['show.inaccessible.resources'] = 'true'; // whether or not resources that are inaccessible to the user are visible
$conf['settings']['schedule']['reservation.label'] = '{name}'; // format for what to display on the reservation slot label. Available properties are: {name}, {title}, {description}, {email}, {phone}, {organization}, {position}, {startdate}, {enddate} {resourcename} {participants} {invitees} {reservationAttributes}. Custom attributes can be added using att with the attribute id. For example {att1}
$conf['settings']['schedule']['hide.blocked.periods'] = 'false'; // if blocked periods should be hidden or shown
/**
* ical integration configuration
*/
$conf['settings']['ics']['require.login'] = 'true'; // recommended, if the user must be logged in to access ics files
$conf['settings']['ics']['subscription.key'] = ''; // must be set to allow webcal subscriptions
$conf['settings']['ics']['import'] = 'false'; // enable iCal import
$conf['settings']['ics']['import.key'] = ''; // it's recommended to set this key when iCal import is enabled
/**
* Privacy configuration - Set up here your business rules
*/
$conf['settings']['privacy']['view.schedules'] = 'true'; // if unauthenticated users can view schedules
$conf['settings']['privacy']['view.reservations'] = 'false'; // if unauthenticated users can view reservations
$conf['settings']['privacy']['hide.user.details'] = 'false'; // if personal user details should be displayed to non-administrators
$conf['settings']['privacy']['hide.reservation.details'] = 'false'; // if reservation details should be displayed to non-administrators
$conf['settings']['privacy']['allow.guest.reservations'] = 'false'; // if reservations can be made by users without a Booked account, if true this overrides schedule and resource visibility
/**
* Reservation specific configuration
*/
$conf['settings']['reservation']['start.time.constraint'] = 'future'; // when reservations can be created or edited. options are future, current, none
$conf['settings']['reservation']['updates.require.approval'] = 'false'; // if updates to previously approved reservations require approval again
$conf['settings']['reservation']['prevent.participation'] = 'false'; // if participation and invitation options should be removed
$conf['settings']['reservation']['prevent.recurrence'] = 'false'; // if recurring reservations are disabled for non-administrators
$conf['settings']['reservation']['enable.reminders'] = 'false'; // if reminders are enabled. this requires email to be enabled and the reminder job to be configured
$conf['settings']['reservation']['allow.guest.participation'] = 'false';
$conf['settings']['reservation']['allow.wait.list'] = 'false';
$conf['settings']['reservation']['checkin.minutes.prior'] = '5';
/**
* Email notification configuration
*/
$conf['settings']['reservation.notify']['resource.admin.add'] = 'false';
$conf['settings']['reservation.notify']['resource.admin.update'] = 'false';
$conf['settings']['reservation.notify']['resource.admin.delete'] = 'false';
$conf['settings']['reservation.notify']['resource.admin.approval'] = 'false';
$conf['settings']['reservation.notify']['application.admin.add'] = 'false';
$conf['settings']['reservation.notify']['application.admin.update'] = 'false';
$conf['settings']['reservation.notify']['application.admin.delete'] = 'false';
$conf['settings']['reservation.notify']['application.admin.approval'] = 'false';
$conf['settings']['reservation.notify']['group.admin.add'] = 'false';
$conf['settings']['reservation.notify']['group.admin.update'] = 'false';
$conf['settings']['reservation.notify']['group.admin.delete'] = 'false';
$conf['settings']['reservation.notify']['group.admin.approval'] = 'false';
/**end business rules
* File upload configuration
*/
$conf['settings']['uploads']['enable.reservation.attachments'] = 'false'; // if reservation attachments can be uploaded
$conf['settings']['uploads']['reservation.attachment.path'] = 'uploads/reservation'; // full or relative (to the root of your installation) filesystem path to store reservation attachments
$conf['settings']['uploads']['reservation.attachment.extensions'] = 'txt,jpg,gif,png,doc,docx,pdf,xls,xlsx,ppt,pptx,csv'; // comma separated list of file extensions that users are allowed to attach. leave empty to allow all extensions
/**
* Database configuration
*/
$conf['settings']['database']['type'] = 'mysql';
$conf['settings']['database']['user'] = 'booked_user'; // database user with permission to the booked database
$conf['settings']['database']['password'] = 'your_password'; fill with the booked_user password
$conf['settings']['database']['hostspec'] = '127.0.0.1'; // ip, dns or named pipe
$conf['settings']['database']['name'] = 'bookedscheduler';
/**TIP: if you have problems to conect to database, please, try with the user and passord of root, if it works, go back to user database permitions.
* Mail server configuration
*/To e-mail configurarion I need to use a relay to my e-mail server and in my server I instaled postfix and configurate it to send e-mails
$conf['settings']['phpmailer']['mailer'] = 'mail'; // options are 'mail', 'smtp' or 'sendmail'
$conf['settings']['phpmailer']['smtp.host'] = 'your-mx'; // 'smtp.company.com'
$conf['settings']['phpmailer']['smtp.port'] = '25';
$conf['settings']['phpmailer']['smtp.secure'] = ''; // options are '', 'ssl' or 'tls'
$conf['settings']['phpmailer']['smtp.auth'] = 'true'; // options are 'true' or 'false'
$conf['settings']['phpmailer']['smtp.username'] = '[email protected]';
$conf['settings']['phpmailer']['smtp.password'] = 'your-password';
$conf['settings']['phpmailer']['sendmail.path'] = '/usr/sbin/sendmail';
$conf['settings']['phpmailer']['smtp.debug'] = 'false';
/**
* Plugin configuration. For more on plugins, see readme_installation.html
*/
$conf['settings']['plugins']['Authentication'] = '';
$conf['settings']['plugins']['Authorization'] = '';
$conf['settings']['plugins']['Permission'] = '';
$conf['settings']['plugins']['PostRegistration'] = '';
$conf['settings']['plugins']['PreReservation'] = '';
$conf['settings']['plugins']['PostReservation'] = '';
/**
* Installation settings
*/
$conf['settings']['install.password'] = ''; //just to automated instalation
/**
* Pages
*/
$conf['settings']['pages']['enable.configuration'] = 'true';
/**
* API
*/
$conf['settings']['api']['enabled'] = 'false';
/**
* ReCaptcha
*/
$conf['settings']['recaptcha']['enabled'] = 'false';
$conf['settings']['recaptcha']['public.key'] = '';
$conf['settings']['recaptcha']['private.key'] = '';
/**
*/
$conf['settings']['email']['default.from.address'] = 'your-email-address';
$conf['settings']['email']['default.from.name'] = 'your-system-name';
/**
* Reports
*/
$conf['settings']['reports']['allow.all.users'] = 'false';
/**
* Account Password Rules
*/
$conf['settings']['password']['minimum.letters'] = '6';
$conf['settings']['password']['minimum.numbers'] = '0';
$conf['settings']['password']['upper.and.lower'] = 'false';
/**
* Label display settings
*/
$conf['settings']['reservation.labels']['ics.summary'] = '{title}';
$conf['settings']['reservation.labels']['ics.my.summary'] = '{title}';
$conf['settings']['reservation.labels']['rss.description'] = '<div><span>Start</span> {startdate}</div><div><span>End</span> {enddate}</div><div><span>Organizer</span> {name}</div><div><span>Description</span> {description}</div>';
$conf['settings']['reservation.labels']['my.calendar'] = '{resourcename} {title}';
$conf['settings']['reservation.labels']['resource.calendar'] = '{name}';
$conf['settings']['reservation.labels']['reservation.popup'] = ''; // Format for what to display in reservation popups. Possible values: {name} {dates} {title} {resources} {participants} {accessories} {description} {attributes}. Custom attributes can be added using att with the attribute id. For example {att1}
/**
* Security header settings
*/
$conf['settings']['security']['security.headers'] = 'false'; // Enable the following options
$conf['settings']['security']['security.strict-transport'] = 'true';
$conf['settings']['security']['security.x-frame'] = 'deny';
$conf['settings']['security']['security.x-xss'] = '1; mode=block';
$conf['settings']['security']['security.x-content-type'] = 'nosniff';
$conf['settings']['security']['security.content-security-policy'] = "default-src 'self'"; // Requires careful tuning (know what your doing)
/**
* Google Analytics settings
*/
$conf['settings']['google.analytics']['tracking.id'] = ''; // if set, Google Analytics tracking code will be added to every page in Booked
$conf['settings']['authentication']['allow.facebook.login'] = 'true';
$conf['settings']['authentication']['allow.google.login'] = 'true';
$conf['settings']['authentication']['required.email.domains'] = '';
/**
* Credits functionality
*/
$conf['settings']['credits']['enabled'] = 'false';
Configurar la interfaz web del programador reservado
Acceda a la siguiente dirección http://your-ipaddress/Web/index.php, si todo funciona bien, verá la siguiente pantalla:
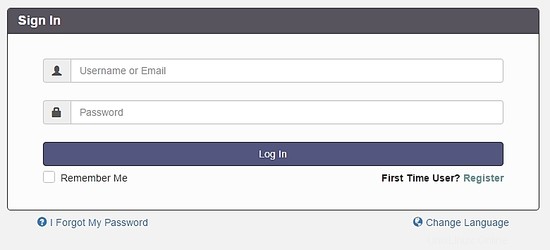
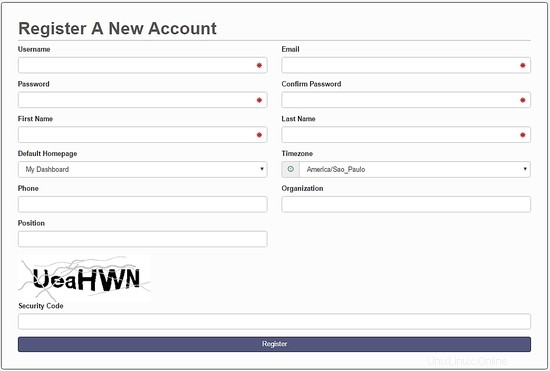
Seleccione la opción Registrarse para crear una cuenta de administrador, recuerda usar la dirección de correo electrónico configurada previamente en el archivo config.php.
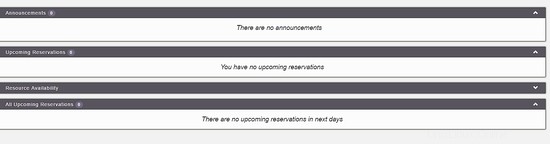
Después de crear su cuenta, vaya a la pantalla de inicio de sesión y autentíquese. A dashboard will be load, like this image:
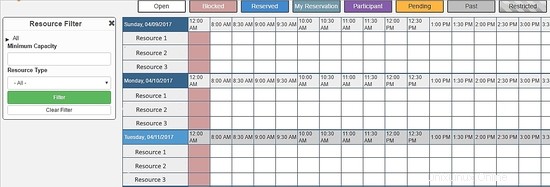
On the main menu, you can config all system, select Application Management :

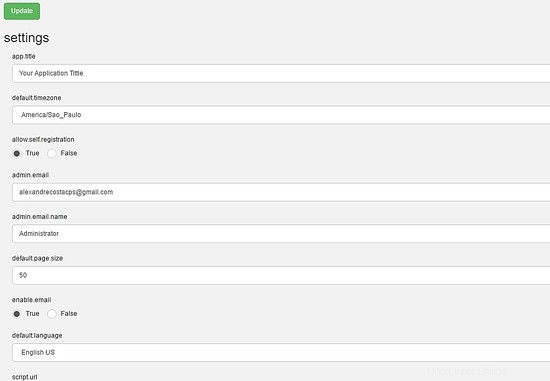
Through this menu, you can configure all resources of Booked Scheduler, to change the config.php, select the Application Configuration :
This article is a small overview about Booked Scheduler, this software has a lot of amazing features who can help any environment to provide a rational use of resources.
I hope this article can introduce you to the software, in case you have any problem with the installation, feel free to ask questions. If you want to get more information about Booked Scheduler access http://www.bookedscheduler.com/.