Este tutorial muestra la instalación de ISPConfig 3.2 en un servidor CentOS 8 (64 bits). ISPConfig es un panel de control de alojamiento web que le permite configurar los siguientes servicios a través de un navegador web:servidor web Apache, PHP, servidor de correo Postfix, MySQL, servidor de nombres BIND, PureFTPd, SpamAssassin, ClamAV, Mailman y muchos más.
1 Requisitos
Para instalar dicho sistema, necesitará lo siguiente:
- Un sistema de servidor mínimo Centos 8. Puede ser un servidor instalado desde cero como se describe en nuestro tutorial de servidor mínimo de Centos 8 o un servidor virtual o un servidor raíz de una empresa de hospedaje que tenga instalada una configuración mínima de Centos 8.
- Una conexión rápida a Internet.
2 Nota Preliminar
En este tutorial, utilizo el nombre de host server1.example.com con la dirección IP 192.168.0.100 y la puerta de enlace 192.168.0.1. Estas configuraciones pueden diferir para usted, por lo que debe reemplazarlas cuando corresponda.
3 Prepare el servidor
Establecer la distribución del teclado
En caso de que la distribución del teclado del servidor no coincida con su teclado, puede cambiar al teclado correcto (en mi caso, "de" para una distribución de teclado alemana, con el comando localectl:
localectl set-keymap de
Para obtener una lista de todos los mapas de teclas disponibles, ejecute:
localectl list-keymaps
Quiero instalar ISPConfig al final de este tutorial, ISPConfig se envía con el script de firewall Bastille que usaré como firewall, por lo tanto, deshabilito el firewall predeterminado de CentOS ahora. Por supuesto, puede dejar activado el cortafuegos de CentOS y configurarlo según sus necesidades (pero luego no debe usar ningún otro cortafuegos, ya que lo más probable es que interfiera con el cortafuegos de CentOS).
Corre...
dnf -y install net-tools wget rsyslog curl
systemctl stop firewalld.service
systemctl disable firewalld.service
para detener y deshabilitar el firewall de CentOS. Está bien si obtiene errores aquí, esto solo indica que el firewall no se instaló.
Entonces deberías comprobar que el cortafuegos realmente ha sido deshabilitado. Para hacerlo, ejecute el comando:
iptables -L
La salida debería verse así:
[[email protected] ~]# iptables -L
Chain INPUT (policy ACCEPT)
target prot opt source destination
Chain FORWARD (policy ACCEPT)
target prot opt source destination
Chain OUTPUT (policy ACCEPT)
target prot opt source destination
O use el comando firewall-cmd:
firewall-cmd --state
[[email protected] ~]# firewall-cmd --state
not running
[[email protected] ~]#
Ahora instalaré el editor de configuración de red y el editor basado en shell "nano" que usaré en los próximos pasos para editar los archivos de configuración:
dnf -y install nano wget NetworkManager-tui yum-utils
Si no configuró su tarjeta de red durante la instalación, puede hacerlo ahora. Corre...
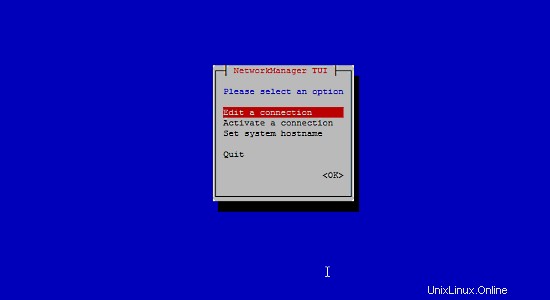
nmtui
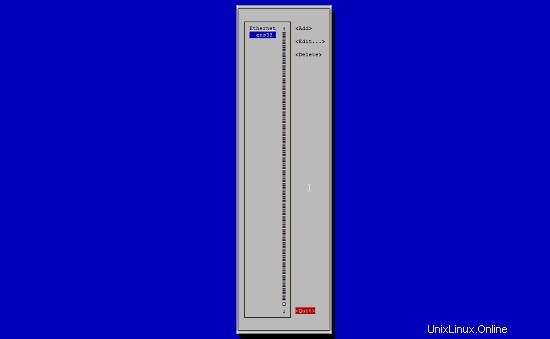
... y vaya a Editar una conexión:
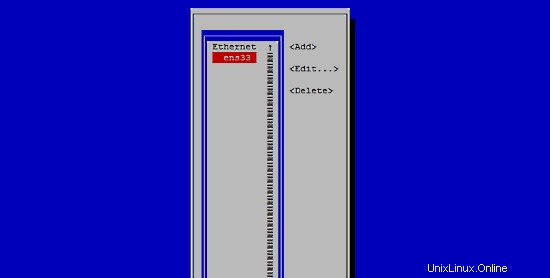
Seleccione su interfaz de red:
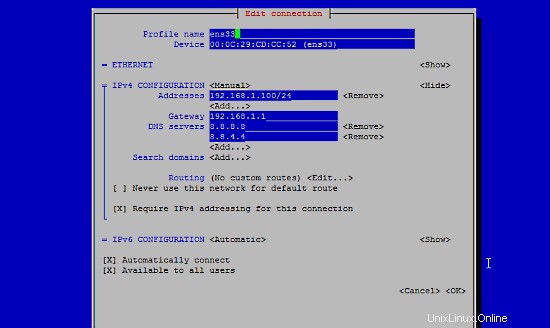
Luego complete los detalles de su red:deshabilite DHCP y complete una dirección IP estática, una máscara de red, su puerta de enlace y uno o dos servidores de nombres, luego presione Aceptar:
A continuación, seleccione Aceptar para confirmar los cambios que realizó en la configuración de red
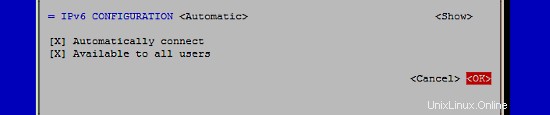
y Salir para cerrar la herramienta de configuración de red nmtui.
Deberías correr
ifconfig
ahora para verificar si el instalador obtuvo su dirección IP correcta:
[[email protected] ~]# ifconfig
ens33: flags=4163<UP,BROADCAST,RUNNING,MULTICAST>  mtu 1500
        inet 192.168.0.100  netmask 255.255.255.0  broadcast 192.168.0.255
        inet6 fe80::20c:29ff:feee:b665  prefixlen 64  scopeid 0x20<link>
        inet6 2003:e1:bf22:1b00:20c:29ff:feee:b665  prefixlen 64  scopeid 0x0<global>
        ether 00:0c:29:ee:b6:65  txqueuelen 1000  (Ethernet)
        RX packets 2874  bytes 1369892 (1.3 MiB)
        RX errors 0  dropped 546  overruns 0  frame 0
        TX packets 968  bytes 160901 (157.1 KiB)
        TX errors 0  dropped 0 overruns 0  carrier 0  collisions 0
lo: flags=73<UP,LOOPBACK,RUNNING>  mtu 65536
        inet 127.0.0.1  netmask 255.0.0.0
        inet6 ::1  prefixlen 128  scopeid 0x10<host>
        loop  txqueuelen 1000  (Local Loopback)
        RX packets 0  bytes 0 (0.0 B)
        RX errors 0  dropped 0  overruns 0  frame 0
        TX packets 0  bytes 0 (0.0 B)
        TX errors 0  dropped 0 overruns 0  carrier 0  collisions 0
Si su tarjeta de red no aparece allí, entonces no estará habilitada en el arranque. En este caso, abra el archivo /etc/sysconfig/network-scripts/ifcfg-eth0
nano /etc/sysconfig/network-scripts/ifcfg-ens33
y establezca ONBOOT en sí:
[...]
ONBOOT=yes
[...]
y reinicie el servidor.
Verifique su /etc/resolv.conf si enumera todos los servidores de nombres que configuró previamente:
cat /etc/resolv.conf
Si faltan servidores de nombres, ejecute
nmtui
y vuelva a agregar los servidores de nombres que faltan.
Ahora, a la configuración...
Ajuste de /etc/hosts y /etc/hostname
A continuación, editaremos /etc/hosts. Haz que se vea así:
nano /etc/hosts
127.0.0.1   localhost localhost.localdomain localhost4 localhost4.localdomain4
192.168.0.100   server1.example.com     server1

::1         localhost localhost.localdomain localhost6 localhost6.localdomain6
Establezca el nombre de host en el archivo /etc/hostname. El archivo debe contener el nombre de dominio completo (por ejemplo, server1.example.com en mi caso) y no solo el nombre corto como "server1". Abra el archivo con el editor nano:
nano /etc/hostname
Y establezca el nombre de host en el archivo.
server1.example.com
Guarde el archivo y salga de nano.
Establecer SELinux en permisivo
SELinux es una extensión de seguridad de CentOS que debería proporcionar seguridad extendida. ISPConfig no se envía con un conjunto de reglas de SELinux, por lo tanto, lo configuré como permisivo (esto es obligatorio si desea instalar ISPConfig más adelante).
Edite /etc/selinux/config y establezca SELINUX=permisivo:
nano /etc/selinux/config
# This file controls the state of SELinux on the system.
# SELINUX= can take one of these three values:
#     enforcing - SELinux security policy is enforced.
#     permissive - SELinux prints warnings instead of enforcing.
#     disabled - No SELinux policy is loaded.
SELINUX=permissive
# SELINUXTYPE= can take one of these two values:
#     targeted - Targeted processes are protected,
#     mls - Multi Level Security protection.
SELINUXTYPE=targeted
Posteriormente debemos reiniciar el sistema:
reboot
4 Habilite repositorios adicionales e instale algún software
Primero, importamos las claves GPG para los paquetes de software:
rpm --import /etc/pki/rpm-gpg/RPM-GPG-KEY*
Luego habilitamos el repositorio EPEL en nuestro sistema CentOS ya que muchos de los paquetes que vamos a instalar en el transcurso de este tutorial no están disponibles en el repositorio oficial de CentOS 8:
dnf -y install epel-release
Activar herramientas eléctricas:
dnf config-manager --set-enabled powertools
Luego actualizamos nuestros paquetes existentes en el sistema:
dnf -y update
Ahora instalamos algunos paquetes de software que se necesitarán más adelante:
dnf -y groupinstall 'Development Tools'
5 Cuota
(Si ha elegido un esquema de particionamiento diferente al que yo elegí, debe ajustar este capítulo para que la cuota se aplique a las particiones donde lo necesita).
Para instalar la cuota, ejecutamos este comando:
dnf -y install quota
Ahora verificamos si la cuota ya está habilitada para el sistema de archivos donde se almacena el sitio web (/var/www) y los datos de Maildir (var/vmail). En esta configuración de ejemplo, tengo una partición raíz grande, así que busco ' / ':
mount | grep ' / '
[[email protected] ~]# mount | grep ' / '
/dev/mapper/centos-root on / type xfs (rw,relatime,attr2,inode64,noquota)
[[email protected] ~]#
Si tiene una partición /var separada, use:
mount | grep ' /var '
en cambio. Si la línea contiene la palabra "noquota ", luego continúe con los siguientes pasos para habilitar la cuota.
Habilitar cuota en la partición / (raíz)
Normalmente habilitaría la cuota en el archivo /etc/fstab, pero si el sistema de archivos es el sistema de archivos raíz "/", entonces la cuota debe habilitarse mediante un parámetro de arranque del kernel de Linux.
Edite el archivo de configuración de grub:
nano /etc/default/grub
Busque la línea que comienza con GRUB_CMDLINE_LINUX y agregue rootflags=uquota,gquota a los parámetros de la línea de comandos para que la línea resultante se vea así:
GRUB_CMDLINE_LINUX="crashkernel=auto resume=/dev/mapper/cl-swap rd.lvm.lv=cl/root rd.lvm.lv=cl/swap rootflags=uquota,gquota"
y aplique los cambios ejecutando el siguiente comando.
cp /boot/grub2/grub.cfg /boot/grub2/grub.cfg_bak
grub2-mkconfig -o /boot/grub2/grub.cfg
y reinicie el servidor.
reboot
Ahora comprueba si la cuota está habilitada:
mount | grep ' / '
[[email protected] ~]# mount | grep ' / '
/dev/mapper/centos-root on / type xfs (rw,relatime,attr2,inode64,usrquota,grpquota)
[[email protected] ~]#
Cuando la cuota está activa, podemos ver "usrquota,grpquota " en la lista de opciones de montaje.
Habilitar cuota en una partición /var separada
Si tiene una partición /var separada, edite /etc/fstab y agregue ,uquota,gquota a la partición / (/dev/mapper/centos-var):
nano /etc/fstab
#
# /etc/fstab
# Created by anaconda on Sun Sep 21 16:33:45 2014
#
# Accessible filesystems, by reference, are maintained under '/dev/disk'
# See man pages fstab(5), findfs(8), mount(8) and/or blkid(8) for more info
#
/dev/mapper/centos-root /                       xfs     defaults        1 1
/dev/mapper/centos-var /var                     xfs     defaults,uquota,gquota        1 2
UUID=9ac06939-7e43-4efd-957a-486775edd7b4 /boot                   xfs     defaults        1 3
/dev/mapper/centos-swap swap                    swap    defaults        0 0
Entonces corre
mount -o remount /var
quotacheck -avugm
quotaon -avug
para habilitar la cuota. Cuando reciba un error de que no hay ninguna partición con la cuota habilitada, reinicie el servidor antes de continuar.
6 Instalar Apache, PHP, MySQL y phpMyAdmin
Habilite el repositorio de Remi para obtener versiones de PHP más nuevas (actualmente PHP 7.4):
dnf install http://rpms.remirepo.net/enterprise/remi-release-8.rpm
dnf -y install yum-utils
dnf -y module reset php
dnf -y module install php:remi-7.4
dnf update
Podemos instalar los paquetes necesarios con un solo comando:
dnf -y install httpd mod_ssl mariadb-server php php-mysqlnd php-mbstring
Para garantizar que el servidor no pueda ser atacado a través de la vulnerabilidad HTTPOXY, deshabilitaremos el encabezado HTTP_PROXY en apache globalmente.
Agregue la regla de encabezado de apache al final del archivo httpd.conf:
echo "RequestHeader unset Proxy early" >> /etc/httpd/conf/httpd.conf
Y reinicie httpd para aplicar el cambio de configuración.
service httpd restart
Instalar phpMyAdmin:
cd /tmp
wget https://files.phpmyadmin.net/phpMyAdmin/5.0.2/phpMyAdmin-5.0.2-all-languages.tar.gz
tar xzvf phpMyAdmin-5.0.2-all-languages.tar.gz
mkdir /usr/share/phpmyadmin
mv phpMyAdmin-5.0.2-all-languages/* /usr/share/phpmyadmin/
mkdir /usr/share/phpmyadmin/tmp
chown -R apache:apache /usr/share/phpmyadmin
chmod 777 /usr/share/phpmyadmin/tmp
Opcional:cambiar el módulo MPM de Apache
CentOS 8 usa el módulo de eventos Apache MPM de forma predeterminada, esto es bueno por un lado, ya que le permite usar el protocolo HTTP/2. Por otro lado, no te permite usar el módulo apache mod_php. En general, uno debería usar PHP-FPM como predeterminado hoy e ISPConfig lo admite. En caso de que necesite el antiguo modo mod_php por razones de compatibilidad, puede cambiar el MPM de Apache de esta manera:
nano /etc/httpd/conf.modules.d/00-mpm.conf
Agregue un # delante de la línea de eventos de MPM para que se vea así:
# LoadModule mpm_event_module modules/mod_mpm_event.so
Luego elimine la entrada # de la línea MPM Prefork, para que se vea así:
LoadModule mpm_prefork_module modules/mod_mpm_prefork.so
Luego reinicie httpd para aplicar el cambio de configuración.
service httpd restart
7 Instalar Dovecot
Dovecot se puede instalar de la siguiente manera:
dnf -y install dovecot dovecot-mysql dovecot-pigeonhole
Cree un archivo dovecot-sql.conf vacío y cree enlaces simbólicos:
touch /etc/dovecot/dovecot-sql.conf
ln -s /etc/dovecot/dovecot-sql.conf /etc/dovecot-sql.conf
ln -s /etc/dovecot/dovecot.conf /etc/dovecot.conf
Ahora cree los enlaces de inicio del sistema e inicie Dovecot:
systemctl enable dovecot
systemctl start dovecot
8 Instalar Postfix
Postfix se puede instalar de la siguiente manera:
dnf -y install postfix postfix-mysql
A continuación, abra los puertos TLS/SSL y de envío en Postfix:
nano /etc/postfix/master.cf
Elimine los comentarios de las secciones envío y smtps de la siguiente manera y agregue líneas donde sea necesario para que esta sección del archivo master.cf se vea exactamente como la siguiente. IMPORTANTE: ¡Elimine el # delante de las líneas que comienzan con smtps y el envío también y no solo de las líneas -o después de estas líneas!
[...]
submission inet n - n - - smtpd
 -o syslog_name=postfix/submission
 -o smtpd_tls_security_level=encrypt
 -o smtpd_sasl_auth_enable=yes
 -o smtpd_client_restrictions=permit_sasl_authenticated,reject
# -o smtpd_reject_unlisted_recipient=no
# -o smtpd_client_restrictions=$mua_client_restrictions
# -o smtpd_helo_restrictions=$mua_helo_restrictions
# -o smtpd_sender_restrictions=$mua_sender_restrictions
# -o smtpd_recipient_restrictions=
# -o smtpd_relay_restrictions=permit_sasl_authenticated,reject
# -o milter_macro_daemon_name=ORIGINATING
smtps inet n - n - - smtpd
 -o syslog_name=postfix/smtps
 -o smtpd_tls_wrappermode=yes
 -o smtpd_sasl_auth_enable=yes
 -o smtpd_client_restrictions=permit_sasl_authenticated,reject
# -o smtpd_reject_unlisted_recipient=no
# -o smtpd_client_restrictions=$mua_client_restrictions
# -o smtpd_helo_restrictions=$mua_helo_restrictions
# -o smtpd_sender_restrictions=$mua_sender_restrictions
# -o smtpd_recipient_restrictions=
# -o smtpd_relay_restrictions=permit_sasl_authenticated,reject
# -o milter_macro_daemon_name=ORIGINATING
[...]
Luego apague Sendmail e inicie Postfix y MariaDB (MySQL):
systemctl enable mariadb.service
systemctl start mariadb.service
systemctl enable postfix.service
systemctl restart postfix.service
Deshabilitamos sendmail para asegurarnos de que no se inicie en caso de que esté instalado en su servidor. Entonces, el mensaje de error "Error al emitir la llamada al método:Unidad sendmail.service no cargada". puede ser ignorado.
Para habilitar la compatibilidad con dispositivos antiguos/obsoletos, ejecute este comando (opcional, utilícelo solo cuando desee que se conecten dispositivos de correo antiguos, ya que debilita la configuración de SSL/TLS al permitir cifrados menos seguros):
update-crypto-policies --set LEGACY
9 Instalar Getmail
Getmail se puede instalar de la siguiente manera:
dnf install python2
cd /tmp
wget http://pyropus.ca/software/getmail/old-versions/getmail-5.14.tar.gz
tar xvfz getmail-5.14.tar.gz
cd getmail-5.14
python2 setup.py build
python2 setup.py install
10 Establecer contraseñas de MySQL y configurar phpMyAdmin
Establecer contraseñas para la cuenta raíz de MySQL:
mysql_secure_installation
[[email protected] tmp]# mysql_secure_installation


NOTE: RUNNING ALL PARTS OF THIS SCRIPT IS RECOMMENDED FOR ALL MariaDB
SERVERS IN PRODUCTION USE! PLEASE READ EACH STEP CAREFULLY!
In order to log into MariaDB to secure it, we'll need the current
password for the root user. If you've just installed MariaDB, and
you haven't set the root password yet, the password will be blank,
so you should just press enter here.
Enter current password for root (enter for none):
OK, successfully used password, moving on...
Setting the root password ensures that nobody can log into the MariaDB
root user without the proper authorisation.

Set root password? [Y/n] <-- ENTER
New password: <-- yourrootsqlpassword
Re-enter new password: <-- yourrootsqlpassword
Password updated successfully!
Reloading privilege tables..
 ... Success!


By default, a MariaDB installation has an anonymous user, allowing anyone
to log into MariaDB without having to have a user account created for
them. This is intended only for testing, and to make the installation
go a bit smoother. You should remove them before moving into a
production environment.

Remove anonymous users? [Y/n] <-- ENTER
 ... Success!

Normally, root should only be allowed to connect from 'localhost'.  This
ensures that someone cannot guess at the root password from the network.

Disallow root login remotely? [Y/n] <-- ENTER
 ... Success!

By default, MariaDB comes with a database named 'test' that anyone can
access. This is also intended only for testing, and should be removed
before moving into a production environment.

Remove test database and access to it? [Y/n] <-- ENTER
 - Dropping test database...
 ... Success!
 - Removing privileges on test database...
 ... Success!

Reloading the privilege tables will ensure that all changes made so far
will take effect immediately.

Reload privilege tables now? [Y/n] <-- ENTER
 ... Success!

Cleaning up...


All done! If you've completed all of the above steps, your MariaDB
installation should now be secure.

Thanks for using MariaDB!

[[email protected] tmp]#
Ahora configuramos phpMyAdmin. Cree este archivo de configuración de phpMyAdmin:
nano /etc/httpd/conf.d/phpmyadmin.conf
Agregue este contenido al archivo:
# phpMyAdmin - Web based MySQL browser written in php
#
# Allows only localhost by default
#
# But allowing phpMyAdmin to anyone other than localhost should be considered
# dangerous unless properly secured by SSL

Alias /phpMyAdmin /usr/share/phpmyadmin
Alias /phpmyadmin /usr/share/phpmyadmin

<Directory /usr/share/phpmyadmin/>
   <IfModule mod_authz_core.c>
     # Apache 2.4
  #  <RequireAny>
     #  Require ip 127.0.0.1
     #  Require ip ::1
  #  </RequireAny>
   </IfModule>
   <IfModule !mod_authz_core.c>
     # Apache 2.2
     Order Deny,Allow
     Deny from All
     Allow from 127.0.0.1
     Allow from ::1
   </IfModule>
</Directory>
A continuación, cambiamos la autenticación en phpMyAdmin de cookie a http:
cp -pf /usr/share/phpmyadmin/config.sample.inc.php /usr/share/phpmyadmin/config.inc.php
nano /usr/share/phpmyadmin/config.inc.php
[...]
/* Authentication type */
$cfg['Servers'][$i]['auth_type'] = 'http';
[...]
Luego creamos los enlaces de inicio del sistema para Apache y lo iniciamos:
systemctl enable httpd
systemctl restart httpd
Ahora puede dirigir su navegador a http://server1.example.com/phpmyadmin/ o http://192.168.0.100/phpmyadmin/ e iniciar sesión con el nombre de usuario raíz y su nueva contraseña raíz de MySQL.
11 Instale Amavisd-new, SpamAssassin, ClamAV y Postgrey
Para instalar amavisd-new, SpamAssassin y ClamAV, ejecute el siguiente comando:
dnf -y install amavisd-new spamassassin clamav-server clamav-data clamav-update clamav-filesystem clamav clamav-scanner-systemd clamav-devel clamav-lib clamav-server-systemd unzip bzip2 perl-DBD-mysql postgrey re2c
Luego comenzamos con freshclam, amavisd y clamd.amavisd:
sa-update
freshclam
systemctl enable amavisd.service
systemctl start amavisd.service
systemctl start [email protected]
systemctl enable postgrey.service
systemctl start postgrey.service
En el siguiente paso, configuramos postgrey. Abra el archivo /etc/sysconfig/postgrey en un editor:
nano /etc/sysconfig/postgrey
y cambia la línea:
POSTGREY_TYPE="--unix=/var/spool/postfix/postgrey/socket"
a
POSTGREY_TYPE="--inet=10023"
Guarde el archivo y reinicie postgrey:
service postgrey restart
Para configurar amavisd, edite el archivo /etc/clamd.d/amavisd.conf:
nano /etc/clamd.d/amavisd.conf
y cambia la línea:
LocalSocket /run/clamd.amavisd/clamd.sock
a
LocalSocket /var/spool/amavisd/clamd.sock
Guarde el archivo de configuración modificado y reinicie ClamAV:
systemctl restart [email protected]
Ahora tenemos que crear una unidad de sistema para el servicio freshclam. Cree un nuevo archivo /usr/lib/systemd/system/freshclam.service:
nano /usr/lib/systemd/system/freshclam.service
e ingrese el siguiente contenido en ese archivo:
[Unit]
Description = ClamAV Scanner
After = network.target

[Service]
Type = forking
# if you want to scan more than one in a day change the number 1 with your desired number in below line.
ExecStart = /usr/bin/freshclam -d -c 1
Restart = on-failure
PrivateTmp =true

[Install]
WantedBy=multi-user.target
Guarde el archivo y luego habilite e inicie el servicio.
systemctl enable freshclam.service
systemctl start freshclam.service
systemctl status freshclam.service
12 Instalando Apache con mod_php, mod_fcgi/PHP, PHP-FPM
ISPConfig 3 le permite usar mod_php, mod_fcgi/PHP, cgi/PHP y PHP-FPM por sitio web.
Podemos instalar Apache2 con mod_php, mod_fcgid y PHP de la siguiente manera:
dnf -y install php php-devel php-gd php-imap php-ldap php-mysql php-odbc php-pear php-xml php-xmlrpc php-pecl-apc php-mbstring php-mcrypt php-snmp php-soap php-tidy curl curl-devel perl-libwww-perl ImageMagick libxml2 libxml2-devel mod_fcgid php-cli httpd-devel php-fpm php-intl php-imagick php-pspell wget
A continuación, abrimos /etc/php.ini...
nano /etc/php.ini
... y cambie el informe de errores (para que los avisos ya no se muestren), establezca la zona horaria y descomente cgi.fix_pathinfo=1:
[...]
;error_reporting = E_ALL & ~E_DEPRECATED
error_reporting = E_ALL & ~E_NOTICE & ~E_DEPRECATED & ~E_STRICT
[...]
; cgi.fix_pathinfo provides *real* PATH_INFO/PATH_TRANSLATED support for CGI.  PHP's
; previous behaviour was to set PATH_TRANSLATED to SCRIPT_FILENAME, and to not grok
; what PATH_INFO is.  For more information on PAppp.tldTH_INFO, see the cgi specs.  Setting
; this to 1 will cause PHP CGI to fix its paths to conform to the spec.  A setting
; of zero causes PHP to behave as before.  Default is 1.  You should fix your scripts
; to use SCRIPT_FILENAME rather than PATH_TRANSLATED.
; http://www.php.net/manual/en/ini.core.php#ini.cgi.fix-pathinfo
cgi.fix_pathinfo=1
[...]
date.timezone = 'Europe/Berlin'
[...]
Habilite httpd y PHP-FPM para comenzar en el momento del arranque e inicie el servicio PHP-FPM.
systemctl start php-fpm.service
systemctl enable php-fpm.service
systemctl enable httpd.service
Finalmente, reiniciamos Apache:
systemctl restart httpd.service
Ahora agregaremos soporte para Let's encrypt. ISPConfig está usando acme.sh ahora como cliente de Let's Encrypt. Instale acme.sh usando el siguiente comando:
curl https://get.acme.sh | sh -s
13 Instalación de mod_python
El módulo de Apache mod_python no está disponible como paquete RPM, por lo tanto, lo compilaremos desde la fuente. El primer paso es instalar los archivos de desarrollo de python y descargar la versión actual de mod_python como archivo .tar.gz
dnf -y install python3-devel
cd /usr/local/src/
wget http://dist.modpython.org/dist/mod_python-3.5.0.tgz
tar xfz mod_python-3.5.0.tgz
cd mod_python-3.5.0
y luego configurar y compilar el módulo.
./configure --with-python=/usr/bin/python3
make
Hay un error en el módulo compilado que hará que la instalación falle con el error "version ="fatal:No es un repositorio de git (ni ninguno de los directorios principales):.git ". Para arreglar eso, ejecute este comando sed (¡el comando es una línea!).
sed -e 's/(git describe --always)/(git describe --always 2>\/dev\/null)/g' -e 's/`git describe --always`/`git describe --always 2>\/dev\/null`/g' -i $( find . -type f -name Makefile\* -o -name version.sh )
Luego instale el módulo con este comando.
make install
y habilite el módulo en Apache:
echo 'LoadModule python_module modules/mod_python.so' > /etc/httpd/conf.modules.d/10-python.conf
systemctl restart httpd.service
14 Instalar PureFTPd
PureFTPd se puede instalar con el siguiente comando:
dnf -y install pure-ftpd
Luego cree los enlaces de inicio del sistema e inicie PureFTPd:
systemctl enable pure-ftpd.service
systemctl start pure-ftpd.service
Ahora configuramos PureFTPd para permitir sesiones FTP y TLS. FTP es un protocolo muy inseguro porque todas las contraseñas y todos los datos se transfieren en texto claro. Mediante el uso de TLS, toda la comunicación se puede cifrar, lo que hace que el FTP sea mucho más seguro.
TLS necesita OpenSSL; para instalar OpenSSL, simplemente ejecutamos:
dnf install openssl
Abra /etc/pure-ftpd/pure-ftpd.conf...
nano /etc/pure-ftpd/pure-ftpd.conf
Si desea permitir sesiones FTP y TLS, establezca TLS en 1 eliminando el # delante de la línea TLS. Se recomienda encarecidamente habilitar TLS.
[...]
# This option can accept three values :
# 0 : disable SSL/TLS encryption layer (default).
# 1 : accept both traditional and encrypted sessions.
# 2 : refuse connections that don't use SSL/TLS security mechanisms,
#     including anonymous sessions.
# Do _not_ uncomment this blindly. Be sure that :
# 1) Your server has been compiled with SSL/TLS support (--with-tls),
# 2) A valid certificate is in place,
# 3) Only compatible clients will log in.

TLS                      1
[...]
Para usar TLS, debemos crear un certificado SSL. Lo creo en /etc/ssl/private/, por lo tanto, primero creo ese directorio:
mkdir -p /etc/ssl/private/
Posteriormente, podemos generar el certificado SSL de la siguiente manera:
openssl req -x509 -nodes -days 7300 -newkey rsa:2048 -keyout /etc/ssl/private/pure-ftpd.pem -out /etc/ssl/private/pure-ftpd.pem
Nombre del país (código de 2 letras) [XX]:<-- Ingrese el nombre de su país (por ejemplo, "DE").
Nombre del estado o provincia (nombre completo) []:<-- Ingrese el nombre de su estado o provincia .
Nombre de la localidad (p. ej., ciudad) [Ciudad predeterminada]:<-- Ingrese su ciudad.
Nombre de la organización (p. ej., empresa) [Empresa predeterminada Ltd]:<-- Ingrese el nombre de su organización (p. ej., , el nombre de su empresa).
Nombre de la unidad organizativa (p. ej., sección) []:<-- Ingrese el nombre de su unidad organizativa (p. ej., "Departamento de TI").
Nombre común (p. ej., su nombre o el nombre de host de su servidor) []:<-- Ingrese el nombre de dominio completo del sistema (por ejemplo, "server1.example.com").
Dirección de correo electrónico []:<-- Ingrese su dirección de correo electrónico.
Cambiar los permisos del certificado SSL:
chmod 600 /etc/ssl/private/pure-ftpd.pem
Cree un archivo DHParam:
openssl dhparam -out /etc/ssl/private/pure-ftpd-dhparams.pem 2048
Finalmente, reinicie PureFTPd:
systemctl restart pure-ftpd.service
Eso es todo. Ahora puede intentar conectarse usando su cliente FTP; sin embargo, debe configurar su cliente FTP para usar TLS.
15 Instalar BIND
Podemos instalar BIND de la siguiente manera:
dnf -y install bind bind-utils haveged
Haga una copia de seguridad del archivo /etc/named.conf existente y cree uno nuevo de la siguiente manera:
cp /etc/named.conf /etc/named.conf_bak
cat /dev/null > /etc/named.conf
nano /etc/named.conf
//
// named.conf
//
// Provided by Red Hat bind package to configure the ISC BIND named(8) DNS
// server as a caching only nameserver (as a localhost DNS resolver only).
//
// See /usr/share/doc/bind*/sample/ for example named configuration files.
//
options {
        listen-on port 53 { any; };
        listen-on-v6 port 53 { any; };
        directory       "/var/named";
        dump-file       "/var/named/data/cache_dump.db";
        statistics-file "/var/named/data/named_stats.txt";
        memstatistics-file "/var/named/data/named_mem_stats.txt";
        allow-query     { any; };
				allow-recursion {"none";};
        recursion no;
};
logging {
        channel default_debug {
                file "data/named.run";
                severity dynamic;
        };
};
zone "." IN {
        type hint;
        file "named.ca";
};
include "/etc/named.conf.local";
Cree el archivo /etc/named.conf.local que se incluye al final de /etc/named.conf (/etc/named.conf.local se llenará más tarde con ISPConfig si crea zonas DNS en ISPConfig):
touch /etc/named.conf.local
Luego creamos los enlaces de inicio y comenzamos BIND:
systemctl enable named.service
systemctl start named.service
systemctl enable haveged.service
systemctl start haveged.service
16 Instalar AWStats
AWStats se puede instalar de la siguiente manera:
dnf -y install awstats perl-DateTime-Format-HTTP perl-DateTime-Format-Builder
La aplicación alternativa de estadísticas web 'webalizer' ya no está disponible para CentOS 8, por lo que solo podrá usar AWStats.
17 Instalar Jailkit
Jailkit se usa para chrootear usuarios SSH y cronjobs. Se puede instalar de la siguiente manera:
ln -s /usr/bin/python2 /usr/bin/python
cd /tmp
wget http://olivier.sessink.nl/jailkit/jailkit-2.21.tar.gz
tar xvfz jailkit-2.21.tar.gz
cd jailkit-2.21
./configure
make
make install
cd ..
rm -rf jailkit-2.21*
18 Instalar Fail2Ban
Esto es opcional pero recomendado, porque el monitor ISPConfig intenta mostrar el registro.
dnf -y install iptables-services fail2ban fail2ban-systemd
systemctl stop firewalld.service
systemctl mask firewalld.service
systemctl disable firewalld.service
A continuación, creamos el archivo /etc/fail2ban/jail.local y habilitamos la supervisión para el servicio ssh, correo electrónico y ftp.
nano /etc/fail2ban/jail.local
Agregue el siguiente contenido al archivo jail.local:
[sshd]
enabled = true
action = iptables[name=sshd, port=ssh, protocol=tcp]

[pure-ftpd]
enabled = true
action = iptables[name=FTP, port=ftp, protocol=tcp]
maxretry = 3

[dovecot]
enabled = true
action = iptables-multiport[name=dovecot, port="pop3,pop3s,imap,imaps", protocol=tcp]
maxretry = 5

[postfix-sasl]
enabled = true
action = iptables-multiport[name=postfix-sasl, port="smtp,smtps,submission", protocol=tcp]
maxretry = 3
Luego cree los enlaces de inicio del sistema para fail2ban e inícielo:
systemctl enable fail2ban.service
systemctl start fail2ban.service
19 Instalar rkhunter
rkhunter se puede instalar de la siguiente manera:
dnf -y install rkhunter
20 Instalar Mailman
Si desea administrar listas de correo con Mailman en su servidor, instale mailman ahora. Mailman es compatible con ISPConfig, por lo que podrá crear nuevas listas de correo a través de ISPConfig más adelante.
dnf -y install mailman
Antes de que podamos iniciar Mailman, se debe crear una primera lista de correo llamada mailman:
touch /var/lib/mailman/data/aliases
postmap /var/lib/mailman/data/aliases
/usr/lib/mailman/bin/newlist mailman
ln -s /usr/lib/mailman/mail/mailman /usr/bin/mailman
[[email protected] tmp]# /usr/lib/mailman/bin/newlist mailman
Ingrese el correo electrónico de la persona que ejecuta la lista: <-- dirección de correo electrónico del administrador, por ej. [email protected]
Contraseña inicial del cartero: <-- contraseña de administrador para la lista de carteros
Para terminar de crear tu lista de correos, debes editar tu archivo /etc/aliases (o
equivalente) por agregando las siguientes líneas, y posiblemente ejecutando el programa
`newaliases':
## mailman mailing list
mailman: "|/usr/lib/mailman/mail/mailman post mailman"
mailman-admin: "|/usr/lib/mailman/mail/mailman admin mailman"
mailman-bounces: "|/usr/lib/mailman/mail/mailman bounces mailman"
mailman-confirm: "|/usr/lib/mailman/mail/mailman confirm mailman"
mailman-join: "|/usr/lib/mailman/mail/mailman join mailman"
mailman- dejar: "|/usr/lib/mailman/mail/mailman leave mailman"
mailman-propietario: "|/usr/lib/mailman/mail/mailman propietario mailman"
mailman-request: "| /usr/lib/mailman/mail/mailman request mailman"
mailman-subscribe: "|/usr/lib/mailman/mail/mailman subscribe mailman"
mailman-unsub escriba: "|/usr/lib/mailman/mail/mailman darse de baja de mailman"
Pulse enter para notificar al propietario de mailman... <-- ENTRAR
[[email protected ] tmp]#
Abra /etc/aliases luego...
nano /etc/aliases
... y agregue las siguientes líneas:
[...]
mailman:              "|/usr/lib/mailman/mail/mailman post mailman"
mailman-admin:        "|/usr/lib/mailman/mail/mailman admin mailman"
mailman-bounces:      "|/usr/lib/mailman/mail/mailman bounces mailman"
mailman-confirm:      "|/usr/lib/mailman/mail/mailman confirm mailman"
mailman-join:         "|/usr/lib/mailman/mail/mailman join mailman"
mailman-leave:        "|/usr/lib/mailman/mail/mailman leave mailman"
mailman-owner:        "|/usr/lib/mailman/mail/mailman owner mailman"
mailman-request:      "|/usr/lib/mailman/mail/mailman request mailman"
mailman-subscribe:    "|/usr/lib/mailman/mail/mailman subscribe mailman"
mailman-unsubscribe:  "|/usr/lib/mailman/mail/mailman unsubscribe mailman"
Ejecutar
newaliases
después y reinicie Postfix:
systemctl restart postfix.service
Ahora abra el archivo de configuración de Mailman Apache /etc/httpd/conf.d/mailman.conf...
nano /etc/httpd/conf.d/mailman.conf
... y agregue la línea ScriptAlias /cgi-bin/mailman/ /usr/lib/mailman/cgi-bin/. Comente Alias /pipermail/ /var/lib/mailman/archives/public/ y agregue la línea Alias /pipermail /var/lib/mailman/archives/public/:
#
#  httpd configuration settings for use with mailman.
#

ScriptAlias /mailman/ /usr/lib/mailman/cgi-bin/
ScriptAlias /cgi-bin/mailman/ /usr/lib/mailman/cgi-bin/
<Directory /usr/lib/mailman/cgi-bin/>
    AllowOverride None
    Options ExecCGI
    Order allow,deny
    Allow from all
</Directory>


#Alias /pipermail/ /var/lib/mailman/archives/public/
Alias /pipermail /var/lib/mailman/archives/public/
<Directory /var/lib/mailman/archives/public>
    Options Indexes MultiViews FollowSymLinks
    AllowOverride None
    Order allow,deny
    Allow from all
    AddDefaultCharset Off
</Directory>

# Uncomment the following line, to redirect queries to /mailman to the
# listinfo page (recommended).

# RedirectMatch ^/mailman[/]*$ /mailman/listinfo
Reiniciar Apache:
systemctl restart httpd.service
Cree los enlaces de inicio del sistema para Mailman e inícielo:
systemctl enable mailman.service
systemctl start mailman.service
Después de haber instalado ISPConfig 3, puede acceder a Mailman de la siguiente manera:
Puede usar el alias /cgi-bin/mailman para todos los vhosts de Apache (tenga en cuenta que suExec y CGI deben estar deshabilitados para todos los vhosts desde los que desea acceder a Mailman), lo que significa que puede acceder a la interfaz de administración de Mailman para obtener una lista en http://
En http://
21 Instalar el correo web de Roundcube
Para instalar el cliente de correo web RoundCube, descarga la última versión con wget en la carpeta /tmp:
cd /tmp
wget https://github.com/roundcube/roundcubemail/releases/download/1.4.3/roundcubemail-1.4.3-complete.tar.gz
Descomprima el archivo tar.gz y mueva la fuente de RoundCube a /usr/share/roundcubemail
tar xfz roundcubemail-1.4.3-complete.tar.gz
mkdir /usr/share/roundcubemail
mv /tmp/roundcubemail-1.4.3/* /usr/share/roundcubemail/
chown -R root:root /usr/share/roundcubemail
chown apache /usr/share/roundcubemail/temp
chown apache /usr/share/roundcubemail/logs
Cree un archivo de configuración roundcubemail.conf con el editor nano:
nano /etc/httpd/conf.d/roundcubemail.conf
Y agregue el siguiente contenido a ese archivo:
#
# Round Cube Webmail is a browser-based multilingual IMAP client
#

Alias /roundcubemail /usr/share/roundcubemail
Alias /webmail /usr/share/roundcubemail

# Define who can access the Webmail
# You can enlarge permissions once configured

<Directory /usr/share/roundcubemail/>
        Options none
        AllowOverride Limit
        Require all granted
</Directory>

# Define who can access the installer
# keep this secured once configured

<Directory /usr/share/roundcubemail/installer>
        Options none
        AllowOverride Limit
        Require all granted
</Directory>


# Those directories should not be viewed by Web clients.
<Directory /usr/share/roundcubemail/bin/>
    Order Allow,Deny
    Deny from all
</Directory>
<Directory /usr/share/roundcubemail/plugins/enigma/home/>
    Order Allow,Deny
    Deny from all
</Directory>
Reiniciar Apache:
systemctl restart httpd.service
Ahora necesitamos una base de datos para el correo de RoundCube, la inicializaremos de la siguiente manera:
mysql -u root -p
En el aviso de uso de MariaDB:
CREATE DATABASE roundcubedb;
CREATE USER [email protected] IDENTIFIED BY 'roundcubepassword';
GRANT ALL PRIVILEGES on roundcubedb.* to [email protected] ;
FLUSH PRIVILEGES;
exit
Estoy usando los detalles de la base de datos RoundCube como ejemplo, reemplace los valores según su elección por razones de seguridad.
Ahora instalaremos RoundCube en el navegador en http://192.168.0.100/roundcubemail/installer
Ahora crea el archivo config.inc.php:
nano /usr/share/roundcubemail/config/config.inc.php
<?php
/* Local configuration for Roundcube Webmail */
// ----------------------------------
// SQL DATABASE
// ----------------------------------
// Database connection string (DSN) for read+write operations
// Format (compatible with PEAR MDB2): db_provider://user:[email protected]/database
// Currently supported db_providers: mysql, pgsql, sqlite, mssql, sqlsrv, oracle
// For examples see http://pear.php.net/manual/en/package.database.mdb2.intro-dsn.php
// NOTE: for SQLite use absolute path (Linux): 'sqlite:////full/path/to/sqlite.db?mode=0646'
// or (Windows): 'sqlite:///C:/full/path/to/sqlite.db'
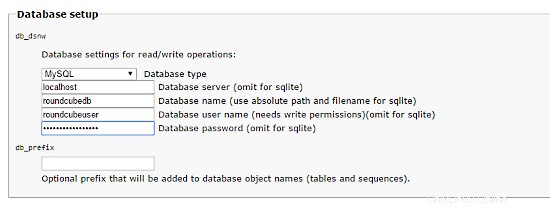
$config['db_dsnw'] = 'mysql://roundcubeuser:[email protected]/roundcubedb';
// ----------------------------------
// IMAP
// ----------------------------------
// The IMAP host chosen to perform the log-in.
// Leave blank to show a textbox at login, give a list of hosts
// to display a pulldown menu or set one host as string.
// To use SSL/TLS connection, enter hostname with prefix ssl:// or tls://
// Supported replacement variables:
// %n - hostname ($_SERVER['SERVER_NAME'])
// %t - hostname without the first part
// %d - domain (http hostname $_SERVER['HTTP_HOST'] without the first part)
// %s - domain name after the '@' from e-mail address provided at login screen
// For example %n = mail.domain.tld, %t = domain.tld
// WARNING: After hostname change update of mail_host column in users table is
// required to match old user data records with the new host.
$config['default_host'] = 'localhost';
$config['smtp_server'] = 'localhost';
$config['smtp_port'] = 25;
// provide an URL where a user can get support for this Roundcube installation
// PLEASE DO NOT LINK TO THE ROUNDCUBE.NET WEBSITE HERE!
$config['support_url'] = '';
// This key is used for encrypting purposes, like storing of imap password
// in the session. For historical reasons it's called DES_key, but it's used
// with any configured cipher_method (see below).
$config['des_key'] = 'pb0UucO0eqjgvhrqYlFTBVjE';
// ----------------------------------
// PLUGINS
// ----------------------------------
// List of active plugins (in plugins/ directory)
$config['plugins'] = array();
// Set the spell checking engine. Possible values:
// - 'googie' - the default (also used for connecting to Nox Spell Server, see 'spellcheck_uri' setting)
// - 'pspell' - requires the PHP Pspell module and aspell installed
// - 'enchant' - requires the PHP Enchant module
// - 'atd' - install your own After the Deadline server or check with the people at http://www.afterthedeadline.com before using their API
// Since Google shut down their public spell checking service, the default settings
// connect to http://spell.roundcube.net which is a hosted service provided by Roundcube.
// You can connect to any other googie-compliant service by setting 'spellcheck_uri' accordingly.
$config['spellcheck_engine'] = 'pspell';
$config['enable_installer'] = true;
Luego presione "continuar" en el instalador web. En la página siguiente, presione el botón "Inicializar base de datos".
Finally, disable the Roundecubemail installer. Change the RoundCube config.inc.php configuration file
nano /usr/share/roundcubemail/config/config.inc.php
y cambia la línea:
$config['enable_installer'] = true;
a:
$config['enable_installer'] = false;
Roundcube is available now under the aliases /webmail and /roundcubemail on your server:
http://192.168.0.100/webmail
The RoundCube login is the email address and password of an email account that you create later in ISPConfig.
22 Install ISPConfig 3.2
The ISPConfig installer will configure all services like Postfix, Dovecot, etc. for you.
You now also have the possibility to let the installer create an SSL vhost for the ISPConfig control panel so that ISPConfig can be accessed using https:// instead of http://. To achieve this, just press ENTER when you see this question:Do you want a secure (SSL) connection to the ISPConfig web interface (y,n) [y]:.
To install ISPConfig 3.2 nightly build, do this:
cd /tmp
wget -O ispconfig.tar.gz https://www.ispconfig.org/downloads/ISPConfig-3-stable.tar.gz
tar xfz ispconfig.tar.gz
cd ispconfig3*/install/
The next step is to run:
php -q install.php
Esto iniciará el instalador de ISPConfig 3. El instalador configurará todos los servicios como Postfix, Dovecot, etc. por usted.
[[email protected] install]# php install.php
--------------------------------------------------------------------------------
_____ ___________ _____ __ _ ____
|_ _/ ___| ___ \ / __ \ / _(_) /__ \
| | \ `--.| |_/ / | / \/ ___ _ __ | |_ _ __ _ _/ /
| | `--. \ __/ | | / _ \| '_ \| _| |/ _` | |_ |
_| |_/\__/ / | | \__/\ (_) | | | | | | | (_| | ___\ \
\___/\____/\_| \____/\___/|_| |_|_| |_|\__, | \____/
__/ |
|___/
--------------------------------------------------------------------------------
>> Initial configuration
Operating System: CentOS 8.2
Following will be a few questions for primary configuration so be careful.
Default values are in [brackets] and can be accepted with <ENTER>.
Tap in "quit" (without the quotes) to stop the installer.
Select language (en,de) [en]: <-- Hit Enter
Installation mode (standard,expert) [standard]: <-- Hit Enter
Full qualified hostname (FQDN) of the server, eg server1.domain.tld [server1.example.com]: <-- Hit Enter
MySQL server hostname [localhost]: <-- Hit Enter
MySQL server port [3306]: <-- Hit Enter
MySQL root username [root]: <-- Hit Enter
MySQL root password []: <-- Ente the MySQL root password here
MySQL database to create [dbispconfig]: <-- Hit Enter
MySQL charset [utf8]: <-- Hit Enter
Configuring Postgrey
Configuring Postfix
Generating a 4096 bit RSA private key
................................++
.....................................................................................................................................................................................................................................................................................................................................................++
writing new private key to 'smtpd.key'
-----
You are about to be asked to enter information that will be incorporated
into your certificate request.
What you are about to enter is what is called a Distinguished Name or a DN.
There are quite a few fields but you can leave some blank
For some fields there will be a default value,
If you enter '.', the field will be left blank.
-----
Country Name (2 letter code) [XX]: <-- Enter 2 Letter country code, e.g. US
State or Province Name (full name) []: <-- Enter anme of State or Province
Locality Name (eg, city) [Default City]: <-- Name of city
Organization Name (eg, company) [Default Company Ltd]: <-- Company name
Organizational Unit Name (eg, section) []: <-- Hit Enter
Common Name (eg, your name or your server's hostname) []: <-- Enter server hostname here, in my case: server1.example.com
Email Address []: <-- Enter Email address
Configuring mailman
Configuring Dovecot
Configuring Spamassassin
Configuring Amavisd
Configuring Getmail
Configuring Jailkit
Configuring Pureftpd
Configuring BIND
Configuring Apache
Configuring vlogger
[INFO] service OpenVZ not detected
Configuring Bastille Firewall
[INFO] service Metronome XMPP Server not detected
Configuring Fail2ban
Configuring Apps vhost
Installing ISPConfig
ISPConfig Port [8080]: <-- Hit Enter
Admin password [fad579a6]: <-- Enter new password for ISPConfig admin user
Re-enter admin password []: <-- Repeat the password
Do you want a secure (SSL) connection to the ISPConfig web interface (y,n) [y]: <-- Hit Enter
Generating RSA private key, 4096 bit long modulus
.................................................................................++
.....++
e is 65537 (0x10001)
You are about to be asked to enter information that will be incorporated
into your certificate request.
What you are about to enter is what is called a Distinguished Name or a DN.
There are quite a few fields but you can leave some blank
For some fields there will be a default value,
If you enter '.', the field will be left blank.
-----
Country Name (2 letter code) [XX]: <-- Enter 2 Letter country code, e.g. US
State or Province Name (full name) []: <-- Enter anme of State or Province
Locality Name (eg, city) [Default City]: <-- Name of city
Organization Name (eg, company) [Default Company Ltd]: <-- Company name
Organizational Unit Name (eg, section) []: <-- Hit Enter
Common Name (eg, your name or your server's hostname) []: <-- Enter server hostname here, in my case: server1.example.com
Email Address []: <-- Enter Email address
Please enter the following 'extra' attributes
to be sent with your certificate request
A challenge password []: <-- Hit Enter
An optional company name []: <-- Hit Enter
writing RSA key
Configuring DBServer
Installing ISPConfig crontab
Installing ISPConfig crontab
no crontab for root
no crontab for getmail
Detect IP addresses
Restarting services ...
Installation completed.
El instalador configura automáticamente todos los servicios subyacentes, por lo que no es necesaria una configuración manual.
23 First ISPConfig Login
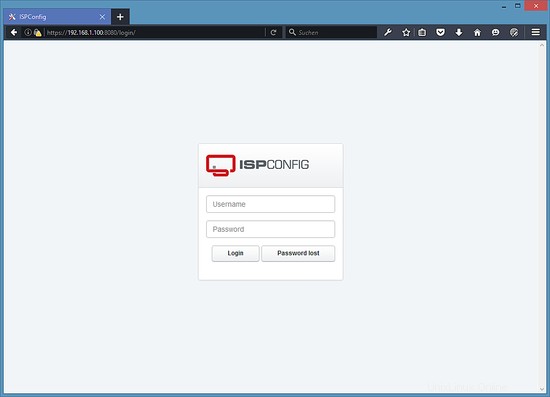
Afterwards you can access ISPConfig 3 under http(s)://server1.example.com:8080/ or http(s)://192.168.0.100:8080/ (http or https depends on what you chose during installation).
Inicie sesión con el nombre de usuario admin y la contraseña admin (debe cambiar la contraseña predeterminada después de su primer inicio de sesión):
23.1 The ISPConfig 3 Manual
In order to learn how to use ISPConfig 3, I strongly recommend downloading the ISPConfig 3 Manual.
On more than 300 pages, it covers the concept behind ISPConfig (admin, resellers, clients), explains how to install and update ISPConfig 3, includes a reference for all forms and form fields in ISPConfig together with examples of valid inputs, and provides tutorials for the most common tasks in ISPConfig 3. It also lines out how to make your server more secure and comes with a troubleshooting section at the end.
24 Download as a virtual machine
Esta configuración está disponible como descarga de máquina virtual en formato ova/ovf (compatible con VMWare y Virtualbox) para forjar suscriptores.
Información de inicio de sesión para la máquina virtual
- La contraseña de root es:howtoforge
- The password of the ISPConfig "admin" user is: howtoforge
- There is another shell user with the name "howtoforge" and password:howtoforge
Cambie ambas contraseñas en el primer inicio de sesión.
- The IP address of the VM is 192.168.0.100
25 Links
- CentOS:http://www.centos.org/
- ISPConfig:http://www.ispconfig.org/