LAMP es la abreviatura de L entrada, A pache, M ySQL, P HP. Este tutorial muestra cómo puede instalar un servidor web Apache2 en un servidor CentOS 6.4 compatible con PHP5 (mod_php) y MySQL.
¡No emito ninguna garantía de que esto funcione para usted!
1 nota preliminar
En este tutorial, utilizo el nombre de host server1.example.com con la dirección IP 192.168.0.100. Estas configuraciones pueden diferir para usted, por lo que debe reemplazarlas cuando corresponda.
2 Instalación de MySQL 5
Para instalar MySQL, hacemos esto:
yum -y install mysql mysql-server
Luego creamos los enlaces de inicio del sistema para MySQL (para que MySQL se inicie automáticamente cada vez que se inicia el sistema) e iniciamos el servidor MySQL:
chkconfig --levels 235 mysqld on
/etc/init.d/mysqld start
Establecer contraseñas para la cuenta raíz de MySQL:
mysql_secure_installation
[[email protected] ~]# mysql_secure_installation
NOTE: RUNNING ALL PARTS OF THIS SCRIPT IS RECOMMENDED FOR ALL MySQL
SERVERS IN PRODUCTION USE! PLEASE READ EACH STEP CAREFULLY!
In order to log into MySQL to secure it, we'll need the current
password for the root user. If you've just installed MySQL, and
you haven't set the root password yet, the password will be blank,
so you should just press enter here.
Enter current password for root (enter for none):
OK, successfully used password, moving on...
Setting the root password ensures that nobody can log into the MySQL
root user without the proper authorisation.
Set root password? [Y/n] <-- ENTER
New password: <-- yourrootsqlpassword
Re-enter new password: <-- yourrootsqlpassword
Password updated successfully!
Reloading privilege tables..
... Success!
By default, a MySQL installation has an anonymous user, allowing anyone
to log into MySQL without having to have a user account created for
them. This is intended only for testing, and to make the installation
go a bit smoother. You should remove them before moving into a
production environment.
Remove anonymous users? [Y/n] <-- ENTER
... Success!
Normally, root should only be allowed to connect from 'localhost'. This
ensures that someone cannot guess at the root password from the network.
Disallow root login remotely? [Y/n] <-- ENTER
... Success!
By default, MySQL comes with a database named 'test' that anyone can
access. This is also intended only for testing, and should be removed
before moving into a production environment.
Remove test database and access to it? [Y/n] <-- ENTER
- Dropping test database...
... Success!
- Removing privileges on test database...
... Success!
Reloading the privilege tables will ensure that all changes made so far
will take effect immediately.
Reload privilege tables now? [Y/n] <-- ENTER
... Success!
Cleaning up...
All done! If you've completed all of the above steps, your MySQL
installation should now be secure.
Thanks for using MySQL!
3 Instalación de Apache2
Apache2 está disponible como un paquete de CentOS, por lo que podemos instalarlo así:
yum -y install httpd
Ahora configure su sistema para iniciar Apache en el momento del arranque...
chkconfig --levels 235 httpd on
... e inicie Apache:
/etc/init.d/httpd start
Ahora dirija su navegador a http://192.168.0.100, y debería ver la página de marcador de posición de Apache2:
La raíz de documentos predeterminada de Apache es /var/www/html en CentOS, y el archivo de configuración es /etc/httpd/conf/httpd.conf. Las configuraciones adicionales se almacenan en el directorio /etc/httpd/conf.d/.
4 Instalación de PHP5
Podemos instalar PHP5 y el módulo Apache PHP5 de la siguiente manera:
yum -y install php
Debemos reiniciar Apache después:
/etc/init.d/httpd restart
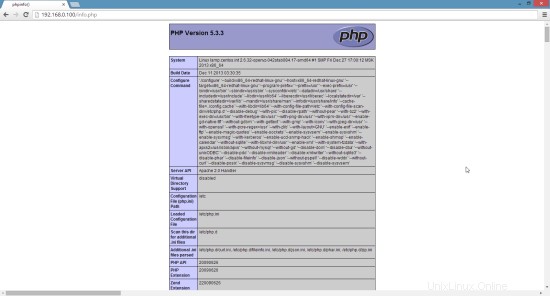
5 Probar PHP5 / Obtener detalles sobre su instalación de PHP5
La raíz del documento del sitio web predeterminado es /var/www/html. Ahora crearemos un pequeño archivo PHP (info.php) en ese directorio y lo llamaremos en un navegador. El archivo mostrará muchos detalles útiles sobre nuestra instalación de PHP, como la versión de PHP instalada.
vi /var/www/html/info.php
<?php phpinfo(); ?> |
# # Web application to manage MySQL # #<Directory "/usr/share/phpmyadmin"> # Order Deny,Allow # Deny from all # Allow from 127.0.0.1 #</Directory> Alias /phpmyadmin /usr/share/phpmyadmin Alias /phpMyAdmin /usr/share/phpmyadmin Alias /mysqladmin /usr/share/phpmyadmin |
[...] /* Authentication type */ $cfg['Servers'][$i]['auth_type'] = 'http'; [...] |
