Introducción
Subversión es un sistema de control de versiones de código abierto. Fundado en 2000 por CollabNet, Inc., el proyecto y el software Subversion han tenido un éxito increíble durante la última década. Subversion ha disfrutado y sigue disfrutando de una amplia adopción tanto en el campo del código abierto como en el mundo empresarial.
USVN fácil de usar es una interfaz web escrita en PHP utilizada para configurar repositorios de Subversion. Su objetivo es facilitar la creación de nuevos proyectos sin tener que usar la interfaz de línea de comandos, por lo tanto, quizás sin acceso privilegiado al servidor. USVN luego generará la lista de usuarios autorizados a acceder a su código fuente. Esto habilita la delegación de derechos para administrar repositorios de Subversion.
Instalar Apache Subversion (SVN)
USVN requería un servidor web para la implementación. Entonces instalaremos Apache HTTP Server.
# yum install -y httpdIniciar y habilitar httpd servicio.
# systemctl start httpd
# systemctl enable httpd
Desactivar página de bienvenida del servidor Apache HTTP.
# mv /etc/httpd/conf.d/welcome.conf /etc/httpd/conf.d/welcome.conf.orgDeshabilitar índices de directorio en las configuraciones del servidor Apache HTTP, luego reinicie el servicio httpd con los siguientes comandos:
# cp /etc/httpd/conf/httpd.conf /etc/httpd/conf/httpd.conf.org
# sed -i "s/Options Indexes FollowSymLinks/Options FollowSymLinks/" /etc/httpd/conf/httpd.conf
# systemctl restart httpd
Luego, debe permitir el servicio http a través del servicio firewalld con los comandos:
# firewall-cmd --permanent --add-service=http
# firewall-cmd --reload
Además, USVN requiere que una base de datos MySQL sea una base de datos de back-end. Entonces, instalaremos mariadb base de datos y php .
# yum install php mariadb-server php-mysql -yIniciar y habilitar mariadb servicio.
# systemctl start mariadb
# systemctl enable mariadb
Configure el servidor mariadb con el comando:
[root@unixcop ~]# mysql_secure_installation

NOTE: RUNNING ALL PARTS OF THIS SCRIPT IS RECOMMENDED FOR ALL MariaDB
      SERVERS IN PRODUCTION USE!  PLEASE READ EACH STEP CAREFULLY!

In order to log into MariaDB to secure it, we'll need the current
password for the root user.  If you've just installed MariaDB, and
you haven't set the root password yet, the password will be blank,
so you should just press enter here.

Enter current password for root (enter for none):
OK, successfully used password, moving on...

Setting the root password ensures that nobody can log into the MariaDB
root user without the proper authorisation.

Set root password? [Y/n] Y
New password:
Re-enter new password:
Password updated successfully!
Reloading privilege tables..
 ... Success!


By default, a MariaDB installation has an anonymous user, allowing anyone
to log into MariaDB without having to have a user account created for
them.  This is intended only for testing, and to make the installation
go a bit smoother.  You should remove them before moving into a
production environment.

Remove anonymous users? [Y/n] Y
 ... Success!

Normally, root should only be allowed to connect from 'localhost'.  This
ensures that someone cannot guess at the root password from the network.

Disallow root login remotely? [Y/n] Y
 ... Success!

By default, MariaDB comes with a database named 'test' that anyone can
access.  This is also intended only for testing, and should be removed
before moving into a production environment.

Remove test database and access to it? [Y/n] Y
 - Dropping test database...
 ... Success!
 - Removing privileges on test database...
 ... Success!

Reloading the privilege tables will ensure that all changes made so far
will take effect immediately.

Reload privilege tables now? [Y/n] Y
 ... Success!

Cleaning up...

All done!  If you've completed all of the above steps, your MariaDB
installation should now be secure.

Thanks for using MariaDB!
[root@unixcop ~]#
También edite la zona horaria en la configuración de php:
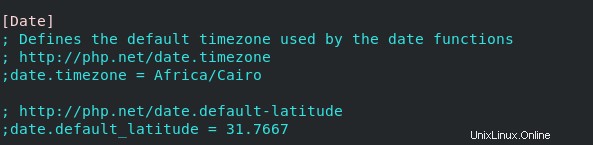
# vim /etc/php.iniY agregue la zona horaria a esta línea
date.timezone = Así
date.timezone = Africa/Cairo
Instalar Apache Subversion y módulo de servidor Apache HTTP
Puede descargarlos con este comando a continuación:
# yum install -y subversion mod_dav_svnInstalar SVN fácil de usar (USVN)
Descargue y extraiga USVN en el servidor Apache HTTP. Simplemente siga los comandos en los pasos a continuación:
# cd /var/www/html[root@unixcop html]# wget https://github.com/usvn/usvn/archive/1.0.7.tar.gz
--2021-08-24 07:28:42-- https://github.com/usvn/usvn/archive/1.0.7.tar.gz
Resolving github.com (github.com)... 192.30.255.113
Connecting to github.com (github.com)|192.30.255.113|:443... connected.
HTTP request sent, awaiting response... 302 Found
Location: https://codeload.github.com/usvn/usvn/tar.gz/1.0.7 [following]
--2021-08-24 07:28:42-- https://codeload.github.com/usvn/usvn/tar.gz/1.0.7
Resolving codeload.github.com (codeload.github.com)... 192.30.255.120
Connecting to codeload.github.com (codeload.github.com)|192.30.255.120|:443... connected.
HTTP request sent, awaiting response... 200 OK
Length: unspecified [application/x-gzip]
Saving to: ‘1.0.7.tar.gz’
[ <=> ] 4,577,871 5.77MB/s in 0.8s
2021-08-24 07:28:43 (5.77 MB/s) - ‘1.0.7.tar.gz’ saved [4577871]
[root@unixcop html]#Extraiga el archivo tar descargado:
[root@unixcop html]# tar xvf 1.0.7.tar.gz Cambie el nombre del archivo extraído a usvn:
[root@unixcop html]# mv usvn-1.0.7 usvnLuego vaya al directorio usvn y cree un directorio de archivos configurando algunos permisos de carpeta requeridos con los siguientes comandos:
[root@unixcop html]# cd usvn
[root@unixcop usvn]# mkdir files
[root@unixcop usvn]# chmod -R g+w {public,files,config}
[root@unixcop usvn]# chgrp -R apache /var/www/html/usvn
[root@unixcop usvn]# restorecon -R /var/www/html/usvn
Finalmente, configure la aplicación USVN en el servidor Apache.
[root@unixcop usvn]# vim /etc/httpd/conf.d/usvn.conf Luego agrega lo siguiente:
<Directory /var/www/html/usvn/>
AllowOverride All
Require all granted
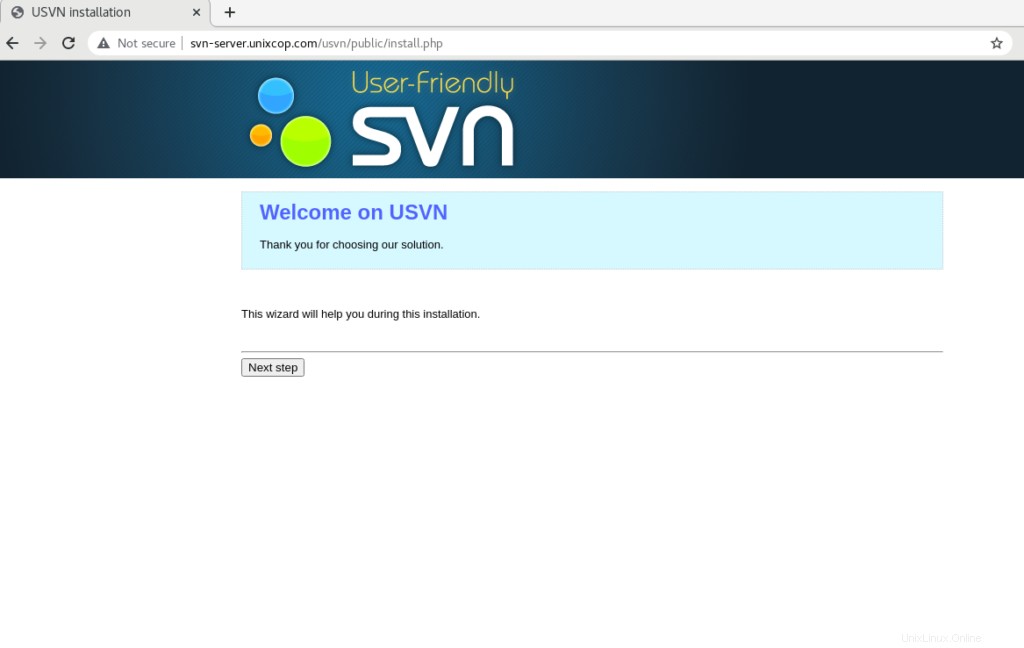
</Directory>En el navegador, abra http://ip_address/usvn/public/install.php para iniciar la instalación.
O abre http://svn-server.unixcop.com/usvn/public/install.php e inicie la instalación de USVN.
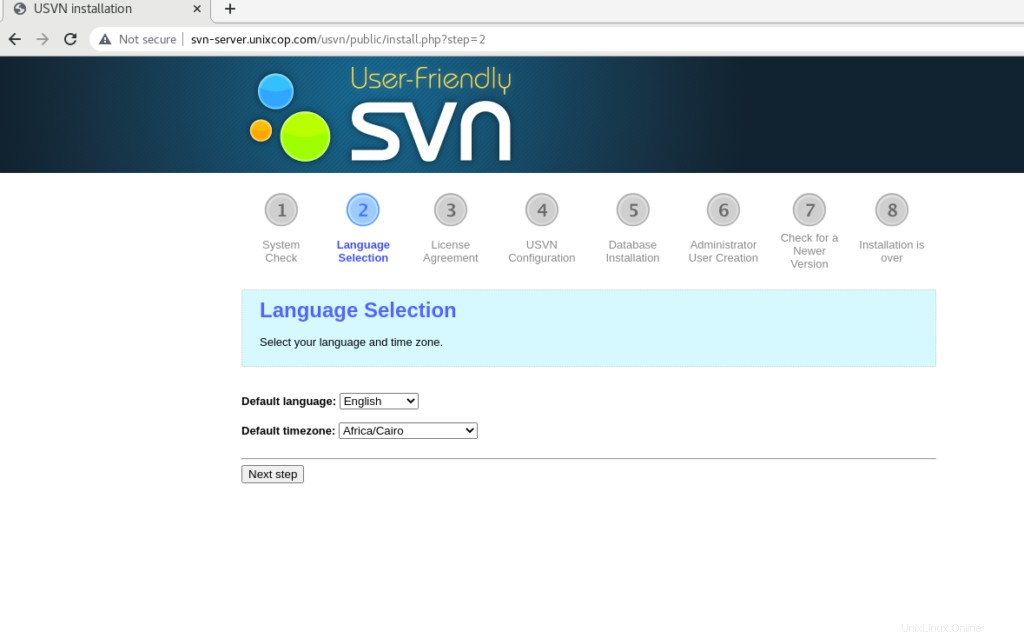
Seleccione su idioma y zona horaria.
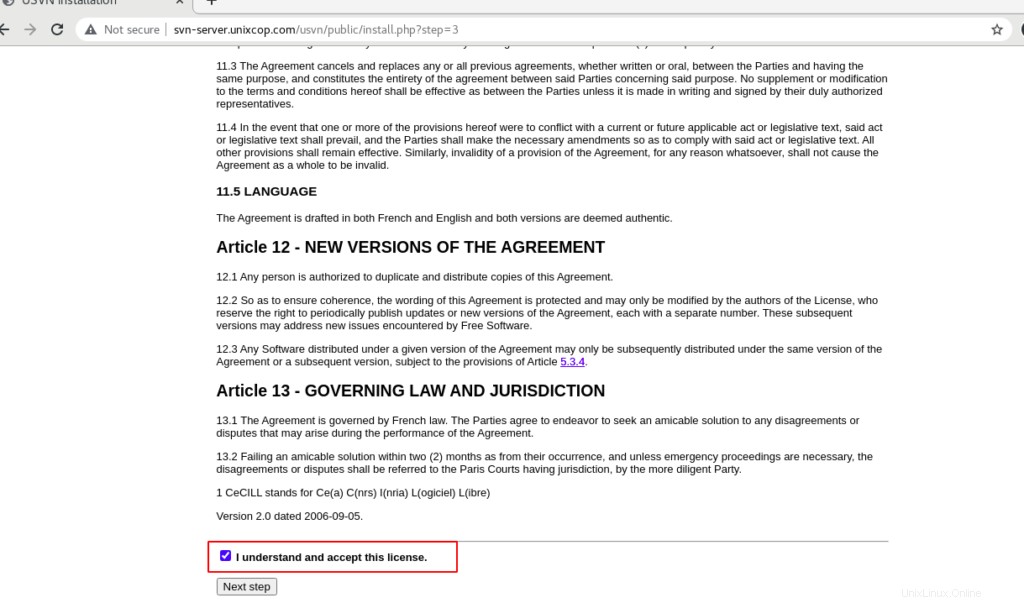
Marque Entiendo y acepto esta licencia luego haga clic en Siguiente paso .
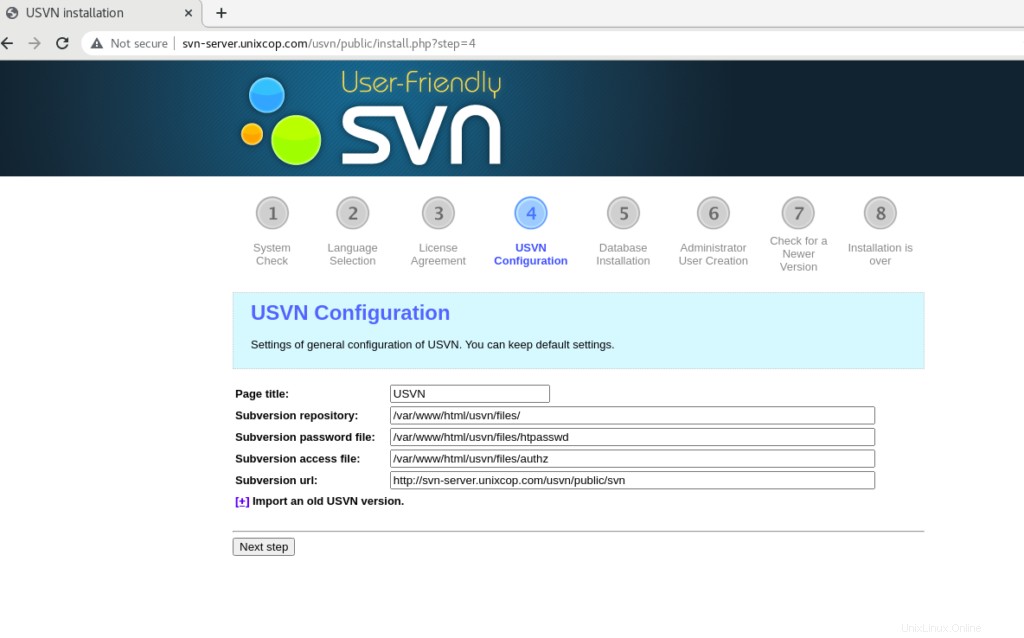
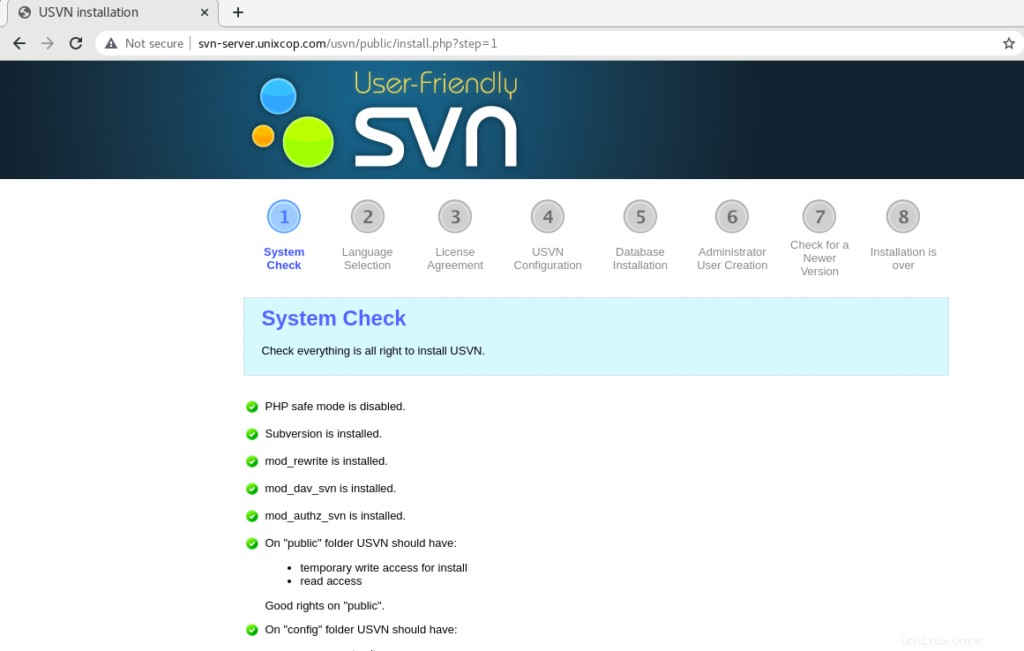
Haga clic en Siguiente paso .
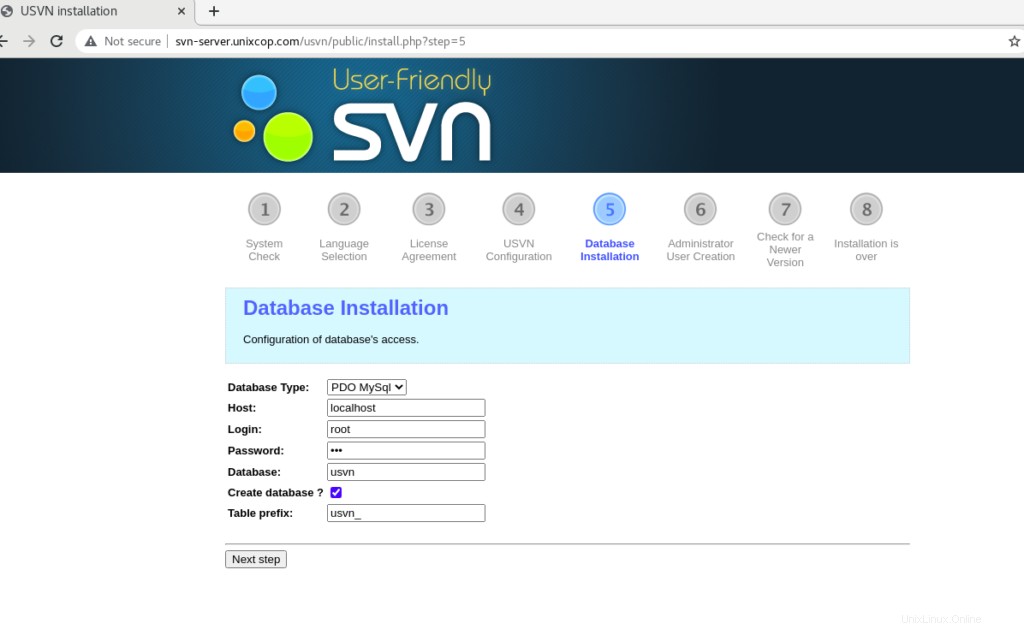
Proporcione la contraseña de la base de datos y marque ¿Crear base de datos? luego haga clic en siguiente .
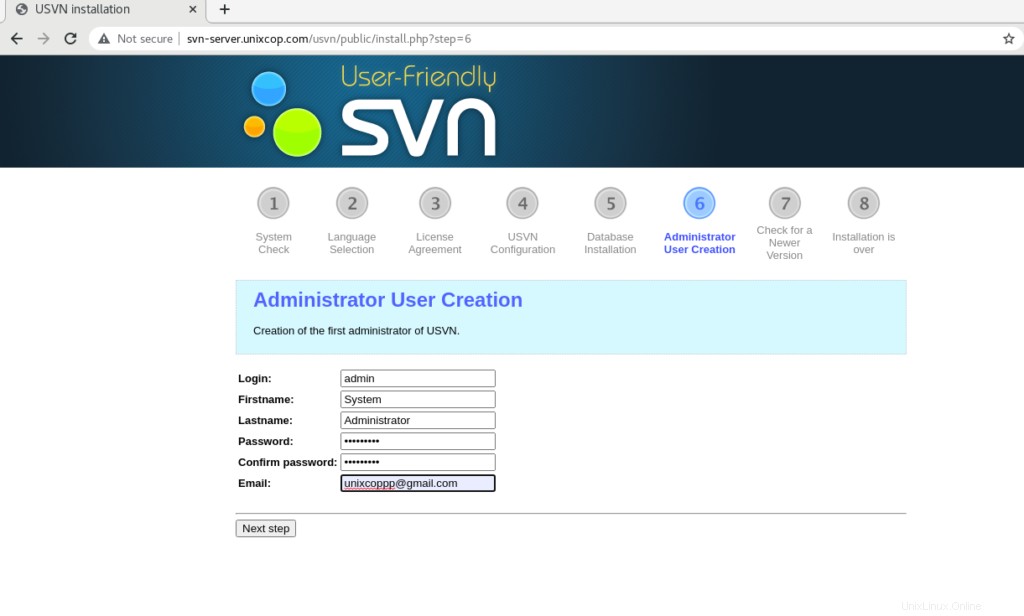
Cree un administrador de USVN y luego haga clic en Siguiente paso.
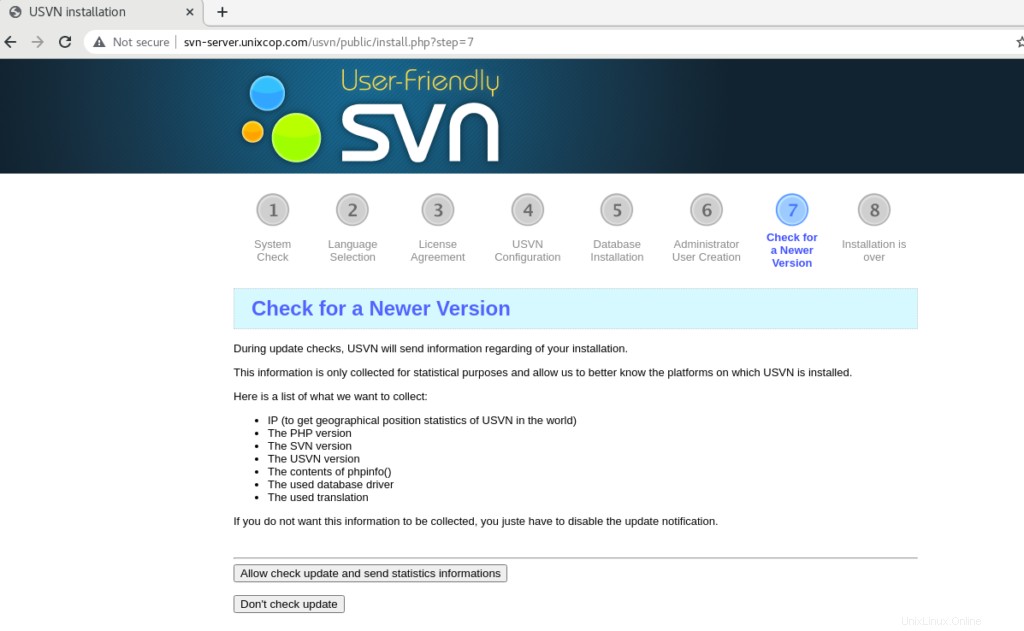
Desactive las comprobaciones automáticas para versiones actualizadas de USVN o Permitirlo.
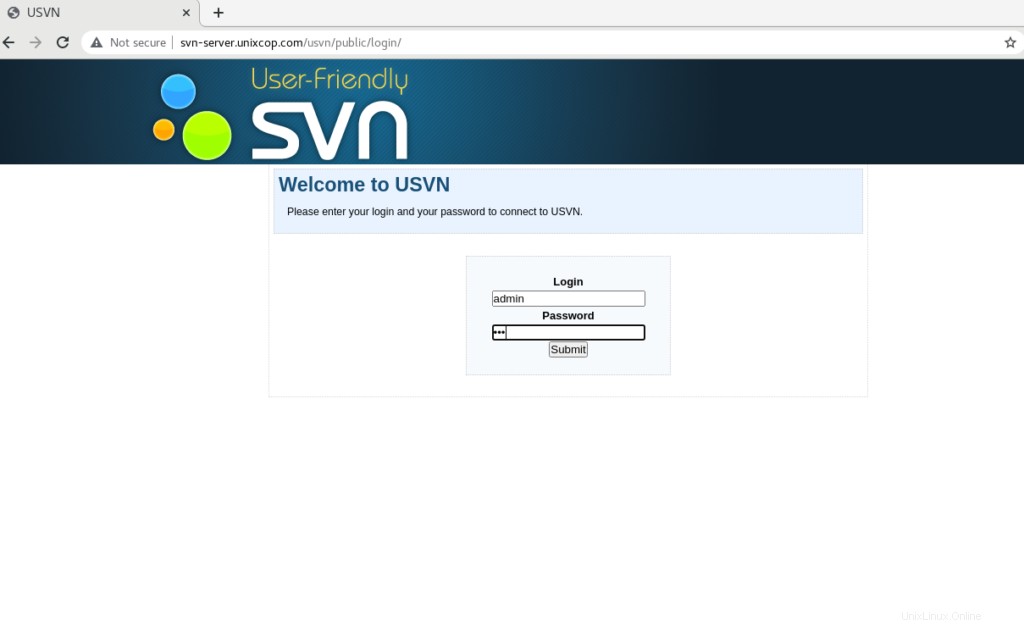
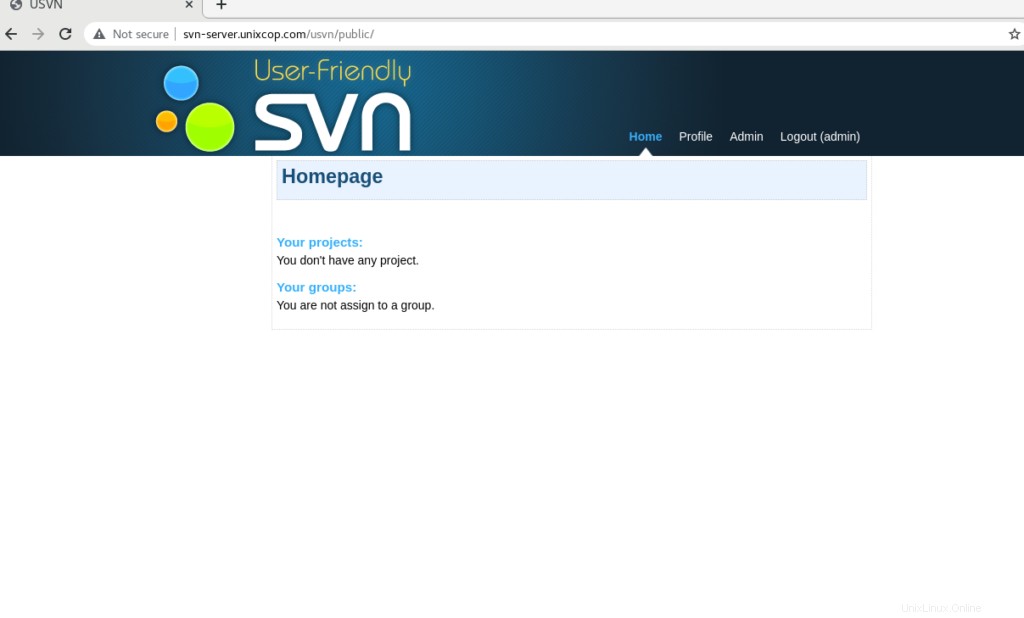
Será redirigido a la página de inicio de sesión con el usuario administrador. Por lo tanto, ingrese el nombre de usuario (admin) y la contraseña correcta que acaba de crear.
Conclusión
Así que hemos instalado con éxito la aplicación (USVN) y Apache Subversion (SVN).
Este tutorial para aprender a instalar Subversion y USVN (Apache SVN) en CentOS 8.