Recientemente, mientras experimentaba con GTK y sus enlaces de Ruby, decidí escribir un tutorial para presentar esta funcionalidad. En esta publicación, crearemos una aplicación ToDo simple (algo así como lo que creamos con Ruby on Rails) usando gtk3 gema (también conocido como enlaces GTK+ Ruby).
Puede encontrar el código del tutorial en GitHub.
¿Qué es GTK+?
Según el sitio web de GTK+:
GTK+, o GIMP Toolkit, es un conjunto de herramientas multiplataforma para crear interfaces gráficas de usuario. Al ofrecer un conjunto completo de widgets, GTK+ es adecuado para proyectos que van desde pequeñas herramientas únicas hasta conjuntos completos de aplicaciones.
El sitio también explica por qué se creó GTK+:
GTK+ fue inicialmente desarrollado y utilizado por GIMP, el programa de manipulación de imágenes de GNU. Se llama "The GIMP ToolKit" para recordar los orígenes del proyecto. En la actualidad, se conoce más comúnmente como GTK+ para abreviar y lo utilizan una gran cantidad de aplicaciones, incluido el escritorio GNOME del proyecto GNU.
Requisitos
GTK+:
Contenido relacionado
Asegúrate de tener GTK+ instalado. Desarrollé la aplicación del tutorial en Ubuntu 16.04, que tiene GTK+ (versión 3.18) instalado por defecto.
Puede verificar su versión con el siguiente comando: dpkg -l libgtk-3-0 .
Rubí:
Debe tener Ruby instalado en su sistema. Uso RVM para administrar varias versiones de Ruby instaladas en mi sistema. Si también desea hacer eso, puede encontrar instrucciones de instalación de RVM en su página de inicio e instrucciones para instalar versiones de Ruby (también conocido como Rubies) en la página de documentación relacionada.
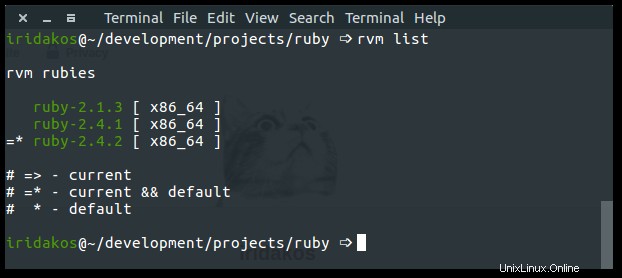
Este tutorial utiliza Ruby 2.4.2. Puede verificar su versión usando ruby --version o vía RVM con rvm list .
claro:
Según el sitio web de Glade, "Glade es una herramienta RAD que permite el desarrollo rápido y fácil de interfaces de usuario para el kit de herramientas GTK+ y el entorno de escritorio GNOME".
Usaremos Glade para diseñar la interfaz de usuario de nuestra aplicación. Si está en Ubuntu, instale glade con sudo apt install glade .
Gema GTK3:
Esta gema proporciona los enlaces Ruby para el kit de herramientas GTK+. En otras palabras, nos permite hablar con la API GTK+ usando el lenguaje Ruby.
Instale la gema con gem install gtk3 .
Definiendo las especificaciones de la aplicación
La aplicación que construiremos en este tutorial:
- Tener una interfaz de usuario (es decir, una aplicación de escritorio)
- Permitir a los usuarios establecer varias propiedades para cada elemento (p. ej., prioridad)
- Permitir a los usuarios crear y editar tareas pendientes
- Todos los elementos se guardarán como archivos en el directorio de inicio del usuario en una carpeta llamada
.gtk-todo-tutorial
- Todos los elementos se guardarán como archivos en el directorio de inicio del usuario en una carpeta llamada
- Permitir a los usuarios archivar tareas pendientes
- Los elementos archivados deben colocarse en su propia carpeta llamada
archived
- Los elementos archivados deben colocarse en su propia carpeta llamada
Estructura de la aplicación
gtk-todo-tutorial # root directory

  |-- application

    |-- ui # everything related to the ui of the application

    |-- models # our models

    |-- lib # the directory to host any utilities we might need

  |-- resources # directory to host the resources of our application

  gtk-todo # the executable that will start our application
Construyendo la aplicación ToDo
Iniciando la aplicación
Cree un directorio para guardar todos los archivos que necesitará la aplicación. Como puede ver en la estructura anterior, llamé a la mía gtk-todo-tutorial .
Crea un archivo llamado gtk-todo (así es, sin extensión) y agrega lo siguiente:
#!/usr/bin/env ruby
require 'gtk3'
app = Gtk::Application.new 'com.iridakos.gtk-todo', :flags_none
app.signal_connect :activate do |application|
window = Gtk::ApplicationWindow.new(application)
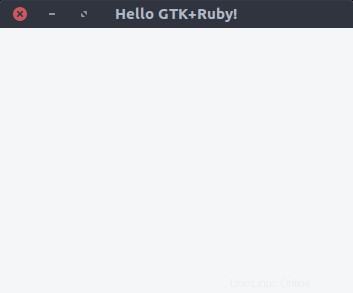
window.set_title 'Hello GTK+Ruby!'
window.present
end
puts app.run
Este será el script que inicia la aplicación.
Tenga en cuenta el shebang (#! ) en la primera línea. Así es como definimos qué intérprete ejecutará el script bajo los sistemas operativos Unix/Linux. De esta manera, no tenemos que usar ruby gtk-todo; podemos simplemente usar el nombre del script:gtk-todo .
Sin embargo, no lo intente todavía, porque no hemos cambiado el modo del archivo para que sea ejecutable. Para hacerlo, escriba el siguiente comando en una terminal después de navegar al directorio raíz de la aplicación:
chmod +x ./gtk-todo # make the script executable Desde la consola, ejecute:
./gtk-todo # execute the script
Notas:
- El objeto de la aplicación que definimos anteriormente (y todos los widgets de GTK+ en general) emiten señales para desencadenar eventos. Una vez que una aplicación comienza a ejecutarse, por ejemplo, emite una señal para activar
activarevento. Todo lo que tenemos que hacer es definir qué queremos que suceda cuando se emita esta señal. Logramos esto usandosignal_connectmétodo de instancia y pasándole un bloque cuyo código se ejecutará en el evento dado. Haremos esto mucho a lo largo del tutorial. - Cuando inicializamos la
Gtk::Applicationobjeto, pasamos dos parámetros:com.iridakos.gtk-todo:Este es el ID de nuestra aplicación y, en general, debe ser un identificador de estilo DNS inverso. Puede obtener más información sobre su uso y mejores prácticas en la wiki de GNOME.:flags_none:Esta bandera define el comportamiento de la aplicación. Utilizamos el comportamiento predeterminado. Consulte todas las banderas y los tipos de aplicaciones que definen. Podemos usar las banderas equivalentes a Ruby, como se define enGio::ApplicationFlags.constants. Por ejemplo, en lugar de usar:flags_none, podríamos usarGio::ApplicationFlags::FLAGS_NONE.
Supongamos que el objeto de la aplicación que creamos previamente (Gtk::Application ) tenía muchas cosas que hacer cuando activate se emitió señal o que queríamos conectarnos a más señales. Terminaríamos creando un enorme gtk-todo archivo de script, lo que dificulta su lectura/mantenimiento. Es hora de refactorizar.
Como se describe en la estructura de la aplicación anterior, crearemos una carpeta llamada aplicación y subcarpetas ui , modelos y lib .
- En la
uicarpeta, colocaremos todos los archivos relacionados con nuestra interfaz de usuario. - En los
modeloscarpeta, colocaremos todos los archivos relacionados con nuestros modelos. - En la
libcarpeta, colocaremos todos los archivos que no pertenezcan a ninguna de esas categorías.
Definiremos una nueva subclase de la Gtk::Application clase para nuestra aplicación. Crearemos un archivo llamado application.rb en aplicación/ui/todo con los siguientes contenidos:
module ToDo

  class Application < Gtk::Application

    def initialize

      super 'com.iridakos.gtk-todo', Gio::ApplicationFlags::FLAGS_NONE


      signal_connect :activate do |application|

        window = Gtk::ApplicationWindow.new(application)

        window.set_title 'Hello GTK+Ruby!'

        window.present

      end

    end

  end

end
Cambiaremos el gtk-todo guión en consecuencia:
#!/usr/bin/env ruby


require 'gtk3'


app = ToDo::Application.new


puts app.run
Mucho más limpio, ¿no? Sí, pero no funciona. Obtenemos algo como:
./gtk-todo:5:in `<main>': uninitialized constant ToDo (NameError)
El problema es que no hemos requerido ninguno de los archivos de Ruby colocados en la aplicación carpeta. Necesitamos cambiar el archivo de script de la siguiente manera y ejecutarlo nuevamente.
#!/usr/bin/env ruby


require 'gtk3'


# Require all ruby files in the application folder recursively

application_root_path = File.expand_path(__dir__)

Dir[File.join(application_root_path, '**', '*.rb')].each { |file| require file }


app = ToDo::Application.new


puts app.run
Ahora debería estar bien.
Recursos
Al comienzo de este tutorial, dijimos que usaríamos Glade para diseñar la interfaz de usuario de la aplicación. Glade produce xml archivos con los elementos y atributos apropiados que reflejan lo que diseñamos a través de su interfaz de usuario. Necesitamos usar esos archivos para nuestra aplicación para obtener la interfaz de usuario que diseñamos.
Estos archivos son recursos para la aplicación y el GResource La API proporciona una forma de empaquetarlos todos juntos en un archivo binario al que luego se puede acceder desde dentro de la aplicación con ventajas, en lugar de tener que lidiar manualmente con los recursos ya cargados, su ubicación en el sistema de archivos, etc. Lea más sobre el GRecurso API.
Describiendo los recursos
Primero, necesitamos crear un archivo que describa los recursos de la aplicación. Cree un archivo llamado gresources.xml y colóquelo directamente debajo de resources carpeta.
<?xml version="1.0" encoding="UTF-8"?>

<gresources>

  <gresource prefix="/com/iridakos/gtk-todo">

    <file preprocess="xml-stripblanks">ui/application_window.ui</file>

  </gresource>

</gresources>
Esta descripción básicamente dice:"Tenemos un recurso que se encuentra bajo la ui directorio (relativo a este xml archivo) con el nombre application_window.ui . Antes de cargar este recurso, elimine los espacios en blanco". Por supuesto, esto no funcionará todavía, ya que no hemos creado el recurso a través de Glade. Sin embargo, no se preocupe, una cosa a la vez.
Nota :Los xml-stripblanks directiva utilizará el xmllint comando para eliminar los espacios en blanco. En Ubuntu, debe instalar el paquete libxml2-utils .
Creando el archivo binario de recursos
Para producir el archivo de recursos binarios, usaremos otra utilidad de biblioteca GLib llamada glib-compile-resources . Comprueba si lo tienes instalado con dpkg -l libglib2.0-bin . Deberías ver algo como esto:
ii libglib2.0-bin 2.48.2-0ubuntu amd64 Programs for the GLib library
De lo contrario, instale el paquete (sudo apt install libglib2.0-bin en Ubuntu).
Construyamos el archivo. Agregaremos código a nuestro script para que los recursos se construyan cada vez que lo ejecutemos. Cambia el gtk-todo guión de la siguiente manera:
#!/usr/bin/env ruby


require 'gtk3'

require 'fileutils'


# Require all ruby files in the application folder recursively

application_root_path = File.expand_path(__dir__)

Dir[File.join(application_root_path, '**', '*.rb')].each { |file| require file }


# Define the source & target files of the glib-compile-resources command

resource_xml = File.join(application_root_path, 'resources', 'gresources.xml')

resource_bin = File.join(application_root_path, 'gresource.bin')


# Build the binary

system("glib-compile-resources",

       "--target", resource_bin,

       "--sourcedir", File.dirname(resource_xml),

       resource_xml)


at_exit do

  # Before existing, please remove the binary we produced, thanks.

  FileUtils.rm_f(resource_bin)

end


app = ToDo::Application.new

puts app.run
Cuando lo ejecutamos, sucede lo siguiente en la consola; lo arreglaremos más tarde:
/.../gtk-todo-tutorial/resources/gresources.xml: Failed to locate 'ui/application_window.ui' in any source directory. Esto es lo que hicimos:
- Se agregó un
requiredeclaración parafileutilsbiblioteca para que podamos usarla enat_exitllamar - Definición de los archivos de origen y de destino de
glib-compile-resourcescomando - Ejecutó
glib-compile-resourcescomando - Establezca un enlace para que el archivo binario se elimine antes de salir del script (es decir, antes de que se cierre la aplicación) para que la próxima vez se vuelva a compilar
Cargando el archivo binario de recursos
Hemos descrito los recursos y los hemos empaquetado en un archivo binario. Ahora tenemos que cargarlos y registrarlos en la aplicación para poder usarlos. Esto es tan fácil como agregar las siguientes dos líneas antes de at_exit anzuelo:
resource = Gio::Resource.load(resource_bin)

Gio::Resources.register(resource)
Eso es todo. A partir de ahora, podemos utilizar los recursos desde cualquier lugar dentro de la aplicación. (Veremos cómo más adelante). Por ahora, el script falla porque no puede cargar un binario que no se haya producido. Se paciente; pronto llegaremos a la parte interesante. En realidad ahora.
Diseñando la ventana principal de la aplicación
Presentamos Glade
Para comenzar, abre Glade.

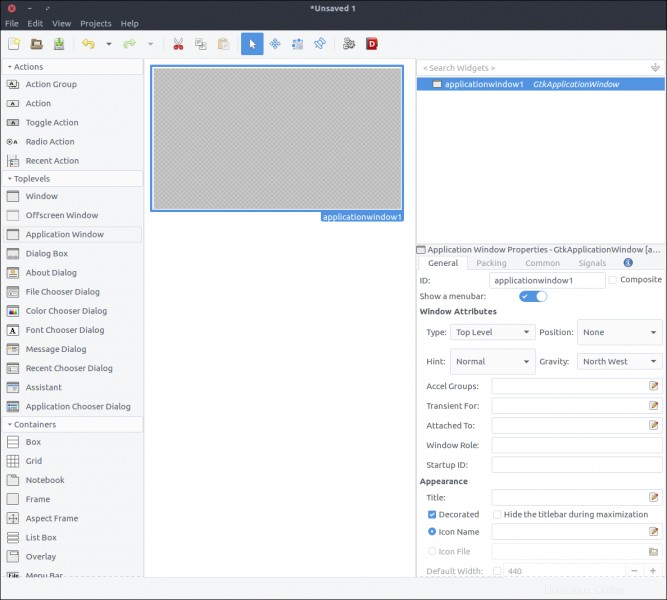
Esto es lo que vemos:
- A la izquierda, hay una lista de widgets que se pueden arrastrar y soltar en la sección central. (No puede agregar una ventana de nivel superior dentro de un widget de etiqueta). Llamaré a esto la sección de widgets .
- La sección central contiene nuestros widgets tal como aparecerán (la mayoría de las veces) en la aplicación. Llamaré a esto la sección de diseño .
- A la derecha hay dos subsecciones:
- La sección superior contiene la jerarquía de los widgets a medida que se agregan al recurso. Llamaré a esto la sección de jerarquía .
- La sección inferior contiene todas las propiedades que se pueden configurar a través de Glade para un widget seleccionado anteriormente. Llamaré a esto la sección de Propiedades .
Describiré los pasos para crear la interfaz de usuario de este tutorial con Glade, pero si está interesado en crear aplicaciones GTK+, debe consultar los recursos y tutoriales oficiales de la herramienta.
Crea el diseño de la ventana de la aplicación
Vamos a crear la ventana de la aplicación simplemente arrastrando la Ventana de la aplicación widget de la sección Widget a la sección Diseño.
Gtk::Constructor es un objeto que se usa en aplicaciones GTK+ para leer descripciones textuales de una interfaz de usuario (como la que construiremos a través de Glade) y construir los widgets de objetos descritos.
Lo primero en la sección Propiedades es el ID , y tiene un valor predeterminado applicationWindow1 . Si dejamos esta propiedad como está, luego crearíamos un Gtk::Builder a través de nuestro código que cargaría el archivo producido por Glade. Para obtener la ventana de la aplicación, tendríamos que usar algo como:
application_window = builder.get_object('applicationWindow1')


application_window.signal_connect 'whatever' do |a,b|

...
La ventana_aplicación el objeto sería de clase Gtk::ApplicationWindow; por lo tanto, cualquier cosa que tuviéramos que agregar a su comportamiento (como establecer su título) tendría lugar fuera de la clase original. Además, como se muestra en el fragmento anterior, el código para conectarse a la señal de una ventana se colocaría dentro del archivo que la creó.
La buena noticia es que GTK+ introdujo una característica en 2013 que permite la creación de plantillas de widgets compuestas, que (entre otras ventajas) nos permiten definir la clase personalizada para el widget (que eventualmente se deriva de un GTK::Widget
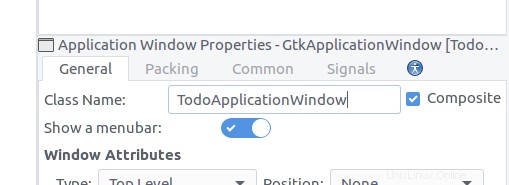
Para definir nuestro diseño como plantilla, marque el Compuesto casilla de verificación en el widget de propiedad. Tenga en cuenta que el ID propiedad cambiada a Nombre de clase . Complete TodoApplicationWindow . Esta es la clase que crearemos en nuestro código para representar este widget.
Guarde el archivo con el nombre application_window.ui en una nueva carpeta llamada ui dentro de los recursos . Esto es lo que vemos si abrimos el archivo desde un editor:
<?xml version="1.0" encoding="UTF-8"?>

<!-- Generated with glade 3.18.3 -->

<interface>

  <requires lib="gtk+" version="3.12"/>

  <template class="TodoApplicationWindow" parent="GtkApplicationWindow">

    <property name="can_focus">False</property>

    <child>

      <placeholder/>

    </child>

  </template>

</interface>
Nuestro widget tiene una clase y un atributo principal. Siguiendo la convención de atributos de la clase principal, nuestra clase debe definirse dentro de un módulo llamado Todo . Antes de llegar allí, intentemos iniciar la aplicación ejecutando el script (./gtk-todo ).
¡Sí! ¡Empieza!
Crea la clase de ventana de la aplicación
Si revisamos el contenido del directorio raíz de la aplicación mientras la ejecutamos, podemos ver el gresource.bin archivo allí. Aunque la aplicación se inicia correctamente porque el contenedor de recursos está presente y se puede registrar, no lo usaremos todavía. Seguiremos iniciando un Gtk::ApplicationWindow ordinario en nuestro application.rb expediente. Ahora es el momento de crear nuestra clase de ventana de aplicación personalizada.
Cree un archivo llamado application_window.rb en la aplicación/ui/todo carpeta y agregue el siguiente contenido:
module Todo
class ApplicationWindow < Gtk::ApplicationWindow
# Register the class in the GLib world
type_register
class << self
def init
# Set the template from the resources binary
set_template resource: '/com/iridakos/gtk-todo/ui/application_window.ui'
end
end
def initialize(application)
super application: application
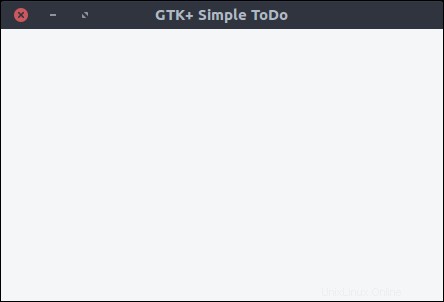
set_title 'GTK+ Simple ToDo'
end
end
end
Definimos el init como método singleton en la clase después de abrir la eigenclass para vincular la plantilla de este widget al archivo de recursos previamente registrado.
Antes de eso, llamamos al type_register método de clase, que registra y pone a disposición nuestra clase de widget personalizado para GLib mundo.
Finalmente, cada vez que creamos una instancia de esta ventana, establecemos su título en GTK+ Simple ToDo .
Ahora, volvamos a application.rb archivo y use lo que acabamos de implementar:
module ToDo

  class Application < Gtk::Application

    def initialize

      super 'com.iridakos.gtk-todo', Gio::ApplicationFlags::FLAGS_NONE


      signal_connect :activate do |application|

        window = Todo::ApplicationWindow.new(application)

        window.present

      end

    end

  end

end
Ejecute el script.
Definir el modelo
Para simplificar, guardaremos los elementos de ToDo en archivos en formato JSON en una carpeta oculta dedicada en el directorio de inicio de nuestro usuario. En una aplicación real, usaríamos una base de datos, pero eso está fuera del alcance de este tutorial.
Nuestro Todo::Item modelo tendrá las siguientes propiedades:
- identificación :la identificación del artículo
- título :El título
- notas :Cualquier nota
- prioridad :Su prioridad
- fecha_hora_de_creación :la fecha y la hora en que se creó el elemento
- nombre de archivo :el nombre del archivo en el que se guarda un elemento
Crearemos un archivo llamado item.rb bajo la aplicación/modelos directorio con los siguientes contenidos:
require 'securerandom'

require 'json'


module Todo

  class Item

    PROPERTIES = [:id, :title, :notes, :priority, :filename, :creation_datetime].freeze


    PRIORITIES = ['high', 'medium', 'normal', 'low'].freeze


    attr_accessor *PROPERTIES


    def initialize(options = {})

      if user_data_path = options[:user_data_path]

        # New item. When saved, it will be placed under the :user_data_path value

        @id = SecureRandom.uuid

        @creation_datetime = Time.now.to_s

        @filename = "#{user_data_path}/#{id}.json"

      elsif filename = options[:filename]

        # Load an existing item

        load_from_file filename

      else

        raise ArgumentError, 'Please specify the :user_data_path for new item or the :filename to load existing'

      end

    end


    # Loads an item from a file

    def load_from_file(filename)

      properties = JSON.parse(File.read(filename))


      # Assign the properties

      PROPERTIES.each do |property|

        self.send "#{property}=", properties[property.to_s]

      end

    rescue => e

      raise ArgumentError, "Failed to load existing item: #{e.message}"

    end


    # Resolves if an item is new

    def is_new?

      !File.exists? @filename

    end


    # Saves an item to its `filename` location

    def save!

      File.open(@filename, 'w') do |file|

        file.write self.to_json

      end

    end


    # Deletes an item

    def delete!

      raise 'Item is not saved!' if is_new?


      File.delete(@filename)

    end


    # Produces a json string for the item

    def to_json

      result = {}

      PROPERTIES.each do |prop|

        result[prop] = self.send prop

      end


      result.to_json

    end

  end

end
Aquí definimos métodos para:
- Inicializar un elemento:
- Como "nuevo" definiendo
:user_data_pathen el que se guardará más tarde - Como "existente" definiendo
:filenamepara ser cargado desde. El nombre del archivo debe ser un archivo JSON generado previamente por un elemento
- Como "nuevo" definiendo
- Cargar un elemento desde un archivo
- Resolver si un elemento es nuevo o no (es decir, guardado al menos una vez en
:user_data_patho no) - Guarde un elemento escribiendo su cadena JSON en un archivo
- Eliminar un elemento
- Producir la cadena JSON de un elemento como un hash de sus propiedades
Agregar un nuevo elemento
Crea el botón
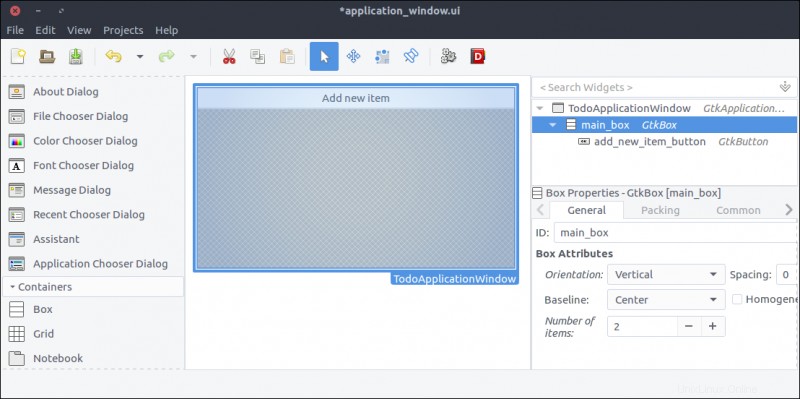
Agreguemos un botón a nuestra ventana de aplicación para agregar un nuevo elemento. Abra resources/ui/application_window.ui archivo en Glade.
- Arrastre un
Botóndesde la sección Widget hasta la sección Diseño. - En la sección Propiedades, establezca su ID valor para
add_new_item_button. - Cerca de la parte inferior del General en la sección Propiedades, hay un área de texto justo debajo de la Etiqueta con imagen opcional opción. Cambia su valor desde Botón para Añadir nuevo elemento .
- Guarde el archivo y ejecute el script.

No te preocupes; luego mejoraremos el diseño. Ahora, veamos cómo conectar funcionalidad a nuestro botón clic evento.
Primero, debemos actualizar nuestra clase de ventana de aplicación para que aprenda sobre su nuevo hijo, el botón con id add_new_item_button . Entonces podemos acceder al niño para alterar su comportamiento.
Cambia el init método de la siguiente manera:
def init

  # Set the template from the resources binary

  set_template resource: '/com/iridakos/gtk-todo/ui/application_window.ui'


  bind_template_child 'add_new_item_button'

end
Bastante simple, ¿verdad? El bind_template_child hace exactamente lo que dice, y de ahora en adelante cada instancia de nuestro Todo::ApplicationWindow la clase tendrá un add_new_item_button para acceder al botón relacionado. Entonces, modifiquemos el initialize método de la siguiente manera:
def initialize(application)

  super application: application


  set_title 'GTK+ Simple ToDo'


  add_new_item_button.signal_connect 'clicked' do |button, application|

    puts "OMG! I AM CLICKED"

  end

end
Como puede ver, accederemos al botón mediante el add_new_item_button método, y definimos lo que queremos que suceda cuando se haga clic en él. Reinicie la aplicación e intente hacer clic en el botón. En la consola, deberías ver el mensaje OMG! HAGO CLIC cuando haces clic en el botón.
Sin embargo, lo que queremos que suceda cuando hacemos clic en este botón es mostrar una nueva ventana para guardar un elemento ToDo. Has acertado:son las en punto de Glade.
Crea la ventana del nuevo elemento
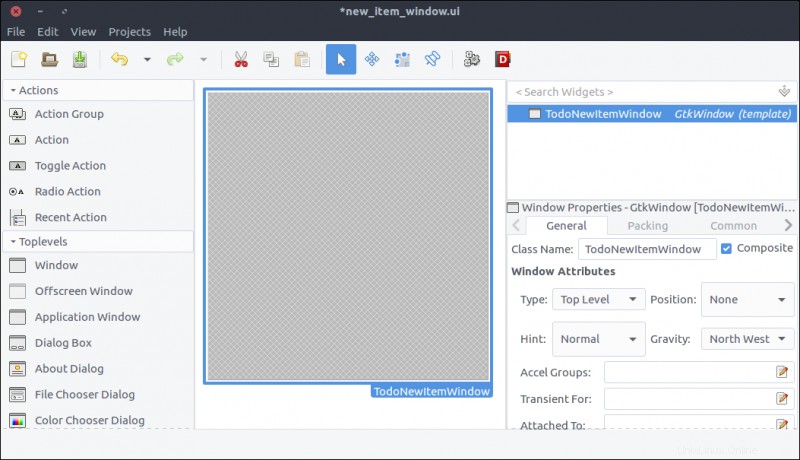
- Cree un nuevo proyecto en Glade presionando el icono más a la izquierda en la barra superior o seleccionando Archivo> Nuevo desde el menú de la aplicación.
- Arrastre una
Ventanadesde la sección Widget hasta el área de Diseño. - Compruebe su
Compuestopropiedad y nombre la claseTodoNewItemWindow.
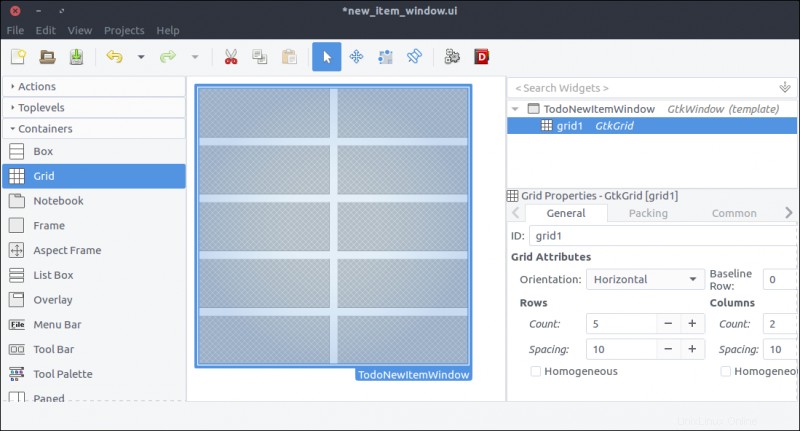
- Arrastre una
Cuadrículade la sección Widget y colóquelo en la ventana que agregamos anteriormente. - Juego 5 filas y 2 columnas en la ventana que aparece.
- En el General pestaña de la sección Propiedades, establezca el espacio entre filas y columnas en 10 (píxeles).
- En el Común pestaña de la sección Propiedades, establezca
Espaciado de widgets> Márgenes> Superior, Inferior, Izquierda, Derechatodo a 10 para que el contenido no se pegue a los bordes de la cuadrícula.
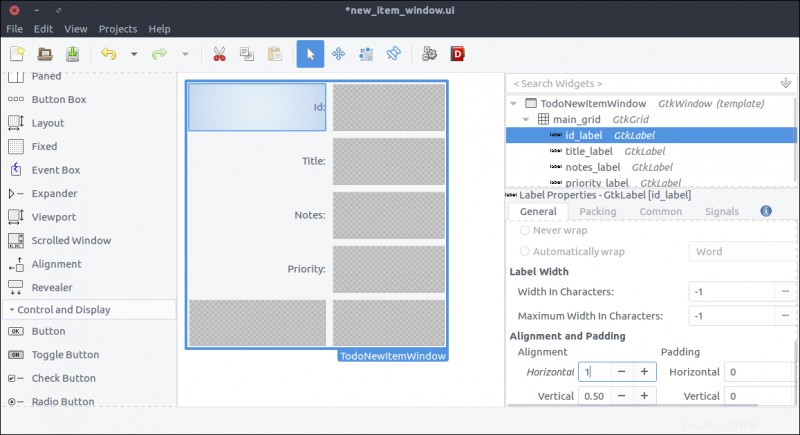
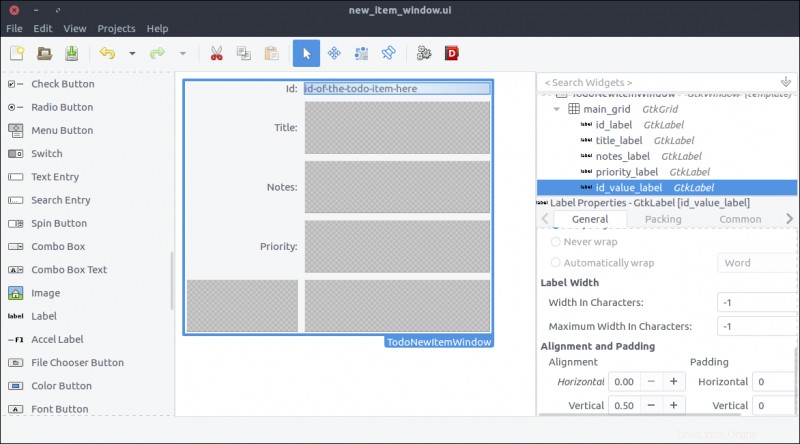
- Arrastre cuatro
Etiquetawidgets de la sección Widget y coloque uno en cada fila de la cuadrícula. - Cambiar su
Etiquetapropiedades, de arriba a abajo, de la siguiente manera:Identificación:Título:Notas:Prioridad:
- En el General pestaña de la sección Propiedades, cambie la Alineación y relleno> Alineación> Horizontal propiedad de 0,50 a 1 para cada propiedad con el fin de alinear a la derecha el texto de la etiqueta.
- Este paso es opcional pero recomendado. No uniremos esas etiquetas en nuestra ventana ya que no necesitamos alterar su estado o comportamiento. En este contexto, no necesitamos establecer una identificación descriptiva para ellos como lo hicimos para el
add_new_item_buttonbotón en la ventana de la aplicación. PERO agregaremos más elementos a nuestro diseño, y la jerarquía de los widgets en Glade será difícil de leer si dicenlabel1,etiqueta2, etc. Establecer ID descriptivos (comoid_label,título_etiqueta,notas_etiqueta,priority_label) nos hará la vida más fácil. Incluso configuré la ID de la cuadrícula enmain_gridporque no me gusta ver números o nombres de variables en los ID.
- Arrastre una
Etiquetadesde la sección Widget hasta la segunda columna de la primera fila de la cuadrícula. El ID será generado automáticamente por nuestro modelo; no permitiremos la edición, por lo que una etiqueta para mostrarlo es más que suficiente. - Establecer el
IDpropiedad aid_value_label. - Establecer la Alineación y relleno> Alineación> Horizontal propiedad a 0 para que el texto se alinee a la izquierda.
- Enlazaremos este widget a nuestra clase Ventana para que podamos cambiar su texto cada vez que carguemos la ventana. Por lo tanto, no es necesario configurar una etiqueta a través de Glade, pero hace que el diseño se acerque más a cómo se verá cuando se represente con datos reales. Puede establecer una etiqueta para lo que más le convenga; Establecí el mío en
id-of-the-todo-item-here.
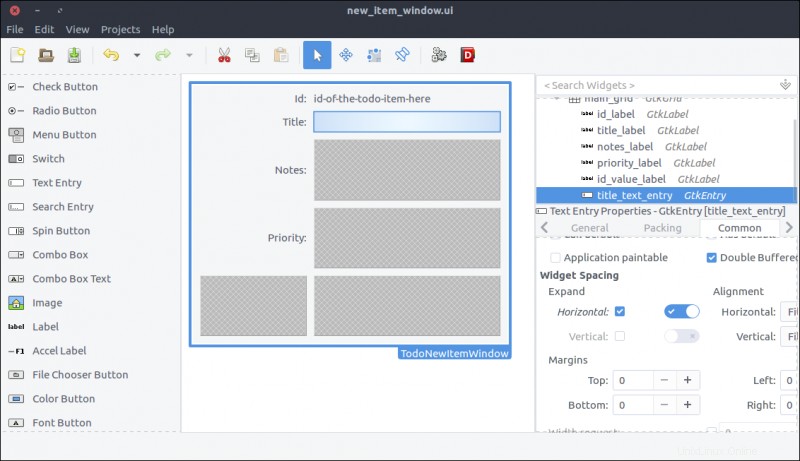
- Arrastre una
Entrada de textodesde la sección Widget a la segunda columna de la segunda fila de la cuadrícula. - Establezca su propiedad ID en
title_text_entry. Como habrás notado, prefiero obtener el tipo de widget en el ID para que el código de la clase sea más legible. - En el Común pestaña de la sección Propiedades, marque
Espaciado de widgets> Expandir> Horizontalcasilla de verificación y encienda el interruptor junto a ella. De esta manera, el widget se expandirá horizontalmente cada vez que se cambie el tamaño de su padre (también conocido como la cuadrícula).
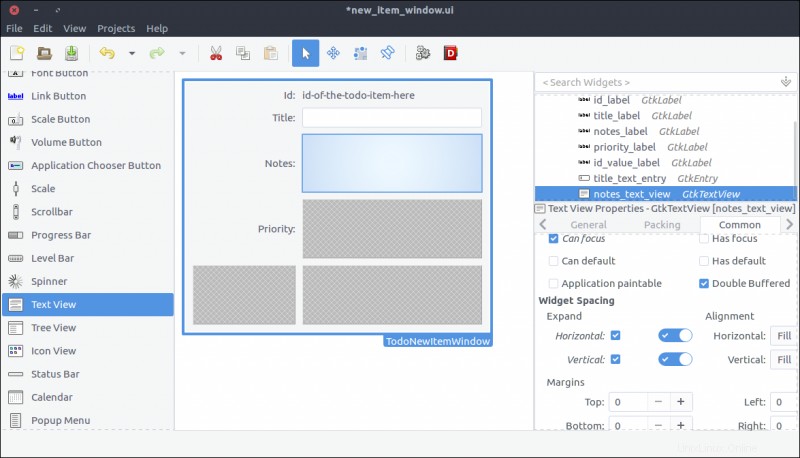
- Arrastre una
Vista de textodesde la sección Widget hasta la segunda columna de la tercera fila de la cuadrícula. - Establecer su
IDanotas. No, solo te estoy probando. Establecer suIDpropiedad anotes_text_view. - En el Común pestaña de la sección Propiedades, marque
Espaciado de widgets> Expandir> Horizontal, Verticalcasillas de verificación y encienda los interruptores junto a ellas. De esta forma, el widget se expandirá horizontal y verticalmente cada vez que se cambie el tamaño de su padre (la cuadrícula).
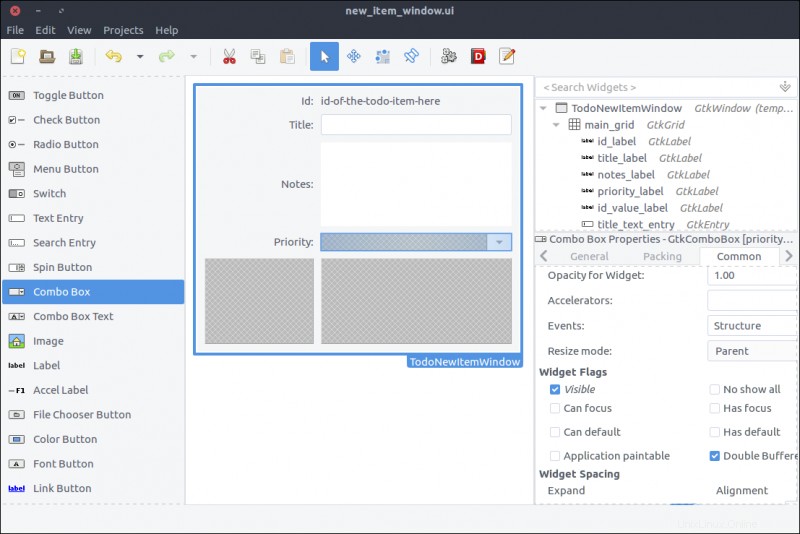
- Arrastre un
Cuadro combinadodesde la sección Widget hasta la segunda columna de la cuarta fila de la cuadrícula. - Establecer su
IDapriority_combo_box. - En el Común pestaña de la sección Propiedades, marque
Espaciado de widgets> Expandir> Horizontalcasilla de verificación y encienda el interruptor a su derecha. Esto permite que el widget se expanda horizontalmente cada vez que se cambia el tamaño de su padre (la cuadrícula). - Este widget es un elemento desplegable. Completaremos sus valores que pueden ser seleccionados por el usuario cuando aparezca dentro de nuestra clase de ventana.
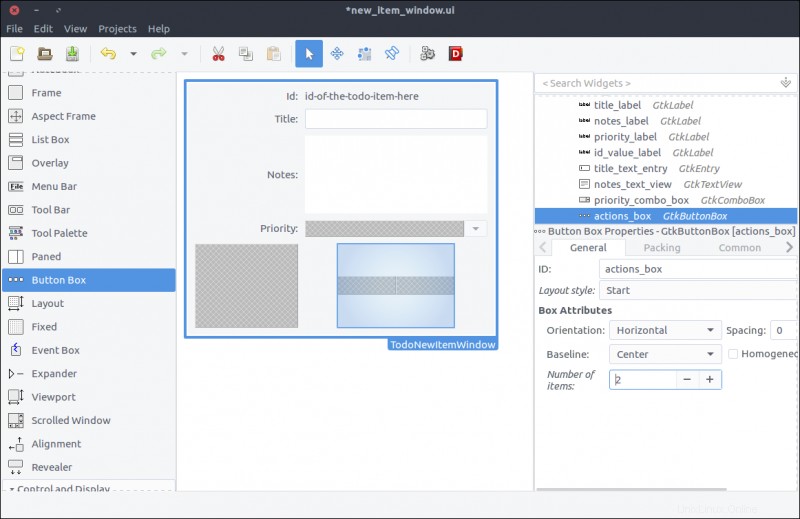
- Drag a
Button Boxfrom the Widget section to the second column of the last row of the grid. - In the pop-up window, select 2 items.
- In the General tab of the Properties section, set the Box Attributes> Orientation property to Horizontal .
- In the General tab of the Properties section, set the Box Attributes> Spacing property to 10 .
- In the Common tab of the Properties section, set the Widget Spacing> Alignment> Horizontal to Center .
- Again, our code won't alter this widget, but you can give it a descriptive
IDfor readability. I named mineactions_box.
- Drag two
Buttonwidgets and place one in each box of the button box widget we added in the previous step. - Set their
IDproperties tocancel_buttonandsave_button, respectively. - In the General tab of the Properties window, set their Button Content> Label with option image property to Cancel and Save , respectively.
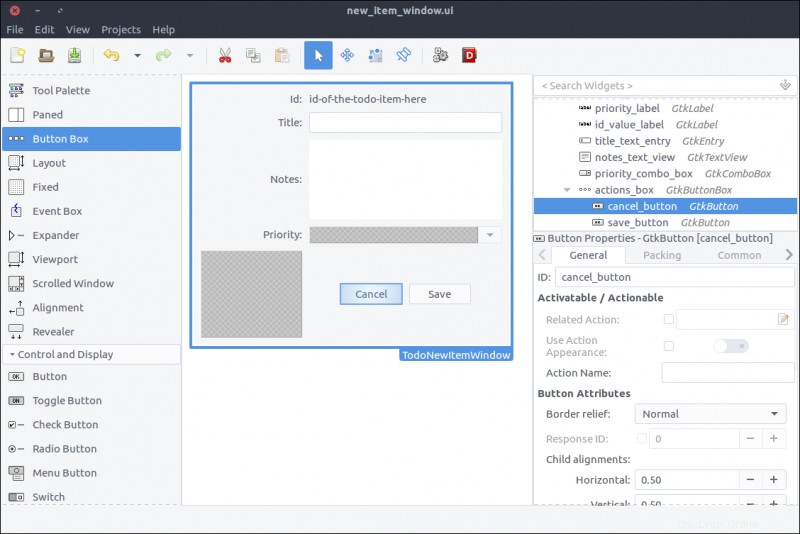
The window is ready. Save the file under resources/ui/new_item_window.ui .
It's time to port it into our application.
Implement the new item window class
Before implementing the new class, we must update our GResource description file (resources/gresources.xml ) to obtain the new resource:
<?xml version="1.0" encoding="UTF-8"?>

<gresources>

  <gresource prefix="/com/iridakos/gtk-todo">

    <file preprocess="xml-stripblanks">ui/application_window.ui</file>

    <file preprocess="xml-stripblanks">ui/new_item_window.ui</file>

  </gresource>

</gresources>
Now we can create the new window class. Create a file under application/ui/todo named new_item_window.rb and set its contents as follows:
module Todo

  class NewItemWindow < Gtk::Window

    # Register the class in the GLib world

    type_register


    class << self

      def init

        # Set the template from the resources binary

        set_template resource: '/com/iridakos/gtk-todo/ui/new_item_window.ui'

      end

    end


    def initialize(application)

      super application: application

    end

  end

end
There's nothing special here. We just changed the template resource to point to the correct file of our resources.
We have to change the add_new_item_button code that executes on the clicked signal to show the new item window. We'll go ahead and change that code in application_window.rb to this:
add_new_item_button.signal_connect 'clicked' do |button|

  new_item_window = NewItemWindow.new(application)

  new_item_window.present

end
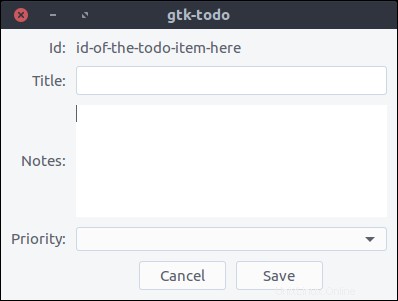
Let's see what we have done. Start the application and click on the Add new item botón. Tadaa!
But nothing happens when we press the buttons. Let's fix that.
First, we'll bind the UI widgets in the Todo::NewItemWindow class.
Change the init method to this:
def init

  # Set the template from the resources binary

  set_template resource: '/com/iridakos/gtk-todo/ui/new_item_window.ui'


  # Bind the window's widgets

  bind_template_child 'id_value_label'

  bind_template_child 'title_text_entry'

  bind_template_child 'notes_text_view'

  bind_template_child 'priority_combo_box'

  bind_template_child 'cancel_button'

  bind_template_child 'save_button'

end
This window will be shown when either creating or editing a ToDo item, so the new_item_window naming is not very valid. We'll refactor that later.
For now, we will update the window's initialize method to require one extra parameter for the Todo::Item to be created or edited. We can then set a more meaningful window title and change the child widgets to reflect the current item.
We'll change the initialize method to this:
def initialize(application, item)

  super application: application

  set_title "ToDo item #{item.id} - #{item.is_new? ? 'Create' : 'Edit' } Mode"


  id_value_label.text = item.id

  title_text_entry.text = item.title if item.title

  notes_text_view.buffer.text = item.notes if item.notes


  # Configure the combo box

  model = Gtk::ListStore.new(String)

  Todo::Item::PRIORITIES.each do |priority|

    iterator = model.append

    iterator[0] = priority

  end


  priority_combo_box.model = model

  renderer = Gtk::CellRendererText.new

  priority_combo_box.pack_start(renderer, true)

  priority_combo_box.set_attributes(renderer, "text" => 0)


  priority_combo_box.set_active(Todo::Item::PRIORITIES.index(item.priority)) if item.priority

end
Then we'll add the constant PRIORITIES in the application/models/item.rb file just below the PROPERTIES constant:
PRIORITIES = ['high', 'medium', 'normal', 'low'].freeze What did we do here?
- We set the window's title to a string containing the current item's ID and the mode (depending on whether the item is being created or edited).
- We set the
id_value_labeltext to display the current item's ID. - We set the
title_text_entrytext to display the current item's title. - We set the
notes_text_viewtext to display the current item's notes. - We created a model for the
priority_combo_boxwhose entries are going to have only oneStringvalor. At first sight, aGtk::ListStoremodel might look a little confusing. Here's how it works.- Suppose we want to display in a combo box a list of country codes and their respective country names.
- We would create a
Gtk::ListStoredefining that its entries would consist of two string values:one for the country code and one for the country name. Thus we would initialize the ListStore as:model = Gtk::ListStore.new(String, String) - To fill the model with data, we would do something like the following (make sure you don't miss the comments in the snippet):
[['gr', 'Greece'], ['jp','Japan'], ['nl', 'Netherlands']].each do |country_pair|

  entry = model.append

  # Each entry has two string positions since that's how we initialized the Gtk::ListStore

  # Store the country code in position 0

  entry[0] = country_pair[0]

  # Store the country name in position 1

  entry[1] = country_pair[1]

end - We also configured the combo box to render two text columns/cells (again, make sure you don't miss the comments in the snippet):
country_code_renderer = Gtk::CellRendererText.new

# Add the first renderer

combo.pack_start(country_code_renderer, true)

# Use the value in index 0 of each model entry a.k.a. the country code

combo.set_attributes(country_code_renderer, 'text' => 0)


country_name_renderer = Gtk::CellRendererText.new

# Add the second renderer

combo.pack_start(country_name_renderer, true)

# Use the value in index 1 of each model entry a.k.a. the country name

combo.set_attributes(country_name_renderer, 'text' => 1) - I hope that made it a little clearer.
- We added a simple text renderer in the combo box and instructed it to display the only value of each model's entry (a.k.a., position
0). Imagine that our model is something like[['high'],['medium'],['normal'],['low']]and0is the first element of each sub-array. I will stop with the model-combo-text-renderer explanations now…
Configure the user data path
Remember that when initializing a new Todo::Item (not an existing one), we had to define a :user_data_path in which it would be saved. We are going to resolve this path when the application starts and make it accessible from all the widgets.
All we have to do is check if the .gtk-todo-tutorial path exists inside the user's home ~ directorio. If not, we will create it. Then we'll set this as an instance variable of the application. All widgets have access to the application instance. So, all widgets have access to this user path variable.
Change the application/application.rb file to this:
module ToDo

  class Application < Gtk::Application

    attr_reader :user_data_path


    def initialize

      super 'com.iridakos.gtk-todo', Gio::ApplicationFlags::FLAGS_NONE


      @user_data_path = File.expand_path('~/.gtk-todo-tutorial')

      unless File.directory?(@user_data_path)

        puts "First run. Creating user's application path: #{@user_data_path}"

        FileUtils.mkdir_p(@user_data_path)

      end


      signal_connect :activate do |application|

        window = Todo::ApplicationWindow.new(application)

        window.present

      end

    end

  end

end
One last thing we need to do before testing what we have done so far is to instantiate the Todo::NewItemWindow when the add_new_item_button is clicked complying with the changes we made. In other words, change the code in application_window.rb to this:
add_new_item_button.signal_connect 'clicked' do |button|

  new_item_window = NewItemWindow.new(application, Todo::Item.new(user_data_path: application.user_data_path))

  new_item_window.present

end
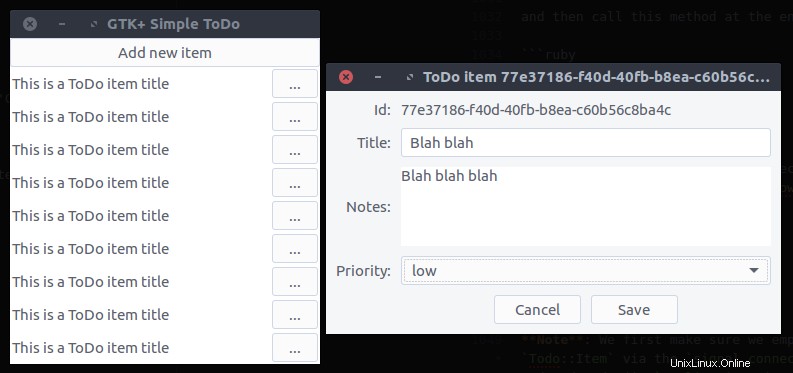
Start the application and click on the Add new item botón. Tadaa! (Note the - Create mode part in the title).

Cancel item creation/update
To close the Todo::NewItemWindow window when a user clicks the cancel_button , we only have to add this to the window's initialize method:
cancel_button.signal_connect 'clicked' do |button|

  close

end
close is an instance method of the Gtk::Window class that closes the window.
Save the item
Saving an item involves two steps:
- Update the item's properties based on the widgets' values.
- Call the
save!method on theTodo::Iteminstance.
Again, our code will be placed in the initialize method of the Todo::NewItemWindow :
save_button.signal_connect 'clicked' do |button|

  item.title = title_text_entry.text

  item.notes = notes_text_view.buffer.text

  item.priority = priority_combo_box.active_iter.get_value(0) if priority_combo_box.active_iter

  item.save!

  close

end
Once again, the window closes after saving the item.
Let's try that out.
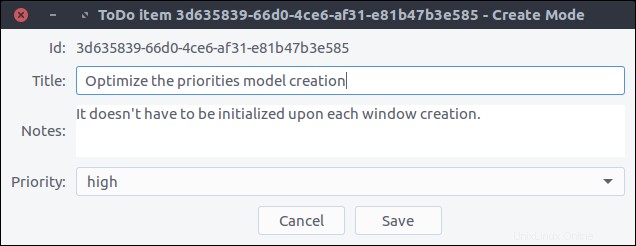
Now, by pressing Save and navigating to our ~/.gtk-todo-tutorial folder, we should see a file. Mine had the following contents:
{

        "id": "3d635839-66d0-4ce6-af31-e81b47b3e585",

        "title": "Optimize the priorities model creation",

        "notes": "It doesn't have to be initialized upon each window creation.",

        "priority": "high",

        "filename": "/home/iridakos/.gtk-todo-tutorial/3d635839-66d0-4ce6-af31-e81b47b3e585.json",

        "creation_datetime": "2018-01-25 18:09:51 +0200"

}
Don't forget to try out the Cancel button as well.
View ToDo items
The Todo::ApplicationWindow contains only one button. It's time to change that.
We want the window to have Add new item on the top and a list below with all of our ToDo items. We'll add a Gtk::ListBox to our design that can contain any number of rows.
Update the application window
- Open the
resources/ui/application_window.uifile in Glade. - Nothing happens if we drag a
List Boxwidget from the Widget section directly on the window. Eso es normal. First, we have to split the window into two parts:one for the button and one for the list box. Bear with me. - Right-click on the
new_item_windowin the Hierarchy section and select Add parent> Box . - In the pop-up window, set 2 for the number of items.
- The orientation of the box is already vertical, so we are fine.
- Now, drag a
List Boxand place it on the free area of the previously added box. - Set its
IDproperty totodo_items_list_box. - Set its
Selection modetoNonesince we won't provide that functionality.

Design the ToDo item list box row
Each row of the list box we created in the previous step will be more complex than a row of text. Each will contain widgets that allow the user to expand an item's notes and to delete or edit the item.
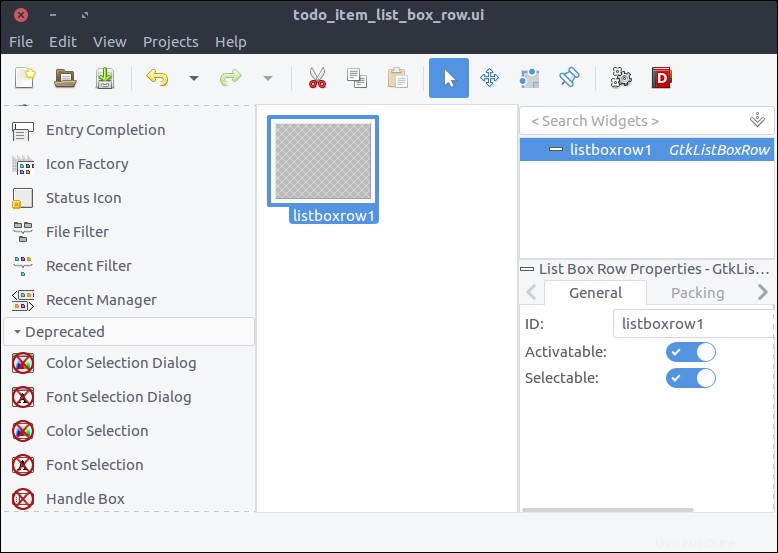
- Create a new project in Glade, as we did for the
new_item_window.ui. Save it underresources/ui/todo_item_list_box_row.ui. - Unfortunately (at least in my version of Glade), there is no List Box Row widget in the Widget section. So, we'll add one as the top-level widget of our project in a kinda hackish way.
- Drag a
List Boxfrom the Widget section to the Design area. - Inside the Hierarchy section, right-click on the
List Boxand selectAdd Row

- In the Hierarchy section, right-click on the newly added
List Box Rownested under theList Boxand selectRemove parent. There it is! TheList Box Rowis the top-level widget of the project now.
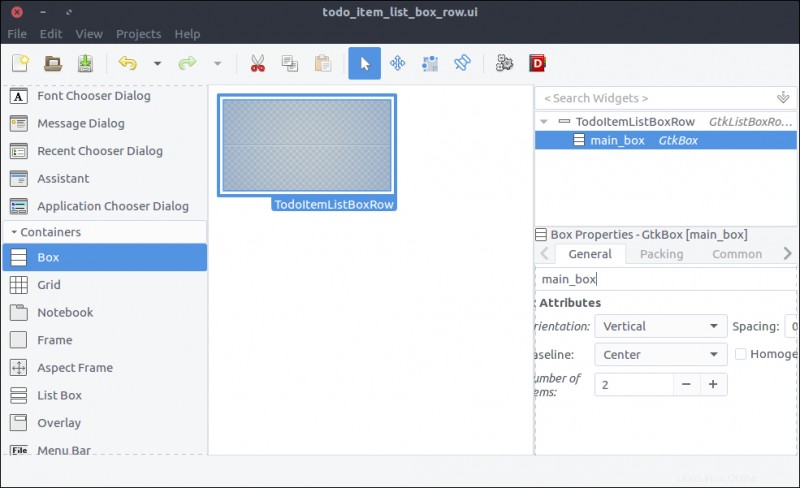
- Check the widget's
Compositeproperty and set its name toTodoItemListBoxRow. - Drag a
Boxfrom the Widget section to the Design area inside ourList Box Row. - Set 2 items in the pop-up window.
- Set its
IDproperty tomain_box.
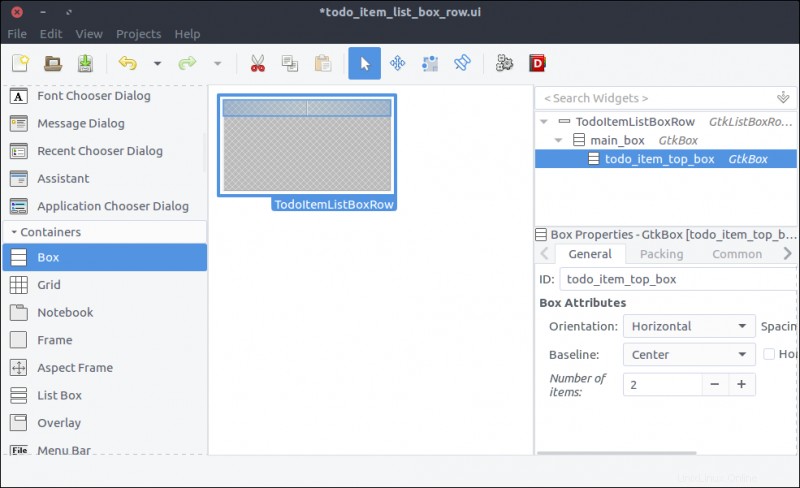
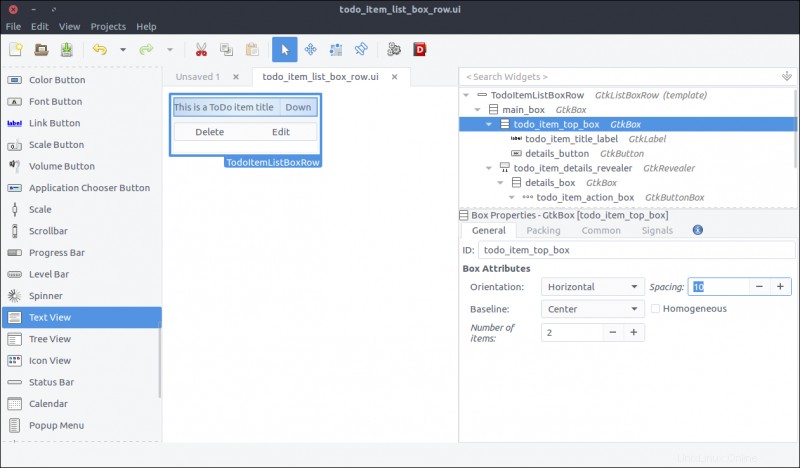
- Drag another
Boxfrom the Widget section to the first row of the previously added box. - Set 2 items in the pop-up window.
- Set its
IDproperty totodo_item_top_box. - Set its Orientation property to Horizontal .
- Set its
Spacing(General tab) property to 10 .
- Drag a
Labelfrom the Widget section to the first column of thetodo_item_top_box. - Set its
IDproperty totodo_item_title_label. - Set its Alignment and Padding> Alignment> Horizontal property to 0.00 .
- In the Common tab of the Properties section, check the Widget Spacing> Expand> Horizontal checkbox and turn on the switch next to it so the label will expand to the available space.
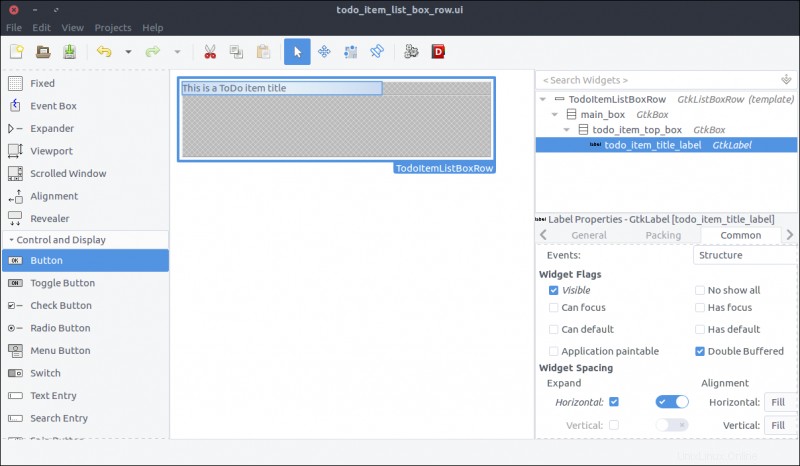
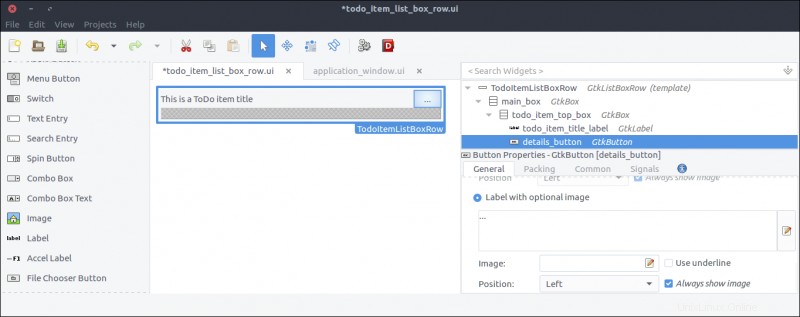
- Drag a
Buttonfrom the Widget section to the second column of thetodo_item_top_box. - Set its
IDproperty todetails_button. - Check the Button Content> Label with optional image radio and type
...(three dots).
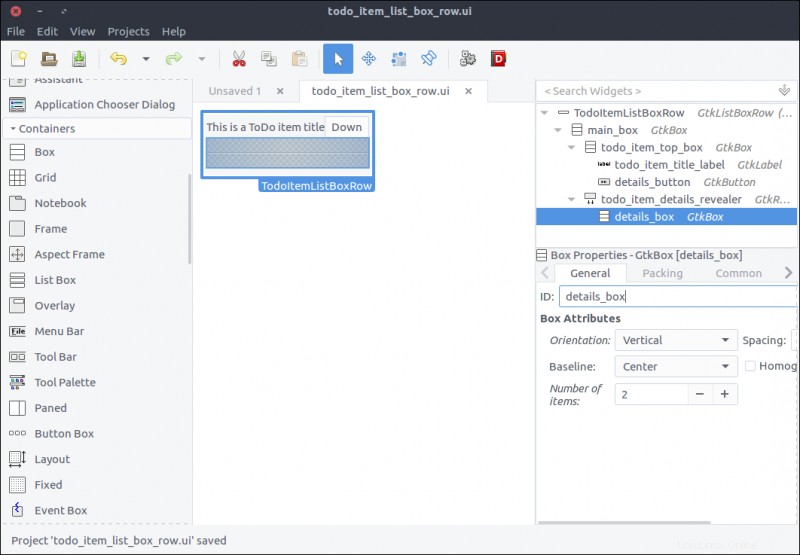
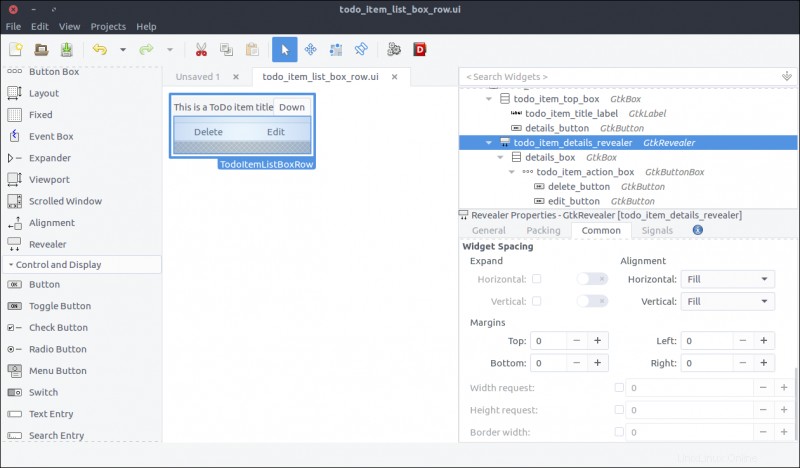
- Drag a
Revealerwidget from the Widget section to the second row of themain_box. - Turn off the
Reveal Childswitch in the General tab. - Set its
IDproperty totodo_item_details_revealer. - Set its
Transition typeproperty toSlide Down.
- Drag a
Boxfrom the Widget section to the reveal space. - Set its items to 2 in the pop-up window.
- Set its
IDproperty todetails_box. - In the Common tab, set its Widget Spacing> Margins> Top property to 10 .
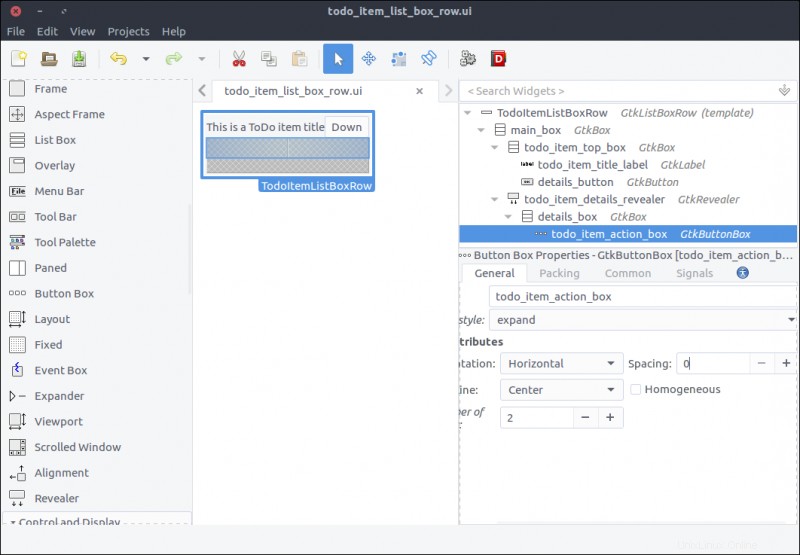
- Drag a
Button Boxfrom the Widget section to the first row of thedetails_box. - Set its
IDproperty totodo_item_action_box. - Set its
Layout styleproperty toexpand.
- Drag
Buttonwidgets to the first and second columns of thetodo_item_action_box. - Set their
IDproperties todelete_buttonandedit_button, respectively. - Set their Button Content> Label with optional image properties to Delete and Edit , respectively.
- Drag a
Viewportwidget from the Widget section to the second row of thedetails_box. - Set its
IDproperty totodo_action_notes_viewport. - Drag a
Text Viewwidget from the Widget section to thetodo_action_notes_viewportthat we just added. - Set its
IDtotodo_item_notes_text_view. - Uncheck its
Editableproperty in theGeneraltab of the Properties section.
Create the ToDo item list-box row class
Now we will create the class reflecting the UI of the list-box row we just created.
First we have to update our GResource description file to include the newly created design. Change the resources/gresources.xml file as follows:
<?xml version="1.0" encoding="UTF-8"?>

<gresources>

  <gresource prefix="/com/iridakos/gtk-todo">

    <file preprocess="xml-stripblanks">ui/application_window.ui</file>

    <file preprocess="xml-stripblanks">ui/new_item_window.ui</file>

    <file preprocess="xml-stripblanks">ui/todo_item_list_box_row.ui</file>

  </gresource>

</gresources>
Create a file named item_list_box_row.rb inside the application/ui folder and add the following:
module Todo

  class ItemListBoxRow < Gtk::ListBoxRow

    type_register


    class << self

      def init

        set_template resource: '/com/iridakos/gtk-todo/ui/todo_item_list_box_row.ui'

      end

    end


    def initialize(item)

      super()

    end

  end

end
We will not bind any children at the moment.
When starting the application, we have to search for files in the :user_data_path , and we must create a Todo::Item instance for each file. For each instance, we must also add a new Todo::ItemListBoxRow to the Todo::ApplicationWindow 's todo_items_list_box list box. One thing at a time.
First, let's bind the todo_items_list_box in the Todo::ApplicationWindow clase. Change the init method as follows:
def init

  # Set the template from the resources binary

  set_template resource: '/com/iridakos/gtk-todo/ui/application_window.ui'


  bind_template_child 'add_new_item_button'

  bind_template_child 'todo_items_list_box'

end
Next, we'll add an instance method in the same class that will be responsible to load the ToDo list items in the related list box. Add this code in Todo::ApplicationWindow :
def load_todo_items

  todo_items_list_box.children.each { |child| todo_items_list_box.remove child }


  json_files = Dir[File.join(File.expand_path(application.user_data_path), '*.json')]

  items = json_files.map{ |filename| Todo::Item.new(filename: filename) }


  items.each do |item|

    todo_items_list_box.add Todo::ItemListBoxRow.new(item)

  end

end
Then we'll call this method at the end of the initialize method:
def initialize(application)

  super application: application


  set_title 'GTK+ Simple ToDo'


  add_new_item_button.signal_connect 'clicked' do |button|

    new_item_window = NewItemWindow.new(application, Todo::Item.new(user_data_path: application.user_data_path))

    new_item_window.present

  end


  load_todo_items

end
Todo::Item via the signal_connect of the save_button of the Todo::NewItemWindow , and the parent application window will be reloaded! Here's the updated code (in application/ui/new_item_window.rb ):
save_button.signal_connect 'clicked' do |button|

  item.title = title_text_entry.text

  item.notes = notes_text_view.buffer.text

  item.priority = priority_combo_box.active_iter.get_value(0) if priority_combo_box.active_iter

  item.save!


  close


  # Locate the application window

  application_window = application.windows.find { |w| w.is_a? Todo::ApplicationWindow }

  application_window.load_todo_items

end
Previously, we used this code:
json_files = Dir[File.join(File.expand_path(application.user_data_path), '*.json')] to find the names of all the files in the application-user data path with a JSON extension.
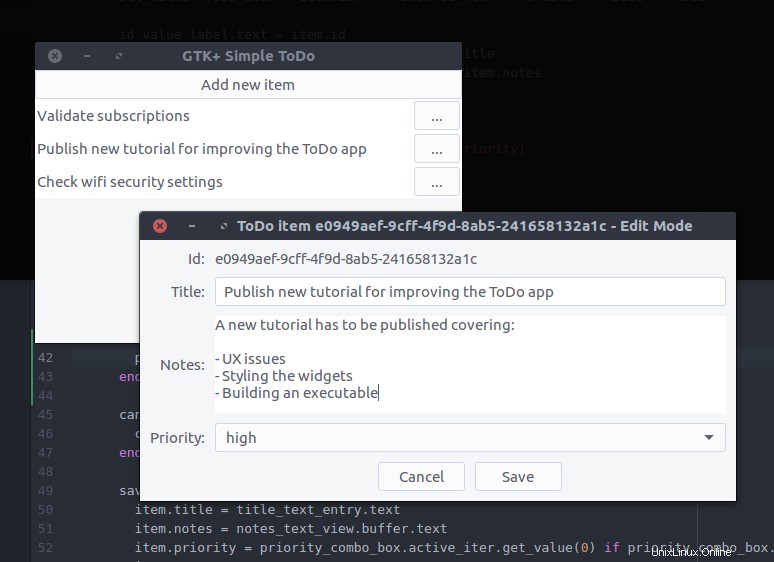
Let's see what we've created. Start the application and try adding a new ToDo item. After pressing the Save button, you should see the parent Todo::ApplicationWindow automatically updated with the new item!
What's left is to complete the functionality of the Todo::ItemListBoxRow .
First, we will bind the widgets. Change the init method of the Todo::ItemListBoxRow class as follows:
def init

  set_template resource: '/com/iridakos/gtk-todo/ui/todo_item_list_box_row.ui'


  bind_template_child 'details_button'

  bind_template_child 'todo_item_title_label'

  bind_template_child 'todo_item_details_revealer'

  bind_template_child 'todo_item_notes_text_view'

  bind_template_child 'delete_button'

  bind_template_child 'edit_button'

end
Then, we'll set up the widgets based on the item of each row.
def initialize(item)

  super()


  todo_item_title_label.text = item.title || ''


  todo_item_notes_text_view.buffer.text = item.notes


  details_button.signal_connect 'clicked' do

    todo_item_details_revealer.set_reveal_child !todo_item_details_revealer.reveal_child?

  end


  delete_button.signal_connect 'clicked' do

    item.delete!


    # Locate the application window

    application_window = application.windows.find { |w| w.is_a? Todo::ApplicationWindow }

    application_window.load_todo_items

  end


  edit_button.signal_connect 'clicked' do

    new_item_window = NewItemWindow.new(application, item)

    new_item_window.present

  end

end


def application

  parent = self.parent

  parent = parent.parent while !parent.is_a? Gtk::Window

  parent.application

end
- As you can see, when the
details_buttonis clicked, we instruct thetodo_item_details_revealerto swap the visibility of its contents. - After deleting an item, we find the application's
Todo::ApplicationWindowto call itsload_todo_items, as we did after saving an item. - When clicking to edit a button, we create a new instance of the
Todo::NewItemWindowpassing an item as the current item. Works like a charm! - Finally, to reach the application parent of a list-box row, we defined a simple instance method
applicationthat navigates through the widget's parents until it reaches a window from which it can obtain the application object.
Save and run the application. There it is!
This has been a really long tutorial and, even though there are so many items that we haven't covered, I think we better end it here.
Long post, cat photo.

Useful links
- This tutorial's code
- A set of bindings for the GNOME-2.x libraries to use from Ruby
- Gtk3 tutorial for Ruby based on the official C version
- GTK+ 3 Reference Manual
This was originally published on Lazarus Lazaridis's blog, iridakos.com, and is republished with permission.