Si le pregunta a un grupo de desarrolladores qué es Linux, la mayoría probablemente dirá que es un sistema operativo de código abierto. Aquellos con más conocimientos técnicos probablemente lo llamarán kernel.
Sin embargo, para mí, Linux no es solo un sistema operativo o un kernel. Para mí, es la libertad. La libertad de armar un sistema operativo de acuerdo a mis necesidades, y ahí es donde entra Arch Linux.
Según su wiki,
Arch Linux es una distribución de GNU/Linux de propósito general x86-64 desarrollada de forma independiente que se esfuerza por proporcionar las últimas versiones estables de la mayoría del software siguiendo un modelo de lanzamiento continuo.
La instalación predeterminada es un sistema base mínimo, configurado por el usuario para agregar solo lo que se requiere a propósito.
En otras palabras, Arch Linux es una distribución optimizada para la arquitectura x86-64 dirigida a usuarios experimentados de Linux. Le permite tener total responsabilidad y control sobre su sistema.
Podrá elegir qué paquetes desea, el núcleo (sí, hay varios), el cargador de arranque, el entorno de escritorio, etc.
¿Alguna vez has escuchado a alguien decir,
Oh, por cierto, ¡uso Arch Linux!
Esto se debe a que la instalación de Arch Linux en una máquina requiere que tenga un conocimiento adecuado de cómo funcionan las diferentes partes de una distribución de Linux. Por lo tanto, ejecutar Arch Linux en su sistema es una especie de testimonio de su comprensión de Linux.
Hablando por experiencia, instalar Arch Linux no es muy diferente de instalar algo como Fedora o Ubuntu. Es solo que debe realizar los pasos individuales manualmente en lugar de que un instalador haga las cosas por usted. Pero una vez que haya pasado por el proceso, comenzará a comprender cómo funcionan las otras distribuciones en general.
En este artículo, lo guiaré a través de todo el proceso de instalación y configuración de Arch Linux en su máquina. También hablaré sobre algunas tareas comunes y consejos para solucionar problemas cerca del final.
Así que ven conmigo y te mostraré hasta dónde llega la madriguera del conejo.
Tabla de contenido
- Algunas suposiciones que hago
- Cómo crear una unidad USB Arch Linux de arranque
- Cómo preparar su computadora para instalar Arch Linux
- Cómo instalar Arch Linux
- Cómo configurar el diseño y la fuente del teclado de la consola
- Cómo verificar el modo de arranque
- Cómo conectarse a Internet
- Cómo actualizar el reloj del sistema
- Cómo particionar los discos
- Cómo formatear las particiones
- Cómo montar los sistemas de archivos
- Cómo configurar los espejos
- Cómo instalar el sistema base Arch Linux
- Cómo configurar Arch Linux
- Cómo generar el archivo Fstab
- Cómo iniciar sesión en el sistema recién instalado mediante Arch-Chroot
- Cómo configurar la zona horaria
- Cómo configurar la localización
- Cómo configurar la red
- Cómo configurar la contraseña raíz
- Cómo crear un usuario no root
- Cómo instalar microcódigo
- Cómo instalar y configurar un cargador de arranque
- Cómo instalar Xorg
- Cómo instalar controladores de gráficos
- Cómo instalar un entorno de escritorio
- Cómo instalar GNOME
- Cómo instalar Plasma
- Cómo finalizar la instalación
- Cómo cambiar entre entornos de escritorio
- Cómo administrar paquetes usando Pacman
- Cómo instalar paquetes usando Pacman
- Cómo eliminar paquetes usando Pacman
- Cómo actualizar paquetes usando Pacman
- Cómo buscar paquetes usando Pacman
- Cómo usar AUR en Arch Linux
- Cómo instalar paquetes usando un asistente
- Cómo instalar paquetes manualmente
- Cómo solucionar problemas comunes
- Cómo utilizar Live Arch ISO como medio de rescate
- Lecturas adicionales
- Conclusión
Algunas suposiciones que estoy haciendo
Antes de saltar al núcleo del tutorial, quiero aclarar algunas cosas. Para que todo este artículo sea accesible, hago las siguientes suposiciones sobre usted y su sistema:
- Conoces Arch Linux a un nivel básico
- Arco Linux
- Preguntas frecuentes
- Arco comparado con otras distribuciones
- Su computadora está usando UEFI y no BIOS
- Tiene una unidad USB lo suficientemente grande (4 GB) para iniciar Linux desde
- Tiene experiencia previa en la instalación de Linux (Ubuntu/Fedora)
- Tiene suficiente espacio para instalar Linux en su HDD o SSD
Eso es practicamente todo. Si tiene todo lo anterior, está listo para comenzar.
Cómo crear una unidad USB Arch Linux de arranque
Para descargar Arch Linux, diríjase a https://archlinux.org/download/ y descargue la última versión (2022.01.01 a partir de este escrito). El ISO debería tener un tamaño de alrededor de 870 megabytes.
Una vez descargado, tendrás que ponerlo en tu USB. Puede usar el programa Fedora Media Writer para hacer eso. Descargue e instale la aplicación en su sistema. Ahora conecte su unidad USB y abra la aplicación:
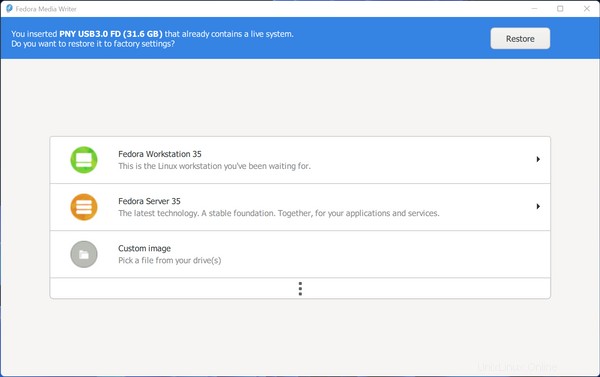
Haga clic en "Imagen personalizada" y use el explorador de archivos para elegir el archivo ISO de Arch Linux descargado.
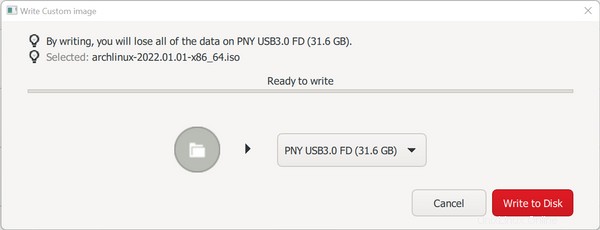
La aplicación ahora le permitirá elegir una de sus unidades USB conectadas. Tenga mucho cuidado al seleccionar el correcto si tiene varias unidades USB conectadas a su máquina. Ahora presione el botón "Escribir en disco" y espere hasta que finalice el proceso.
Cómo preparar su computadora para instalar Arch Linux
En este paso, deberá realizar algunos cambios en su sistema; de lo contrario, es posible que Arch Linux no se inicie o no se ejecute correctamente.
El primer cambio que deberá realizar es deshabilitar el arranque seguro en su configuración de UEFI. Esta función ayuda a prevenir ataques de malware durante el arranque, pero también evita que arranque el instalador de Arch Linux.
Las instrucciones detalladas sobre cómo puede desactivar esto varían según la placa base o la marca de la computadora portátil. Tendrás que buscar en Internet tú mismo para encontrar el camino correcto esta vez.
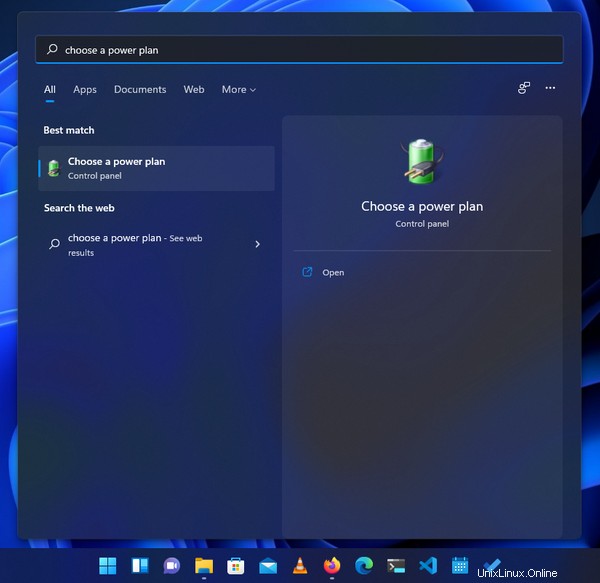
La segunda cosa que debe deshabilitar solo es relevante si está instalando Arch Linux junto con Windows. Hay una característica de Windows llamada inicio rápido que reduce el tiempo de arranque de su computadora al hibernarla parcialmente.
En general, esta es una característica agradable, pero evita que cualquier otro sistema operativo en una configuración de arranque dual acceda al disco duro en el proceso.
Para deshabilitar esta función, abra el menú de inicio y busque "Elegir un plan de energía" de la siguiente manera:
Luego, en la siguiente ventana, haga clic en "Elegir lo que hacen los botones de encendido" en la barra lateral izquierda:

Luego, en la siguiente ventana, verá una lista de "Configuración de apagado" y la opción "Activar inicio rápido (recomendado)" debería mostrarse como solo lectura allí.
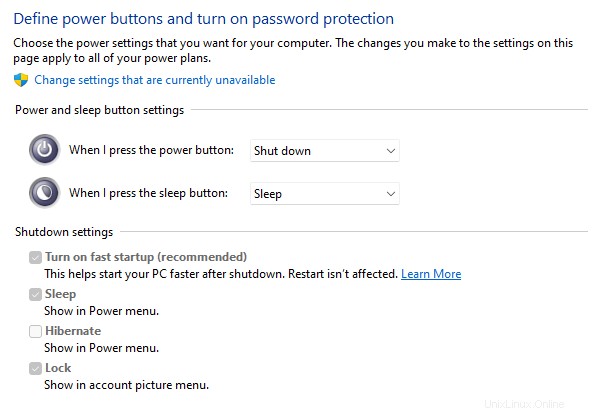
Haga clic en "Cambiar la configuración que actualmente no está disponible" en la parte superior y luego debería poder cambiar la configuración.
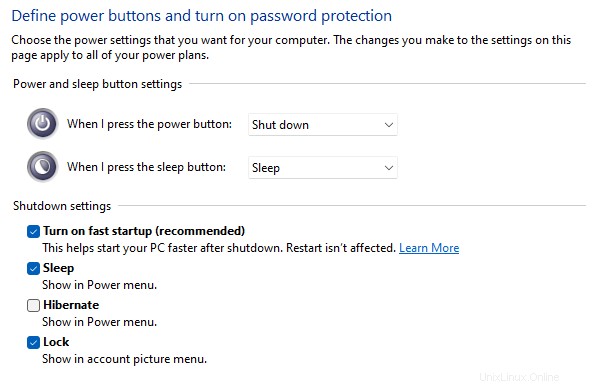
Desmarque la opción "Activar inicio rápido (recomendado)" y presione el botón "Guardar cambios" en la parte inferior. A partir de ahora, el proceso de arranque puede tardar unos minutos más, pero merece la pena.
En este artículo, instalaré Arch Linux como mi sistema operativo predeterminado. Así que le asignaré todo mi espacio en disco.
Sin embargo, si está intentando instalarlo junto con Windows, tengo un artículo dedicado al tema. Y en ese artículo, hay una sección que analiza el proceso de partición en gran detalle.
Cómo instalar Arch Linux
Suponiendo que tiene una unidad USB de arranque y que su computadora está configurada correctamente, tendrá que arrancar desde la unidad USB. El proceso de arranque desde una unidad USB difiere de una máquina a otra.
En mi máquina, presionar la tecla F12 durante el arranque me lleva a la lista de dispositivos de arranque. Desde allí puedo elegir mi unidad USB de arranque. Es posible que ya conozca la técnica adecuada para su computadora o que deba investigar un poco.
Una vez que haya logrado aterrizar en la lista de dispositivos de arranque conectados, seleccione su unidad USB para arrancar y debería aparecer el siguiente menú:
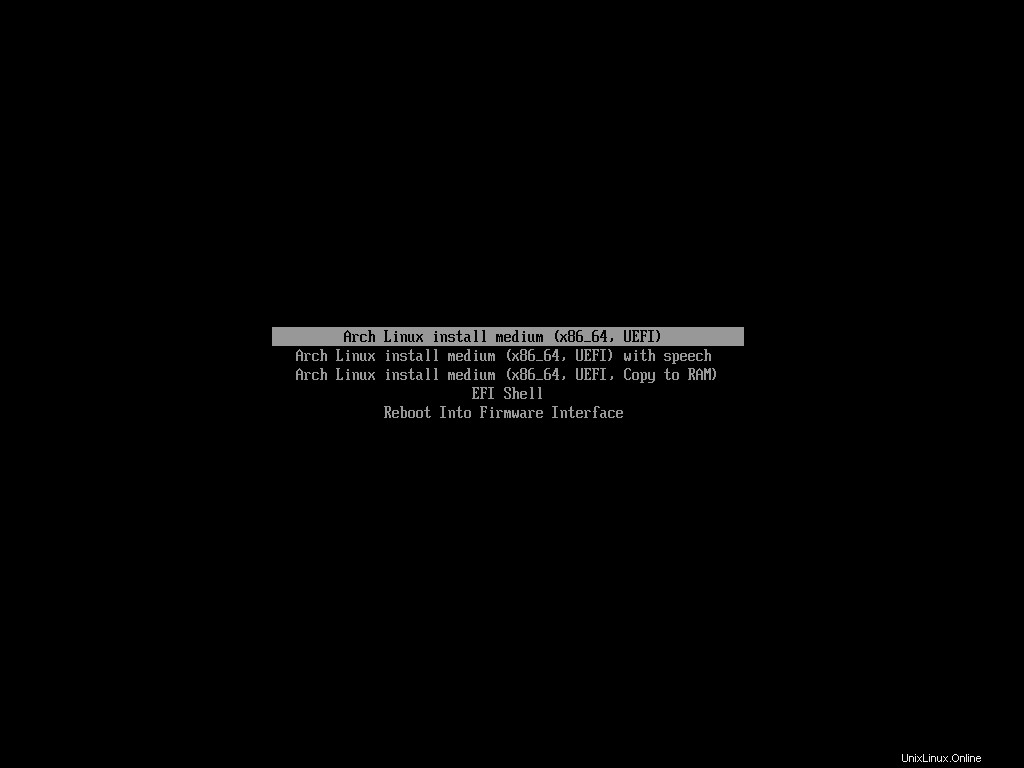
Elija el primero de la lista y espere hasta que el instalador de Arch termine de iniciarse. Una vez que haya arrancado por completo, verá algo como esto:
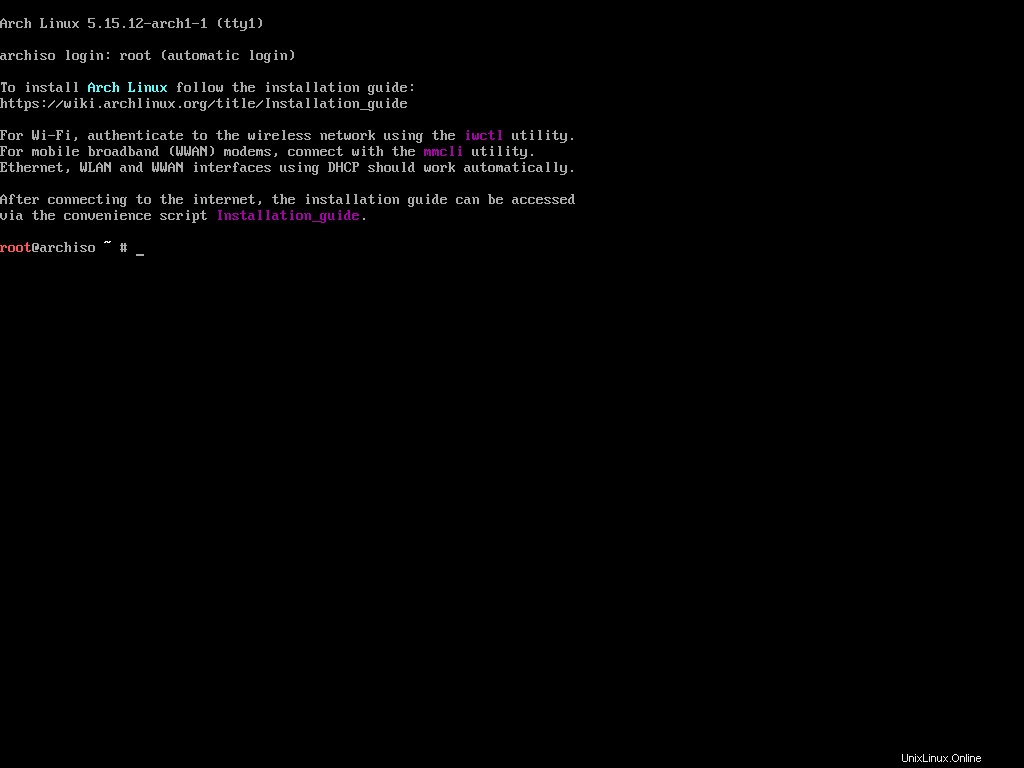
Eso es todo. Eso es todo lo que obtendrás. A diferencia de otros sistemas operativos con los que quizás esté familiarizado, el instalador de Arch no tiene ninguna interfaz gráfica de usuario para automatizar la instalación.
Más bien requiere que invierta su tiempo y esfuerzo y configure cada parte de la distribución pieza por pieza. Puede sonar abrumador pero, para ser honesto, si comprende lo que está haciendo, instalar Arch Linux es bastante divertido.
Cómo configurar el diseño y la fuente del teclado de la consola
Como ya he dicho, el instalador de Arch no tiene una interfaz gráfica de usuario, por lo que habrá que escribir mucho. Configurar el diseño de su teclado y una fuente atractiva puede hacer que el proceso de instalación sea mucho menos frustrante.
De manera predeterminada, la consola asume que tiene un diseño de teclado estándar de EE. UU. Esto debería estar bien para la mayoría de las personas, pero en caso de que tenga uno diferente, puede cambiarlo.
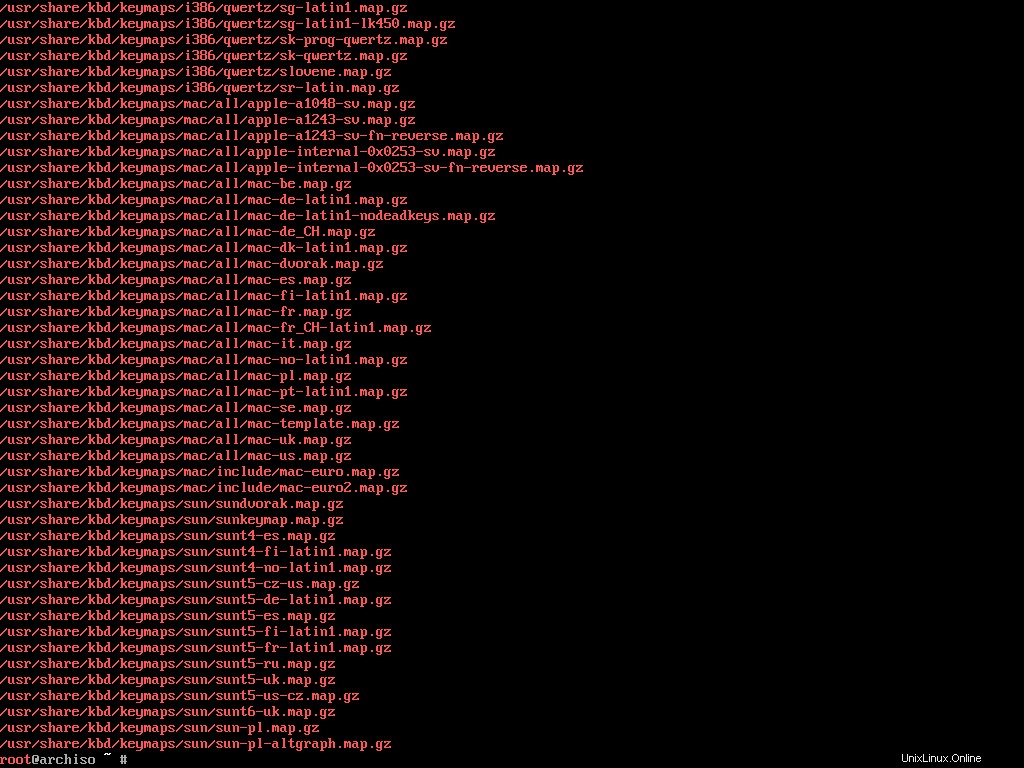
Todos los mapas de teclas disponibles generalmente se mantienen dentro de /usr/share/kbd/keymaps directorio en forma de map.gz archivos Puede ver la lista de ellos usando el ls comando:
ls /usr/share/kbd/keymaps/**/*.map.gz
Esto enumerará todos los mapas clave disponibles:
Ahora, por ejemplo, si tiene el diseño de teclado Mac-US, busque el map.gz correspondiente archivo de esta lista que es el mac-us.map.gz uno.
Puedes usar las loadkeys comando para cargar el mapa de teclas deseado. Para configurar mac-us.map.gz por defecto, ejecute el siguiente comando:
loadkeys mac-us
También puede cambiar la fuente de la consola si no le gusta la predeterminada. Al igual que los mapas de teclas, las fuentes de la consola se mantienen dentro de /usr/share/kbd/consolefonts que puede enumerar usando el ls comando:
ls /usr/share/kbd/consolefontsEsto enumerará todas las fuentes disponibles:

Ahora puede usar el setfont Comando para configurar uno de estos. Por ejemplo, si desea establecer el drdos8x16 por defecto, ejecute el siguiente comando:
setfont drdos8x16
Tanto las loadkeys y setfont los comandos son parte del kbd paquete que contiene las herramientas de teclado esenciales de Linux. Tienen una excelente documentación, por lo que si desea obtener más información, no dude en consultarla.
Cómo verificar el modo de inicio
Ahora que tiene su consola configurada, el siguiente paso es asegurarse de que ha arrancado en modo UEFI y no en modo BIOS.
Para ser honesto, este paso me parece innecesario ya que literalmente dice x86_64 UEFI en el menú de inicio en vivo. Pero hagámoslo por el bien de la guía de instalación oficial de Arch.
Para verificar el modo de arranque, ejecute el siguiente comando:
ls /sys/firmware/efi/efivarsSi está en modo UEFI, aparecerá una lista de varios archivos en su pantalla:
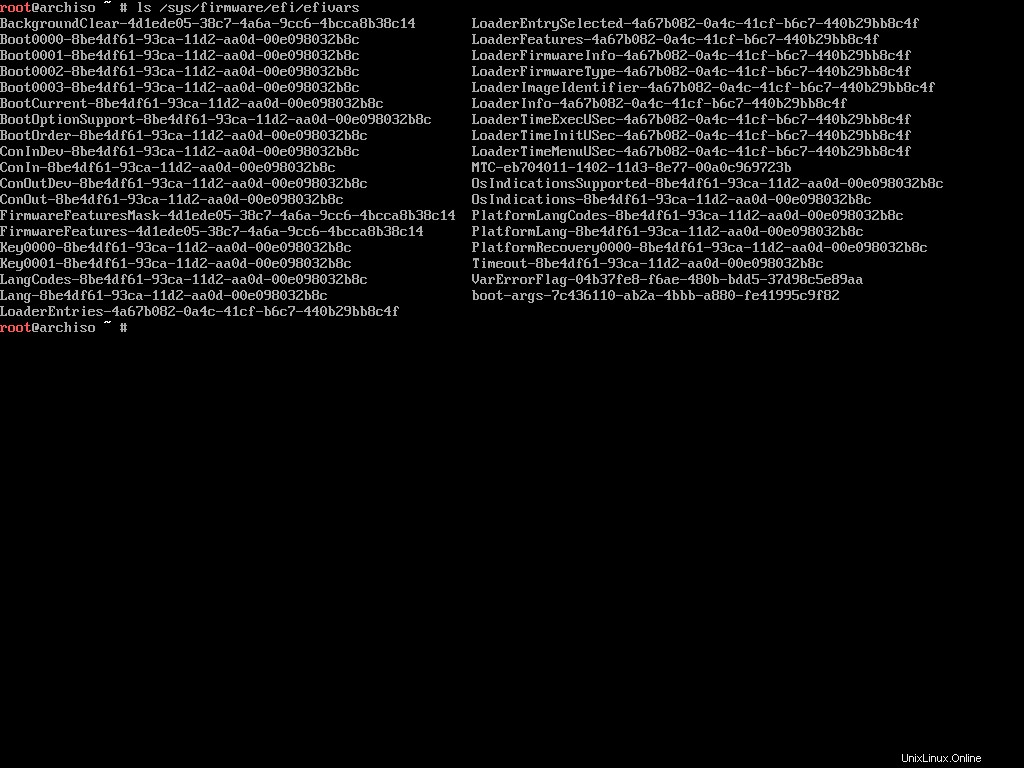
En caso de un arranque del BIOS, el efi el directorio ni siquiera existirá dentro de /sys/firmware directorio. Si está en modo UEFI (que debería estar si ha seguido todo correctamente), continúe con el siguiente paso.
Cómo conectarse a Internet
A diferencia de muchas otras distribuciones en vivo, el entorno en vivo de Arch no viene con todos los paquetes necesarios integrados. Contiene una serie de paquetes mínimos básicos que puede usar para instalar el resto del sistema. Por lo tanto, una conexión a Internet que funcione es imprescindible.
Si está utilizando una red cableada, entonces debería tener una conexión a Internet que funcione desde el principio. Para probarlo, haga ping en cualquiera de las direcciones públicas:
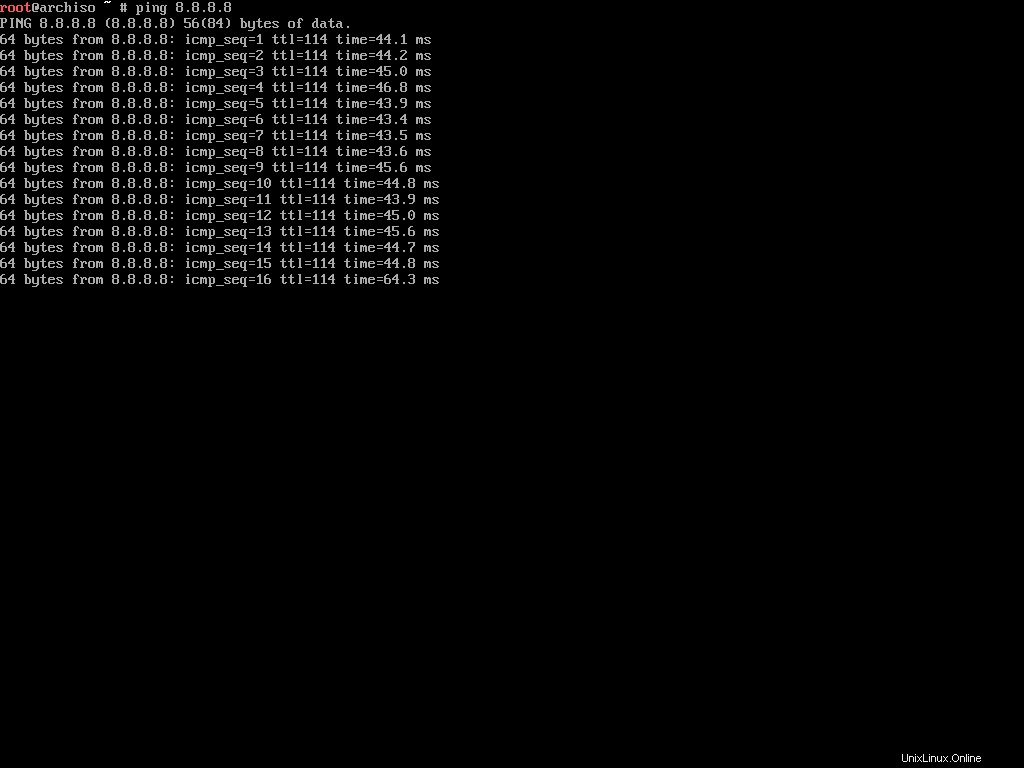
Estoy haciendo estas capturas de pantalla usando VirtualBox, por lo que la conexión a Internet funciona perfectamente con la conexión por cable. Pero si tiene una conexión inalámbrica, las cosas pueden complicarse un poco.
El entorno en vivo viene con el iwd o paquete de demonio inalámbrico iNet. Puede usar este paquete para conectarse a una red inalámbrica cercana.
Para empezar, ejecuta el siguiente comando:
iwctlEsto iniciará un mensaje interactivo de la siguiente manera:
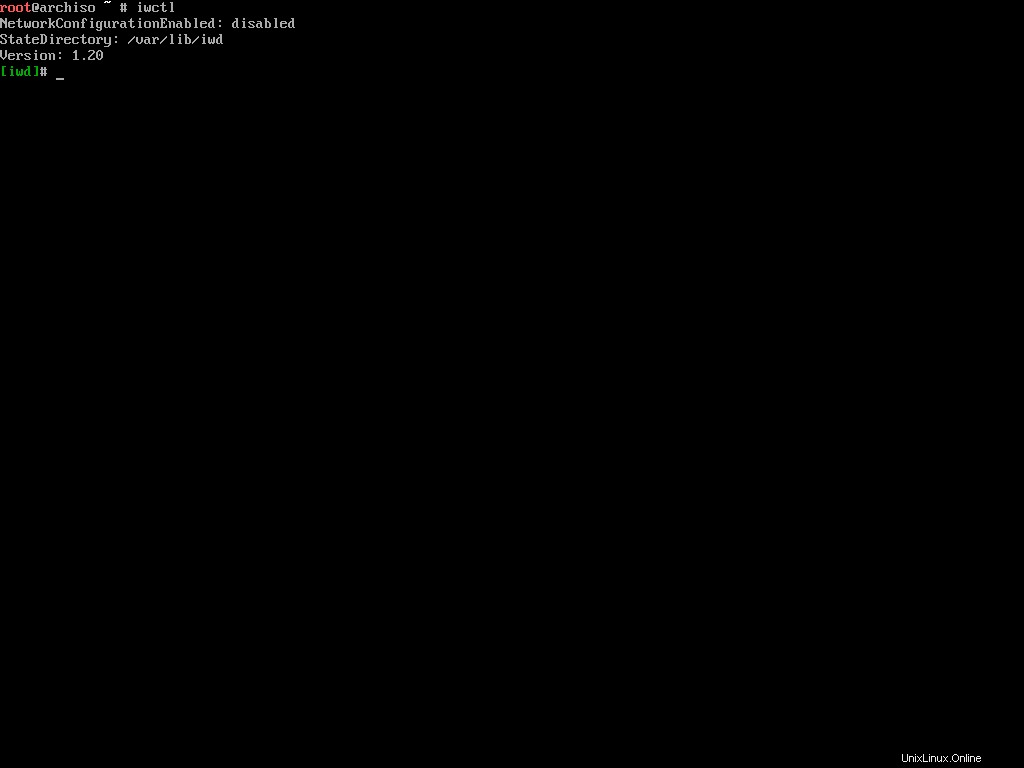
Ahora ejecute el siguiente comando para ver la lista de dispositivos inalámbricos disponibles:
device list
Esto escupirá una lista de dispositivos inalámbricos disponibles. Por dispositivos inalámbricos me refiero a cualquier adaptador inalámbrico conectado a su computadora. Supongamos wlan0 es el nombre del dispositivo.
Para buscar redes inalámbricas cercanas usando el dispositivo encontrado, ejecute el siguiente comando:
# station <device> scan

station wlan0 scan
Puede pensar que este comando imprimirá una lista de todas las redes cercanas, pero ese no es el caso. Para ver la lista de redes, ejecute el siguiente comando:
# station <device> get-networks

station wlan0 get-networks
Ahora suponiendo que el nombre de su red doméstica se llama Skynet , puede conectarse ejecutando el siguiente comando:
# station <device> connect <SSID>

station wlan0 connect Skynet
El iwctl programa le pedirá la contraseña de wi-fi. Insértelo con cuidado y, una vez conectado a la red, salga del programa escribiendo exit y dando enter. Intente hacer ping a una dirección pública una vez más y asegúrese de que Internet funcione bien.
Cómo actualizar el reloj del sistema
En Linux, NTP o Network Time Protocol se usa para sincronizar los relojes del sistema informático a través de una red. Puedes usar el timedatectl Comando para habilitar NTP en su entorno Arch Live:
timedatectl set-ntp trueEste comando comenzará a generar algunos resultados y después de unos segundos. Si no vuelve a aparecer el cursor de comando, pruebe a pulsar Intro. Me he enfrentado a este inconveniente varias veces en el pasado.
Cómo particionar los discos
Este es probablemente el paso más delicado de todo el proceso de instalación, porque si arruinas tus particiones, pierdes tus valiosos datos. Así que mi consejo sería no seguir inmediatamente con esta sección. En su lugar, lea la sección completa primero y luego siga adelante.
Para comenzar el proceso de partición, primero deberá conocer los diferentes discos conectados a su computadora. Puedes usar fdisk que es un programa basado en diálogos para la creación y manipulación de tablas de partición.
fdisk -lEste comando listará las tablas de particiones para todos los dispositivos disponibles en su computadora.
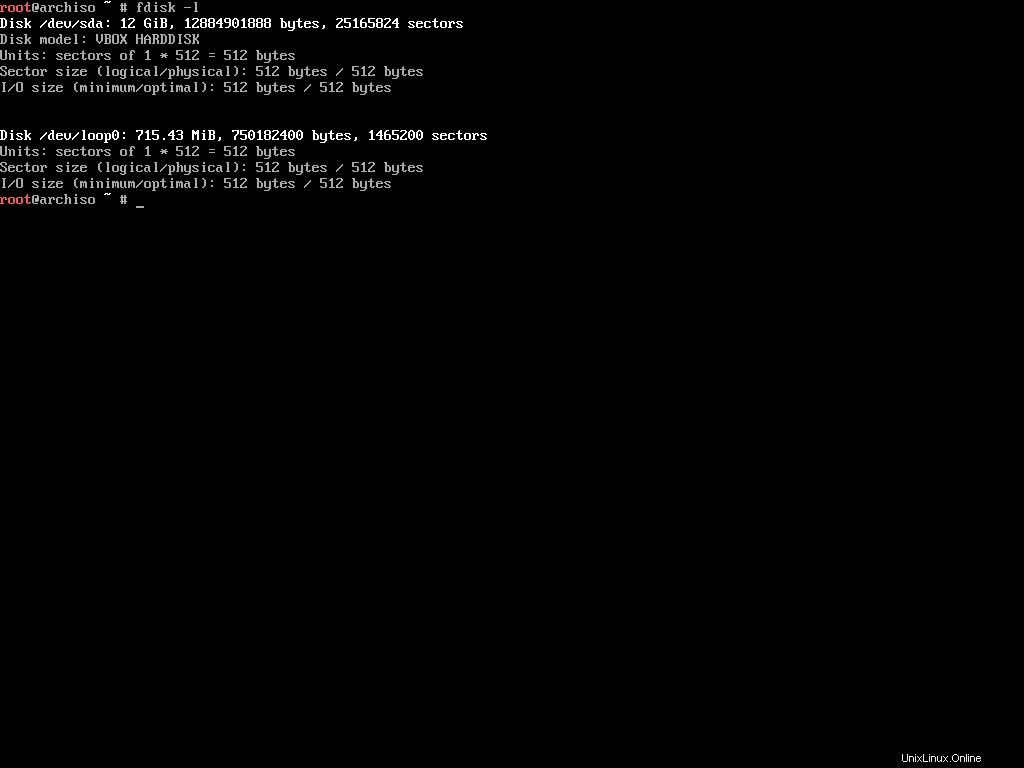
Como puede ver, hay dos dispositivos conectados a mi computadora (máquina virtual en realidad). Dependiendo de la cantidad de dispositivos que tenga, esta lista puede ser más larga, así que ignore cualquier dispositivo que termine con rom , loop o airoot al revisar la lista. No puede usar esos dispositivos para la instalación.
Eso nos deja con el /dev/sda dispositivo. Tenga en cuenta que esto puede ser completamente diferente en su máquina. Por ejemplo, si tiene una unidad NVME, puede ver /dev/nvme0n1 en su lugar.
Una vez que haya decidido qué dispositivo usar, es una buena idea verificar si hay particiones existentes dentro de ese dispositivo. Para hacerlo, puede usar la siguiente variación del mismo fdisk comando:
fdisk /dev/sda -l
Recuerde reemplazar /dev/sda con lo que tienes Este comando listará todas las particiones dentro del dispositivo dado.
Aunque no hay particiones en este dispositivo, en una situación de la vida real es posible que haya creado particiones previamente. Esas particiones se mostrarán como /dev/sda1 , /dev/sda2 o en el caso de una unidad NVME /dev/nvme0n1p1 , /dev/nvme0n1p2 y así sucesivamente.
El fdisk El programa puede hacer mucho más que enumerar particiones. Consulta la página correspondiente de ArchWiki para conocer las tareas que puedes realizar usando este programa.
Hay otro programa cfdisk que es un manipulador de tabla de particiones de disco basado en curses (biblioteca de programación) para Linux. Es similar en funcionalidad con fdisk pero estar basado en curses significa que tiene una interfaz que facilita el trabajo.
Ejecute el siguiente comando para iniciar cfdisk en su dispositivo preferido:
cfdisk /dev/sda
Recuerde reemplazar /dev/sda con lo que tienes Si el dispositivo tiene una tabla de particiones creada previamente, entonces cfdisk mostrará directamente la lista de particiones. De lo contrario, podrá elegir un tipo de tabla de partición para comenzar:
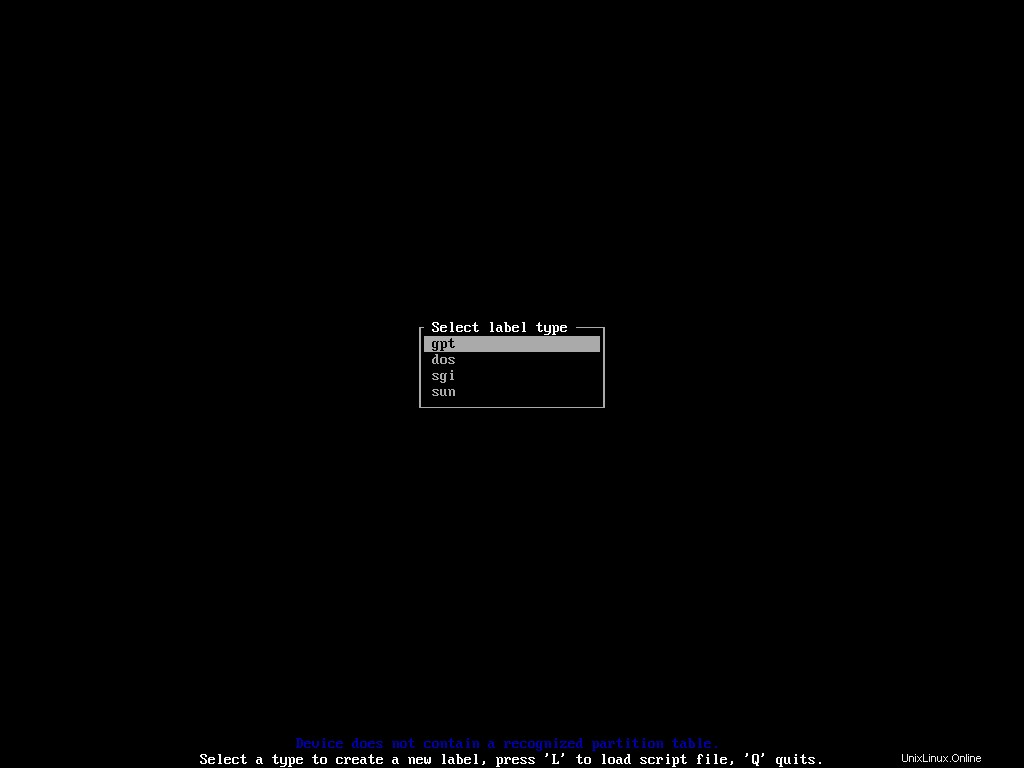
Elija gpt para su sistema basado en UEFI. A continuación, aterrizará en la lista de particiones y espacio libre en el dispositivo:
Puede moverse verticalmente a lo largo de la lista de dispositivos usando las teclas de flecha arriba/abajo y moverse horizontalmente a lo largo de las diferentes acciones usando las teclas de flecha izquierda/derecha.
Para instalar Arch, o cualquier otra distribución de Linux, necesitará tres particiones separadas. Son los siguientes:
- Partición del sistema EFI:para almacenar archivos requeridos por el firmware UEFI.
- ROOT:para instalar la propia distribución.
- SWAP:para servir como espacio de desbordamiento para su RAM.
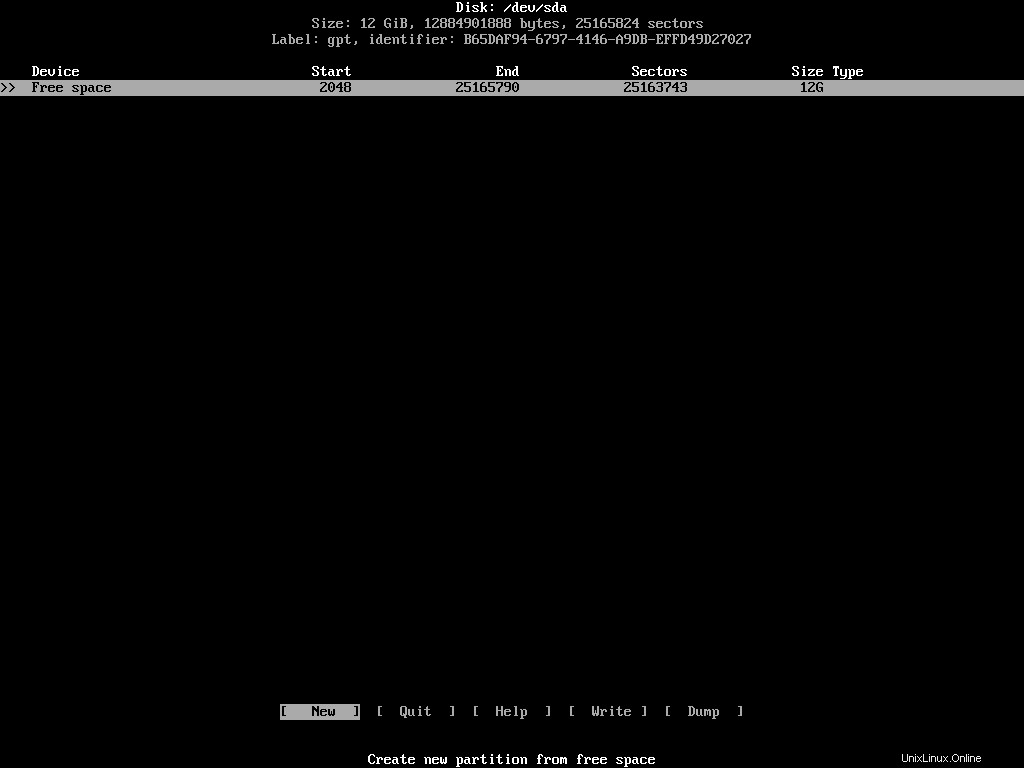
Asegúrese de que la partición o el espacio libre correctos estén resaltados en la lista y seleccione [ New ] acción.
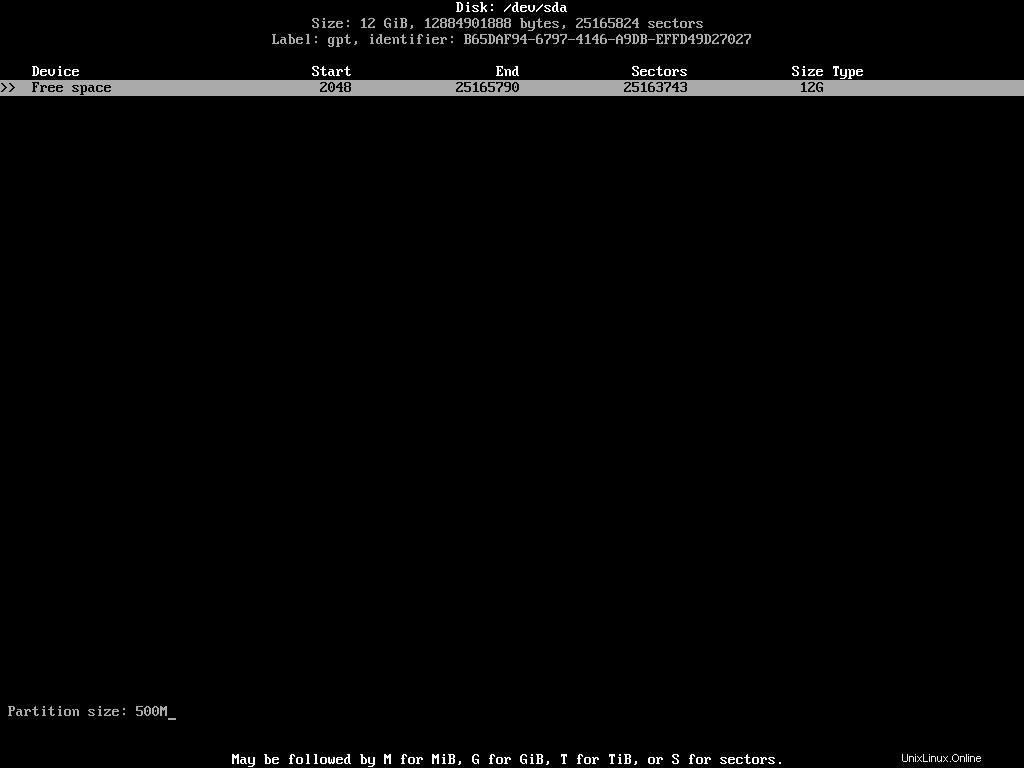
Ponga el tamaño de partición deseado. Puede usar M para indicar megabytes, G para gigabytes y T para terabytes.
Para una partición del sistema EFI, debe asignar al menos 500 MB. Una vez que haya ingresado el tamaño deseado, presione Entrar para finalizar. La lista actualizada de particiones puede tener el siguiente aspecto:
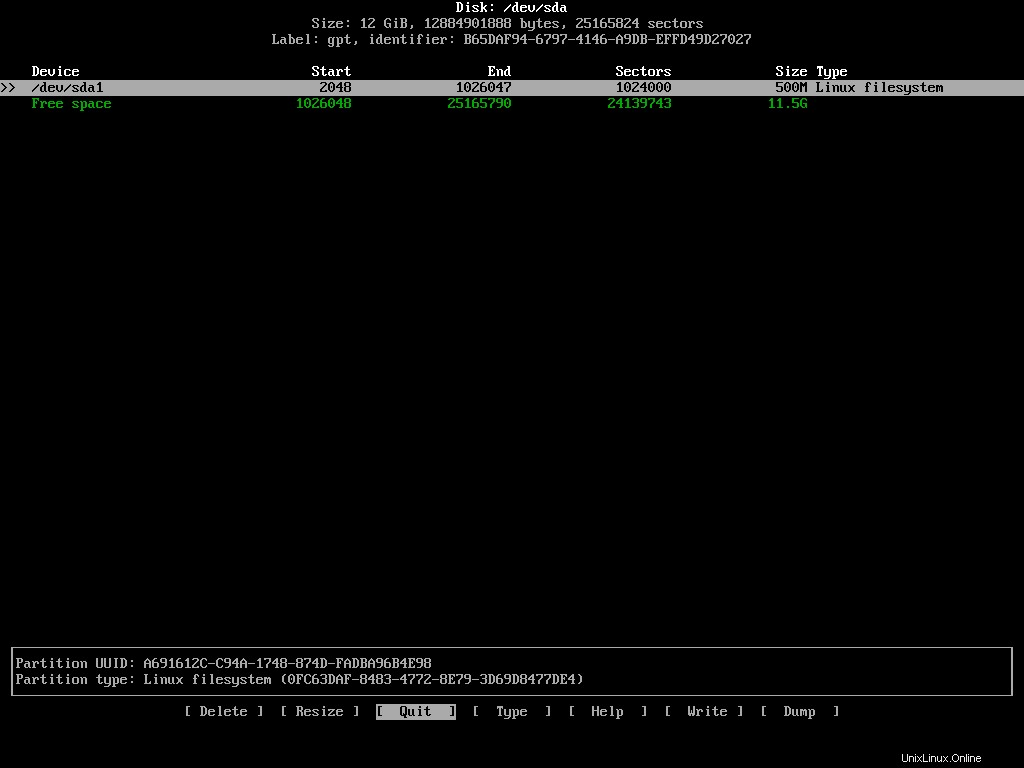
La partición del sistema EFI es un tipo especial de partición. Tiene que estar en un tipo y formato específico. Para cambiar el tipo predeterminado, mantenga resaltada la partición recién creada y seleccione [ Type ] de la lista de acciones.
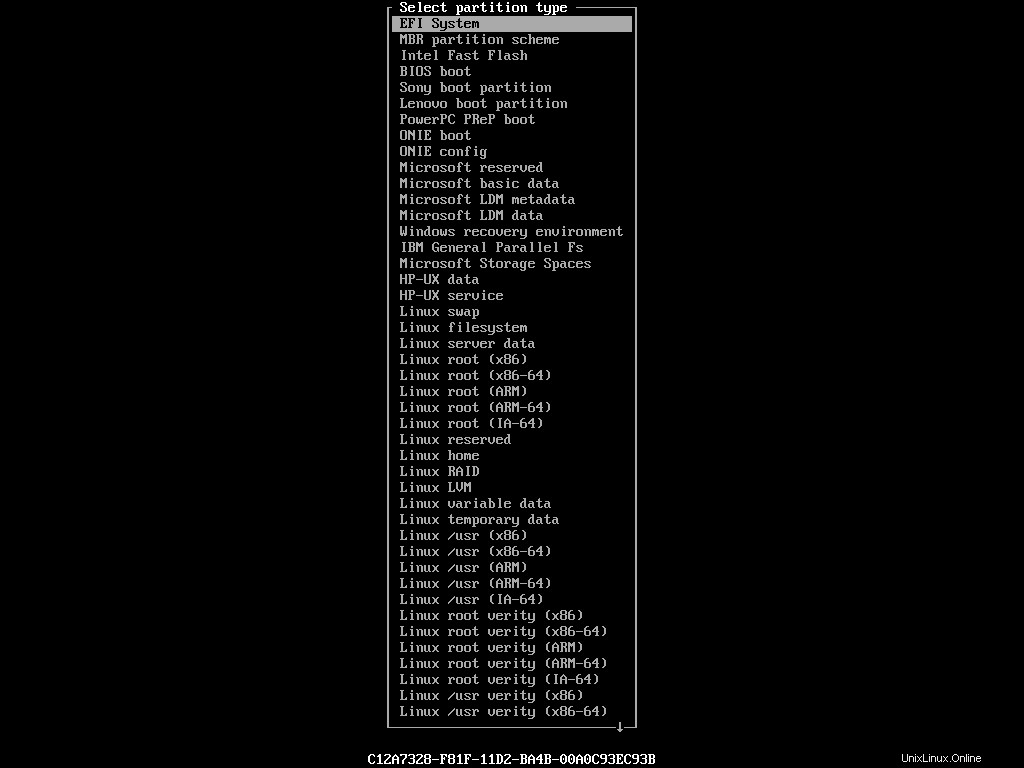
De esta larga lista de tipos, resalte EFI System y presione Entrar. El tipo de partición en la lista debería actualizarse en consecuencia:
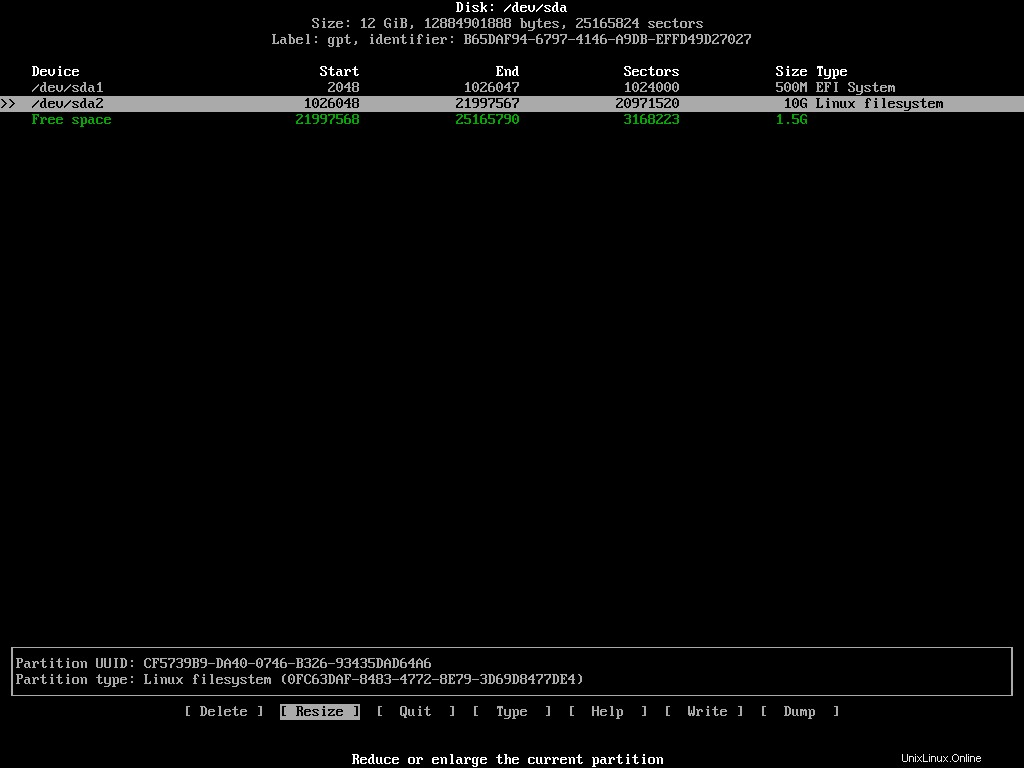
La siguiente es la partición raíz. Resalte el espacio libre restante y seleccione [ New ] una vez más. Esta vez asigne 10 GB a esta partición. El tamaño ideal de la partición raíz depende de sus necesidades. Personalmente, asigno al menos 100 GB a la partición raíz de todas mis instalaciones de Linux.
No necesita cambiar el tipo de esta partición. El Linux filesystem predeterminado lo haré.
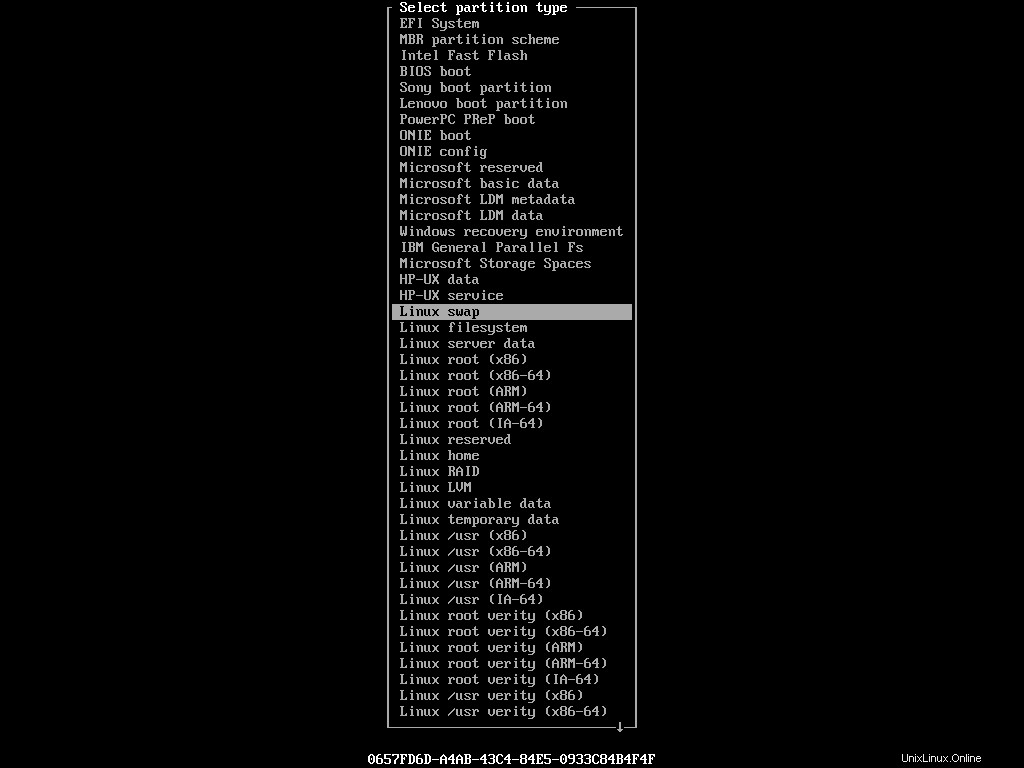
Cree una última partición con el espacio restante y cambie su tipo a Linux swap del menú:
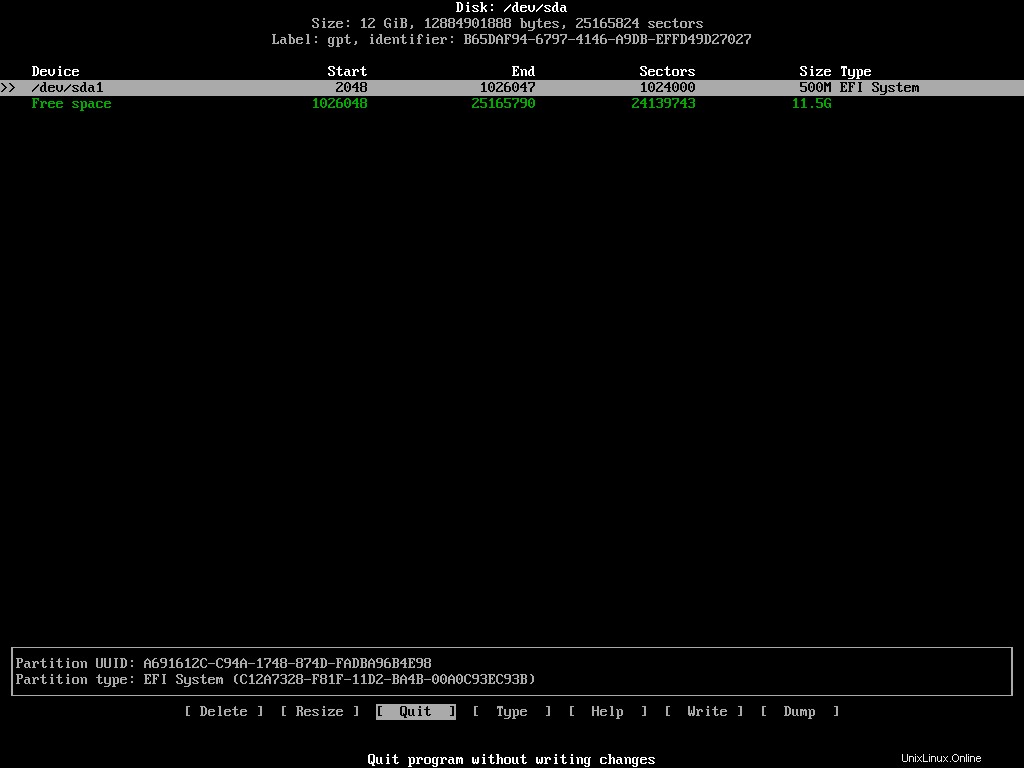
El tamaño ideal de una partición de intercambio es un tema de debate. Personalmente, no tengo particiones de intercambio en mis máquinas. La cantidad de RAM física que tengo es más que suficiente. Pero si alguna vez siento la necesidad de uno más adelante, uso un swapfile en cambio. De todos modos, el estado final de su dispositivo debería ser el siguiente:
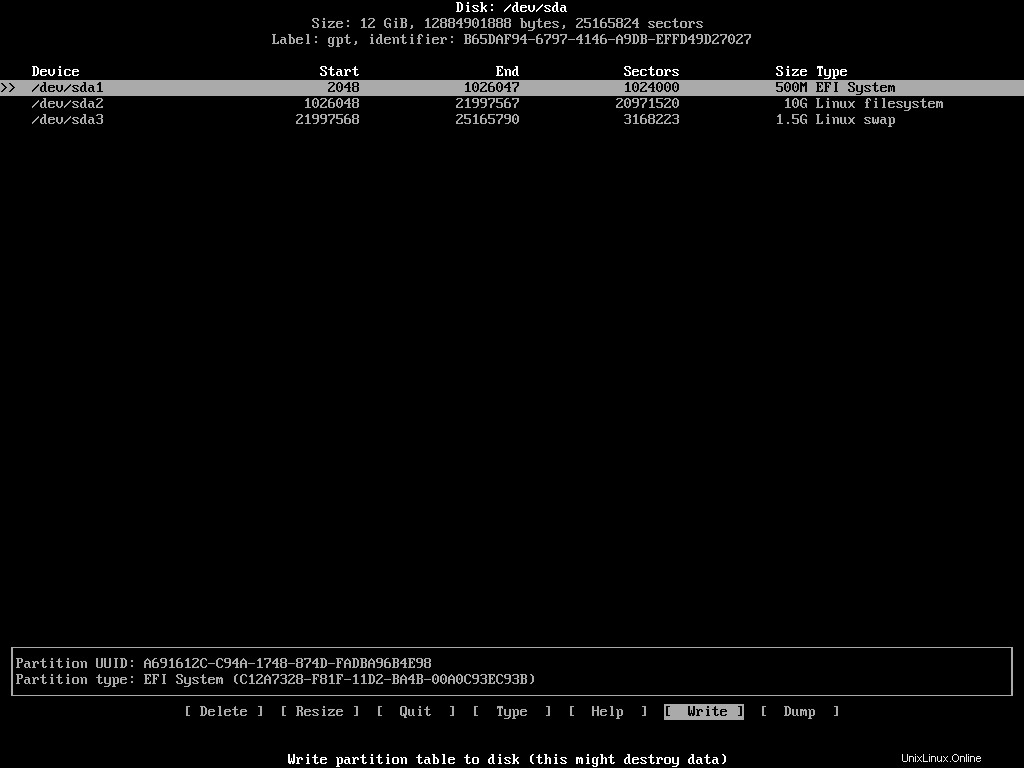
Si está satisfecho con la configuración, resalte [ Write ] de la lista de acciones y presione Entrar. El programa le preguntará si desea conservar estos cambios o no. Tendrás que escribir yes y presione enter si está de acuerdo. Una vez que se haya modificado la tabla de particiones, seleccione [ Quit ] para salir del programa.
Una cosa que me gustaría mencionar para aquellos que intentan instalar Arch Linux junto con Windows es que, en ese caso, la partición del sistema EFI ya debería existir en su dispositivo. Así que no toques eso. Solo crea las otras particiones y sigue adelante.
Cómo formatear las particiones
Ahora que ha creado las particiones necesarias, deberá formatearlas en consecuencia. Puedes usar el mkfs y mkswap programas para hacer eso. Antes de formatear, eche un vistazo final a su lista de particiones ejecutando el siguiente comando:
fdisk /dev/sda -lEsta vez verás las tres particiones recién creadas con sus detalles:
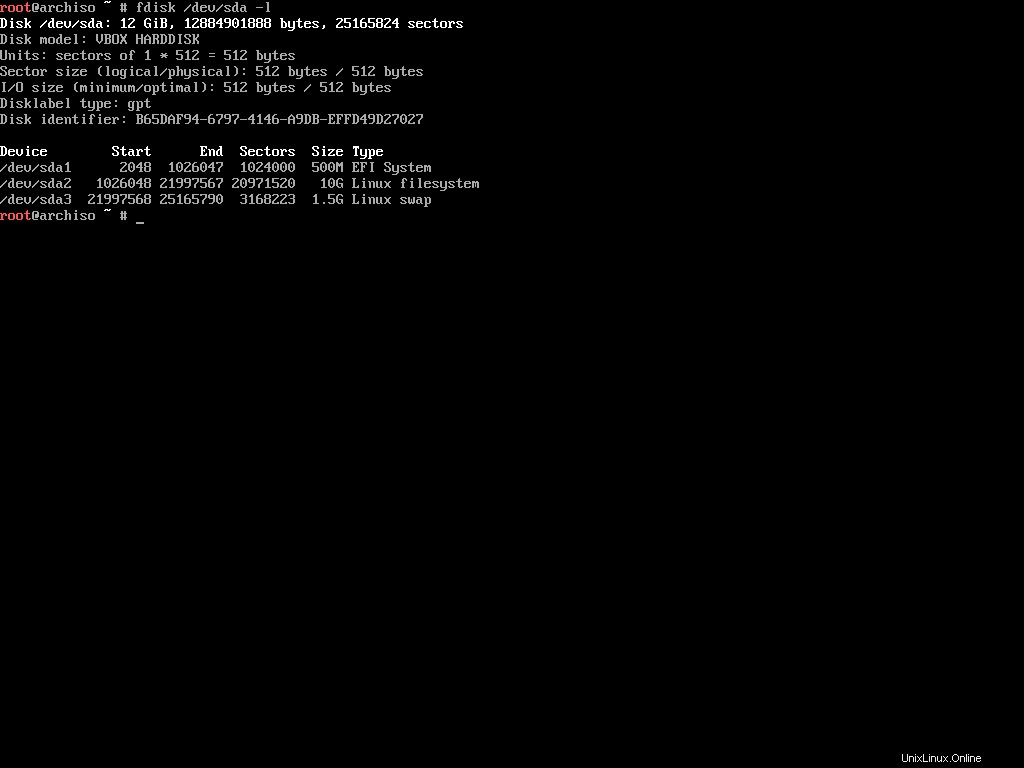
Tome nota de los nombres de los dispositivos, como /dev/sda1 , /dev/sda2 , /dev/sda3 y así. La partición del sistema EFI debe estar en formato FAT32. Ejecute el siguiente comando para formatear una partición en formato FAT32:
mkfs.fat -F32 /dev/sda1La siguiente es la partición raíz. Puede estar en varios formatos, pero prefiero usar EXT4 para todos mis sistemas de archivos de Linux. Use el siguiente comando para formatear la partición en EXT4:
mkfs.ext4 /dev/sda2Esta operación puede tardar unos minutos en finalizar dependiendo del tamaño de su partición. Finalmente, la partición de intercambio. Use el siguiente comando para formatear eso:
mkswap /dev/sda3Con eso, ha terminado el proceso de preparación de sus particiones para la instalación.
Cómo montar los sistemas de archivos
Ahora que ha creado y formateado sus particiones, está listo para montarlas. Puedes usar el mount comando con los puntos de montaje apropiados para montar cualquier partición:
# mount <device> <mount point>

mount /dev/sda2 /mnt
Espero que recuerdes que el /dev/sda2 La partición fue creada para ser la partición raíz. El /mnt El punto de montaje en Linux es para montar un dispositivo de almacenamiento temporalmente. Como solo necesitamos montar la partición para instalar Arch Linux en ella, el /mnt el punto de montaje es perfecto.
En el caso de una partición de intercambio, no la montará como las demás. Tendrá que decirle a Linux que use esta partición como intercambio explícitamente. Para hacerlo, ejecute el siguiente comando:
swapon /dev/sda3
Como habrás adivinado, el swapon El comando le dice al sistema que cambie en este dispositivo. Trabajaremos con la partición del sistema EFI en una sección posterior. Por ahora, bastará con montar estas dos particiones.
Cómo configurar los espejos
Hay un último paso antes de que pueda instalar Arch Linux en su máquina, y es configurar los espejos. Los espejos son servidores ubicados en diferentes puntos del mundo para atender a la población cercana.
El instalador viene con Reflector, un script de Python escrito para recuperar la última lista de réplicas de la página de estado de réplicas de Arch Linux. Para imprimir la última lista de espejos, simplemente ejecute el siguiente comando:
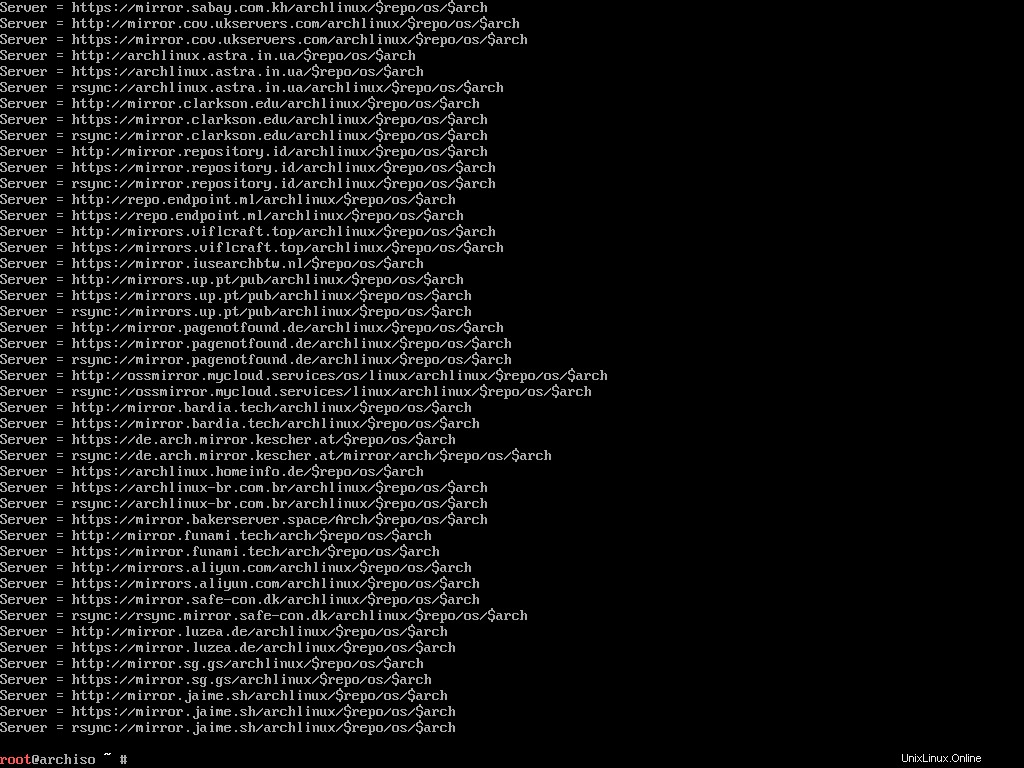
reflectorSi tiene una conexión a Internet lenta, es posible que encuentre un mensaje de error como el siguiente:
failed to rate http(s) download (https://arch.jensgutermuth.de/community/os/x86_64/community.db): Download timed out after 5 second(s).Esto sucede cuando el tiempo de espera predeterminado (5 segundos) es inferior al tiempo real que se tarda en descargar la información.
Puede solucionar este problema utilizando --download-timeout opción:
reflector --download-timeout 60Ahora Reflector esperará un minuto completo antes de comenzar a gritar. Debería aparecer una larga lista de espejos en su pantalla:
Revisar toda la lista para encontrar espejos cercanos sería una molestia. Es por eso que reflector puede hacer eso por ti.
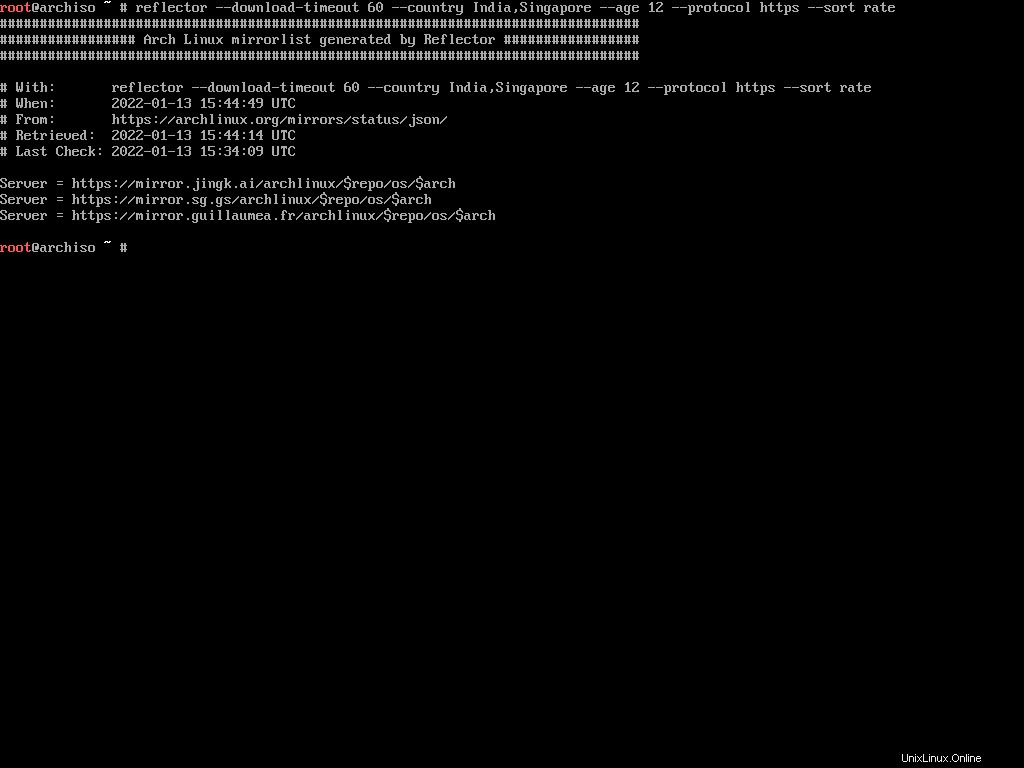
Reflector puede generar una lista de espejos basada en una plétora de restricciones dadas. Por ejemplo, quiero una lista de espejos que se sincronizaron en las últimas 12 horas y que están ubicados en India o Singapur (estos dos son los más cercanos a mi ubicación), y ordeno los espejos por velocidad de descarga.
Resulta que el reflector puede hacer eso:
reflector --download-timeout 60 --country India,Singapore --age 12 --protocol https --sort rateLos servidores encontrados se enumerarán como antes:
Imprimir una lista espejo como esta no es suficiente. Deberá conservar la lista en /etc/pacman.d/mirrorlist localización. Pacman, el administrador de paquetes predeterminado para Arch Linux, usa este archivo para obtener información sobre los espejos.
Antes de sobrescribir la lista de réplicas predeterminada, haz una copia:
cp /etc/pacman.d/mirrorlist /etc/pacman.d/mirrorlist.bak
Ahora ejecute el comando reflector con --save opción de la siguiente manera:
reflector --download-timeout 60 --country India,Singapore --age 12 --protocol https --sort rate --save /etc/pacman.d/mirrorlistEste comando generará la lista de réplicas y sobrescribirá la predeterminada. Ahora está listo para instalar el sistema base Arch Linux.
Cómo instalar Arch Linux Base System
Antes de instalar el sistema base, es una buena idea actualizar la memoria caché del paquete de acuerdo con la nueva lista de espejos. Para hacerlo, ejecute el siguiente comando:
pacman -Sy
El pacman programa para Arch Linux es lo que apt es para Ubuntu o dnf es para Fedora. El -S opción significa sincronización que es equivalente a install en apt o dnf administradores de paquetes.
Una vez que finaliza el proceso de actualización, puede usar el pacstrap script para instalar el sistema Arch Linux. Ejecute el siguiente comando para iniciar el proceso de instalación:
pacstrap /mnt base base-devel linux linux-firmware sudo nano ntfs-3g networkmanager
El pacstrap script puede instalar paquetes en un nuevo directorio raíz especificado. Como recordará, la partición raíz se montó en /mnt punto de montaje, así que eso es lo que usará con este script. Luego pasará los nombres de los paquetes que desea instalar:
base– Paquete mínimo establecido para definir una instalación básica de Arch Linux.base-devel– Grupo de paquetes necesarios para crear software desde el código fuente.linux– El kernel en sí.linux-firmware– Controladores para hardware común.sudo– ¿Quieres ejecutar comandos como root, verdad?nano– Un clon de pico editor con algunas mejoras.ntfs-3g– Controlador y utilidades del sistema de archivos NTFS necesarios para trabajar con unidades NTFS.networkmanager– Proporciona detección y configuración para que los sistemas se conecten automáticamente a las redes.
Quisiera aclarar que esta lista de siete paquetes no es algo obligatorio. Para tener una instalación funcional de Arch Linux, solo necesita la base , linux y linux-firmware paquetes Pero teniendo en cuenta que necesitarás los otros de todos modos, ¿por qué no atraparlos todos de una vez?
Dependiendo de su conexión a Internet, el proceso de instalación puede demorar un tiempo. Siéntate y relájate hasta que pacstrap hace lo suyo. Una vez hecho esto, verá algo como lo siguiente:
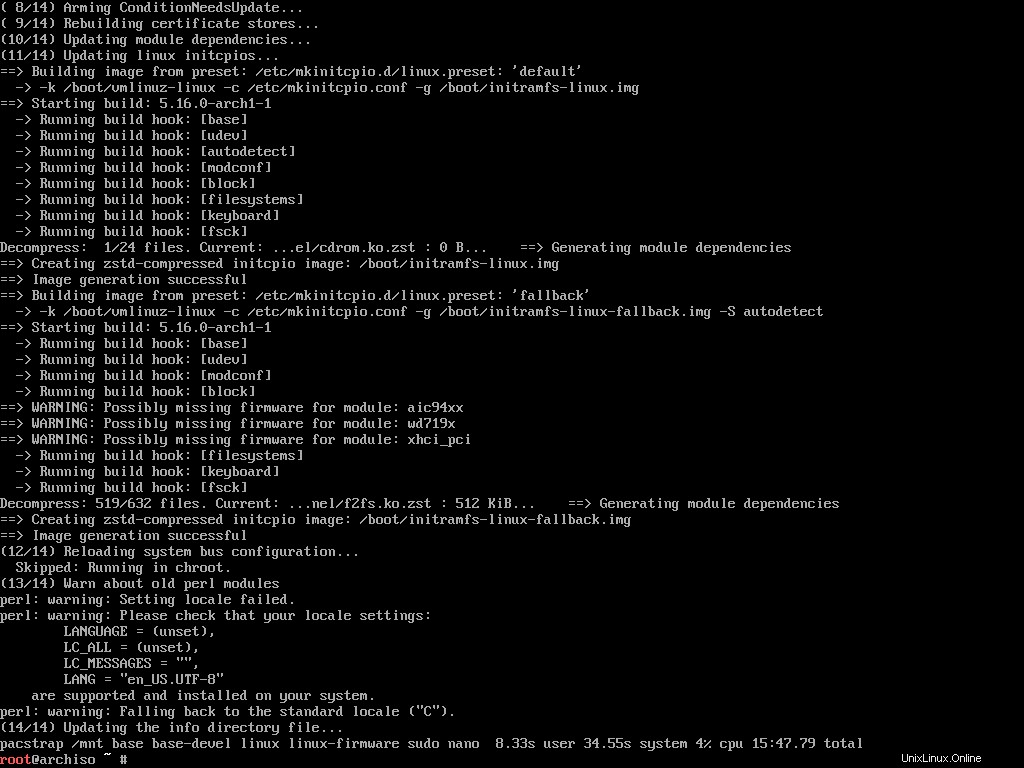
Felicitaciones, ha instalado con éxito Arch Linux en su computadora. Todo lo que queda por hacer ahora es configurar el sistema.
Cómo configurar Arch Linux
Instalar Arch Linux no fue tan difícil, ¿verdad? De hecho, en mi opinión, instalarlo es mucho más sencillo que configurarlo. Hay mucho que hacer aquí. Así que empecemos.
Cómo generar el archivo Fstab
Según ArchWiki,
El fstab El archivo se puede usar para definir cómo se deben montar las particiones de disco, varios otros dispositivos de bloque o sistemas de archivos remotos en el sistema de archivos. En otras distribuciones como Ubuntu o Fedora esto se genera automáticamente durante la instalación. En Arch, sin embargo, tendrás que hacerlo manualmente. Para hacerlo, ejecute el siguiente comando:
genfstab -U /mnt >> /mnt/etc/fstab
El genfstab El programa puede detectar todos los montajes actuales debajo de un punto de montaje dado e imprimirlos en formato compatible con fstab en la salida estándar. Entonces genfstab -U /mnt generará todos los montajes actuales bajo /mnt punto de montaje. Podemos guardar esa salida en /mnt/etc/fstab archivo usando el >> operador.
Cómo iniciar sesión en el sistema recién instalado usando Arch-Chroot
En este momento, está conectado al entorno en vivo y no al sistema que acaba de instalar.
Para continuar configurando su sistema recién instalado, primero deberá iniciar sesión en él. Para hacerlo, ejecute el siguiente comando:
arch-chroot /mnt
El arch-chroot bash script is part of the arch-install-scripts package and lets you change to the newly installed system's root user without any reboot. How cool is that!
How To Configure the Time Zone
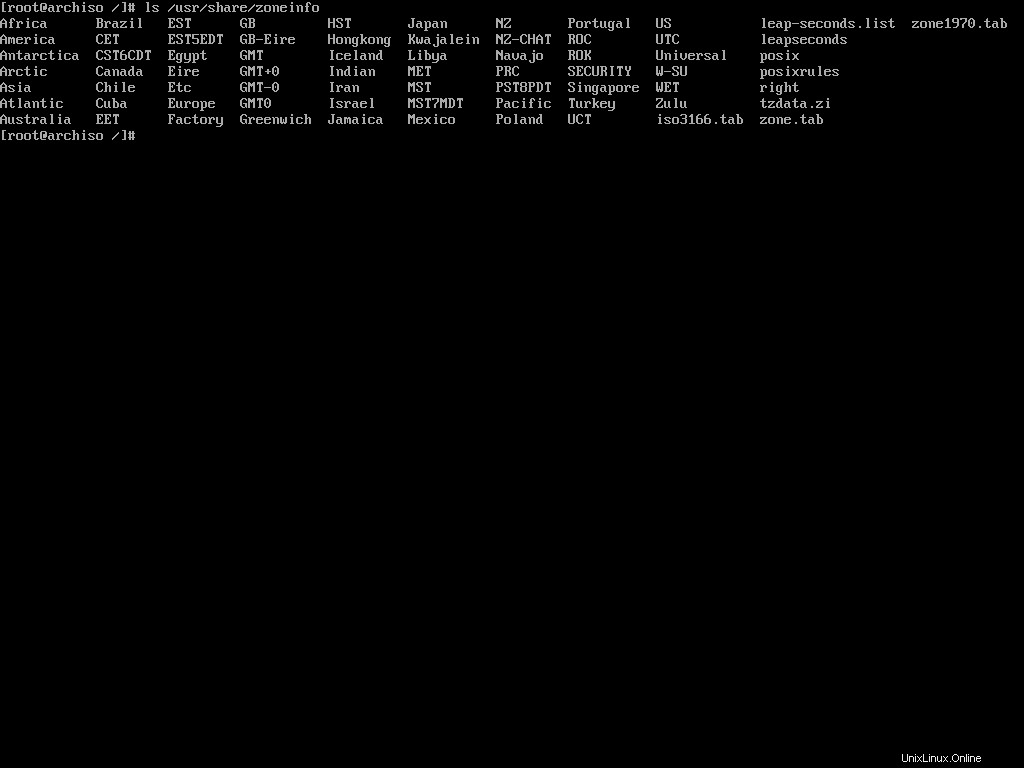
Once you've switched root, the first thing to configure is the time zone. To see a list of all the available zones, execute the following command:
ls /usr/share/zoneinfoAll the major zones should be in the directory.
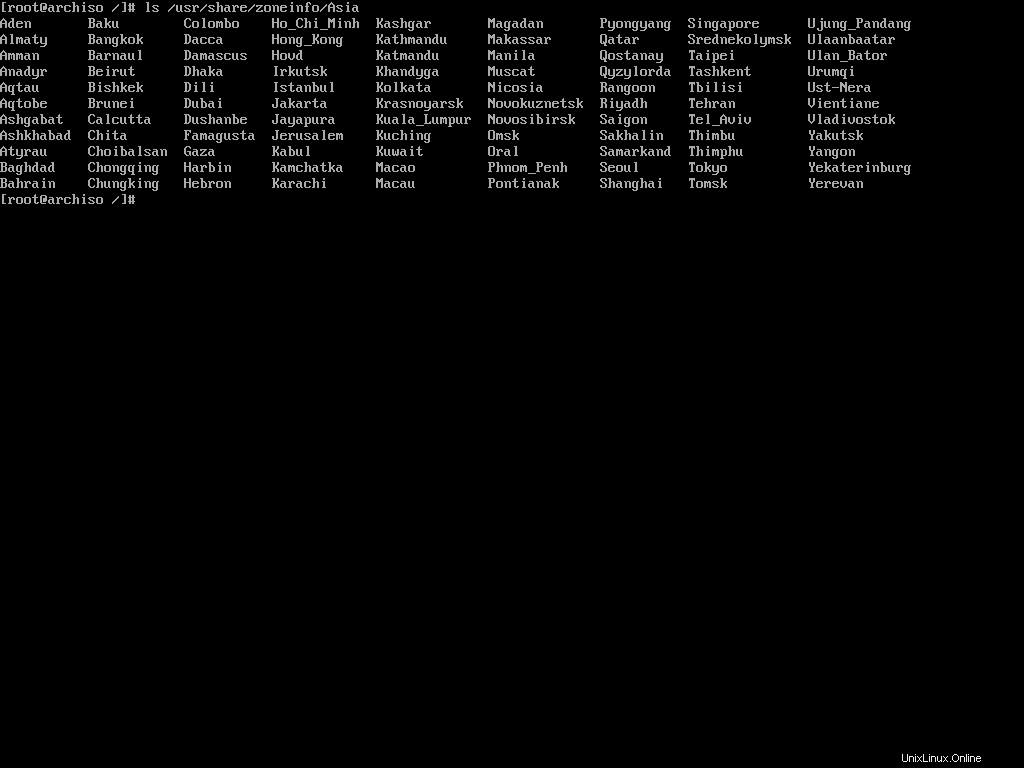
I live in Dhaka, Bangladesh which resides inside the Asia zone. If I list out the content of Asia, I should see Dhaka there:
To set Asia/Dhaka as my default time zone, I'll have to make a symbolic link of the file at the /etc/localtime location:
ln -sf /usr/share/zoneinfo/Asia/Dhaka /etc/localtime
The ln command is used for creating symbolic links. The -sf options indicate soft and force, respectively.
How To Configure the Localization
Now you'll have to configure your languages. Arch Linux has an easy way to set that up as well.
First, you'll have to edit the etc/locale.gen file according to your localization. Open the file in the nano text editor:
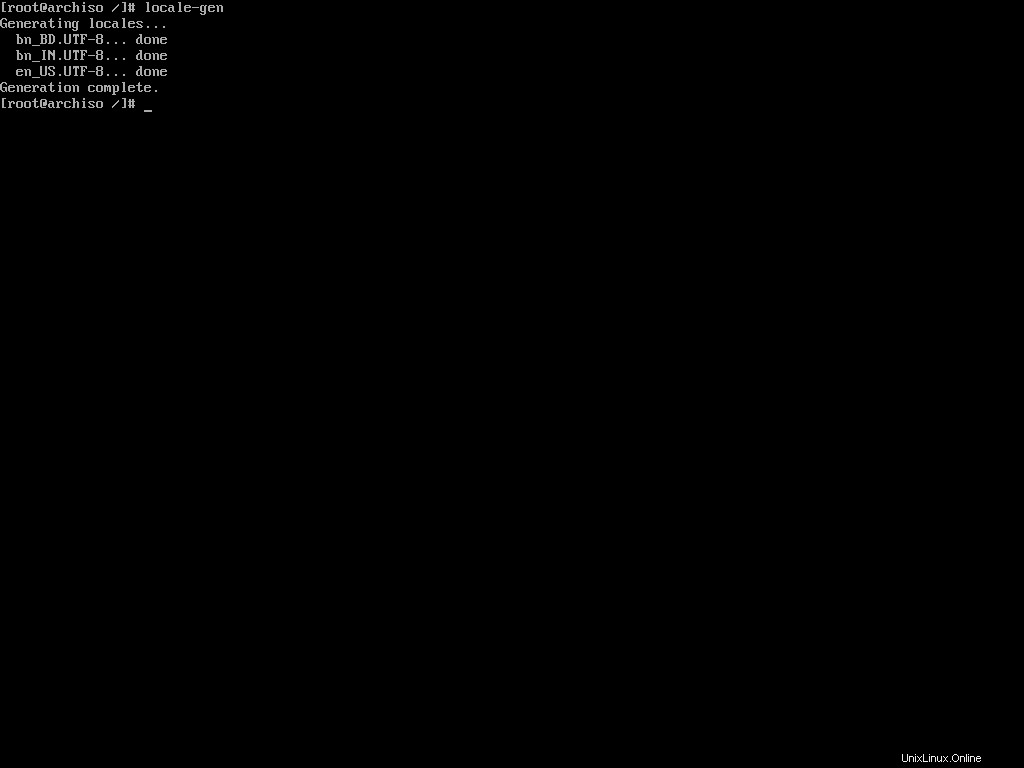
nano /etc/locale.genYou'll see a long list of languages:
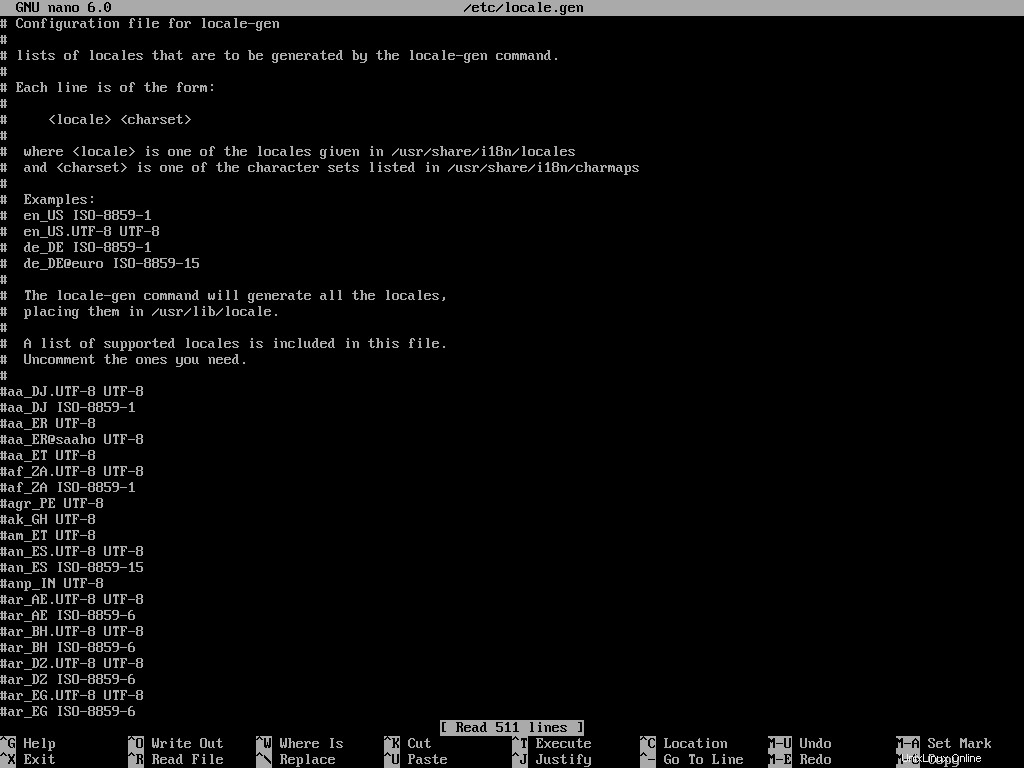
You'll have to uncomment the languages that you want to enable. I usually only need English and Bengali. So I'll locate the en_US.UTF-8 UTF-8 , bn_BD UTF-8 , and bn_IN UTF-8 idiomas Save the file by pressing Ctrl + O and exit nano by pressing the Ctrl + X key combination.
Now you'll have to execute the following command:
locale-gen
The locale-gen command will read your /etc/locale.gen file and generate the locales accordingly.
Now that you've enabled multiple languages, you'll have to tell Arch Linux which one to use by default. To do so, open the /etc/locale.conf file and add the following line to it:
LANG=en_US.UTF-8
That's all you gotta do to configure your locale. You can always go back to the /etc/locale.gen file and add or remove languages from it. Just remember to run locale-gen whenever you do that.
Apart from the locales, if you've made any changes to your console keymaps in the first step of installation, you may want to persist them now. To do so, open the /etc/vconsole.conf file and add your preferred keymaps there.
For example, if you changed the default keymaps to mac-us in the first step, then you may want to add the following line to the vconsole.conf archivo:
KEYMAP=mac-usNow every time you use the virtual console, it'll have the correct keymap and you will not have to configure it every time.
How To Configure the Network
Configuring a network manually in any Linux distribution can be tricky. That's why I advised you to install the networkmanager package during the system installation. If you did as I said, you're good to go. Otherwise, use pacman to install the package now:
pacman -S networkmanager
Pacman is a package manager. You'll learn more about it later. Let's set the host name for your computer now. A host name is a unique name created to identify a machine on a network, written in the /etc/hostname archivo.
Open the file with nano and write your host name in it. You can use anything to identify your machine. I usually use my device brand or model as my hostname and as I'm on a legion laptop, I'll simply write the following:
legion
Local host name resolution is provided by nss-myhostname (an NSS module provided by systemd) without having to edit /etc/hosts expediente. It is enabled by default.
But some software may still read the /etc/hosts file directly. Open the file in nano and add the following lines to it:
127.0.0.1        localhost
::1              localhost
127.0.1.1        legion
Make sure to replace legion with your host name. Now you may install the aforementioned package:
pacman -S networkmanager
Enable the NetworkManager service by executing the following command:
systemctl enable NetworkManager
Make sure to write NetworkManager and not networkmanager as the service name. If the command succeeds, network manager will start automatically on boot from now on and do its thing.
How To Set the Root Password
You may want to set a password for the root user because why not? To do so, execute the following command:
passwd
The passwd command lets you change the password for a user. By default it affects the current user's password which is the root right now.
It'll ask for a new password and confirmation password. Input them carefully and make sure you don't forget the password.
How To Create a Non-root User
Using your Linux system as the root user for long is not a good idea. So creating a non-root user is important. To create a new user, execute the following command:
useradd -m -G wheel farhan
The useradd command lets you create a new user. Make sure to replace my name with the one you want to use. The -m option indicates that you also want it to create the corresponding home directory. The -G option will add the new user to the wheel group which is the administration user group in Arch Linux.
Now you can use the passwd command once again to set the password for the newly created user:
passwd farhanThe program will prompt you for a new password and a password confirmation. Again, don't forget to replace my name with the one you've used.
Finally, you'll have to enable sudo privilege for this new user. To do so, open the /etc/sudoers file using nano. Once open, locate the following line and uncomment it:
# %wheel ALL=(ALL) ALL
This file essentially means that all users in the wheel group can use sudo by providing their password. Save the file by hitting Ctrl + O and exit nano by hitting Ctrl + X. Now the new user will be able to use sudo when necessary.
How To Install Microcode
According to PCMag,
A set of elementary instructions in a complex instruction set computer (CISC). The microcode resides in a separate high-speed memory and functions as a translation layer between the machine instructions and the circuit level of the computer. Microcode enables the computer designer to create machine instructions without having to design electronic circuits.
Processor manufacturers such as Intel and AMD often release stability and security updates to the processor. These updates are crucial for the system's stability.
In Arch Linux, microcode updates are available through official packages that every user should install on their systems.
# for amd processors
pacman -S amd-ucode

# for intel processors
pacman -S intel-ucode
Just installing these packages is not enough though. You'll have to make sure that your bootloader is loading them. You'll learn about it in the next section.
How To Install and Configure a Boot Loader
According to Wikipedia,
A bootloader, also spelled as boot loader or called boot manager and bootstrap loader, is a computer program that is responsible for booting a computer.
The internals of bootloader is out of scope of this article so I'll just go on with the installation process. If you've used any other Linux distribution in the past you may have encountered the GRUB menu.
GRUB is one of the most popular bootloaders out there. Although there are a number of options available, I'll demonstrate the installation of GRUB because it is what most people will likely use.
To install GRUB, you'll have to first install two packages.
pacman -S grub efibootmgr
If you're installing alongside other operating systems, you'll also need the os-prober package:
pacman -S os-proberThis program will search for already installed operating systems on your system and will make them a part of the GRUB configuration file.
Now, you'll have to mount the EFI system partition you created a few sections ago. To do so, you'll have to first create an efi directory:
mkdir /boot/efiAccording to Wikipedia,
In Linux, and other Unix-like operating systems, the /boot/ directory holds files used in booting the operating system.
This directory is present in all Unix-like operating systems. The above mentioned command creates a directory called efi inside the /boot directorio. After creating the directory, you'll have to mount your EFI system partition in that directory.
mount /dev/sda1 /boot/efi
I hope you remember that we formatted the /dev/sda1 device as the EFI system partition during the partitioning phase. Make sure to use the correct one for your device.
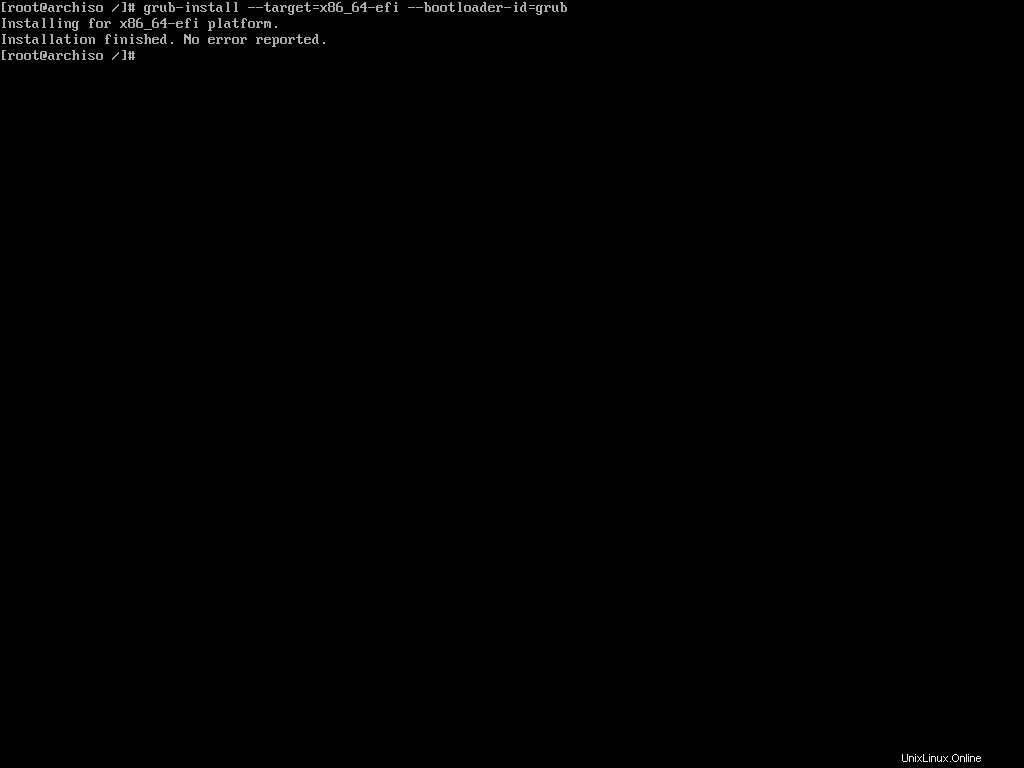
Now, we'll use the grub-install command to install GRUB in the newly mounted EFI system partition:
grub-install --target=x86_64-efi --bootloader-id=grub
You can more or less use this command verbatim. You can change the --bootloader-id to something more expressive like arch o algo mas. If the installation finishes without any errors, you'll then have to generate the GRUB configuration file.
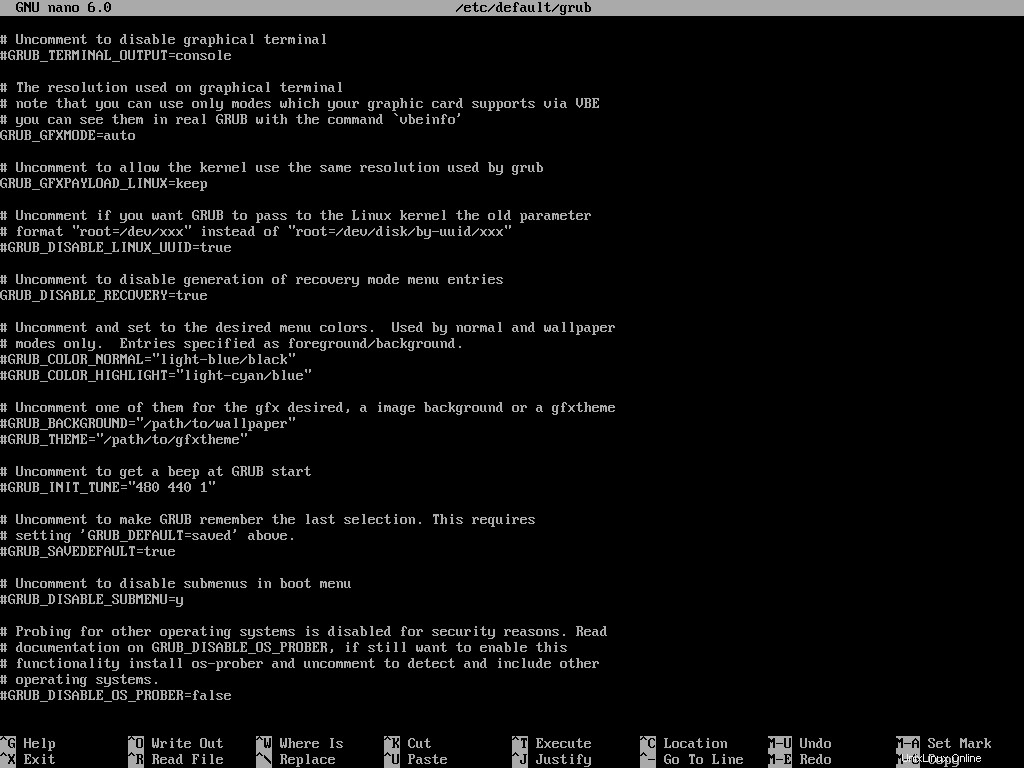
If you're installing alongside other operating systems, you'll have to enable os-prober before generating the configuration file. To do so, open the /etc/default/grub file in nano text editor. Locate the following line and uncomment it:
#GRUB_DISABLE_OS_PROBER=falseThis should be the last line in the aforementioned file so just scroll to the bottom and uncomment it.
Now execute the following command to generate the configuration file:
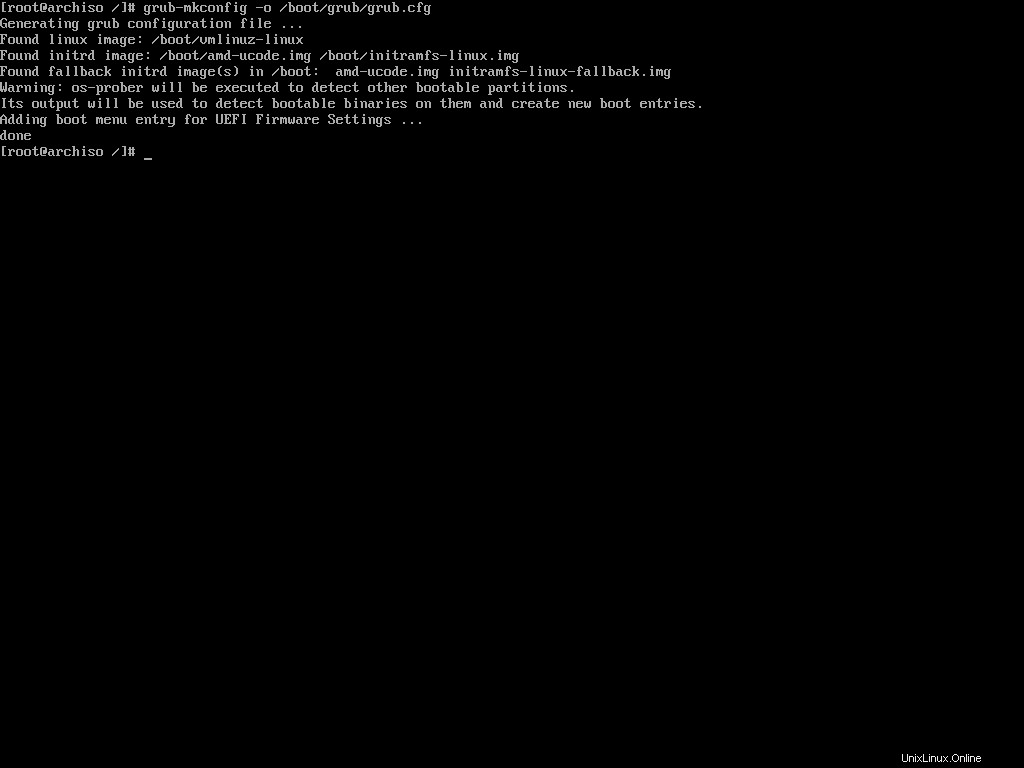
grub-mkconfig -o /boot/grub/grub.cfg
The grub-mkconfig command generates the GRUB configuration file and saves it to a given target location. In this case /boot/grub/grub.cfg is the target location.
The command will also take into account the microcode you installed earlier and any other existing operating system on your machine.
Congratulations, you now have a working Arch Linux installation. At this point, you can exit the Arch-Chroot environment, unmount the partition, and reboot. But I would suggest you to stay a bit longer and set-up the graphical user interface as well.
How To Install Xorg
To run programs with graphical user interfaces on your system, you'll have to install an X Window System implementation. The most common one is Xorg.
To install Xorg, execute the following command:
pacman -S xorg-serverWait until the installation is done and then move on to installing the necessary graphics drivers.
How To Install Graphics Drivers
Installing graphics drivers on Arch Linux is very straightforward. You just install the packages required by your graphics processing unit and call it a day.
# for nvidia graphics processing unit
pacman -S nvidia nvidia-utils

# for amd discreet and integrated graphics processing unit
pacman -S xf86-video-amdgpu

# for intel integrated graphics processing unit
pacman -S xf86-video-intel
If you need further assistance, feel free to check the ArchWiki page.
How To Install a Desktop Environment
Now that you've installed Xorg and the necessary graphics drivers, you're ready to install a desktop environment like GNOME, Plasma, or XFCE.
Arch Linux supports a long list of desktop environments but I've only tried out GNOME and Plasma. I'll demonstrate how you can install either of these two.
How To Install GNOME
To install GNOME, you'll have to install the gnome paquete. To do so, execute the following command:
pacman -S gnome
During the installation, you'll be offered multiple choices for pipwire-session-manager and emoji-font paquetes Accept the defaults by hitting Enter in both prompts. The installation may take some time to finish.
The gnome package comes with GDM or Gnome Display Manager. You can enable the service by executing the following command:
systemctl enable gdmThat's all you need to do to get GNOME up and running on your Arch system.
How To Install Plasma
The KDE Plasma installation is not that different from GNOME. You'll need to install Plasma related packages instead of GNOME.
pacman -S plasma plasma-wayland-session
If you have an NVIDIA graphics card, then avoid installing the plasma-wayland-session and use plain old X11. I own two devices with NVIDIA GPUs and both of them have shown instability when using Wayland.
During the installation, you'll get multiple choices for ttf-font , pipwire-session-manager , and phonon-qt5-backend paquetes Make sure to pick noto-fonts as your ttf-font and accept the defaults for the other two.
Like gdm in GNOME, Plasma comes with sddm as the default display manager. Execute the following command to enable the service:
systemctl enable sddmAnd that's all you need to do to get Plasma up and running on your Arch Linux system.
How To Finalize The Installation
Now that you've installed Arch Linux and gone through all necessary configuration steps, you can reboot to your newly installed system. To do so, first come out of the Arch-Chroot environment:
exitNext, unmount the root partition to make sure there are no pending operations:
umount -R /mntNow reboot the machine:
rebootWait until you see the GRUB menu.
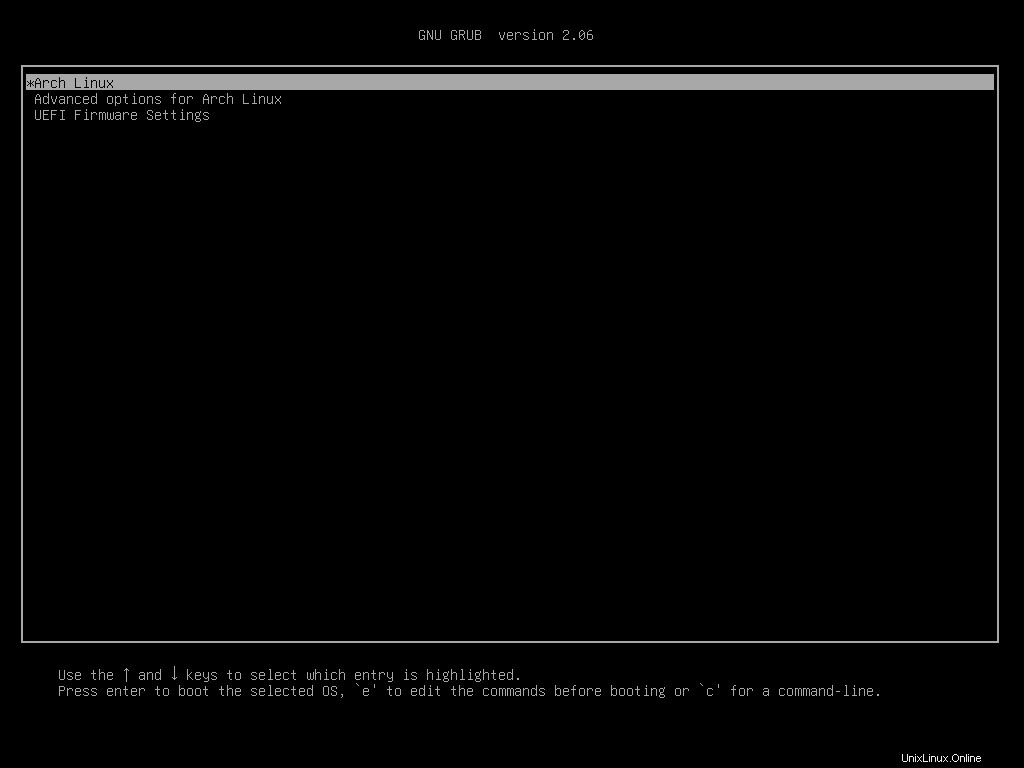
Choose Arch Linux from the list and wait until the system finishes booting up.
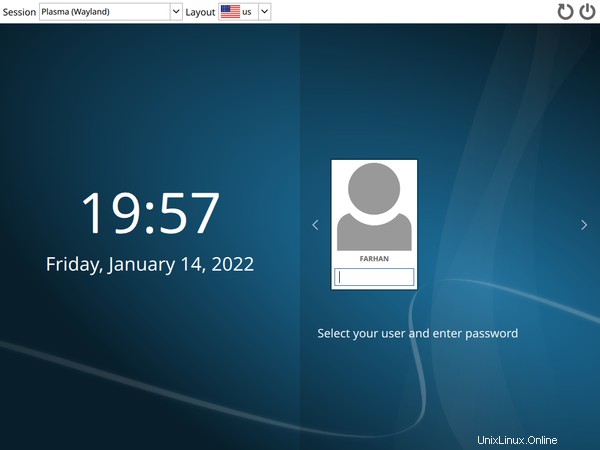
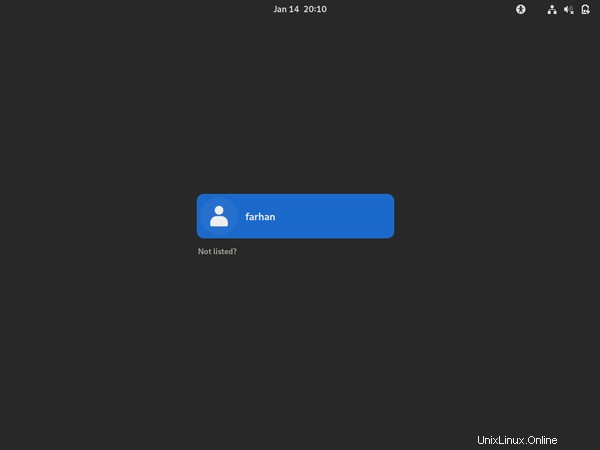
Log in with your user credentials and voilà!
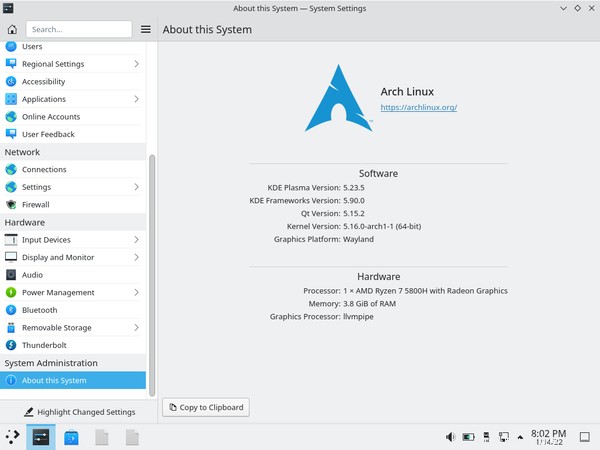
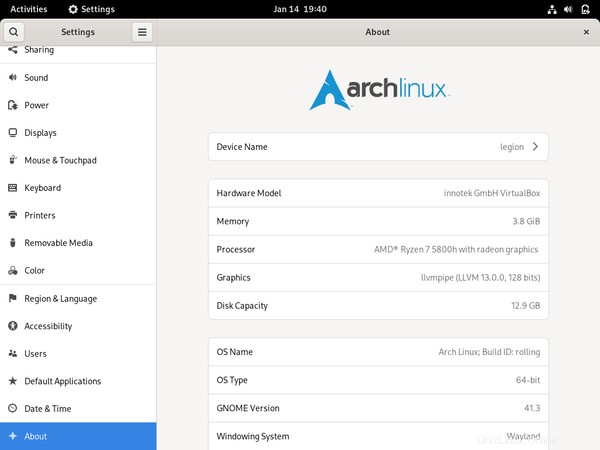
Your shiny new Arch Linux system is ready to do wonders.
How To Switch Between Desktop Environments
Unlike other distributions coupled tightly with their default desktop environment, Arch is flexible. You can switch to another desktop environment whenever you feel like it.
To do so, first logout of your current session.
As you can see, I'm currently using Plasma. Now switch to TTY2 press Ctrl + Alt + F2 key combination. You'll see a console login prompt:
Login with the root credentials and disable the sddm display manager.
systemctl disable sddmThen uninstall the Plasma related packages you installed earlier:
sudo pacman -Rns plasma plasma-wayland-sessionOnce the packages have been uninstalled, install the packages needed for GNOME:
pacman -S gnome
Then perform the installation according to the section you read earlier. After the gnome package has been installed, enable the gdm display manager:
systemctl enable gdmRestart the computer.
rebootWait until the Arch Linux system finishes booting.
Lo and behold, the gorgeous Gnome Display Manager. Login with your credentials.
You can switch between the desktop environments as much as you want to, but I would suggest on settling down with one of them. Also, I wouldn't recommend having multiples of them installed at the same time.
How To Manage Packages Using Pacman
You've already installed a number of packages using pacman. It's equivalent to package managers like apt in Ubuntu and dnf in Fedora.
In this section, I'll introduce you to some of the common pacman commands that you may need on a daily basis.
How To Install Packages Using Pacman
To install a package using pacman, you can use the following command syntax:
# sudo pacman -S <package name>

sudo pacman -S rust
You can install multiple packages as follows:
# sudo pacman -S <package name> <package name>

sudo pacman -S rust golang
You can also specify the repository you want to install the package from like this:
# sudo pacman -S <package repository>/<package name>

sudo pacman -S extra/rust
In this command, the -S option means synchronize which is equivalent to install in the case of apt or dnf package managers.
How To Remove Packages Using Pacman
To remove a package using pacman you can use the following syntax:
# sudo pacman -R <package name>

sudo pacman -R rust
This will remove the package but will leave the dependencies. You can remove the package with dependencies if they're not required by any other package by executing the following command:
# sudo pacman -Rs <package name>

sudo pacman -Rs rust
Pacman often saves important configuration files when removing certain applications. You can override this behavior by using the following syntax:
# sudo pacman -Rn <package name>

sudo pacman -Rn rust
I usually use sudo pacman -Rns whenever I want to uninstall something. One last thing that I want to show is how to remove orphan packages.
In Ubuntu the sudo apt autoremove command uninstalls any unnecessary package. The equivalent command in Arch is:
sudo pacman -Qdtq | pacman -Rs -This will cleanup any leftover package from previously installed packages.
How To Upgrade Packages Using Pacman
To upgrade all the packages in your system, you can use the following syntax:
sudo pacman -Syu
In this command, the S option synchronizes the packages, y refreshes the local package cache, and u updates the system. This is like the ultimate upgrade command and I run it at least once everyday.
How To Search for Packages Using Pacman
To search for a package in the database, you can use the following syntax:
# sudo pacman -Ss <package name>

sudo pacman -Ss rust
This will print out all the packages found in the database with that search term and will also indicate if any of those are already installed.
If you would like to check if a package is already installed or not, you can use the following command:
# sudo pacman -Qs <package name>

sudo pacman -Qs rust
This is useful when you want to uninstall a package but do not know its exact name.
How To Use AUR in Arch Linux
According to It's FOSS,
AUR stands for Arch User Repository. It is a community-driven repository for Arch-based Linux distributions users. It contains package descriptions named PKGBUILDs that allow you to compile a package from source with makepkg and then install it via pacman (package manager in Arch Linux).
AUR is one of the most attractive features of Arch Linux. It's due to AUR that Arch Linux has a package count almost equal to Debian. You've already used pacman to install various packages. Sadly, you can not use that to install packages from AUR.
You'll have to install one of the AUR helpers instead. Arch Linux doesn't support any of these helpers and advises you to learn how to build packages manually. I'll explain both techniques here. If you understand how a helper works, you'll be able to do it manually as well.
How To Install Packages Using a Helper
Among the available and currently maintained AUR helpers, I like the yay or yet another yogurt package. It's written in Go and is quite solid.
You can not install yay like other packages. You'll have to get the source code and compile the program. You'll need git and the base-devel package to do so. Assuming you've already installed base-devel during Arch Linux installation:
pacman -S git
Clone the yay repository from GitHub and cd into it:
git clone https://aur.archlinux.org/yay.git && cd yayTo build and install yay from source, execute the following command:
makepkg -si
The makepkg script automates the build process of packages. The -si options stand for sync dependencies and install. The first option will install required dependencies (Golang in this case) and the later option will install the built package.
After the build process finishes, makepkg will ask for installation confirmation and your password. Input your password carefully and let the installation finish.
Check if yay has been installed properly or not:
yay --version
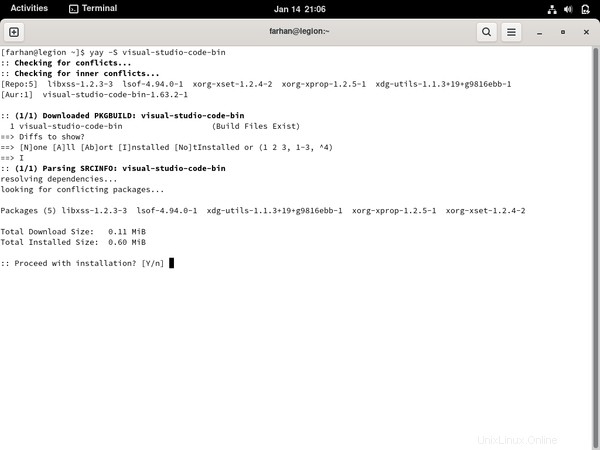
# yay v11.1.0 - libalpm v13.0.1Now let's install something using yay. One of the common packages you may want to install is the visual-studio-code-bin package. To do so, execute the following command:
yay -S visual-studio-code-binUnlike pacman, you shouldn't run yay with sudo. Yay will look for the given package and will ask whether you would like to see the diff or not:
All the repositories over at AUR comes with a PKGBUILD file which contains the instructions for building this package. Yay has this nice feature where it shows you what has changed in the PKGBUILD file since the last time.
For now, I'll pick N for none and hit enter. Yay will now look for the dependencies and ask for your password to install them.
Confirm the installation and provide your password. Yay will then install the dependencies and start building the package. Once built, yay will install the package and prompt for your password where necessary.
After the installation finishes, search for Visual Studio Code in the application launcher:
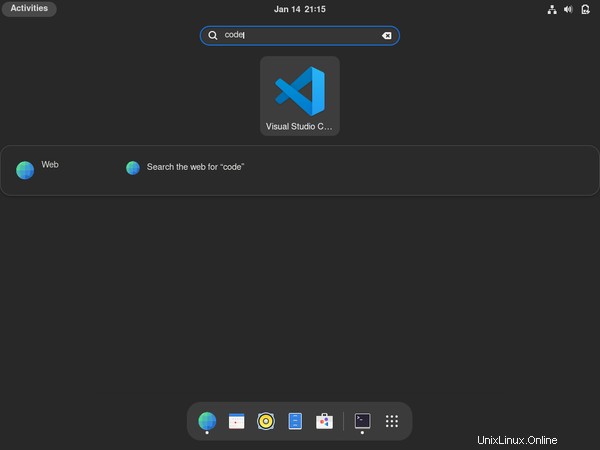
Congratulations on installing your first package from AUR. Yay commands are almost identical to pacman, so if you can do something with pacman, you should be able to do that with yay as well.
In fact, yay can also install packages from official Arch Linux repositories like pacman. But I would suggest you to use yay only for installing packages from AUR when necessary and pacman for everything else.
How To Install Packages Manually
Like I said in the previous section, the ArchWiki suggests avoiding any AUR helper and installing packages from AUR manually. I'll now show you how to do it.
Make sure you have git and base-devel packages installed. If not, use pacman to install them.
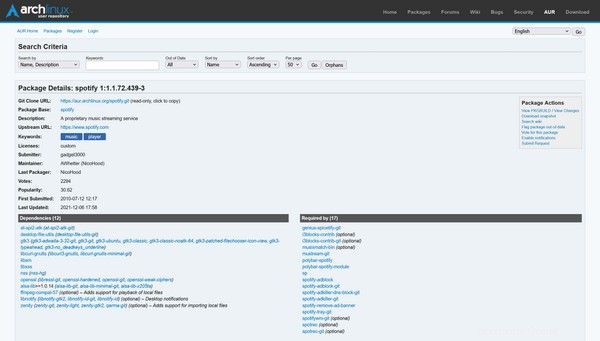
For the demonstration, let's install Spotify this time. First visit the AUR page for the spotify package - https://aur.archlinux.org/packages/spotify/ and copy the "Git Clone URL" from there.
The page even lists all the dependencies you'll need. Clone the repository to your machine:
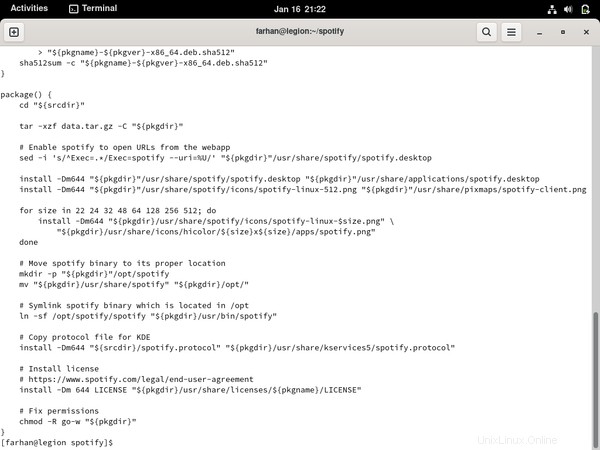
Every AUR repository comes with a PKGBUILD file containing the instructions for building the package. Whenever you're installing a package from AUR, it's a great idea to checkout the PKGBUILD file using something like the cat comando:
Make sure there's nothing harmful in the file. Once you're satisfied, use makepkg to install any dependencies, build the package, and install it. Ideally there shouldn't be any issues but sometimes, things can take an unexpected turn.
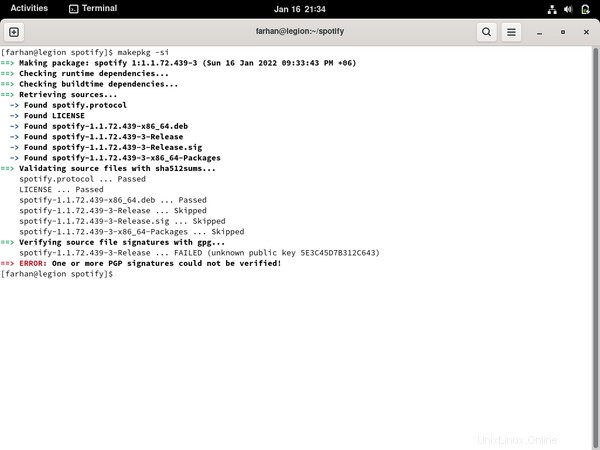
In these cases, go back to the corresponding AUR page and check the user comments. Like in this case, I found the following pinned comment:

Turns out the package requires you to add the Spotify for Linux gpg key to the user kyechain. This command downloads the gpg key using curl and pipes it as the input of the gpg --import comando:
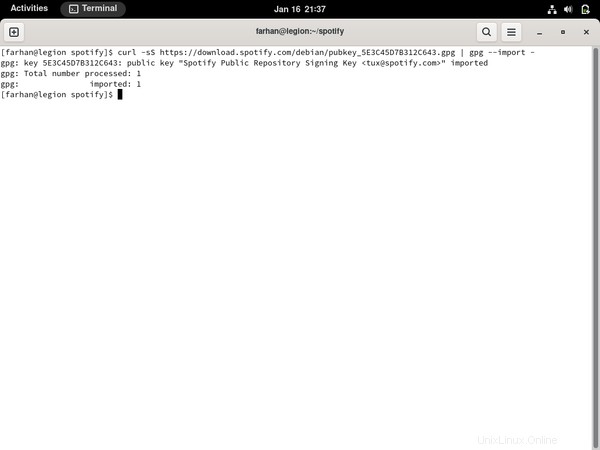
Try executing makepkg -si once again and everything should work fine this time:
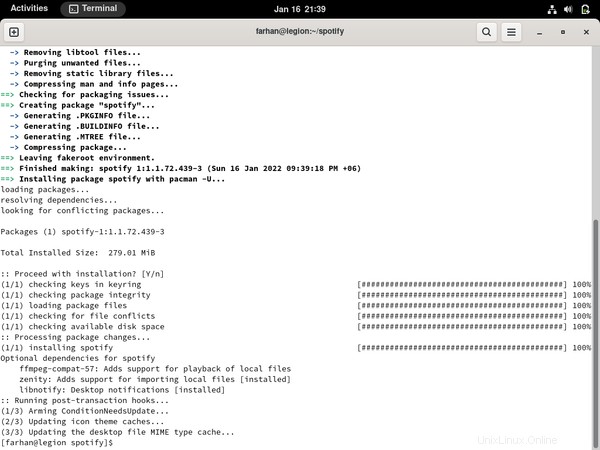
See, told ya! Manually installing packages often involves such troubleshooting but help is almost always around the comment corner. Let's enjoy some music now.
How To Troubleshoot Common Problems
Look, I've been using Arch as my primary on all my devices for some years now but I still run into issues. Fortunately there are some great places to look for help when you're stuck:
- ArchWiki
- Arch Linux Forum
- r/archlinux
For the most part, the wiki should have the information you're looking for. In fact, if you're on a laptop and having difficulty getting something to work, there is an entire wiki category dedicated to different laptops. So look around the wiki.
If the wiki fails to solve your problem, then ask other fellow users at the forum as well as the subreddit. But whenever you're doing that, make sure to do your research first and include as much description as you can in the post. It's really annoying if other users have to keep asking you for more information and it'll also lower the chance that you'll get an answer.
How To Use the Live Arch ISO as a Rescue Media
Whatever people may say, Arch Linux is very stable as long as you know what you're doing. If you go about installing every funky package you come across in the AUR or keep switching different kernels without knowing what they're for, your system may fail to boot.
In those cases, you can use your live USB drive as a rescue media. To do so, reconnect the bootable USB to your computer and boot into the live environment. Once there, configure the time, keymaps, and fonts if you want to.
Then use fdisk to list out all your partitions and locate the one holding your Arch Linux installation. In my case it's the /dev/sda2 dividir. Mount the partition like you did before:
mount /dev/sda2 /mntNow use Arch-Chroot to log in as the root user.
arch-chroot /mntNow uninstall the bad package you installed or go back to a kernel version that used to work in the past and so on. Once done, exit the Arch-Chroot environment, unmount the partition, and reboot:
exit
umount -R /mnt
reboot
If the computer boots fine then congratulations. Otherwise try the wiki, forum, or the subreddit. If nothing works, you may have to do a fresh install.
Further Reading
If you've come this far then you've done a lot of reading already – but that's not all. This entire handbook was written by combining information from the wiki, forum, and subreddit. I'm listing out some wiki pages that I think you should read.
- Installation guide
- Network configuration
- General recommendation
- Desktop environment
- pacman
- Arch Build System
- makepkg
- List of applications
Couldn't think of any more at the moment but I'll keep this list updated.
Conclusión
I would like to thank you from the bottom of my heart for the time you've spent on reading this article. I hope you've enjoyed your time and have learned a lot about not only Arch but Linux in general
Apart from this one, I've written full-length handbooks on other complicated topics available for free on freeCodeCamp.
These handbooks are part of my mission to simplify hard to understand technologies for everyone. Each of these handbooks takes a lot of time and effort to write.
If you've enjoyed my writing and want to keep me motivated, consider leaving starts on GitHub and endorse me for relevant skills on LinkedIn.
I'm always open to suggestions and discussions on Twitter or LinkedIn. Hit me with direct messages.
In the end, consider sharing the resources with others, because
In open source, we feel strongly that to really do something well, you have to get a lot of people involved. — Linus Torvalds
Till the next one, stay safe and keep learning.