para habilitar la cuota.
Desafortunadamente, no hay paquetes rpm para Courier-IMAP, Courier-Authlib y Maildrop, por lo tanto, tenemos que crearlos nosotros mismos.
Primero elimine Dovecot (Fedora 15 viene con Dovecot 2.x; desafortunadamente, ISPConfig 3 es compatible con Dovecot 1.2.x, pero no con 2.x):
Luego instale los requisitos previos que necesitamos para construir paquetes rpm de Courier:
Los paquetes RPM no deben construirse como root; courier-imap incluso se negará a compilar si detecta que la compilación se ejecuta como usuario raíz. Por lo tanto, creamos una cuenta de usuario normal ahora (falko en este ejemplo) y le damos una contraseña:
Necesitaremos el comando sudo más adelante para que el usuario falko pueda compilar e instalar los paquetes rpm. Pero primero, debemos permitir que falko ejecute todos los comandos usando sudo:
En el archivo que se abre hay una línea raíz ALL=(ALL) ALL. Agregue una línea similar para falko justo debajo de esa línea:
[...]
## Allow root to run any commands anywhere
root    ALL=(ALL)       ALL
falko   ALL=(ALL)       ALL
[...] |
Ahora estamos listos para construir nuestro paquete rpm. Primero conviértete en el usuario falko:
su falko
A continuación, creamos nuestro entorno de compilación:
mkdir $INICIO/rpm
mkdir $INICIO/rpm/FUENTES
mkdir $INICIO/rpm/ESPECIFICACIONES
mkdir $INICIO/rpm/BUILD
mkdir $INICIO/rpm/BUILDROOT
mkdir $INICIO/rpm/SRPMS
mkdir $INICIO/rpm/RPMS
mkdir $INICIO/rpm/RPMS/i386
mkdir $INICIO/rpm/RPMS/x86_64
echo "%_topdir $HOME/rpm" >> $HOME/.rpmmacros
Ahora creamos un directorio de descargas y descargamos los archivos fuente desde http://www.courier-mta.org/download.php:
mkdir $HOME/descargas
cd $HOME/descargas
wget https://sourceforge.net/projects/courier/files/authlib/0.63.0/courier-authlib-0.63.0.tar.bz2/download
wget https://sourceforge.net/projects/courier /files/imap/4.8.1/courier-imap-4.8.1.tar.bz2/download
wget https://sourceforge.net/projects/courier/files/maildrop/2.5.4/maildrop-2.5 .4.tar.bz2/descargar
(Quizás se pregunte por qué no descargo la versión más reciente de courier-imap - 4.9.3 en el momento de escribir este artículo - sino que utilizo una más antigua - 4.8.1. Esto se debe a que 4.9.3 no se pudo compilar en mi sistema , mientras que 4.8.1 funciona bien).
Ahora (todavía en $HOME/descargas) podemos construir courier-authlib:
sudo rpmbuild -ta courier-authlib-0.63.0.tar.bz2
Después del proceso de compilación, los paquetes rpm se pueden encontrar en /root/rpmbuild/RPMS/x86_64 (/root/rpmbuild/RPMS/i686 si está en un sistema i686). El comando
sudo ls -l /root/rpmbuild/RPMS/x86_64
muestra los paquetes rpm disponibles:
[example@unixlinux.online downloads]$ sudo ls -l /root/rpmbuild/RPMS/x86_64
total 520
-rw-r--r-- 1 root root 123448 25 de mayo 18:06 courier -authlib-0.63.0-1.fc15.x86_64.rpm
-rw-r--r-- 1 raíz raíz 265144 25 de mayo 18:06 courier-authlib-debuginfo-0.63.0-1.fc15. x86_64.rpm
-rw-r--r-- 1 raíz raíz 34876 25 de mayo 18:06 courier-authlib-devel-0.63.0-1.fc15.x86_64.rpm
-rw-r --r-- 1 raíz raíz 17448 25 de mayo 18:06 courier-authlib-ldap-0.63.0-1.fc15.x86_64.rpm
-rw-r--r-- 1 raíz raíz 13808 25 de mayo 18:06 courier-authlib-mysql-0.63.0-1.fc15.x86_64.rpm
-rw-r--r-- 1 root root 13020 25 de mayo 18:06 courier-authlib-pgsql-0.63. 0-1.fc15.x86_64.rpm
-rw-r--r-- 1 raíz raíz 8276 25 de mayo 18:06 courier-authlib-pipe-0.63.0-1.fc15.x86_64.rpm
-rw-r--r-- 1 root root 34108 25 de mayo 18:06 courier-authlib-userdb-0.63.0-1.fc15.x86_64.rpm
[example@unixlinux.online descargas]$
Selecciona los que quieras instalar e instálalos así:
sudo rpm -ivh /root/rpmbuild/RPMS/x86_64/courier-authlib-0.63.0-1.fc15.x86_64.rpm /root/rpmbuild/RPMS/x86_64/courier-authlib-mysql-0.63.0-1.fc15.x86_64.rpm /root/rpmbuild/RPMS/x86_64/courier-authlib-devel-0.63.0-1.fc15.x86_64.rpm
Ahora volvemos a nuestro directorio de descargas:
cd $HOME/downloads
Ejecute los siguientes comandos para crear los directorios necesarios o cambiar los permisos de los directorios (porque, de lo contrario, el proceso de creación de Courier-Imap fallará):
sudo mkdir /var/cache/ccache/tmp
sudo chmod o+rwx /var/cache/ccache/
sudo chmod 777 /var/cache/ccache/tmp
Ahora ejecute rpmbuild nuevamente, esta vez sin sudo, de lo contrario, la compilación fallará porque se ejecutó como root:
rpmbuild -ta courier-imap-4.8.1.tar.bz2
Después del proceso de compilación, los paquetes rpm se pueden encontrar en $HOME/rpm/RPMS/x86_64 ($HOME/rpm/RPMS/i686 si está en un sistema i686):
cd $HOME/rpm/RPMS/x86_64
El comando
ls -l
muestra los paquetes rpm disponibles:
[ejemplo@unixlinux.online x86_64]$ ls -l
total 1708
-rw-rw-r-- 1 falko falko 596432 25 de mayo 18:33 courier-imap-4.8.1-2.15.x86_64 .rpm
-rw-rw-r-- 1 falko falko 1149328 25 de mayo 18:33 courier-imap-debuginfo-4.8.1-2.15.x86_64.rpm
[ejemplo@unixlinux.online x86_64] $
Puede instalar courier-imap así:
sudo rpm -ivh courier-imap-4.8.1-2.15.x86_64.rpm
Ahora volvemos a nuestro directorio de descargas:
cd $HOME/downloads
y vuelva a ejecutar rpmbuild, esta vez para crear un paquete maildrop:
sudo rpmbuild -ta maildrop-2.5.4.tar.bz2
Después del proceso de compilación, los paquetes rpm se pueden encontrar en /root/rpmbuild/RPMS/x86_64 (/root/rpmbuild/RPMS/i686 si está en un sistema i686). El comando
sudo ls -l /root/rpmbuild/RPMS/x86_64
muestra los paquetes rpm disponibles:
[example@unixlinux.online downloads]$ sudo ls -l /root/rpmbuild/RPMS/x86_64
total 1628
-rw-r--r-- 1 root root 123448 25 de mayo 18:06 courier -authlib-0.63.0-1.fc15.x86_64.rpm
-rw-r--r-- 1 raíz raíz 265144 25 de mayo 18:06 courier-authlib-debuginfo-0.63.0-1.fc15. x86_64.rpm
-rw-r--r-- 1 raíz raíz 34876 25 de mayo 18:06 courier-authlib-devel-0.63.0-1.fc15.x86_64.rpm
-rw-r --r-- 1 raíz raíz 17448 25 de mayo 18:06 courier-authlib-ldap-0.63.0-1.fc15.x86_64.rpm
-rw-r--r-- 1 raíz raíz 13808 25 de mayo 18:06 courier-authlib-mysql-0.63.0-1.fc15.x86_64.rpm
-rw-r--r-- 1 root root 13020 25 de mayo 18:06 courier-authlib-pgsql-0.63. 0-1.fc15.x86_64.rpm
-rw-r--r-- 1 raíz raíz 8276 25 de mayo 18:06 courier-authlib-pipe-0.63.0-1.fc15.x86_64.rpm
-rw-r--r-- 1 raíz raíz 34108 25 de mayo 18:06 courier-authlib-userdb-0.63.0-1.fc15.x86_64.rpm
-rw-r--r-- 1 raíz raíz 278520 25 de mayo 18:50 maildrop-2.5.4-1.15.x86_64.rpm
-rw-r--r-- 1 raíz raíz 685672 25 de mayo 18:50 maildrop-debuginfo-2.5.4 -1.15.x86_64.rpm
-rw-r--r-- 1 raíz raíz 99924 25 de mayo 18:50 maildrop-devel-2.5.4-1.15.x86_64.rpm
-rw-r- -r-- 1 raíz raíz 63968 25 de mayo 18:50 maildrop-man-2.5.4-1.15.x86_64.rpm
[example@unixlinux.online descargas]$
Ahora puede instalar maildrop así:
sudo rpm -ivh /root/rpmbuild/RPMS/x86_64/maildrop-2.5.4-1.15.x86_64.rpm
Una vez que haya compilado e instalado todos los paquetes necesarios, puede volver a ser root escribiendo
exit
12 Instalar Postfix
Postfix se puede instalar de la siguiente manera:
yum install postfix
Luego apague Sendmail e inicie Postfix y MySQL:
chkconfig --niveles 235 mysqld en
/etc/init.d/mysqld start
chkconfig sendmail off
chkconfig --levels 235 postfix on
/etc/init.d/sendmail stop
/etc/init.d/postfix start
13 Instalar Getmail
Getmail se puede instalar de la siguiente manera:
yum install getmail
Establecer contraseñas para la cuenta raíz de MySQL:
mysql_secure_installation
[example@unixlinux.online ~]# mysql_secure_installation
NOTA: SE RECOMIENDA EJECUTAR TODAS LAS PARTES DE ESTE SCRIPT PARA TODOS MySQL
SERVIDORES EN PRODUCCIÓN ¡USAR! ¡POR FAVOR, LEA CADA PASO CUIDADOSAMENTE!
Para iniciar sesión en MySQL para protegerlo, necesitaremos la contraseña actual
para el usuario root. Si acaba de instalar MySQL y
aún no ha establecido la contraseña raíz, la contraseña estará en blanco,
por lo que solo debe presionar Intro aquí.
Introducir contraseña actual para root (ingresar para ninguno):<-- ENTER
OK, contraseña utilizada con éxito, continuando...
Configurar la contraseña de root asegura que nadie pueda iniciar sesión en MySQL
usuario root sin la autorización adecuada.
¿Establecer contraseña root? [Y/n] <-- ENTRAR
Nueva contraseña: <-- turootsqlpassword
Vuelve a introducir nueva contraseña: <-- turootsqlpassword
¡La contraseña se actualizó correctamente!
Recargando tablas de privilegios. .
... ¡Éxito!
De forma predeterminada, una instalación de MySQL tiene un usuario anónimo, permitiendo que cualquiera
inicie sesión en MySQL sin tener que tener una cuenta de usuario creado para
ellos. Esto solo está diseñado para realizar pruebas y para que la instalación
sea un poco más sencilla. Debe eliminarlos antes de pasar a un
entorno de producción.
¿Eliminar usuarios anónimos? [S/n] <-- ENTRAR
... ¡Éxito!
Normalmente, solo debería permitirse que el root se conecte desde 'localhost'. Esto
garantiza que nadie pueda adivinar la contraseña raíz de la red.
¿Deshabilitar el inicio de sesión raíz de forma remota? [S/n] <-- ENTRAR
... ¡Éxito!
De forma predeterminada, MySQL viene con una base de datos llamada 'prueba' a la que cualquiera puede
acceder. Esto también está diseñado solo para pruebas y debe eliminarse
antes de pasar a un entorno de producción.
¿Eliminar la base de datos de prueba y acceder a ella? [S/n] <-- ENTRAR
- Eliminación de la base de datos de prueba...
... ¡Éxito!
- Eliminación de privilegios en la base de datos de prueba...
... Éxito !
Al volver a cargar las tablas de privilegios, se asegurará de que todos los cambios realizados hasta el momento
se apliquen de inmediato.
¿Recargar las tablas de privilegios ahora? [S/n] <-- ENTRAR
... ¡Éxito!
Limpiando...
¡Todo hecho! Si completó todos los pasos anteriores, su instalación de MySQL
ahora debería ser segura.
¡Gracias por usar MySQL!
[ejemplo @unixlinux.online ~]#
Ahora configuramos phpMyAdmin. Cambiamos la configuración de Apache para que phpMyAdmin permita conexiones no solo desde localhost (comentando la stanza ):
vi /etc/httpd/conf.d/phpMyAdmin.conf
# phpMyAdmin - Web based MySQL browser written in php
#
# Allows only localhost by default
#
# But allowing phpMyAdmin to anyone other than localhost should be considered
# dangerous unless properly secured by SSL

Alias /phpMyAdmin /usr/share/phpMyAdmin
Alias /phpmyadmin /usr/share/phpMyAdmin

#<Directory /usr/share/phpMyAdmin/>
#   Order Deny,Allow
#   Deny from All
#   Allow from 127.0.0.1
#   Allow from ::1
#</Directory>

<Directory /usr/share/phpMyAdmin/setup/>
   Order Deny,Allow
   Deny from All
   Allow from 127.0.0.1
   Allow from ::1
</Directory>

# These directories do not require access over HTTP - taken from the original
# phpMyAdmin upstream tarball
#
<Directory /usr/share/phpMyAdmin/libraries/>
    Order Deny,Allow
    Deny from All
    Allow from None
</Directory>

<Directory /usr/share/phpMyAdmin/setup/lib/>
    Order Deny,Allow
    Deny from All
    Allow from None
</Directory>

# This configuration prevents mod_security at phpMyAdmin directories from
# filtering SQL etc.  This may break your mod_security implementation.
#
#<IfModule mod_security.c>
#    <Directory /usr/share/phpMyAdmin/>
#        SecRuleInheritance Off
#    </Directory>
#</IfModule> |
Luego creamos los enlaces de inicio del sistema para Apache y lo iniciamos:
chkconfig --levels 235 httpd en
/etc/init.d/httpd start
Ahora puede dirigir su navegador a http://server1.example.com/phpmyadmin/ o http://192.168.0.100/phpmyadmin/ e iniciar sesión con el nombre de usuario raíz y su nueva contraseña raíz de MySQL.
El servidor perfecto - Fedora 15 x86_64 [ISPConfig 3] - Página 5
15 Instalar Amavisd-new, SpamAssassin y ClamAV
Para instalar amavisd-new, spamassassin y clamav, ejecute el siguiente comando:
yum install amavisd-new spamassassin clamav clamav-data clamav-server clamav-update unzip bzip2 perl-DBD-mysql
Cuando instalamos ClamAV, se instaló un trabajo cron que intenta actualizar la base de datos de virus de ClamAV cada tres horas. Pero esto solo funciona si lo habilitamos en /etc/sysconfig/freshclam y /etc/freshclam.conf:
vi /etc/sysconfig/freshclam
Comente la línea FRESHCLAM_DELAY al final:
## When changing the periodicity of freshclam runs in the crontab,
## this value must be adjusted also. Its value is the timespan between
## two subsequent freshclam runs in minutes. E.g. for the default
##
## | 0 */3 * * *  ...
##
## crontab line, the value is 180 (minutes).
# FRESHCLAM_MOD=

## A predefined value for the delay in seconds. By default, the value is
## calculated by the 'hostid' program. This predefined value guarantees
## constant timespans of 3 hours between two subsequent freshclam runs.
##
## This option accepts two special values:
## 'disabled-warn'  ...  disables the automatic freshclam update and
##                         gives out a warning
## 'disabled'       ...  disables the automatic freshclam silently
# FRESHCLAM_DELAY=


### !!!!! REMOVE ME !!!!!!
### REMOVE ME: By default, the freshclam update is disabled to avoid
### REMOVE ME: network access without prior activation
#FRESHCLAM_DELAY=disabled-warn # REMOVE ME |
vi /etc/freshclam.conf
Comente la línea de ejemplo:
[...]
# Comment or remove the line below.
#Example
[...] |
Luego comenzamos con freshclam, amavisd y clamd...
sa-update
chkconfig --levels 235 amavisd en
chkconfig --levels 235 clamd.amavisd en
/usr/bin/freshclam
/etc/init.d/amavisd start
/etc/init.d/clamd.amavisd inicio
A continuación, haga esto:
rm -f /var/spool/amavisd/clamd.sock
mkdir /var/run/clamav.amavisd /var/run/clamd.amavisd /var/run/amavisd
chown amavis /var/run /clamav.amavisd
chown amavis /var/run/clamd.amavisd
chown amavis /var/run/amavisd
ln -sf /var/spool/amavisd/clamd.sock /var/ ejecutar/clamav.amavisd/clamd.sock
ln -sf /var/spool/amavisd/clamd.sock /var/run/clamd.amavisd/clamd.sock
/etc/init.d/clamd .amavisd reiniciar
Fedora 15 tiene un directorio /run para almacenar datos de tiempo de ejecución. /run ahora es un tmpfs, y /var/run y /var/lock ahora están vinculados montados en /run y /run/lock desde tmpfs y, por lo tanto, se vacían al reiniciar (ver https://docs.fedoraproject.org/en -US/Fedora/15/html/Release_Notes/sect-Release_Notes-Changes_for_SysAdmin.html para obtener más detalles).
Esto significa que después de un reinicio, los directorios /var/run/clamav.amavisd, /var/run/clamd.amavisd y /var/run/amavisd que acabamos de crear ya no existirán y, por lo tanto, clamd y amavisd no existirán. falla al comenzar Por lo tanto, creamos el archivo /etc/tmpfiles.d/amavisd.conf ahora que creará estos directorios al iniciar el sistema (consulte http://0pointer.de/public/systemd-man/tmpfiles.d.html para obtener más detalles):
vi /etc/tmpfiles.d/amavisd.conf
D /var/run/clamav.amavisd 0755 amavis root -
D /var/run/clamd.amavisd 0755 amavis root -
D /var/run/amavisd 0755 amavis root - |
16 Instalación de mod_php, mod_fcgi/PHP5 y suPHP
ISPConfig 3 le permite usar mod_php, mod_fcgi/PHP5, cgi/PHP5 y suPHP por sitio web.
Podemos instalar Apache2 con mod_php5, mod_fcgid y PHP5 de la siguiente manera:
yum install php php-devel php-gd php-imap php-ldap php-mysql php-odbc php-pear php-xml php-xmlrpc php-mbstring php-mcrypt php-mssql php-snmp php-soap php-tidy curl curl-devel perl-libwww-perl ImageMagick libxml2 libxml2-devel mod_fcgid php-cli httpd-devel
A continuación abrimos /etc/php.ini...
vi /etc/php.ini
... y cambie el informe de errores (para que los avisos ya no se muestren) y descomente cgi.fix_pathinfo=1:
[...]
;error_reporting = E_ALL & ~E_DEPRECATED
error_reporting = E_ALL & ~E_NOTICE
[...]
; cgi.fix_pathinfo provides *real* PATH_INFO/PATH_TRANSLATED support for CGI.  PHP's
; previous behaviour was to set PATH_TRANSLATED to SCRIPT_FILENAME, and to not grok
; what PATH_INFO is.  For more information on PATH_INFO, see the cgi specs.  Setting
; this to 1 will cause PHP CGI to fix its paths to conform to the spec.  A setting
; of zero causes PHP to behave as before.  Default is 1.  You should fix your scripts
; to use SCRIPT_FILENAME rather than PATH_TRANSLATED.
; http://www.php.net/manual/en/ini.core.php#ini.cgi.fix-pathinfo
cgi.fix_pathinfo=1
[...] |
A continuación instalamos suPHP:
cd /tmp
wget http://www.suphp.org/download/suphp-0.7.1.tar.gz
tar xvfz suphp-0.7.1.tar.gz
cd suphp-0.7.1/
./configure --prefix=/usr --sysconfdir=/etc --with-apr=/usr/bin/apr-1-config --with-apxs=/usr/sbin/apxs --with-apache-user=apache --with-setid-mode=owner --with-php=/usr/bin/php-cgi --with-logfile=/var/log/httpd/suphp_log --enable-SUPHP_USE_USERGROUP=yes
make
make install
Then we add the suPHP module to our Apache configuration...
vi /etc/httpd/conf.d/suphp.conf
LoadModule suphp_module modules/mod_suphp.so |
... and create the file /etc/suphp.conf as follows:
vi /etc/suphp.conf
[global]
;Path to logfile
logfile=/var/log/httpd/suphp.log

;Loglevel
loglevel=info

;User Apache is running as
webserver_user=apache

;Path all scripts have to be in
docroot=/

;Path to chroot() to before executing script
;chroot=/mychroot

; Security options
allow_file_group_writeable=true
allow_file_others_writeable=false
allow_directory_group_writeable=true
allow_directory_others_writeable=false

;Check wheter script is within DOCUMENT_ROOT
check_vhost_docroot=true

;Send minor error messages to browser
errors_to_browser=false

;PATH environment variable
env_path=/bin:/usr/bin

;Umask to set, specify in octal notation
umask=0077

; Minimum UID
min_uid=100

; Minimum GID
min_gid=100

[handlers]
;Handler for php-scripts
x-httpd-suphp="php:/usr/bin/php-cgi"

;Handler for CGI-scripts
x-suphp-cgi="execute:!self" |
Finally we restart Apache:
/etc/init.d/httpd restart
16.1 Ruby
Starting with version 3.0.3, ISPConfig 3 has built-in support for Ruby. Instead of using CGI/FastCGI, ISPConfig depends on mod_ruby being available in the server's Apache.
For Fedora 15, there's no mod_ruby package available, so we must compile it ourselves. First we install some prerequisites:
yum install ruby ruby-devel
Next we download and install mod_ruby as follows:
cd /tmp
wget http://modruby.net/archive/mod_ruby-1.3.0.tar.gz
tar zxvf mod_ruby-1.3.0.tar.gz
cd mod_ruby-1.3.0/
./configure.rb --with-apr-includes=/usr/include/apr-1
make
make install
Finally we must add the mod_ruby module to the Apache configuration, so we create the file /etc/httpd/conf.d/ruby.conf...
vi /etc/httpd/conf.d/ruby.conf
LoadModule ruby_module modules/mod_ruby.so
RubyAddPath /1.8 |
... and restart Apache:
/etc/init.d/httpd restart
(If you leave out the RubyAddPath /1.8 directive, you will see errors like the following ones in Apache's error log when you call Ruby files:
[Thu May 26 02:05:05 2011] [error] mod_ruby:ruby:0:in `require':no such file to load -- apache/ruby-run (LoadError)
[Thu May 26 02:05:05 2011] [error] mod_ruby:failed to require apache/ruby-run
[Thu May 26 02:05:05 2011] [error] mod_ruby:error in ruby
)
16.2 WebDAV
WebDAV should already be enabled, but to check this, open /etc/httpd/conf/httpd.conf and make sure that the following three modules are active:
vi /etc/httpd/conf/httpd.conf
[...]
LoadModule auth_digest_module modules/mod_auth_digest.so
[...]
LoadModule dav_module modules/mod_dav.so
[...]
LoadModule dav_fs_module modules/mod_dav_fs.so
[...] |
If you have to modify /etc/httpd/conf/httpd.conf, don't forget to restart Apache afterwards:
/etc/init.d/httpd restart
17 Install PureFTPd
PureFTPd can be installed with the following command:
yum install pure-ftpd
Then create the system startup links and start PureFTPd:
chkconfig --levels 235 pure-ftpd on
/etc/init.d/pure-ftpd start
Now we configure PureFTPd to allow FTP and TLS sessions. FTP is a very insecure protocol because all passwords and all data are transferred in clear text. By using TLS, the whole communication can be encrypted, thus making FTP much more secure.
OpenSSL is needed by TLS; to install OpenSSL, we simply run:
yum install openssl
Open /etc/pure-ftpd/pure-ftpd.conf...
vi /etc/pure-ftpd/pure-ftpd.conf
If you want to allow FTP and TLS sessions, set TLS to 1:
[...]
# This option can accept three values :
# 0 : disable SSL/TLS encryption layer (default).
# 1 : accept both traditional and encrypted sessions.
# 2 : refuse connections that don't use SSL/TLS security mechanisms,
#     including anonymous sessions.
# Do _not_ uncomment this blindly. Be sure that :
# 1) Your server has been compiled with SSL/TLS support (--with-tls),
# 2) A valid certificate is in place,
# 3) Only compatible clients will log in.

TLS                      1
[...] |
In order to use TLS, we must create an SSL certificate. I create it in /etc/ssl/private/, therefore I create that directory first:
mkdir -p /etc/ssl/private/
Afterwards, we can generate the SSL certificate as follows:
openssl req -x509 -nodes -days 7300 -newkey rsa:2048 -keyout /etc/ssl/private/pure-ftpd.pem -out /etc/ssl/private/pure-ftpd.pem
Country Name (2 letter code) [XX]:<-- Enter your Country Name (e.g., "DE").
State or Province Name (full name) []:<-- Enter your State or Province Name.
Locality Name (eg, city) [Default City]:<-- Enter your City.
Organization Name (eg, company) [Default Company Ltd]:<-- Enter your Organization Name (e.g., the name of your company).
Organizational Unit Name (eg, section) []:<-- Enter your Organizational Unit Name (e.g. "IT Department").
Common Name (eg, your name or your server's hostname) []:<-- Enter the Fully Qualified Domain Name of the system (e.g. "server1.example.com").
Email Address []:<-- Enter your Email Address.
Change the permissions of the SSL certificate:
chmod 600 /etc/ssl/private/pure-ftpd.pem
Finally restart PureFTPd:
/etc/init.d/pure-ftpd restart
Eso es todo. You can now try to connect using your FTP client; however, you should configure your FTP client to use TLS.
18 Install BIND
We can install BIND as follows:
yum install bind bind-utils
Next open /etc/sysconfig/named...
vi /etc/sysconfig/named
... and comment out the ROOTDIR=/var/named/chroot line:
# BIND named process options
# ~~~~~~~~~~~~~~~~~~~~~~~~~~
# Currently, you can use the following options:
#
# ROOTDIR="/var/named/chroot"  --  will run named in a chroot environment.
#                            you must set up the chroot environment
#                            (install the bind-chroot package) before
#                            doing this.
#       NOTE:
#         Those directories are automatically mounted to chroot if they are
#         empty in the ROOTDIR directory. It will simplify maintenance of your
#         chroot environment.
#          - /var/named
#          - /etc/pki/dnssec-keys
#          - /etc/named
#          - /usr/lib64/bind or /usr/lib/bind (architecture dependent)
#
#         Those files are mounted as well if target file doesn't exist in
#         chroot.
#          - /etc/named.conf
#          - /etc/rndc.conf
#          - /etc/rndc.key
#          - /etc/named.rfc1912.zones
#          - /etc/named.dnssec.keys
#          - /etc/named.iscdlv.key
#
#       Don't forget to add "$AddUnixListenSocket /var/named/chroot/dev/log"
#       line to your /etc/rsyslog.conf file. Otherwise your logging becomes
#       broken when rsyslogd daemon is restarted (due update, for example).
#
# OPTIONS="whatever"     --  These additional options will be passed to named
#                            at startup. Don't add -t here, use ROOTDIR instead.
#
# KEYTAB_FILE="/dir/file"    --  Specify named service keytab file (for GSS-TSIG)
#
# DISABLE_ZONE_CHECKING  -- By default, initscript calls named-checkzone
#                           utility for every zone to ensure all zones are
#                           valid before named starts. If you set this option
#                           to 'yes' then initscript doesn't perform those
#                           checks.
#ROOTDIR=/var/named/chroot |
Then we create the startup links:
chkconfig --levels 235 named on
We don't start BIND now because it must be configured first - this will be done automatically by the ISPConfig 3 installer later on.
19 Install Vlogger, Webalizer, And AWStats
Vlogger, webalizer, and AWStats can be installed as follows:
yum install webalizer awstats perl-DateTime-Format-HTTP perl-DateTime-Format-Builder
cd /tmp
wget http://n0rp.chemlab.org/vlogger/vlogger-1.3.tar.gz
tar xvfz vlogger-1.3.tar.gz
mv vlogger-1.3/vlogger /usr/sbin/
rm -rf vlogger*
20 Install Jailkit
Jailkit is needed only if you want to chroot SSH users. It can be installed as follows (important:Jailkit must be installed before ISPConfig - it cannot be installed afterwards!):
cd /tmp
wget http://olivier.sessink.nl/jailkit/jailkit-2.14.tar.gz
tar xvfz jailkit-2.14.tar.gz
cd jailkit-2.14
./configure
make
make install
cd ..
rm -rf jailkit-2.14*
21 Install fail2ban
This is optional but recommended, because the ISPConfig monitor tries to show the log:
yum install fail2ban
chkconfig --levels 235 fail2ban on
/etc/init.d/fail2ban start
22 Install rkhunter
rkhunter can be installed as follows:
yum install rkhunter
The Perfect Server - Fedora 15 x86_64 [ISPConfig 3] - Page 6
23 Install SquirrelMail
To install the SquirrelMail webmail client, run...
yum install squirrelmail
... and restart Apache:
/etc/init.d/httpd restart
Then configure SquirrelMail:
/usr/share/squirrelmail/config/conf.pl
We must tell SquirrelMail that we are using Courier-IMAP/-POP3:
SquirrelMail Configuration : Read: config.php (1.4.0)
---------------------------------------------------------
Main Menu --
1. Organization Preferences
2. Server Settings
3. Folder Defaults
4. General Options
5. Themes
6. Address Books
7. Message of the Day (MOTD)
8. Plugins
9. Database
10. Languages
D. Set pre-defined settings for specific IMAP servers
C Turn color off
S Save data
Q Quit
Command >> <-- D
SquirrelMail Configuration : Read: config.php
---------------------------------------------------------
While we have been building SquirrelMail, we have discovered some
preferences that work better with some servers that don't work so
well with others. If you select your IMAP server, this option will
set some pre-defined settings for that server.
Please note that you will still need to go through and make sure
everything is correct. This does not change everything. There are
only a few settings that this will change.
Please select your IMAP server:
bincimap = Binc IMAP server
courier = Courier IMAP server
cyrus = Cyrus IMAP server
dovecot = Dovecot Secure IMAP server
exchange = Microsoft Exchange IMAP server
hmailserver = hMailServer
macosx = Mac OS X Mailserver
mercury32 = Mercury/32
uw = University of Washington's IMAP server
gmail = IMAP access to Google mail (Gmail) accounts
quit = Do not change anything
Command >> <-- courier
SquirrelMail Configuration : Read: config.php
---------------------------------------------------------
While we have been building SquirrelMail, we have discovered some
preferences that work better with some servers that don't work so
well with others. If you select your IMAP server, this option will
set some pre-defined settings for that server.
Please note that you will still need to go through and make sure
everything is correct. This does not change everything. There are
only a few settings that this will change.
Please select your IMAP server:
bincimap = Binc IMAP server
courier = Courier IMAP server
cyrus = Cyrus IMAP server
dovecot = Dovecot Secure IMAP server
exchange = Microsoft Exchange IMAP server
hmailserver = hMailServer
macosx = Mac OS X Mailserver
mercury32 = Mercury/32
uw = University of Washington's IMAP server
gmail = IMAP access to Google mail (Gmail) accounts
quit = Do not change anything
Command >> courier
imap_server_type = courier
default_folder_prefix = INBOX.
trash_folder = Trash
sent_folder = Sent
draft_folder = Drafts
show_prefix_option = false
default_sub_of_inbox = false
show_contain_subfolders_option = false
optional_delimiter = .
delete_folder = true
Press any key to continue... <-- press ENTER
SquirrelMail Configuration : Read: config.php (1.4.0)
---------------------------------------------------------
Main Menu --
1. Organization Preferences
2. Server Settings
3. Folder Defaults
4. General Options
5. Themes
6. Address Books
7. Message of the Day (MOTD)
8. Plugins
9. Database
10. Languages
D. Set pre-defined settings for specific IMAP servers
C Turn color off
S Save data
Q Quit
Command >> <--S
SquirrelMail Configuration : Read: config.php (1.4.0)
---------------------------------------------------------
Main Menu --
1. Organization Preferences
2. Server Settings
3. Folder Defaults
4. General Options
5. Themes
6. Address Books
7. Message of the Day (MOTD)
8. Plugins
9. Database
10. Languages
D. Set pre-defined settings for specific IMAP servers
C Turn color off
S Save data
Q Quit
Command >> <--Q
One last thing we need to do is modify the file /etc/squirrelmail/config_local.php and comment out the $default_folder_prefix variable - if you don't do this, you will see the following error message in SquirrelMail after you've logged in:Query:CREATE "Sent" Reason Given:Invalid mailbox name.
vi /etc/squirrelmail/config_local.php
<?php
/**
* Local config overrides.
*
* You can override the config.php settings here.
* Don't do it unless you know what you're doing.
* Use standard PHP syntax, see config.php for examples.
*
* @copyright © 2002-2006 The SquirrelMail Project Team
* @license http://opensource.org/licenses/gpl-license.php GNU Public License
* @version $Id$
* @package squirrelmail
* @subpackage config
*/
//$default_folder_prefix = '';
?> |
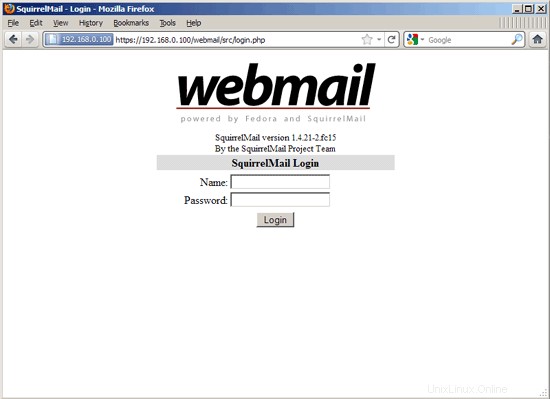
Now you can type in http://server1.example.com/webmail or http://192.168.0.100/webmail in your browser to access SquirrelMail.
24 Install ISPConfig 3
To install ISPConfig 3 from the latest released version, do this:
cd /tmp
wget http://www.ispconfig.org/downloads/ISPConfig-3-stable.tar.gz
tar xfz ISPConfig-3-stable.tar.gz
cd ispconfig3_install/install/
The next step is to run
php -q install.php
This will start the ISPConfig 3 installer:
[example@unixlinux.online install]# php -q install.php
--------------------------------------------------------------------------------
_____ ___________ _____ __ _ ____
|_ _/ ___| ___ \ / __ \ / _(_) /__ \
| | \ `--.| |_/ / | / \/ ___ _ __ | |_ _ __ _ _/ /
| | `--. \ __/ | | / _ \| '_ \| _| |/ _` | |_ |
_| |_/\__/ / | | \__/\ (_) | | | | | | | (_| | ___\ \
\___/\____/\_| \____/\___/|_| |_|_| |_|\__, | \____/
__/ |
|___/
--------------------------------------------------------------------------------
>> Initial configuration
Operating System: Redhat or compatible, unknown version.
Following will be a few questions for primary configuration so be careful.
Default values are in [brackets] and can be accepted with .
Tap in "quit" (without the quotes) to stop the installer.
Select language (en,de) [en]: <-- ENTER
Installation mode (standard,expert) [standard]: <-- ENTER
Full qualified hostname (FQDN) of the server, eg server1.domain.tld [server1.example.com]: <-- ENTER
MySQL server hostname [localhost]: <-- ENTER
MySQL root username [root]: <-- ENTER
MySQL root password []: <-- yourrootsqlpassword
MySQL database to create [dbispconfig]: <-- ENTER
MySQL charset [utf8]: <-- ENTER
Generating a 2048 bit RSA private key
......+++
...............+++
writing new private key to 'smtpd.key'
-----
You are about to be asked to enter information that will be incorporated
into your certificate request.
What you are about to enter is what is called a Distinguished Name or a DN.
There are quite a few fields but you can leave some blank
For some fields there will be a default value,
If you enter '.', the field will be left blank.
-----
Country Name (2 letter code) [XX]: <-- ENTER
State or Province Name (full name) []: <-- ENTER
Locality Name (eg, city) [Default City]: <-- ENTER
Organization Name (eg, company) [Default Company Ltd]: <-- ENTER
Organizational Unit Name (eg, section) []: <-- ENTER
Common Name (eg, your name or your server's hostname) []: <-- E NTER
Email Address []: <-- ENTER
Configuring Jailkit
Configuring SASL
Configuring PAM
Configuring Courier
Configuring Spamassassin
Configuring Amavisd
Configuring Getmail
Configuring Pureftpd
Configuring BIND
Configuring Apache
Configuring Vlogger
Configuring Apps vhost
Configuring Firewall
Installing ISPConfig
ISPConfig Port [8080]: <-- ENTER
Configuring DBServer
Installing ISPConfig crontab
no crontab for root
no crontab for getmail
Restarting services ...
Restarting mysqld (via systemctl): [ OK ]
Restarting postfix (via systemctl): [ OK ]
Restarting saslauthd (via systemctl): [ OK ]
Restarting amavisd (via systemctl): [ OK ]
Restarting clamd.amavisd (via systemctl): [ OK ]
Stopping Courier authentication services: authdaemond
Starting Courier authentication services: authdaemond
Stopping Courier-IMAP server: imap imap-ssl pop3 pop3-ssl
Starting Courier-IMAP server: imap generating-SSL-certificate... imap-ssl pop3 generating-SSL-certificate... pop3-ssl
Stopping Courier-IMAP server: imap imap-ssl pop3 pop3-ssl
Starting Courier-IMAP server: imap imap-ssl pop3 pop3-ssl
Stopping Courier-IMAP server: imap imap-ssl pop3 pop3-ssl
Starting Courier-IMAP server: imap imap-ssl pop3 pop3-ssl
Stopping Courier-IMAP server: imap imap-ssl pop3 pop3-ssl
Starting Courier-IMAP server: imap imap-ssl pop3 pop3-ssl
Restarting httpd (via systemctl): [ OK ]
Restarting pure-ftpd (via systemctl): [ OK ]
Installation completed.
[example@unixlinux.online install]#
El instalador configura automáticamente todos los servicios subyacentes, por lo que no es necesaria una configuración manual.
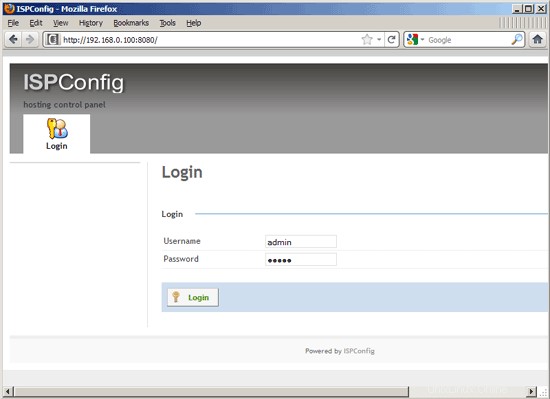
Afterwards you can access ISPConfig 3 under http://server1.example.com:8080/ or http://192.168.0.100:8080/. Inicie sesión con el nombre de usuario admin y la contraseña admin (debe cambiar la contraseña predeterminada después de su primer inicio de sesión):
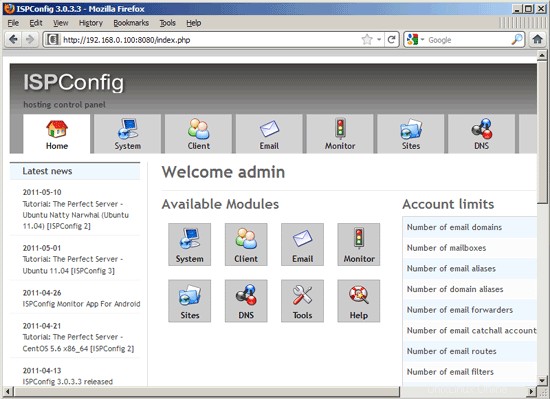
The system is now ready to be used.
24.1 ISPConfig 3 Manual
In order to learn how to use ISPConfig 3, I strongly recommend to download the ISPConfig 3 Manual.
On about 300 pages, it covers the concept behind ISPConfig (admin, resellers, clients), explains how to install and update ISPConfig 3, includes a reference for all forms and form fields in ISPConfig together with examples of valid inputs, and provides tutorials for the most common tasks in ISPConfig 3. It also lines out how to make your server more secure and comes with a troubleshooting section at the end.
24.2 ISPConfig Monitor App For Android
With the ISPConfig Monitor App, you can check your server status and find out if all services are running as expected. You can check TCP and UDP ports and ping your servers. In addition to that you can use this app to request details from servers that have ISPConfig installed (please note that the minimum installed ISPConfig 3 version with support for the ISPConfig Monitor App is 3.0.3.3! ); these details include everything you know from the Monitor module in the ISPConfig Control Panel (e.g. services, mail and system logs, mail queue, CPU and memory info, disk usage, quota, OS details, RKHunter log, etc.), and of course, as ISPConfig is multiserver-capable, you can check all servers that are controlled from your ISPConfig master server.
For download and usage instructions, please visit http://www.ispconfig.org/ispconfig-3/ispconfig-monitor-app-for-android/.
25 Links
- Fedora:http://fedoraproject.org/
- Network Device Naming:http://fedoraproject.org/wiki/Features/ConsistentNetworkDeviceNaming
- /run directory:https://docs.fedoraproject.org/en-US/Fedora/15/html/Release_Notes/sect-Release_Notes-Changes_for_SysAdmin.html
- tmpfiles.d:http://0pointer.de/public/systemd-man/tmpfiles.d.html
- ISPConfig:http://www.ispconfig.org/