El servidor perfecto:OpenSUSE 12.1 x86_64 con Nginx [ISPConfig 3]
Este tutorial muestra cómo preparar un OpenSUSE 12.1 de 64 bits (x86_64) servidor con nginx para la instalación de ISPConfig 3 y cómo instalar ISPConfig 3. Desde la versión 3.0.4, ISPConfig viene con soporte completo para el servidor web nginx además de Apache, y este tutorial cubre la configuración de un servidor que usa nginx en lugar de apache. ISPConfig 3 es un panel de control de alojamiento web que le permite configurar los siguientes servicios a través de un navegador web:servidor web nginx y Apache, servidor de correo Postfix, MySQL, servidor de nombres Dovecot POP3/IMAP, BIND o MyDNS, PureFTPd, SpamAssassin, ClamAV y muchos más.
Si desea usar nginx en lugar de Apache con ISPConfig, tenga en cuenta que su versión de nginx debe ser al menos 0.8.21 y también debe instalar PHP-FPM. Para compatibilidad con CGI/Perl, debe utilizar fcgiwrap. Todo esto está cubierto por este tutorial.
Usaré el siguiente software:
- Servidor web:nginx con PHP 5
- Servidor de base de datos:MySQL
- Servidor de correo:Postfix con usuarios virtuales
- Servidor DNS:BIND
- Servidor FTP:pureftpd
- POP3/IMAP:palomar
- Webalizer y AWStats para estadísticas de sitios web
Al final, debe tener un sistema que funcione de manera confiable y que sea fácilmente manejable con el panel de control ISPConfig 3. La siguiente guía es para la versión de 64 bits de OpenSUSE.
Primero quiero decir que esta no es la única forma de establecer un sistema de este tipo. Hay muchas maneras de lograr este objetivo, pero este es el camino que tomo. ¡No emito ninguna garantía de que esto funcione para usted!
Aviso:esta guía es para ISPConfig 3.0.4 o posterior. ¡No es adecuado para ISPConfig 2.x!
Manual de ISPConfig 3
Para aprender a usar ISPConfig 3, recomiendo descargar el Manual de ISPConfig 3.
En aproximadamente 300 páginas, cubre el concepto detrás de ISPConfig (administrador, revendedores, clientes), explica cómo instalar y actualizar ISPConfig 3, incluye una referencia para todos los formularios y campos de formulario en ISPConfig junto con ejemplos de entradas válidas y proporciona tutoriales para las tareas más comunes en ISPConfig 3. También explica cómo hacer que su servidor sea más seguro y viene con una sección de solución de problemas al final.
Aplicación ISPConfig Monitor para Android
Con la aplicación ISPConfig Monitor, puede verificar el estado de su servidor y averiguar si todos los servicios funcionan como se espera. Puede verificar los puertos TCP y UDP y hacer ping a sus servidores. Además de eso, puede usar esta aplicación para solicitar detalles de los servidores que tienen instalado ISPConfig (tenga en cuenta que la versión mínima instalada de ISPConfig 3 compatible con la aplicación ISPConfig Monitor es 3.0.3.3! ); estos detalles incluyen todo lo que sabe del módulo Monitor en el Panel de control de ISPConfig (por ejemplo, servicios, registros de correo y del sistema, cola de correo, información de CPU y memoria, uso del disco, cuota, detalles del sistema operativo, registro de RKHunter, etc.), y por supuesto , como ISPConfig tiene capacidad para varios servidores, puede verificar todos los servidores que están controlados desde su servidor maestro ISPConfig.
Para obtener instrucciones de uso y descarga, visite http://www.ispconfig.org/ispconfig-3/ispconfig-monitor-app-for-android/.
1 Requisitos
Para instalar dicho sistema, necesitará lo siguiente:
- El DVD de OpenSUSE 12.1 . Puede descargarlo aquí:http://download.opensuse.org/distribution/12.1/iso/openSUSE-12.1-DVD-x86_64.iso
- Una conexión rápida a Internet...
2 Nota Preliminar
En este tutorial utilizo el nombre de host server1.example.com con la dirección IP 192.168.0.100 y la puerta de enlace 192.168.0.1. Estas configuraciones pueden diferir para usted, por lo que debe reemplazarlas cuando corresponda.
3 El Sistema Base
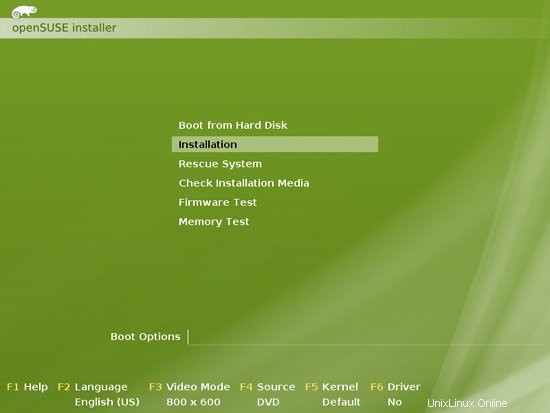
Arranque desde su DVD de OpenSUSE 12.1 y seleccione Instalación:
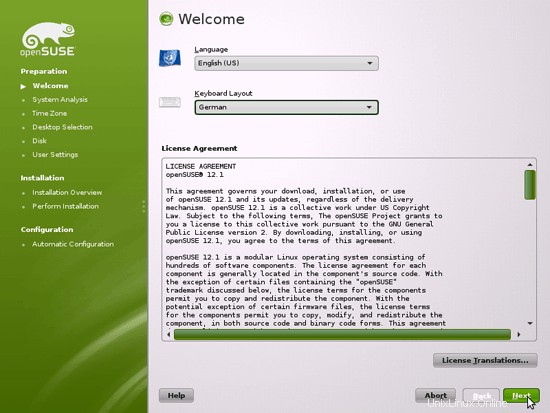
Seleccione su idioma, distribución de teclado y acepte los términos de la licencia:
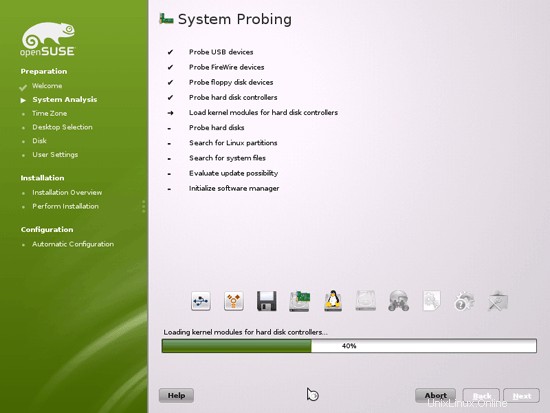
El instalador analiza su hardware y construye el caché del repositorio de software:
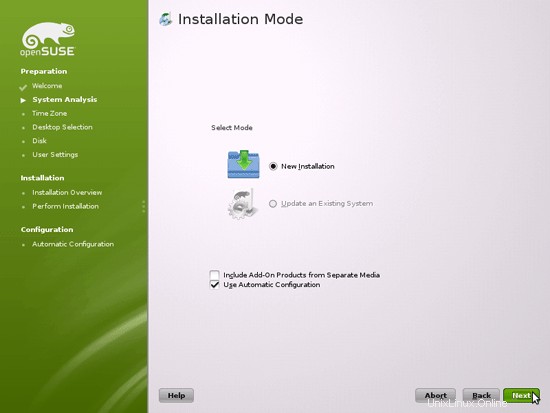
Seleccione Nueva instalación:
Seleccione la región y la zona horaria:

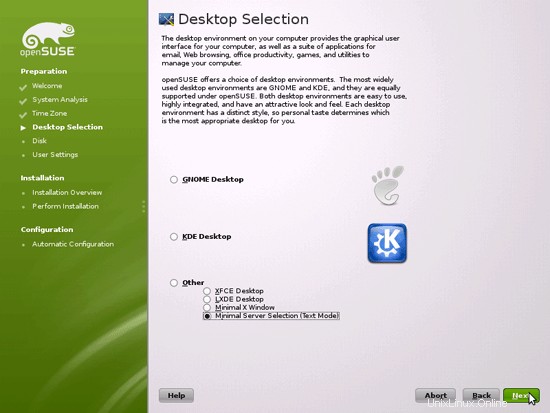
Seleccionamos Otro> Selección mínima de servidor (modo de texto) aquí, ya que queremos instalar un servidor sin escritorio X-Window. El sistema X-Window no es necesario para ejecutar el servidor y ralentizaría el sistema. Haremos todas las tareas de administración en el shell o a través de una conexión SSH, p. a través de PuTTY desde un escritorio remoto.
El servidor perfecto - OpenSUSE 12.1 x86_64 con Nginx [ISPConfig 3] - Página 2
Usamos Yast, la herramienta de administración del sistema OpenSuSE para reconfigurar la configuración de la tarjeta de red. Después del primer arranque, el sistema está configurado para obtener la dirección IP con DHCP. Para un servidor, lo cambiaremos a una dirección IP estática.
Ejecutar
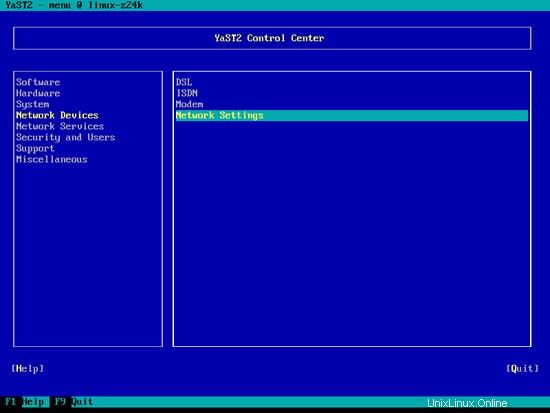
yast2
Seleccione Dispositivos de red> Configuración de red:
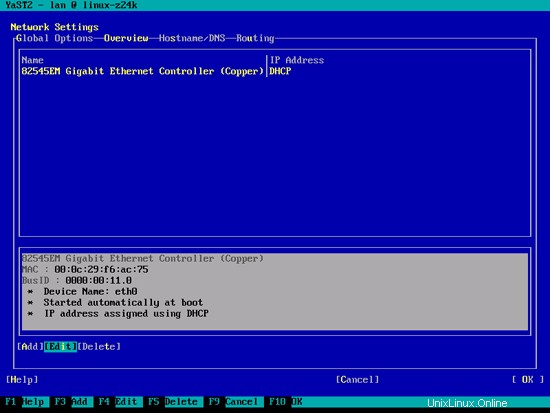
Seleccione su tarjeta de red y luego Edite:
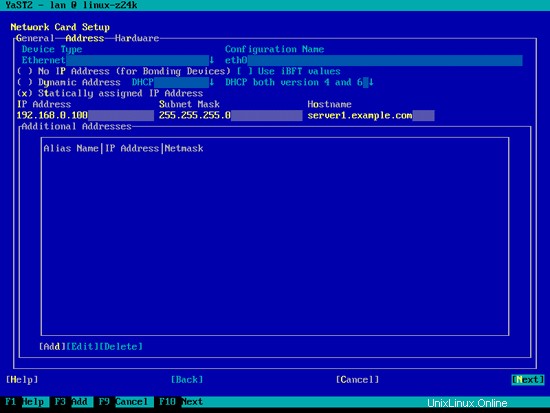
Seleccione Dirección IP asignada estáticamente e ingrese la dirección IP, la máscara de subred y el nombre de host y guarde los cambios seleccionando Siguiente:
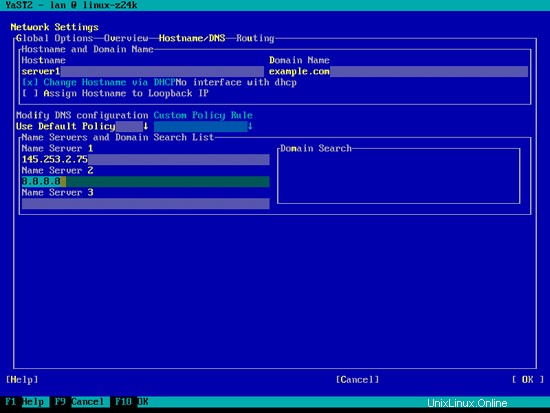
Ahora seleccione Nombre de host/DNS e ingrese el nombre de host (por ejemplo, server1.example.com) y los servidores de nombres (por ejemplo, 145.253.2.75 y 8.8.8.8):
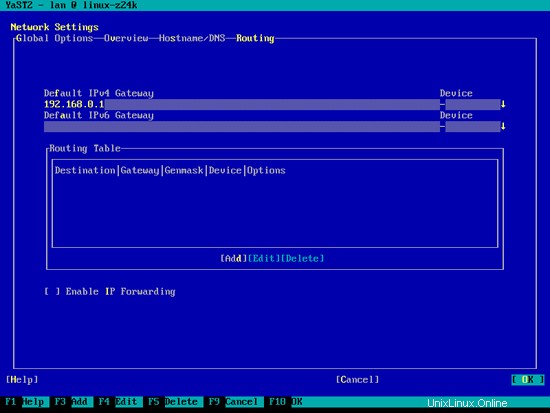
Ahora seleccione Enrutamiento e ingrese la puerta de enlace predeterminada y presione Aceptar:
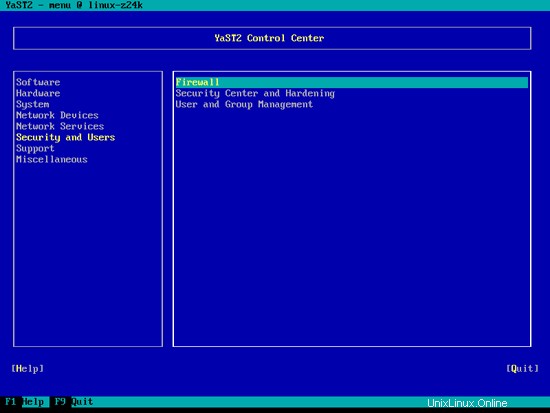
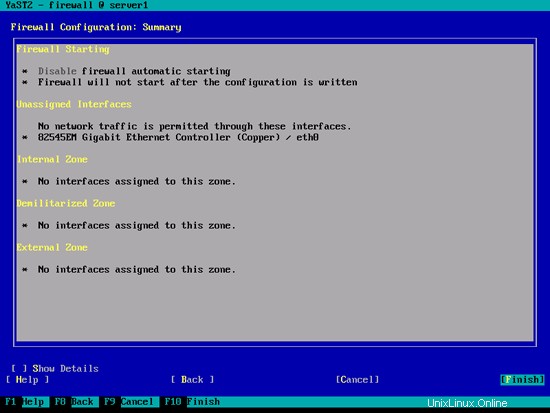
Para configurar el cortafuegos (en caso de que no lo haya configurado durante la instalación básica), seleccione Seguridad y usuarios> Cortafuegos en Yast:
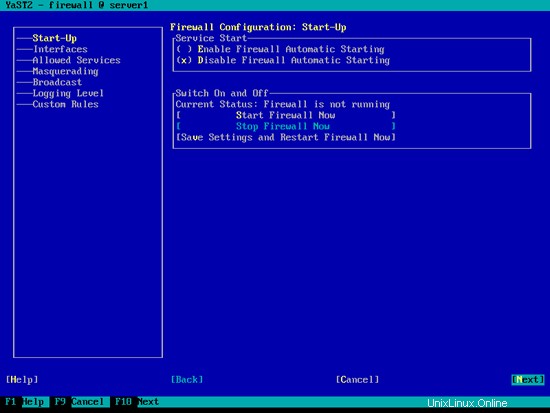
Quiero instalar ISPConfig al final de este tutorial que viene con su propio firewall. Es por eso que deshabilito el firewall predeterminado de OpenSUSE ahora. Por supuesto, puede dejarlo encendido y configurarlo según sus necesidades (pero luego no debe usar ningún otro cortafuegos, ya que lo más probable es que interfiera con el cortafuegos de OpenSUSE).
Seleccione Deshabilitar el inicio automático del cortafuegos y detener el cortafuegos ahora, luego presione Siguiente:
Pulse Finalizar y salga de Yast:
Posteriormente, debe consultar con
ifconfig
si la configuración de su red es correcta. Si no es así (por ejemplo, si falta eth0), reinicie el sistema...
reboot
... y vuelva a comprobar la configuración de su red después; ahora debería ser correcta.
5 Instalar actualizaciones
Ahora instalamos las últimas actualizaciones de los repositorios de openSUSE. Ejecutar
zypper update
Y luego reinicie el servidor, ya que lo más probable es que también haya instalado algunas actualizaciones del kernel:
reboot
6 Instalar algunos paquetes básicos
Ejecutar
yast2 -i findutils readline glibc-devel findutils-locate gcc flex lynx compat-readline4 db-devel wget gcc-c++ subversion make vim telnet cron iptables iputils man man-pages nano pico sudo perl-TimeDate
7 Cuota registrada
Para instalar la cuota, ejecute
yast2 -i quota
Edite /etc/fstab para que se vea así (agregué ,usrjquota=aquota.user,grpjquota=aquota.group,jqfmt=vfsv0 a los puntos de montaje / y /srv):
vi /etc/fstab
/dev/sda1            swap                 swap       defaults              0 0
/dev/sda2            /                    ext4       acl,user_xattr,usrjquota=aquota.user,grpjquota=aquota.group,jqfmt=vfsv0        1 1
/dev/sda3            /srv                 ext4       acl,user_xattr,usrjquota=aquota.user,grpjquota=aquota.group,jqfmt=vfsv0        1 2
proc                 /proc                proc       defaults              0 0
sysfs                /sys                 sysfs      noauto                0 0
debugfs              /sys/kernel/debug    debugfs    noauto                0 0
devpts /dev/pts devpts mode=0620,gid=5 0 0 |
Luego ejecuta:
montar -o volver a montar /
montar -o volver a montar /srv
control de cuota -avugm
cuota -avug
No se preocupe si ve estos mensajes de error; son normales cuando ejecuta la comprobación de cuotas por primera vez:
server1:~ # quotacheck -avugm
quotacheck:Escaneo /dev/sda2 [/] hecho
quotacheck:No se puede establecer el archivo de cuota de usuario antiguo:No existe tal archivo o directorio
quotacheck:No se puede establecer el grupo antiguo archivo de cuota:no existe tal archivo o directorio
quotacheck:no se puede establecer el archivo de cuota de usuario antiguo:no existe tal archivo o directorio
quotacheck:no se puede establecer el archivo de cuota de grupo antiguo:no existe tal archivo o directorio
quotacheck:Se revisaron 3872 directorios y 32991 archivos
quotacheck:Archivo antiguo no encontrado.
quotacheck:Archivo antiguo no encontrado.
quotacheck:Análisis de /dev/sda3 [/srv] realizado
quotacheck:No se puede establecer el archivo de cuota de usuario antiguo:No existe tal archivo o directorio
quotacheck:No se puede establecer el archivo de cuota de grupo antiguo:No existe dicho archivo o directorio
quotacheck:No se puede establecer el archivo de cuota de usuario antiguo:No existe tal archivo o directorio
quotacheck:No se puede establecer estadísticas del archivo de cuota de grupo antiguo:No existe tal archivo o directorio
quotacheck:Se revisaron 6 directorios y 0 archivos
quotacheck:Archivo antiguo no encontrado.
quotacheck:Archivo antiguo no encontrado.
ser ver1:~ #
El servidor perfecto - OpenSUSE 12.1 x86_64 con Nginx [ISPConfig 3] - Página 4
8 Instalar Postfix, Dovecot, MySQL
Ejecutar
yast2 -i postfix postfix-mysql mysql mysql-community-server mysql-client libmysqlclient-devel dovecot12 dovecot12-backend-mysql pwgen cron python
Si te sale el error patterns-openSUSE-minimal_base-conflicts-12.1-25.21.1.x86_64 conflictos con python proporcionado por python-2.7.2-7.1.3.x86_64, selecciona la opción desinstalación de patterns-openSUSE-minimal_base-conflicts- 12.1-25.21.1.x86_64 y pulsa Aceptar -- Inténtalo de nuevo:
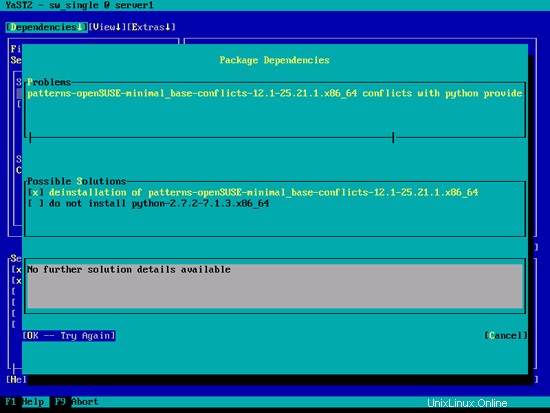
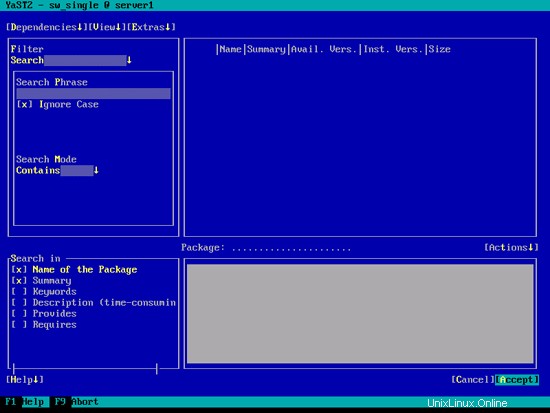
Presiona Aceptar en la siguiente pantalla...
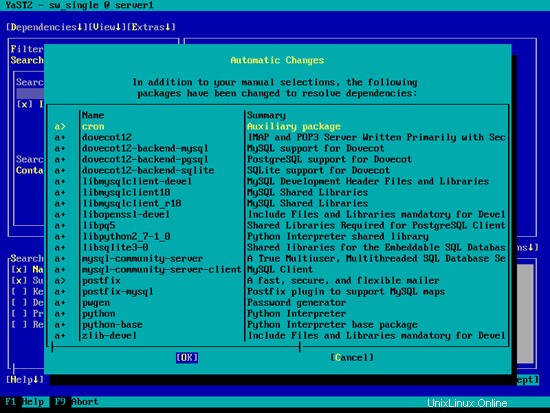
... y finalmente Aceptar:
Abra /etc/postfix/master.cf...
vi /etc/postfix/master.cf
... y descomente la siguiente línea:
[...]
tlsmgr    unix  -       -       n       1000?   1       tlsmgr
[...] |
Cree el siguiente enlace simbólico:
ln -s /usr/lib64/dovecot/modules /usr/lib/dovecot
Inicie MySQL, Postfix y Dovecot y habilite el inicio de los servicios en el momento del arranque.
systemctl habilitar mysql.service
systemctl iniciar mysql.service
systemctl habilitar postfix.servicio
systemctl iniciar postfix.servicio
systemctl habilitar palomar.servicio
systemctl iniciar palomar.servicio
Ahora instalo el paquete getmail:
yast2 -i getmail
Para proteger la instalación de MySQL, ejecute:
mysql_secure_installation
Ahora se le harán varias preguntas:
server1:~ # mysql_secure_installation
NOTA: SE RECOMIENDA EJECUTAR TODAS LAS PARTES DE ESTE SCRIPT PARA TODOS MySQL
SERVIDORES EN USO DE PRODUCCIÓN! ¡POR FAVOR, LEA CADA PASO CUIDADOSAMENTE!
Para iniciar sesión en MySQL para protegerlo, necesitaremos la contraseña actual
para el usuario root. Si acaba de instalar MySQL y
aún no ha establecido la contraseña raíz, la contraseña estará en blanco,
por lo que solo debe presionar Intro aquí.
Introducir contraseña actual para root (ingresar para ninguna):<-- ENTER
OK, contraseña utilizada con éxito, continuando...
Configurar la contraseña de root asegura que nadie pueda iniciar sesión en MySQL
usuario root sin la autorización adecuada.
¿Establecer contraseña root? [Y/n] <-- Y
Nueva contraseña: <-- yourrootsqlpassword
Vuelva a introducir la nueva contraseña: <-- yourrootsqlpassword
¡La contraseña se actualizó correctamente!
Recargando tablas de privilegios. .
... ¡Éxito!
De forma predeterminada, una instalación de MySQL tiene un usuario anónimo, permitiendo que cualquiera
inicie sesión en MySQL sin tener que tener una cuenta de usuario creado para
ellos. Esto solo está diseñado para realizar pruebas y para que la instalación
sea un poco más sencilla. Debe eliminarlos antes de pasar a un
entorno de producción.
¿Eliminar usuarios anónimos? [S/n] <-- S
... ¡Éxito!
Normalmente, solo debería permitirse que la raíz se conecte desde 'localhost'. Esto
garantiza que nadie pueda adivinar la contraseña raíz de la red.
¿Deshabilitar el inicio de sesión raíz de forma remota? [S/n] <-- S
... ¡Éxito!
De forma predeterminada, MySQL viene con una base de datos llamada 'prueba' a la que cualquiera puede
acceder. Esto también está diseñado solo para pruebas y debe eliminarse
antes de pasar a un entorno de producción.
¿Eliminar la base de datos de prueba y acceder a ella? [Y/n] <-- Y
- Eliminando la base de datos de prueba...
... ¡Éxito!
- Eliminando privilegios en la base de datos de prueba...
... Éxito !
Al volver a cargar las tablas de privilegios, se asegurará de que todos los cambios realizados hasta el momento
se apliquen de inmediato.
¿Recargar las tablas de privilegios ahora? [S/n] <-- S
... ¡Éxito!
Limpiando...
¡Todo hecho! Si completó todos los pasos anteriores, su instalación de MySQL
debería ser ahora segura.
¡Gracias por usar MySQL!
servidor1:~ #
Ahora su configuración de MySQL debería estar protegida.
9 Amavisd-new, Spamassassin y Clamav
Instale los antivirus Amavisd-new, Spamassassin y Clamav. Ejecutar
yast2 -i amavisd-new clamav clamav-db zoo unzip unrar bzip2 unarj perl-DBD-mysql
Abra /etc/amavisd.conf...
vi /etc/amavisd.conf
... y agregue la línea $myhostname con su nombre de host correcto debajo de la línea $mydomain:
[...]
$mydomain = 'example.com';   # a convenient default for other settings
$myhostname = "server1.$mydomain";
[...] |
Luego cree un enlace simbólico desde /var/run/clamav/clamd a /var/lib/clamav/clamd-socket:
mkdir -p /var/run/clamav
ln -s /var/lib/clamav/clamd-socket /var/run/clamav/clamd
OpenSUSE 12.1 tiene un directorio /run para almacenar datos de tiempo de ejecución. /run ahora es un tmpfs, y /var/run ahora está montado en /run desde tmpfs y, por lo tanto, se vacía al reiniciar.
Esto significa que después de un reinicio, el directorio /var/run/clamav que acabamos de crear ya no existirá y, por lo tanto, clamd no podrá iniciarse. Por lo tanto, creamos el archivo /etc/tmpfiles.d/clamav.conf ahora que creará este directorio al iniciar el sistema (consulte http://0pointer.de/public/systemd-man/tmpfiles.d.html para obtener más detalles):
vi /etc/tmpfiles.d/clamav.conf
D /var/run/clamav 0755 root root - |
Antes de iniciar amavisd y clamd, debemos editar el script de inicio /etc/init.d/amavis. No pude iniciar, detener y reiniciar de manera confiable amavisd con el script de inicio predeterminado:
vi /etc/init.d/amavis
Comente las siguientes líneas en la sección de inicio y fin:
[...]
    start)
        # ZMI 20100428 check for stale pid file
        #if test -f $AMAVIS_PID ; then
        #       checkproc -p $AMAVIS_PID amavisd
        #       if test $? -ge 1 ; then
        #               # pid file is stale, remove it
        #               echo -n "(stale amavisd pid file $AMAVIS_PID found, removing. Did amavisd crash?)"
        #               rm -f $AMAVIS_PID
        #       fi
        #fi
        echo -n "Starting virus-scanner (amavisd-new): "
        $AMAVISD_BIN start
        #if ! checkproc amavisd; then
        #    rc_failed 7
        #fi
        rc_status -v
        #if [ "$AMAVIS_SENDMAIL_MILTER" == "yes" ]; then
        #    rc_reset
        #    echo -n "Starting amavis-milter:"
        #    startproc -u vscan $AMAVIS_MILTER_BIN -p $AMAVIS_MILTER_SOCK > /dev/null 2>&1
        #    rc_status -v
        #fi
        ;;
    stop)
        echo -n "Shutting down virus-scanner (amavisd-new): "
        #if checkproc amavisd; then
        #    rc_reset
            $AMAVISD_BIN stop
        #else
        #    rc_reset
        #fi
        rc_status -v
        #if [ "$AMAVIS_SENDMAIL_MILTER" == "yes" ]; then
        #    rc_reset
        #    echo -n "Shutting down amavis-milter: "
        #    killproc -TERM $AMAVIS_MILTER_BIN
        #    rc_status -v
        #fi
        ;;
[...] |
Debido a que hemos cambiado el script de inicio, debemos ejecutar
systemctl --system daemon-reload
ahora.
Para habilitar los servicios, ejecute:
systemctl habilitar amavis.service
systemctl habilitar clamd.service
systemctl iniciar amavis.service
systemctl iniciar clamd.service
10 Instale Nginx, PHP5 (PHP-FPM) y Fcgiwrap
Nginx está disponible como paquete para OpenSUSE que podemos instalar de la siguiente manera:
yast2 -i nginx-1.0
Si Apache2 ya está instalado en el sistema, deténgalo ahora...
systemctl stop apache2.service
... y elimine los enlaces de inicio del sistema de Apache:
systemctl disable apache2.service
Luego creamos los enlaces de inicio del sistema para nginx y lo iniciamos:
systemctl habilitar nginx.servicio
systemctl iniciar nginx.servicio
(Si tanto Apache2 como nginx están instalados, el instalador de ISPConfig 3 le preguntará cuál desea usar; responda nginx en este caso. Si solo está instalado uno de estos, ISPConfig realizará la configuración necesaria automáticamente).
Podemos hacer que PHP5 funcione en nginx a través de PHP-FPM (PHP-FPM (FastCGI Process Manager) es una implementación alternativa de PHP FastCGI con algunas funciones adicionales útiles para sitios de cualquier tamaño, especialmente los sitios más concurridos) que instalamos de la siguiente manera:
yast2 -i php5-fpm
Antes de iniciar PHP-FPM, cambie el nombre de /etc/php5/fpm/php-fpm.conf.default a /etc/php5/fpm/php-fpm.conf:
mv /etc/php5/fpm/php-fpm.conf.default /etc/php5/fpm/php-fpm.conf
Cambie los permisos del directorio de sesión de PHP:
chmod 1733 /var/lib/php5
Luego abra /etc/php5/fpm/php-fpm.conf...
vi /etc/php5/fpm/php-fpm.conf
... y cambie error_log a /var/log/php-fpm.log y descomente pm.min_spare_servers y pm.max_spare_servers:
[...]
error_log = /var/log/php-fpm.log
[...]
pm.min_spare_servers = 5
[...]
pm.max_spare_servers = 35
[...] |
A continuación, cree los enlaces de inicio del sistema para php-fpm e inícielo:
systemctl habilitar php-fpm.service
systemctl iniciar php-fpm.service
PHP-FPM es un proceso daemon que ejecuta un servidor FastCGI en el puerto 9000, como puede ver en la salida de
netstat -tapn
servidor1:~ # netstat -tapn
Conexiones activas de Internet (servidores y establecidas)
Proto Recv-Q Send-Q Dirección local Dirección extranjera Estado PID/Nombre del programa
tcp 0 0 0 127 3310 0.0.0.0:* Escuche 10357 /clamd
tcp 0 0 0 0.0.0.0:143 0.0.0.0:* /nginx
tcp 0 0 0 0.0.0.0:22 0.0.0.0:* Escucha 1275 /sshd
tcp 0 0 127.0.0.1:25 0.0.0.0:* Escucha 9816 /maestro
TCP 0 0 127.0. 0.0.0.0:3306 0.0.0.0:* ESCUCHA 9694/mysqld
tcp 0 0 192.168. ESCUCHAR 9816/maestro
servidor1:~ #
Para obtener soporte de MySQL en PHP, podemos instalar el paquete php5-mysql. Es una buena idea instalar algunos otros módulos de PHP5, ya que podría necesitarlos para sus aplicaciones:
yast2 -i php5-mysql php5-bcmath php5-bz2 php5-calendar php5-ctype php5-curl php5-dom php5-ftp php5-gd php5-gettext php5-gmp php5-iconv php5-imap php5-ldap php5-mbstring php5-mcrypt php5-odbc php5-openssl php5-pcntl php5-pgsql php5-posix php5-shmop php5-snmp php5-soap php5-sockets php5-sqlite php5-sysvsem php5-tokenizer php5-wddx php5-xmlrpc php5-xsl php5-zlib php5-exif php5-pear php5-sysvmsg php5-sysvshm
Ahora reinicie PHP-FPM:
systemctl restart php-fpm.service
Para obtener compatibilidad con CGI en nginx, instalamos Fcgiwrap.
Fcgiwrap es un contenedor CGI que debería funcionar también para secuencias de comandos CGI complejas y se puede usar para entornos de alojamiento compartido porque permite que cada host virtual use su propio directorio cgi-bin.
Como no existe un paquete fcgiwrap para OpenSUSE, debemos construirlo nosotros mismos. Primero instalamos algunos requisitos previos:
yast2 -i git patch automake glibc-devel gcc flex compat-readline4 db-devel wget gcc-c++ make vim libtool FastCGI-devel
Cree los siguientes enlaces simbólicos:
ln -s /usr/include/fastcgi/fastcgi.h /usr/local/include/
ln -s /usr/include/fastcgi/fcgi_config.h /usr/local/include/
ln - s /usr/include/fastcgi/fcgi_stdio.h /usr/local/include/
ln -s /usr/include/fastcgi/fcgiapp.h /usr/local/include/
ln -s / usr/include/fastcgi/fcgimisc.h /usr/local/include/
ln -s /usr/include/fastcgi/fcgio.h /usr/local/include/
ln -s /usr/ include/fastcgi/fcgios.h /usr/local/include/
Ahora podemos construir fcgiwrap de la siguiente manera:
cd /usr/local/src/
git clone git://github.com/gnosek/fcgiwrap.git
cd fcgiwrap
autoreconf -i
./configure
hacer
hacer instalar
Esto instala fcgiwrap en /usr/local/sbin/fcgiwrap.
A continuación, instalamos el paquete spawn-fcgi que nos permite ejecutar fcgiwrap como un demonio:
yast2 -i spawn-fcgi
Ahora podemos iniciar fcgiwrap de la siguiente manera:
spawn-fcgi -u wwwrun -g www -s /var/run/fcgiwrap.socket -S -M 0770 -F 1 -P /var/run/spawn-fcgi.pid -- /usr/local/sbin/fcgiwrap
Ahora debería encontrar el socket fcgiwrap en /var/run/fcgiwrap.socket, propiedad del usuario wwwrun y el grupo www. Ahora debemos agregar el usuario nginx al grupo www:
usermod -A www nginx
Vuelva a cargar nginx después:
systemctl reload nginx.service
Si no desea iniciar fcgiwrap manualmente cada vez que inicia su sistema, abra /etc/init.d/boot.local...
vi /etc/init.d/boot.local
... y agregue el comando spawn-fcgi al final del archivo; esto iniciará automáticamente fcgiwrap al final del proceso de arranque:
[...]
/usr/bin/spawn-fcgi -u wwwrun -g www -s /var/run/fcgiwrap.socket -S -M 0770 -F 1 -P /var/run/spawn-fcgi.pid -- /usr/local/sbin/fcgiwrap |
¡Eso es todo! Ahora, cuando cree un vhost nginx, ISPConfig se encargará de la configuración correcta del vhost.
10.1 Instalar phpMyAdmin
A continuación instalamos phpMyAdmin:
yast2 -i phpMyAdmin
Como esto instala Apache como una dependencia, elimine los enlaces de inicio del sistema de Apache:
systemctl disable apache2.service
phpMyAdmin ahora está ubicado en el directorio /srv/www/htdocs/phpMyAdmin, pero lo queremos en el directorio /usr/share/phpmyadmin/, por lo que creamos un enlace simbólico:
ln -s /srv/www/htdocs/phpMyAdmin /usr/share/phpmyadmin
Después de haber instalado ISPConfig 3, puede acceder a phpMyAdmin de la siguiente manera:
El vhost de aplicaciones ISPConfig en el puerto 8081 para nginx viene con una configuración de phpMyAdmin, por lo que puede usar http://server1.example.com:8081/phpmyadmin o http://server1.example.com:8081/phpMyAdmin para acceder a phpMyAdmin.
Si desea usar un alias /phpmyadmin o /phpMyAdmin que pueda usar desde sus sitios web, esto es un poco más complicado que para Apache porque nginx no tiene alias globales (es decir, alias que se pueden definir para todos los vhosts). Por lo tanto, debe definir estos alias para cada uno vhost desde el que desea acceder a phpMyAdmin.
Para hacer esto, pegue lo siguiente en el campo Directivas nginx en la pestaña Opciones del sitio web en ISPConfig:
        location /phpmyadmin {
               root /usr/share/;
               index index.php index.html index.htm;
               location ~ ^/phpmyadmin/(.+\.php)$ {
                       try_files $uri =404;
                       root /usr/share/;
                       fastcgi_pass 127.0.0.1:9000;
                       fastcgi_index index.php;
                       fastcgi_param SCRIPT_FILENAME $document_root$fastcgi_script_name;
                       include /etc/nginx/fastcgi_params;
                       fastcgi_buffer_size 128k;
                       fastcgi_buffers 256 4k;
                       fastcgi_busy_buffers_size 256k;
                       fastcgi_temp_file_write_size 256k;
                       fastcgi_intercept_errors on;
               }
               location ~* ^/phpmyadmin/(.+\.(jpg|jpeg|gif|css|png|js|ico|html|xml|txt))$ {
                       root /usr/share/;
               }
        }
        location /phpMyAdmin {
               rewrite ^/* /phpmyadmin last;
} |
Si usa https en lugar de http para su host virtual, debe agregar la línea fastcgi_param HTTPS; a su configuración de phpMyAdmin así:
        location /phpmyadmin {
               root /usr/share/;
               index index.php index.html index.htm;
               location ~ ^/phpmyadmin/(.+\.php)$ {
                       try_files $uri =404;
                       root /usr/share/;
                       fastcgi_pass 127.0.0.1:9000;
                       fastcgi_param HTTPS on; # <-- add this line
                       fastcgi_index index.php;
                       fastcgi_param SCRIPT_FILENAME $document_root$fastcgi_script_name;
                       include /etc/nginx/fastcgi_params;
                       fastcgi_buffer_size 128k;
                       fastcgi_buffers 256 4k;
                       fastcgi_busy_buffers_size 256k;
                       fastcgi_temp_file_write_size 256k;
                       fastcgi_intercept_errors on;
               }
               location ~* ^/phpmyadmin/(.+\.(jpg|jpeg|gif|css|png|js|ico|html|xml|txt))$ {
                       root /usr/share/;
               }
        }
        location /phpMyAdmin {
               rewrite ^/* /phpmyadmin last;
} |
Si usa tanto http como https para su host virtual, debe agregar la siguiente sección a la sección http {} en /etc/nginx/nginx.conf (antes de cualquier línea de inclusión) que determina si el visitante usa http o https y establece la variable $fastcgi_https (que usaremos en nuestra configuración de phpMyAdmin) en consecuencia:
vi /etc/nginx/nginx.conf
[...]
http {
[...]
        ## Detect when HTTPS is used
        map $scheme $fastcgi_https {
          default off;
          https on;
        }
[...]
}
[...] |
No olvides recargar nginx después:
systemctl reload nginx.service
Luego vaya al campo Directivas nginx nuevamente, y en lugar de fastcgi_param HTTPS en; agregas la línea fastcgi_param HTTPS $fastcgi_https; para que pueda usar phpMyAdmin para solicitudes http y https:
        location /phpmyadmin {
               root /usr/share/;
               index index.php index.html index.htm;
               location ~ ^/phpmyadmin/(.+\.php)$ {
                       try_files $uri =404;
                       root /usr/share/;
                       fastcgi_pass 127.0.0.1:9000;
                       fastcgi_param HTTPS $fastcgi_https; # <-- add this line
                       fastcgi_index index.php;
                       fastcgi_param SCRIPT_FILENAME $document_root$fastcgi_script_name;
                       include /etc/nginx/fastcgi_params;
                       fastcgi_buffer_size 128k;
                       fastcgi_buffers 256 4k;
                       fastcgi_busy_buffers_size 256k;
                       fastcgi_temp_file_write_size 256k;
                       fastcgi_intercept_errors on;
               }
               location ~* ^/phpmyadmin/(.+\.(jpg|jpeg|gif|css|png|js|ico|html|xml|txt))$ {
                       root /usr/share/;
               }
        }
        location /phpMyAdmin {
               rewrite ^/* /phpmyadmin last;
} |
El servidor perfecto - OpenSUSE 12.1 x86_64 con Nginx [ISPConfig 3] - Página 5
11 Cartero
Desde la versión 3.0.4, ISPConfig también le permite administrar (crear/modificar/eliminar) listas de correo de Mailman. Si desea utilizar esta función, instale Mailman de la siguiente manera:
yast2 -i mailman
Antes de que podamos iniciar Mailman, se debe crear una primera lista de correo llamada mailman:
/usr/lib/mailman/bin/newlist mailman
server1:~ # /usr/lib/mailman/bin/newlist mailman
Ingrese el correo electrónico de la persona que ejecuta la lista:<-- dirección de correo electrónico del administrador, p. ej. ejemplo@unixlinux.online
Contraseña inicial del cartero:<-- contraseña de administrador para la lista de carteros
Presione Intro para notificar al propietario del cartero... <-- ENTRAR
server1:~ #
Crear los enlaces de inicio del sistema para Mailman...
systemctl enable mailman.service
... e iniciarlo:
systemctl start mailman.service
Próximo reinicio Posfijo:
systemctl restart postfix.service
Ahora necesitamos crear este enlace simbólico para que Mailman funcione con ISPConfig:
cd /usr/lib/mailman/cgi-bin/
ln -s ./ mailman
Si desea usar Mailman desde sus sitios web creados a través de ISPConfig, esto es un poco más complicado que para Apache porque nginx no tiene alias globales (es decir, alias que se pueden definir para todos los hosts virtuales). Por lo tanto, debe definir estos alias para cada vhost desde el que desea acceder a Mailman.
Para hacer esto, pegue lo siguiente en el campo Directivas nginx en la pestaña Opciones del sitio web en ISPConfig:
        location /mailman {
               root /usr/lib/mailman/cgi-bin/;
               fastcgi_split_path_info (^/mailman/[^/]*)(.*)$;
               include /etc/nginx/fastcgi_params;
               fastcgi_param SCRIPT_FILENAME $document_root$fastcgi_script_name;
               fastcgi_param PATH_INFO $fastcgi_path_info;
               fastcgi_param PATH_TRANSLATED $document_root$fastcgi_path_info;
               fastcgi_intercept_errors on;
               fastcgi_pass unix:/var/run/fcgiwrap.socket;
        }

        location /mailmanicons {
               alias /usr/lib/mailman/icons;
        }

        location /pipermail {
               alias /var/lib/mailman/archives/public;
               autoindex on;
} |
Esto define el alias /mailman/ para su host virtual, lo que significa que puede acceder a la interfaz de administración de Mailman para una lista en http:///mailman/admin/, y la página web para los usuarios de una lista de correo. se puede encontrar en http:///mailman/listinfo/.
En http:///pipermail puede encontrar los archivos de la lista de correo.
12 Instalar PureFTPd
Instale el demonio FTP pure-ftpd. Ejecutar:
yast2 -i pure-ftpd
systemctl enable pure-ftpd.service
systemctl start pure-ftpd.service
Ahora configuramos PureFTPd para permitir sesiones FTP y TLS. FTP es un protocolo muy inseguro porque todas las contraseñas y todos los datos se transfieren en texto claro. Mediante el uso de TLS, toda la comunicación se puede cifrar, lo que hace que el FTP sea mucho más seguro.
TLS necesita OpenSSL; para instalar OpenSSL, simplemente ejecutamos:
yast2 -i openssl
Abra /etc/pure-ftpd/pure-ftpd.conf...
vi /etc/pure-ftpd/pure-ftpd.conf
Si desea permitir FTP y Sesiones TLS, establezca TLS en 1:
[...]
# This option can accept three values :
# 0 : disable SSL/TLS encryption layer (default).
# 1 : accept both traditional and encrypted sessions.
# 2 : refuse connections that don't use SSL/TLS security mechanisms,
#     including anonymous sessions.
# Do _not_ uncomment this blindly. Be sure that :
# 1) Your server has been compiled with SSL/TLS support (--with-tls),
# 2) A valid certificate is in place,
# 3) Only compatible clients will log in.

TLS                      1
[...] |
Si desea aceptar solo sesiones TLS (sin FTP), establezca TLS en 2:
[...]
# This option can accept three values :
# 0 : disable SSL/TLS encryption layer (default).
# 1 : accept both traditional and encrypted sessions.
# 2 : refuse connections that don't use SSL/TLS security mechanisms,
#     including anonymous sessions.
# Do _not_ uncomment this blindly. Be sure that :
# 1) Your server has been compiled with SSL/TLS support (--with-tls),
# 2) A valid certificate is in place,
# 3) Only compatible clients will log in.

TLS                      2
[...] |
Para no permitir TLS en absoluto (solo FTP), establezca TLS en 0:
[...]
# This option can accept three values :
# 0 : disable SSL/TLS encryption layer (default).
# 1 : accept both traditional and encrypted sessions.
# 2 : refuse connections that don't use SSL/TLS security mechanisms,
#     including anonymous sessions.
# Do _not_ uncomment this blindly. Be sure that :
# 1) Your server has been compiled with SSL/TLS support (--with-tls),
# 2) A valid certificate is in place,
# 3) Only compatible clients will log in.

TLS                      0
[...] |
Para usar TLS, debemos crear un certificado SSL. Lo creo en /etc/ssl/private/, por lo tanto, primero creo ese directorio:
mkdir -p /etc/ssl/private/
Posteriormente, podemos generar el certificado SSL de la siguiente manera:
openssl req -x509 -nodes -days 7300 -newkey rsa:2048 -keyout /etc/ssl/private/pure-ftpd.pem -out /etc/ssl/private/pure-ftpd.pem
Nombre del país (código de 2 letras) [AU]:<-- Ingrese el nombre de su país (por ejemplo, "DE").
Nombre del estado o provincia (nombre completo) [Algún estado]:<-- Ingrese su estado o Nombre de la provincia.
Nombre de la localidad (p. ej., ciudad) []:<-- Ingrese su ciudad.
Nombre de la organización (p. ej., empresa) [Internet Widgits Pty Ltd]:<-- Ingrese el nombre de su organización (p. ej., el nombre de su empresa).
Nombre de la unidad organizativa (p. ej., sección) []:<-- Ingrese el nombre de su unidad organizativa (p. ej., "Departamento de TI").
Nombre común (p. ej., SU nombre) []:<-- Ingrese el nombre de dominio completo del sistema (por ejemplo, "servidor1.ejemplo.com").
Dirección de correo electrónico []:<-- Ingrese su dirección de correo electrónico.
Cambiar los permisos del certificado SSL:
chmod 600 /etc/ssl/private/pure-ftpd.pem
Finalmente reinicie PureFTPd:
systemctl restart pure-ftpd.service
Eso es todo. Ahora puede intentar conectarse usando su cliente FTP; sin embargo, debe configurar su cliente FTP para usar TLS; consulte el siguiente capítulo sobre cómo hacerlo con FileZilla.
13 Instalar BIND
El servidor de nombres BIND se puede instalar de la siguiente manera:
yast2 -i bind
Cree los enlaces de inicio del sistema BIND e inícielo:
systemctl enable named.service
systemctl start named.service
14 Instalar Webalizer y AWStats
Since ISPConfig 3 lets you choose if you want to use Webalizer or AWStats to create your web site statistics, we install both:
yast2 -i webalizer perl-DateManip
zypper install http://download.opensuse.org/repositories/network:/utilities/openSUSE_12.1/noarch/awstats-7.0-14.1.noarch.rpm
15 Install fail2ban
fail2ban can be installed as follows:
yast2 -i fail2ban
16 Install Jailkit
Jailkit can be installed like this:
zypper install http://download.opensuse.org/repositories/security/openSUSE_12.1/x86_64/jailkit-2.13-1.1.x86_64.rpm
17 Synchronize The System Clock
If you want to have the system clock synchronized with an NTP server do the following:
yast2 -i xntp
Then add system startup links for ntp and start ntp:
systemctl enable ntp.service
systemctl start ntp.service
18 Install rkhunter
rkhunter can be installed as follows:
yast2 -i rkhunter
The Perfect Server - OpenSUSE 12.1 x86_64 With Nginx [ISPConfig 3] - Page 6
19 Install SquirrelMail
To install the SquirrelMail webmail client, run:
zypper installhttp://download.opensuse.org/repositories/server:/php:/applications/openSUSE_12.1/noarch/squirrelmail-1.4.22-1.1.noarch.rpm
Then configure SquirrelMail:
/srv/www/htdocs/squirrelmail/config/conf.pl
We must tell SquirrelMail that we are using Dovecot:
SquirrelMail Configuration : Read: config.php (1.4.0)
---------------------------------------------------------
Main Menu --
1. Organization Preferences
2. Server Settings
3. Folder Defaults
4. General Options
5. User Interface
6. Address Books
7. Message of the Day (MOTD)
8. Plugins
9. Database
10. Language settings
11. Tweaks
D. Set pre-defined settings for specific IMAP servers
C Turn color on
S Save data
Q Quit
Command >> <-- D
SquirrelMail Configuration : Read: config.php
---------------------------------------------------------
While we have been building SquirrelMail, we have discovered some
preferences that work better with some servers that don't work so
well with others. If you select your IMAP server, this option will
set some pre-defined settings for that server.
Please note that you will still need to go through and make sure
everything is correct. This does not change everything. There are
only a few settings that this will change.
Please select your IMAP server:
bincimap = Binc IMAP server
courier = Courier IMAP server
cyrus = Cyrus IMAP server
dovecot = Dovecot Secure IMAP server
exchange = Microsoft Exchange IMAP server
hmailserver = hMailServer
macosx = Mac OS X Mailserver
mercury32 = Mercury/32
uw = University of Washington's IMAP server
gmail = IMAP access to Google mail (Gmail) accounts
quit = Do not change anything
Command >> <-- dovecot
SquirrelMail Configuration : Read: config.php
---------------------------------------------------------
While we have been building SquirrelMail, we have discovered some
preferences that work better with some servers that don't work so
well with others. If you select your IMAP server, this option will
set some pre-defined settings for that server.
Please note that you will still need to go through and make sure
everything is correct. This does not change everything. There are
only a few settings that this will change.
Please select your IMAP server:
bincimap = Binc IMAP server
courier = Courier IMAP server
cyrus = Cyrus IMAP server
dovecot = Dovecot Secure IMAP server
exchange = Microsoft Exchange IMAP server
hmailserver = hMailServer
macosx = Mac OS X Mailserver
mercury32 = Mercury/32
uw = University of Washington's IMAP server
gmail = IMAP access to Google mail (Gmail) accounts
quit = Do not change anything
Command >> dovecot
imap_server_type = dovecot
default_folder_prefix =
trash_folder = Trash
sent_folder = Sent
draft_folder = Drafts
show_prefix_option = false
default_sub_of_inbox = false
show_contain_subfolders_option = false
optional_delimiter = detect
delete_folder = false
force_username_lowercase = true
Press enter to continue... <-- ENTER
SquirrelMail Configuration : Read: config.php (1.4.0)
---------------------------------------------------------
Main Menu --
1. Organization Preferences
2. Server Settings
3. Folder Defaults
4. General Options
5. User Interface
6. Address Books
7. Message of the Day (MOTD)
8. Plugins
9. Database
10. Language settings
11. Tweaks
D. Set pre-defined settings for specific IMAP servers
C Turn color on
S Save data
Q Quit
Command >> <-- S
SquirrelMail Configuration : Read: config.php (1.4.0)
---------------------------------------------------------
Main Menu --
1. Organization Preferences
2. Server Settings
3. Folder Defaults
4. General Options
5. User Interface
6. Address Books
7. Message of the Day (MOTD)
8. Plugins
9. Database
10. Language settings
11. Tweaks
D. Set pre-defined settings for specific IMAP servers
C Turn color on
S Save data
Q Quit
Command >> S
Data saved in config.php
Done activating plugins; registration data saved in plugin_hooks.php
Press enter to continue... <-- ENTER
SquirrelMail Configuration : Read: config.php (1.4.0)
---------------------------------------------------------
Main Menu --
1. Organization Preferences
2. Server Settings
3. Folder Defaults
4. General Options
5. User Interface
6. Address Books
7. Message of the Day (MOTD)
8. Plugins
9. Database
10. Language settings
11. Tweaks
D. Set pre-defined settings for specific IMAP servers
C Turn color on
S Save data
Q Quit
Command >> <-- Q
SquirrelMail is located in the /srv/www/htdocs/squirrelmail directory, but we need it in the /usr/share/squirrelmail/ directory. Therefore we create a symlink:
ln -s /srv/www/htdocs/squirrelmail /usr/share/squirrelmail
In addition to that, we change the owner of the /srv/www/htdocs/squirrelmail/data/ directory to nobody:
chown nobody /srv/www/htdocs/squirrelmail/data/
After you have installed ISPConfig 3, you can access SquirrelMail as follows:
The ISPConfig apps vhost on port 8081 for nginx comes with a SquirrelMail configuration, so you can use http://server1.example.com:8081/squirrelmail or http://server1.example.com:8081/webmail to access SquirrelMail.
If you want to use a /webmail or /squirrelmail alias that you can use from your web sites, this is a bit more complicated than for Apache because nginx does not have global aliases (i.e., aliases that can be defined for all vhosts). Therefore you have to define these aliases for each vhost from which you want to access SquirrelMail.
To do this, paste the following into the nginx Directives field on the Options tab of the web site in ISPConfig:
        location /squirrelmail {
               root /usr/share/;
               index index.php index.html index.htm;
               location ~ ^/squirrelmail/(.+\.php)$ {
                       try_files $uri =404;
                       root /usr/share/;
                       fastcgi_pass 127.0.0.1:9000;
                       fastcgi_index index.php;
                       fastcgi_param SCRIPT_FILENAME $document_root$fastcgi_script_name;
                       include /etc/nginx/fastcgi_params;
                       fastcgi_buffer_size 128k;
                       fastcgi_buffers 256 4k;
                       fastcgi_busy_buffers_size 256k;
                       fastcgi_temp_file_write_size 256k;
                       fastcgi_intercept_errors on;
               }
               location ~* ^/squirrelmail/(.+\.(jpg|jpeg|gif|css|png|js|ico|html|xml|txt))$ {
                       root /usr/share/;
               }
        }
        location /webmail {
               rewrite ^/* /squirrelmail last;
} |
If you use https instead of http for your vhost, you should add the line fastcgi_param HTTPS on; to your SquirrelMail configuration like this:
        location /squirrelmail {
               root /usr/share/;
               index index.php index.html index.htm;
               location ~ ^/squirrelmail/(.+\.php)$ {
                       try_files $uri =404;
                       root /usr/share/;
                       fastcgi_pass 127.0.0.1:9000;
                       fastcgi_param HTTPS on; # <-- add this line
                       fastcgi_index index.php;
                       fastcgi_param SCRIPT_FILENAME $document_root$fastcgi_script_name;
                       include /etc/nginx/fastcgi_params;
                       fastcgi_buffer_size 128k;
                       fastcgi_buffers 256 4k;
                       fastcgi_busy_buffers_size 256k;
                       fastcgi_temp_file_write_size 256k;
                       fastcgi_intercept_errors on;
               }
               location ~* ^/squirrelmail/(.+\.(jpg|jpeg|gif|css|png|js|ico|html|xml|txt))$ {
                       root /usr/share/;
               }
        }
        location /webmail {
               rewrite ^/* /squirrelmail last;
} |
If you use both http and https for your vhost, you need to add the following section to the http {} section in /etc/nginx/nginx.conf (before any include lines) which determines if the visitor uses http or https and sets the $fastcgi_https variable (which we will use in our SquirrelMail configuration) accordingly:
vi /etc/nginx/nginx.conf
[...]
http {
[...]
        ## Detect when HTTPS is used
        map $scheme $fastcgi_https {
          default off;
          https on;
        }
[...]
}
[...] |
Don't forget to reload nginx afterwards:
systemctl reload nginx.service
Then go to the nginx Directives field again, and instead of fastcgi_param HTTPS on; you add the line fastcgi_param HTTPS $fastcgi_https; so that you can use SquirrelMail for both http and https requests:
        location /squirrelmail {
               root /usr/share/;
               index index.php index.html index.htm;
               location ~ ^/squirrelmail/(.+\.php)$ {
                       try_files $uri =404;
                       root /usr/share/;
                       fastcgi_pass 127.0.0.1:9000;
                       fastcgi_param HTTPS $fastcgi_https; # <-- add this line
                       fastcgi_index index.php;
                       fastcgi_param SCRIPT_FILENAME $document_root$fastcgi_script_name;
                       include /etc/nginx/fastcgi_params;
                       fastcgi_buffer_size 128k;
                       fastcgi_buffers 256 4k;
                       fastcgi_busy_buffers_size 256k;
                       fastcgi_temp_file_write_size 256k;
                       fastcgi_intercept_errors on;
               }
               location ~* ^/squirrelmail/(.+\.(jpg|jpeg|gif|css|png|js|ico|html|xml|txt))$ {
                       root /usr/share/;
               }
        }
        location /webmail {
               rewrite ^/* /squirrelmail last;
} |
20 ISPConfig 3
Before we install ISPConfig 3, make sure that the /var/vmail/ directory exists:
mkdir /var/vmail/
Before you start the ISPConfig installation, make sure that Apache is stopped (if it is installed - it is possible that some of your installed packages have installed Apache as a dependency without you knowing). If Apache2 is already installed on the system, stop it now...
systemctl stop apache2.service
... and remove Apache's system startup links:
systemctl disable apache2.service
Make sure that nginx is running:
systemctl restart nginx.service
(If you have both Apache and nginx installed, the installer asks you which one you want to use:Apache and nginx detected. Select server to use for ISPConfig:(apache,nginx) [apache]:
Type nginx. If only Apache or nginx are installed, this is automatically detected by the installer, and no question is asked.)
Download the current ISPConfig 3 version and install it. The ISPConfig installer will configure all services like Postfix, Dovecot, etc. for you. A manual setup as required for ISPConfig 2 is not necessary anymore.
You now also have the possibility to let the installer create an SSL vhost for the ISPConfig control panel, so that ISPConfig can be accessed using https:// instead of http://. To achieve this, just press ENTER when you see this question:Do you want a secure (SSL) connection to the ISPConfig web interface (y,n) [y]:.
cd /tmp
wget http://www.ispconfig.org/downloads/ISPConfig-3-stable.tar.gz
tar xfz ISPConfig-3-stable.tar.gz
cd ispconfig3_install/install/
Now start the installation process by executing:
php -q install.php
server1:/tmp/ispconfig3_install/install # php -q install.php
--------------------------------------------------------------------------------
_____ ___________ _____ __ _ ____
|_ _/ ___| ___ \ / __ \ / _(_) /__ \
| | \ `--.| |_/ / | / \/ ___ _ __ | |_ _ __ _ _/ /
| | `--. \ __/ | | / _ \| '_ \| _| |/ _` | |_ |
_| |_/\__/ / | | \__/\ (_) | | | | | | | (_| | ___\ \
\___/\____/\_| \____/\___/|_| |_|_| |_|\__, | \____/
__/ |
|___/
--------------------------------------------------------------------------------
>> Initial configuration
Operating System: openSUSE or compatible, unknown version.
Following will be a few questions for primary configuration so be careful.
Default values are in [brackets] and can be accepted with .
Tap in "quit" (without the quotes) to stop the installer.
Select language (en,de) [en]: <-- ENTER
Installation mode (standard,expert) [standard]: <-- ENTER
Full qualified hostname (FQDN) of the server, eg server1.domain.tld [server1.example.com]: <-- ENTER
MySQL server hostname [localhost]: <-- ENTER
MySQL root username [root]: <-- ENTER
MySQL root password []: <-- yourrootsqlpassword
MySQL database to create [dbispconfig]: <-- ENTER
MySQL charset [utf8]: <-- ENTER
Apache and nginx detected. Select server to use for ISPConfig: (apache,nginx) [apache]: <-- nginx
Generating a 2048 bit RSA private key
...................................................................................+++
...+++
writing new private key to 'smtpd.key'
-----
You are about to be asked to enter information that will be incorporated
into your certificate request.
What you are about to enter is what is called a Distinguished Name or a DN.
There are quite a few fields but you can leave some blank
For some fields there will be a default value,
If you enter '.', the field will be left blank.
-----
Country Name (2 letter code) [AU]: <-- ENTER
State or Province Name (full name) [Some-State]: <-- ENTER
Locality Name (eg, city) []: <-- ENTER
Organization Name (eg, company) [Internet Widgits Pty Ltd]: <-- ENTER
Organizational Unit Name (eg, section) []: <-- ENTER
Common Name (eg, YOUR name) []: <-- ENTER
Emai l Address []: <-- ENTER
Configuring Jailkit
Configuring Dovecot
chmod: cannot access `/etc/dovecot/dovecot-sql.conf~': No such file or directory
Configuring Spamassassin
Configuring Amavisd
Configuring Getmail
Configuring Pureftpd
Configuring BIND
Configuring nginx
Configuring Vlogger
Configuring Apps vhost
Configuring Bastille Firewall
Configuring Fail2ban
Installing ISPConfig
ISPConfig Port [8080]: <-- ENTER
Do you want a secure (SSL) connection to the ISPConfig web interface (y,n) [y]:<-- ENTER
Generating RSA private key, 4096 bit long modulus
.++
...............++
e is 65537 (0x10001)
You are about to be asked to enter information that will be incorporated
into your certificate request.
What you are about to enter is what is called a Distinguished Name or a DN.
There are quite a few fields but you can leave some blank
For some fields there will be a default value,
If you enter '.', the field will be left blank.
-----
Country Name (2 letter code) [AU]: <-- ENTER
State or Province Name (full name) [Some-State]: <-- ENTER
Locality Name (eg, city) []: <-- ENTER
Organization Name (eg, company) [Internet Widgits Pty Ltd]: <-- ENTER
Organizational Unit Name (eg, section) []: <-- ENTER
Common Name (eg, YOUR name) []: <-- ENTER
Email Address []: <-- ENTER
Please enter the following 'extra' attributes
to be sent with your certificate request
A challenge password []: <-- ENTER
An optional company name []: <-- ENTER
writing RSA key
Configuring DBServer
Installing ISPConfig crontab
no crontab for root
no crontab for getmail
Restarting services ...
redirecting to systemctl
redirecting to systemctl
redirecting to systemctl
redirecting to systemctl
redirecting to systemctl
redirecting to systemctl
redirectin g to systemctl
redirecting to systemctl
redirecting to systemctl
Installation completed.
server1:/tmp/ispconfig3_install/install #
Clean up the /tmp directory:
cd /tmp
rm -rf /tmp/ispconfig3_install
rm -f /tmp/ISPConfig-3-stable.tar.gz
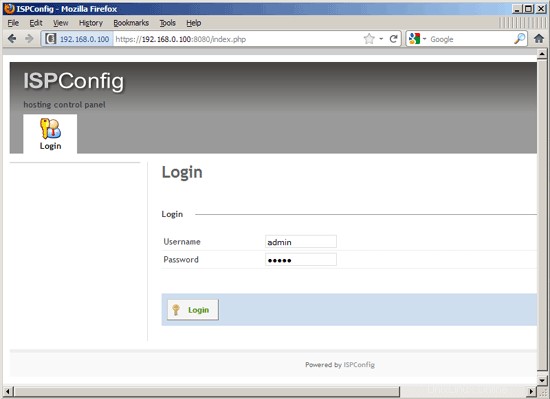
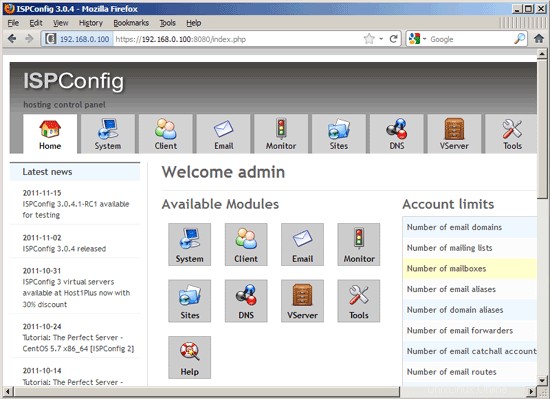
Afterwards you can access ISPConfig 3 under http(s)://server1.example.com:8080/ or http(s)://192.168.0.100:8080/ (http or https depends on what you chose during installation). Log in with the username admin and the password admin (you should change the default password after your first login):
If you want to use IPv6 addresses with your nginx vhosts, please do the following before you create IPv6 vhosts in ISPConfig:
Open /etc/sysctl.conf...
vi /etc/sysctl.conf
... and add the line net.ipv6.bindv6only =1:
[...]
net.ipv6.bindv6only = 1 |
Run...
sysctl -p
... afterwards for the change to take effect.
20.1 ISPConfig 3 Manual
Para aprender a usar ISPConfig 3, recomiendo descargar el Manual de ISPConfig 3.
En aproximadamente 300 páginas, cubre el concepto detrás de ISPConfig (administrador, revendedores, clientes), explica cómo instalar y actualizar ISPConfig 3, incluye una referencia para todos los formularios y campos de formulario en ISPConfig junto con ejemplos de entradas válidas y proporciona tutoriales para las tareas más comunes en ISPConfig 3. También explica cómo hacer que su servidor sea más seguro y viene con una sección de solución de problemas al final.
20.2 ISPConfig Monitor App For Android
Con la aplicación ISPConfig Monitor, puede verificar el estado de su servidor y averiguar si todos los servicios funcionan como se espera. Puede verificar los puertos TCP y UDP y hacer ping a sus servidores. Además de eso, puede usar esta aplicación para solicitar detalles de los servidores que tienen instalado ISPConfig (tenga en cuenta que la versión mínima instalada de ISPConfig 3 compatible con la aplicación ISPConfig Monitor es 3.0.3.3! ); estos detalles incluyen todo lo que sabe del módulo Monitor en el Panel de control de ISPConfig (por ejemplo, servicios, registros de correo y del sistema, cola de correo, información de CPU y memoria, uso del disco, cuota, detalles del sistema operativo, registro de RKHunter, etc.), y por supuesto , como ISPConfig tiene capacidad para varios servidores, puede verificar todos los servidores que están controlados desde su servidor maestro ISPConfig.
Para obtener instrucciones de uso y descarga, visite http://www.ispconfig.org/ispconfig-3/ispconfig-monitor-app-for-android/.
21 Links
- OpenSUSE:http://www.opensuse.org/
- ISPConfig:http://www.ispconfig.org/
About The Author

Falko Timme is the owner of  Timme Hosting (ultra-fast nginx web hosting). He is the lead maintainer of HowtoForge (since 2005) and one of the core developers of ISPConfig (since 2000). He has also contributed to the O'Reilly book "Linux System Administration".