Entorno virtual multiservidor con web dedicada y MySQL, Servidores de correo electrónico y DNS en Debian Squeeze con ISPConfig 3
Versión 1.0
Autor:Michel Käser
Este tutorial describe cómo puede configurar un único servidor dedicado como un entorno multiservidor virtual utilizando OpenVZ con servidores Web y MySQL, correo electrónico y DNS dedicados en Debian Squeeze. Además, aprenderá cómo mantener todos estos servidores. Además, aprenderá cómo instalar algunos paquetes muy útiles en todos ellos, cómo protegerlos y cómo monitorearlos.
Al final, tendrá un entorno virtual multiservidor completamente funcional, listo para alojamiento compartido.
¡No emito ninguna garantía de que esto funcione para usted!
1 Requisitos
Para seguir este tutorial necesitarás lo siguiente:
- un servidor dedicado
- al menos 5 IP
- mucho tiempo
2 Nota Preliminar
En este tutorial utilizo este servidor dedicado:http://www.hetzner.de/hosting/produkte_rootserver/ex4 con Flexi-Pack y una subred /28 adicional (14 IP).
El objetivo es tener estos servidores:
- Tipo:Nodo
- Hardware:Dedicado
- Nombre de host:raíz.ejemplo.tld
- 192.168.1.1
- Tipo:Contenedor
- Hardware:Virtual
- Nombre de host:web.example.tld
- 192.168.1.2
- Tipo:Contenedor
- Hardware:Virtual
- Nombre de host:mail.example.tld
- 192.168.1.3
- Tipo:Contenedor
- Hardware:Virtual
- Nombre de host:ns1.example.tld
- 192.168.1.4
- Tipo:Contenedor
- Hardware:Virtual
- Nombre de host:ns2.example.tld
- 192.168.1.5
3 El Sistema Base
Supongo que tomaste el mismo servidor dedicado que yo. La interfaz web de Hetzner le permite instalar una variedad de distribuciones. Tome el mínimo Debian 6.0 de 64 bits.
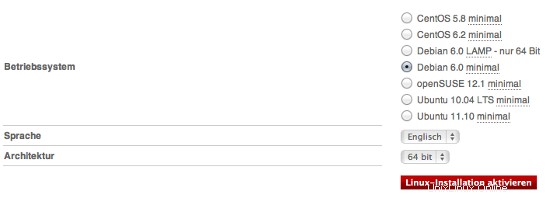
Esto instalará el sistema base por usted y no tiene que configurarlo usted mismo. También obtendrá la contraseña de root.
4 Instalación del panel web OpenVZ + OVZ
Tan pronto como su servidor esté listo, inicie sesión con las credenciales recibidas. Primero haremos una actualización/actualización:
apt-get actualizar &&apt-get -y actualizar &&apt-get -y dist-actualizar
que actualizará nuestro servidor a la última versión.
Instalamos algunos paquetes adicionales para:
apt-get -y install nano wget ntp ntpdate
4.1 Instalación de OpenVZ
Ahora queremos instalar OpenVZ, la base de nuestro entorno virtual multiservidor.
Un kernel OpenVZ y los paquetes vzctl, vzquota y vzdump están disponibles en los repositorios de Debian Squeeze, por lo que podemos instalarlos de la siguiente manera:
apt-get install linux-image-openvz-amd64 vzctl vzquota vzdump
Cree un enlace simbólico de /var/lib/vz a /vz para proporcionar compatibilidad con versiones anteriores:
ln -s /var/lib/vz /vz
Abra /etc/sysctl.conf y asegúrese de tener las siguientes configuraciones:
nano /etc/sysctl.conf
[...]
net.ipv4.conf.all.rp_filter=1
net.ipv4.icmp_echo_ignore_broadcasts=1
net.ipv4.conf.default.forwarding=1
net.ipv4.conf.default.proxy_arp = 0
net.ipv4.ip_forward=1
kernel.sysrq = 1
net.ipv4.conf.default.send_redirects = 1
net.ipv4.conf.all.send_redirects = 0
net.ipv4.conf.eth0.proxy_arp=1
[...]
Si necesita modificar /etc/sysctl.conf, ejecute
sysctl -p
después.
El siguiente paso es importante si las direcciones IP de sus máquinas virtuales son de una subred diferente a la dirección IP del sistema host. ¡Si no hace esto, la red no funcionará en las máquinas virtuales!
Abra /etc/vz/vz.conf y establezca NEIGHBOUR_DEVS en todos:
nano /etc/vz/vz.conf
[...]
# Controls which interfaces to send ARP requests and modify APR tables on.
NEIGHBOUR_DEVS=all
[...]
Finalmente, reinicie el sistema:
reiniciar
Si su sistema se reinicia sin problemas, ¡entonces todo está bien!
Ejecutar
uname -r
y su nuevo núcleo OpenVZ debería aparecer:
ejemplo@unixlinux.online:~# uname -r
2.6.32-5-openvz-amd64
Dado que Hetzner monta /home en un disco duro separado, podemos usarlo como ubicación de copia de seguridad de OpenVZ. Para hacerlo, ejecute:
rm -rf /var/lib/vz/dump
ln -s /home/backup/vz /var/lib/vz/dump
Como usaremos fail2ban dentro de nuestros contenedores virtuales, debemos habilitar algunos soportes de IPTables para ellos. Lo hacemos editando el archivo /etc/vz/vz.conf:
nano /etc/vz/vz.conf
Busque la línea que comienza con IPTABLES y coméntela (#). Pegue lo siguiente después:
[...]
IPTABLES="ipt_REJECT ipt_tos ipt_limit ipt_multiport iptable_filter iptable_mangle ipt_TCPMSS ipt_tcpmss ipt_ttl ipt_length ipt_state"
A continuación, active el módulo de estado en el kernel:
modprobe xt_state
4.2 Instalación del panel web OVZ
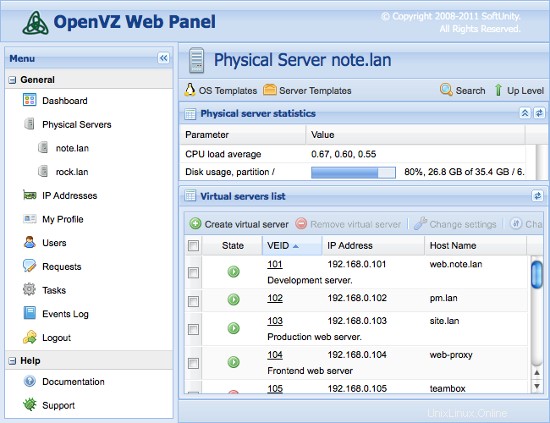
OpenVZ Web Panel es una interfaz gráfica de usuario basada en web para controlar el hardware y los servidores virtuales con la tecnología de virtualización OpenVZ.
La forma más sencilla de instalar OpenVZ Web Panel es ejecutar el siguiente comando:
wget -O - http://ovz-web-panel.googlecode.com/svn/installer/ai.sh | sh
Después de la instalación, el Panel debería estar disponible en la siguiente URL:
http://<192.168.1.1>:3000
Las credenciales de administrador predeterminadas son:admin/admin. No olvide cambiar la contraseña predeterminada.
Entorno multiservidor virtual con servidores Web y MySQL, correo electrónico y DNS dedicados en Debian Squeeze con ISPConfig 3 - Página 2
5 Creando los Servidores Virtuales
Ahora usaremos el Panel Web de OVZ para crear nuestros servidores virtuales. Inicie sesión en el panel y agregue sus direcciones IP en Direcciones IP. Luego, haga clic en host local y plantillas de sistema operativo.
Ahora tenemos que descargar una plantilla para nuestros servidores virtuales. Lo hacemos haciendo clic en Instalar nueva plantilla de sistema operativo -> Contribuido y seleccionando debian-6.0-amd64-minimal.
Ahora regrese a localhost y haga clic en Crear servidor virtual. Complete los campos de la siguiente manera:
- ID del servidor (VEID):un número (yo elegiría la última parte de tu IP, así que 2 para la primera)
- Plantilla de sistema operativo:ya seleccionó la derecha
- Plantilla de servidor:ilimitada
- Dirección IP:192.168.1.2
- Nombre de host:web.example.tld
- Servidor DNS:8.8.4.4 8.8.8.8 (que son los DNS de Google)
- deja el resto como está y asigna espacio en disco, RAM y CPU como quieras...
Repita este paso para todos sus servidores virtuales (finalmente 4 veces:Web, Correo, 2x DNS).
5.1 Preparando los servidores virtuales
Ahora debe iniciar sesión en cada servidor virtual y ejecutar estos comandos:
apt-get update &&apt-get -y upgrade &&apt-get -y dist-upgrade
apt-get -y install nano wget ntp ntpdate
que los actualizará a la última versión e instalará algunos paquetes faltantes.
6 Instalando Los Servidores Dedicados
6.1 Instalación del servidor Web/DB
Edite el archivo de hosts y agregue las direcciones IP y los nombres de host para todos los servidores. Los nombres de host y las direcciones IP deben ajustarse para que coincidan con su configuración.
nano /etc/hosts
127.0.0.1 localhost
192.168.1.2 web.example.tld
192.168.1.3 mail.example.tld
192.168.1.4 ns1.example.tld
192.168.1.5 ns2.example.tld

# The following lines are desirable for IPv6 capable hosts
::1     localhost ip6-localhost ip6-loopback
fe00::0 ip6-localnet
ff00::0 ip6-mcastprefix
ff02::1 ip6-allnodes
ff02::2 ip6-allrouters
ff02::3 ip6-allhosts
Establezca el nombre de host del servidor:
echo web.ejemplo.tld> /etc/nombre de host
/etc/init.d/nombre de host.sh start
Instale el servidor MySQL. Se necesita una instancia de servidor MySQL en cada servidor, ya que ISPConfig la usa para sincronizar la configuración entre los servidores.
apt-get -y install cliente-mysql servidor-mysql
Ingrese la nueva contraseña para MySQL cuando lo solicite el instalador.
Queremos que MySQL escuche en todas las interfaces del servidor maestro, no solo en el host local, por lo que editamos /etc/mysql/my.cnf y comentamos la línea bind-address =127.0.0.1:
nano /etc/mysql/my.cnf
[...]

# Instead of skip-networking the default is now to listen only on
# localhost which is more compatible and is not less secure.
#bind-address           = 127.0.0.1

[...]
Luego reinicie MySQL:
/etc/init.d/mysql reiniciar
Ahora instale Apache2, PHP5, phpMyAdmin, FCGI, suExec, Pear y mcrypt de la siguiente manera:
apt-get -y install apache2 apache2.2-common apache2-doc apache2-mpm-prefork apache2-utils libexpat1 ssl-cert libapache2-mod-php5 php5 php5-common php5-gd php5-mysql php5-imap phpmyadmin php5-cli php5 -cgi libapache2-mod-fcgid apache2-suexec php-pear php-auth php5-mcrypt mcrypt php5-imagick imagemagick libapache2-mod-suphp libopenssl-ruby libapache2-mod-ruby sudo zip wget
Verá la siguiente pregunta:
Servidor web para reconfigurar automáticamente:<-- apache2
Luego ejecute el siguiente comando para habilitar los módulos de Apache suexec, rewrite, ssl, actions, headers, expires e include:
a2enmod suexec reescribir las acciones de ssl incluyen ruby dav_fs dav auth_digest encabezados caduca
PureFTPd se puede instalar con el siguiente comando:
apt-get -y install pure-ftpd-common pure-ftpd-mysql
Edite el archivo /etc/default/pure-ftpd-common...
vi /etc/default/pure-ftpd-common
... y asegúrese de que virtualchroot esté configurado VIRTUALCHROOT=true:
[...]
VIRTUALCHROOT=true
[...]
Ahora configuramos PureFTPd para permitir sesiones FTP y TLS. FTP es un protocolo muy inseguro porque todas las contraseñas y todos los datos se transfieren en texto claro. Mediante el uso de TLS, toda la comunicación se puede cifrar, lo que hace que el FTP sea mucho más seguro.
Si desea permitir sesiones FTP y TLS, ejecute
eco 1> /etc/pure-ftpd/conf/TLS
Para usar TLS, debemos crear un certificado SSL. Lo creo en /etc/ssl/private/, por lo tanto, primero creo ese directorio:
mkdir -p /etc/ssl/privado/
Posteriormente, podemos generar el certificado SSL de la siguiente manera:
openssl req -x509 -nodes -days 7300 -newkey rsa:2048 -keyout /etc/ssl/private/pure-ftpd.pem -out /etc/ssl/private/pure-ftpd.pem
Nombre del país (código de 2 letras) [AU]:<-- Ingrese el nombre de su país (por ejemplo, "DE").
Nombre del estado o provincia (nombre completo) [Algún estado]:<-- Ingrese su estado o Nombre de la provincia.
Nombre de la localidad (p. ej., ciudad) []:<-- Ingrese su ciudad.
Nombre de la organización (p. ej., empresa) [Internet Widgits Pty Ltd]:<-- Ingrese el nombre de su organización (p. ej., el nombre de su empresa).
Nombre de la unidad organizativa (p. ej., sección) []:<-- Ingrese el nombre de su unidad organizativa (p. ej., "Departamento de TI").
Nombre común (p. ej., SU nombre) []:<-- Ingrese el nombre de dominio completo del sistema (por ejemplo, "web.example.tld").
Dirección de correo electrónico []:<-- Ingrese su dirección de correo electrónico.
Cambiar los permisos del certificado SSL:
chmod 600 /etc/ssl/private/pure-ftpd.pem
Instale vlogger, webalizer y awstats:
apt-get -y install vlogger webalizer awstats
Abra /etc/cron.d/awstats luego...
vi /etc/cron.d/awstats
... y comente ambos trabajos cron en ese archivo:
#*/10 * * * * www-data [ -x /usr/share/awstats/tools/update.sh ] && /usr/share/awstats/tools/update.sh

# Generate static reports:
#10 03 * * * www-data [ -x /usr/share/awstats/tools/buildstatic.sh ] && /usr/share/awstats/tools/buildstatic.sh
Instale Jailkit:Jailkit solo es necesario si desea chrootear a los usuarios de SSH. Se puede instalar de la siguiente manera (importante:Jailkit se debe instalar antes de ISPConfig - ¡no se puede instalar después!):
apt-get -y install build-essential autoconf automake1.9 libtool flex bison debhelper
cd /tmp
wget http://olivier.sessink.nl/jailkit/jailkit-2.14.tar.gz
tar xvfz jailkit-2.14.tar.gz
cd jailkit-2.14
./debian/rules binary
cd ..
dpkg -i jailkit_2.14-1_*.deb
rm -rf jailkit-2.14*
Instale fail2ban:esto es opcional pero recomendado, porque el monitor ISPConfig intenta mostrar el registro:
apt-get install fail2ban
Para hacer que fail2ban monitoree PureFTPd, cree el archivo /etc/fail2ban/jail.local:
vi /etc/fail2ban/jail.local
[pureftpd]

enabled  = true
port     = ftp
filter   = pureftpd
logpath  = /var/log/syslog
maxretry = 3
Luego cree el siguiente archivo de filtro:
vi /etc/fail2ban/filter.d/pureftpd.conf
[Definition]
failregex = .*pure-ftpd: \(.*@<HOST>\) \[WARNING\] Authentication failed for user.*
ignoreregex =
Reinicie fail2ban después:
/etc/init.d/fail2ban reiniciar
A continuación, instalaremos ISPConfig 3. Para obtener la URL de descarga de la última versión estable de ISPConfig 3, visite el sitio web de ISPConfig:http://www.ispconfig.org/ispconfig-3/download/
Este servidor es el servidor maestro en nuestra configuración que ejecuta la interfaz del panel de control ISPConfig. Para permitir que las otras instancias de MySQL se conecten a la base de datos MySQL en este nodo durante la instalación, debemos agregar registros de usuario raíz de MySQL en la base de datos maestra para cada nombre de host y dirección IP del servidor esclavo. La forma más fácil de hacer esto es usar la herramienta de administración phpmyadmin basada en la web que ya instalamos. Abra la URL http://192.168.1.2/phpmyadmin en un navegador web, inicie sesión como usuario root de MySQL y ejecute estas consultas de MySQL:
CREAR USUARIO 'root'@'192.168.1.3' IDENTIFICADO POR 'myrootpassword';
CONCEDER TODOS LOS PRIVILEGIOS EN * . * A 'root'@'192.168.1.3' IDENTIFICADO POR 'myrootpassword' CON GRANT OPTION MAX_QUERIES_PER_HOUR 0 MAX_CONNECTIONS_PER_HOUR 0 MAX_UPDATES_PER_HOUR 0 MAX_USER_CONNECTIONS 0;
CREAR USUARIO 'root'@'192.168.1.4' IDENTIFICADO POR 'myrootpassword';
CONCEDER TODOS LOS PRIVILEGIOS EN * . * TO 'root'@'192.168.1.4' IDENTIFICADO POR 'myrootpassword' CON GRANT OPCIÓN MAX_QUERIES_PER_HOUR 0 MAX_CONNECTIONS_PER_HOUR 0 MAX_UPDATES_PER_HOUR 0 MAX_USER_CONNECTIONS 0;
CREAR USUARIO 'root'@'192.168.1.5' IDENTIFICADO POR 'myrootpassword';
CONCEDER TODOS LOS PRIVILEGIOS EN * . * A 'root'@'192.168.1.5' IDENTIFICADO POR 'myrootpassword' CON GRANT OPTION MAX_QUERIES_PER_HOUR 0 MAX_CONNECTIONS_PER_HOUR 0 MAX_UPDATES_PER_HOUR 0 MAX_USER_CONNECTIONS 0;
CREAR USUARIO 'root'@'mail.example.tld' IDENTIFICADO POR 'myrootpassword';
CONCEDER TODOS LOS PRIVILEGIOS EN * . * TO 'root'@'mail.example.tld' IDENTIFICADO POR 'myrootpassword' CON GRANT OPTION MAX_QUERIES_PER_HOUR 0 MAX_CONNECTIONS_PER_HOUR 0 MAX_UPDATES_PER_HOUR 0 MAX_USER_CONNECTIONS 0;
CREAR USUARIO 'root'@'ns1.example.tld' IDENTIFICADO POR 'myrootpassword';
CONCEDER TODOS LOS PRIVILEGIOS EN * . * TO 'root'@'ns1.example.tld' IDENTIFICADO POR 'myrootpassword' CON GRANT OPTION MAX_QUERIES_PER_HOUR 0 MAX_CONNECTIONS_PER_HOUR 0 MAX_UPDATES_PER_HOUR 0 MAX_USER_CONNECTIONS 0;
CREAR USUARIO 'root'@'ns2.example.tld' IDENTIFICADO POR 'myrootpassword';
CONCEDER TODOS LOS PRIVILEGIOS EN * . * TO 'root'@'ns2.example.tld' IDENTIFICADO POR 'myrootpassword' CON GRANT OPTION MAX_QUERIES_PER_HOUR 0 MAX_CONNECTIONS_PER_HOUR 0 MAX_UPDATES_PER_HOUR 0 MAX_USER_CONNECTIONS 0;
En los comandos sql anteriores, reemplace las direcciones IP (192.168.1.3 - 192.168.1.5) con las direcciones IP de sus servidores y reemplace mail.example.tld, ns1.example.tld y ns2.example.tld con los nombres de host de sus servidores y myrootpassword con la contraseña raíz deseada.
Haga clic en el botón de permisos de recarga o reinicie MySQL. Luego cierre phpmyadmin.
Vuelva al shell de web.example.tld y descargue la última versión estable de ISPConfig 3:
cd /tmp
wgethttp://www.ispconfig.org/downloads/ISPConfig-3-stable.tar.gz
tar xfz ISPConfig-3-stable.tar.gz
cd ispconfig3_install/ instalar/
Luego inicie el script de instalación:
php -q instalar.php
Seleccionar idioma (en,de) [en]:<-- en
Modo de instalación (estándar, experto) [estándar]:<-- experto
Nombre de host completo (FQDN) del servidor, por ejemplo, servidor2 .domain.tld [web.example.tld]:<-- web.example.tld
nombre de host del servidor MySQL [localhost]:<-- localhost
nombre de usuario root de MySQL [root]:<-- root
Contraseña raíz de MySQL []:<-- Ingrese su contraseña raíz de MySQL aquí
Base de datos MySQL para crear [dbispconfig]:<-- dbispconfig
Conjunto de caracteres MySQL [utf8]:<-- utf8
¿Debería unirse este servidor a una configuración multiservidor ISPConfig existente (y,n) [n]:<-- n
Configurar correo (y,n) [y]:<-- n
Configurar Jailkit (y,n) [y]:<-- y
Configurar servidor FTP (y,n) [y]:<-- y
Configurar servidor DNS (y,n) [y]:<-- n
Configurar servidor Apache (y,n) [y]:<-- y
Configurar servidor de firewall (y,n) [y]:<--n
Instalar ISPConfig Web -Interfaz (y,n) [y]:<--y
Puerto ISPConfig [8080]:<-- 8080
Habilitar SSL para la interfaz web ISPConfig (y,n) [y]:<-- y
Nombre del país (código de 2 letras) [AU]:<-- ENT ER
Nombre del estado o provincia (nombre completo) [Algún estado]:<-- ENTRAR
Nombre de la localidad (p. ej., ciudad) []:<-- ENTRAR
Nombre de la organización (p. ej., empresa) [Internet Widgits Pty Ltd]:<-- ENTRAR
Nombre de la unidad organizativa (por ejemplo, sección) []:<-- ENTRAR
Nombre común (por ejemplo, SU nombre) []:<-- ENTRAR
Dirección de correo electrónico []:<-- ENTRAR
Una contraseña de seguridad []:<-- ENTRAR
Un nombre de empresa opcional []:<-- ENTRAR
Limpie los directorios de instalación:
cd /tmp
rm -rf /tmp/ispconfig3_install/install
rm -f /tmp/ISPConfig-3-stable.tar.gz
6.2 Instalando El Servidor De Correo
Edite el archivo de hosts y agregue las direcciones IP y los nombres de host para todos los servidores. Los nombres de host y las direcciones IP deben ajustarse para que coincidan con su configuración.
nano /etc/hosts
127.0.0.1 localhost
192.168.1.2 web.example.tld
192.168.1.3 mail.example.tld
192.168.1.4 ns1.example.tld
192.168.1.5 ns2.example.tld

# The following lines are desirable for IPv6 capable hosts
::1     localhost ip6-localhost ip6-loopback
fe00::0 ip6-localnet
ff00::0 ip6-mcastprefix
ff02::1 ip6-allnodes
ff02::2 ip6-allrouters
ff02::3 ip6-allhosts
Establezca el nombre de host del servidor:
echo mail.example.tld> /etc/hostname
echo mail.example.tld> /etc/mailname
/etc/init.d/hostname.sh start
Instale postfix, dovecot y MySQL con un solo comando:
apt-get -y install postfix postfix-mysql postfix-doc mysql-client mysql-server openssl getmail4 rkhunter binutils dovecot-imapd dovecot-pop3d
Ingrese la nueva contraseña para mysql cuando lo solicite el instalador y responda las siguientes preguntas como se describe a continuación:
¿Tipo general de configuración? <-- Sitio de Internet
¿Nombre del correo? <-- correo.ejemplo.tld
Para instalar amavisd-new, SpamAssassin y ClamAV, ejecutamos:
apt-get -y install amavisd-new spamassassin clamav clamav-daemon zoo unzip bzip2 arj nomarch lzop cabextract apt-listchanges libnet-ldap-perl libauthen-sasl-perl clamav-docs daemon libio-string-perl libio-socket-ssl-perl libnet-ident-perl zip libnet-dns-perl
Si desea utilizar listas de correo en su servidor, instale mailman. Este paso es opcional. mailman requiere un servidor web apache, por lo que si no desea ejecutar una instancia de apache en su servidor de correo, no instale mailman.
apt-get -y instalar cartero
El instalador de apt para mailman le pedirá que seleccione los idiomas para la lista de correo. Habilite todos los idiomas que desee utilizar para el cartero. A continuación, cree la lista de correo "mailman".
nuevo cartero de lista
e ingrese la dirección de correo electrónico y la nueva contraseña para el administrador de la lista de correo. Ese es el último paso de la instalación del cartero. El siguiente comando para instalar php debe ejecutarse en cada servidor, independientemente de si instaló mailman o no.
Luego instale la versión de línea de comandos de PHP para poder ejecutar scripts de shell basados en PHP para ISPConfig:
apt-get -y install php5-cli php5-mysql php5-mcrypt mcrypt
Instale fail2ban:esto es opcional pero recomendado, porque el monitor ISPConfig intenta mostrar el registro:
apt-get install fail2ban
Para hacer que fail2ban monitoree PureFTPd y Dovecot, cree el archivo /etc/fail2ban/jail.local:
vi /etc/fail2ban/jail.local
[dovecot-pop3imap]

enabled = true
filter = dovecot-pop3imap
action = iptables-multiport[name=dovecot-pop3imap, port="pop3,pop3s,imap,imaps", protocol=tcp]
logpath = /var/log/mail.log
maxretry = 5
Luego cree el siguiente archivo de filtro:
vi /etc/fail2ban/filter.d/dovecot-pop3imap.conf
[Definition]
failregex = (?: pop3-login|imap-login): .*(?:Authentication failure|Aborted login \(auth failed|Aborted login \(tried to use disabled|Disconnected \(auth failed|Aborted login \(\d+ authentication attempts).*rip=(?P<host>\S*),.*
ignoreregex =
Reinicie fail2ban después:
/etc/init.d/fail2ban reiniciar
Ahora instalaré ISPConfig 3 en este servidor. Para obtener la URL de descarga de la última versión estable de ISPConfig 3, visite el sitio web de ISPConfig:http://www.ispconfig.org/ispconfig-3/download/
Descargue la última versión estable de ISPConfig 3:
cd /tmp
wgethttp://www.ispconfig.org/downloads/ISPConfig-3-stable.tar.gz
tar xfz ISPConfig-3-stable.tar.gz
cd ispconfig3_install/ instalar/
Luego inicie el script de instalación:
php -q instalar.php
Seleccionar idioma (en,de) [en]:<-- en
Modo de instalación (estándar, experto) [estándar]:<-- experto
Nombre de host completo (FQDN) del servidor, por ejemplo, servidor1 .domain.tld [mail.example.tld]:<-- mail.example.tld
nombre de host del servidor MySQL [localhost]:<-- localhost
nombre de usuario root de MySQL [root]:<-- root
Contraseña raíz de MySQL []:<-- Ingrese su contraseña raíz de MySQL aquí
Base de datos MySQL para crear [dbispconfig]:<-- dbispconfig
Conjunto de caracteres MySQL [utf8]:<-- utf8
¿Debería unirse este servidor a una configuración multiservidor ISPConfig existente (y,n) [n]:<-- y
nombre de host del servidor maestro MySQL []:<-- web.example.tld
maestro MySQL nombre de usuario raíz del servidor [root]:<-- root
contraseña raíz del servidor maestro MySQL []:<-- Ingrese la contraseña raíz del servidor maestro aquí
nombre de la base de datos del servidor maestro MySQL [dbispconfig]:<- - dbispconfig
Configurar correo (y,n) [y]:<-- y
Nombre del país (código de 2 letras) [AU]:<-- DE (Ingrese aquí el código ISO del país donde vive)
Nombre del estado o provincia (nombre completo) [Algún estado]:<-- Niedersachsen (Ingrese el estado donde vive aquí)
Nombre de la localidad (p. ej., ciudad) []:<-- Lueneburg (Ingrese aquí la ciudad)
Nombre de la organización (p. ej., empresa) [Internet Widgits Pty Ltd]:<-- ENTRAR
Nombre de la unidad organizativa (por ejemplo, sección) []:<-- ENTRAR
Nombre común (por ejemplo, SU nombre) []:<-- ENTRAR
Dirección de correo electrónico []:<-- ENTRAR
Configurar Jailkit (y,n) [y]:<-- n
Configurar servidor FTP (y,n) [y]:<-- n
Configurar servidor DNS (y,n) [y] :<-- n
Configurar servidor Apache (y,n) [y]:<-- n
Configurar servidor de firewall (y,n) [y]:<--n
Instalar Interfaz web ISPConfig (y, n) [y]:<--n
Corre...
rm -f /var/www/ispconfig
... para eliminar el enlace de la interfaz ISPConfig en el directorio /var/www.
Limpie los directorios de instalación:
rm -rf /tmp/ispconfig3_install/install
rm -f /tmp/ISPConfig-3-stable.tar.gz
Entorno multiservidor virtual con servidores Web y MySQL, correo electrónico y DNS dedicados en Debian Squeeze con ISPConfig 3 - Página 3
6.3 Instalación del servidor DNS primario
Edite el archivo de hosts y agregue las direcciones IP y los nombres de host para todos los servidores. Los nombres de host y las direcciones IP deben ajustarse para que coincidan con su configuración.
nano /etc/hosts
127.0.0.1 localhost
192.168.1.2 web.example.tld
192.168.1.3 mail.example.tld
192.168.1.4 ns1.example.tld
192.168.1.5 ns2.example.tld

# The following lines are desirable for IPv6 capable hosts
::1     localhost ip6-localhost ip6-loopback
fe00::0 ip6-localnet
ff00::0 ip6-mcastprefix
ff02::1 ip6-allnodes
ff02::2 ip6-allrouters
ff02::3 ip6-allhosts
Establezca el nombre de host del servidor:
echo ns1.ejemplo.tld> /etc/nombre de host
/etc/init.d/nombre de host.sh start
Instale el cliente y el servidor MySQL:
apt-get -y install cliente-mysql servidor-mysql
Ingrese la nueva contraseña para MySQL cuando lo solicite el instalador.
Luego instale la versión de línea de comandos de PHP para poder ejecutar scripts de shell basados en PHP para ISPConfig:
apt-get -y install php5-cli php5-mysql php5-mcrypt mcrypt
Instale fail2ban:esto es opcional pero recomendado, porque el monitor ISPConfig intenta mostrar el registro:
apt-get install fail2ban
Instale el servidor DNS BIND:
apt-get -y install bind9 dnsutils
A continuación, instale ISPConfig 3 en el servidor dns. Para obtener la URL de descarga de la última versión estable de ISPConfig 3, visite el sitio web de ISPConfig:http://www.ispconfig.org/ispconfig-3/download/
Descargue la última versión estable de ISPConfig 3:
cd /tmp
wgethttp://www.ispconfig.org/downloads/ISPConfig-3-stable.tar.gz
tar xfz ISPConfig-3-stable.tar.gz
cd ispconfig3_install/ instalar/
Luego inicie el script de instalación:
php -q instalar.php
Seleccionar idioma (en,de) [en]:<-- en
Modo de instalación (estándar, experto) [estándar]:<-- experto
Nombre de host completo (FQDN) del servidor, por ejemplo, servidor2 .domain.tld [ns1.example.tld]:<-- ns1.example.tld
nombre de host del servidor MySQL [localhost]:<-- localhost
nombre de usuario raíz de MySQL [root]:<-- root
Contraseña raíz de MySQL []:<-- Ingrese su contraseña raíz de MySQL aquí
Base de datos MySQL para crear [dbispconfig]:<-- dbispconfig
Conjunto de caracteres MySQL [utf8]:<-- utf8
¿Debería unirse este servidor a una configuración multiservidor ISPConfig existente (y,n) [n]:<-- y
nombre de host del servidor maestro MySQL []:<-- web.example.tld
maestro MySQL nombre de usuario raíz del servidor [root]:<-- root
contraseña raíz del servidor maestro MySQL []:<-- Ingrese la contraseña raíz del servidor maestro aquí
nombre de la base de datos del servidor maestro MySQL [dbispconfig]:<- - dbispconfig
Configurar correo (y,n) [y]:<-- n
Configurar Jailkit (y,n) [y]:<-- n
Configurar servidor FTP (y, n) [y]:<-- n
Configurar servidor DNS (y,n) [y]:<-- y
Configurar e Apache Server (y,n) [y]:<-- n
Configurar servidor de firewall (y,n) [y]:<--n
Instalar interfaz web ISPConfig (y,n) [y]:<--n
Corre...
rm -f /var/www/ispconfig
... para eliminar el enlace de la interfaz ISPConfig en el directorio /var/www.
Limpie los directorios de instalación:
rm -rf /tmp/ispconfig3_install/install
rm -f /tmp/ISPConfig-3-stable.tar.gz
6.4 Instalación del servidor DNS secundario
Edite el archivo de hosts y agregue las direcciones IP y los nombres de host para todos los servidores. Los nombres de host y las direcciones IP deben ajustarse para que coincidan con su configuración.
nano /etc/hosts
127.0.0.1 localhost
192.168.1.2 web.example.tld
192.168.1.3 mail.example.tld
192.168.1.4 ns1.example.tld
192.168.1.5 ns2.example.tld

# The following lines are desirable for IPv6 capable hosts
::1     localhost ip6-localhost ip6-loopback
fe00::0 ip6-localnet
ff00::0 ip6-mcastprefix
ff02::1 ip6-allnodes
ff02::2 ip6-allrouters
ff02::3 ip6-allhosts
Establezca el nombre de host del servidor:
echo ns2.ejemplo.tld> /etc/nombre de host
/etc/init.d/nombre de host.sh start
Instale el cliente y el servidor MySQL:
apt-get -y install cliente-mysql servidor-mysql
Ingrese la nueva contraseña para MySQL cuando lo solicite el instalador.
Luego instale la versión de línea de comandos de PHP para poder ejecutar scripts de shell basados en PHP para ISPConfig:
apt-get -y install php5-cli php5-mysql php5-mcrypt mcrypt
Instale fail2ban:esto es opcional pero recomendado, porque el monitor ISPConfig intenta mostrar el registro:
apt-get install fail2ban
Instale el servidor DNS BIND:
apt-get -y install bind9 dnsutils
A continuación, instale ISPConfig 3 en el servidor dns. Para obtener la URL de descarga de la última versión estable de ISPConfig 3, visite el sitio web de ISPConfig:http://www.ispconfig.org/ispconfig-3/download/
Descargue la última versión estable de ISPConfig 3:
cd /tmp
wgethttp://www.ispconfig.org/downloads/ISPConfig-3-stable.tar.gz
tar xfz ISPConfig-3-stable.tar.gz
cd ispconfig3_install/ instalar/
Luego inicie el script de instalación:
php -q instalar.php
Seleccionar idioma (en,de) [en]:<-- en
Modo de instalación (estándar, experto) [estándar]:<-- experto
Nombre de host completo (FQDN) del servidor, por ejemplo, servidor2 .domain.tld [ns2.example.tld]:<-- ns2.example.tld
nombre de host del servidor MySQL [localhost]:<-- localhost
nombre de usuario root de MySQL [root]:<-- root
Contraseña raíz de MySQL []:<-- Ingrese su contraseña raíz de MySQL aquí
Base de datos MySQL para crear [dbispconfig]:<-- dbispconfig
Conjunto de caracteres MySQL [utf8]:<-- utf8
¿Debería unirse este servidor a una configuración multiservidor ISPConfig existente (y,n) [n]:<-- y
nombre de host del servidor maestro MySQL []:<-- web.example.tld
maestro MySQL nombre de usuario raíz del servidor [root]:<-- root
contraseña raíz del servidor maestro MySQL []:<-- Ingrese la contraseña raíz del servidor maestro aquí
nombre de la base de datos del servidor maestro MySQL [dbispconfig]:<- - dbispconfig
Configurar correo (y,n) [y]:<-- n
Configurar Jailkit (y,n) [y]:<-- n
Configurar servidor FTP (y, n) [y]:<-- n
Configurar servidor DNS (y,n) [y]:<-- y
Configurar e Apache Server (y,n) [y]:<-- n
Configurar servidor de firewall (y,n) [y]:<--n
Instalar interfaz web ISPConfig (y,n) [y]:<--n
Corre...
rm -f /var/www/ispconfig
... para eliminar el enlace de la interfaz ISPConfig en el directorio /var/www.
Limpie los directorios de instalación:
rm -rf /tmp/ispconfig3_install/install
rm -f /tmp/ISPConfig-3-stable.tar.gz
6.5 Ajustar la configuración del servidor en ISPConfig
Inicie sesión en ISPConfig en el servidor maestro con un navegador web:
http://192.168.1.2:8080
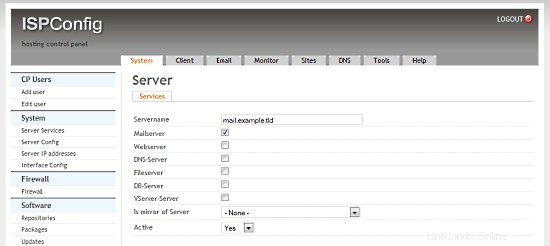
Haga clic en Sistema> Servicios del servidor> web.example.tld y desactive todas las casillas de verificación excepto la casilla de verificación Servidor web, Servidor de archivos y Servidor DB y haga clic en Guardar.

Haga clic en Sistema> Servicios del servidor> mail.example.tld y deshabilite todas las casillas de verificación excepto la casilla de verificación Servidor de correo y haga clic en Guardar.
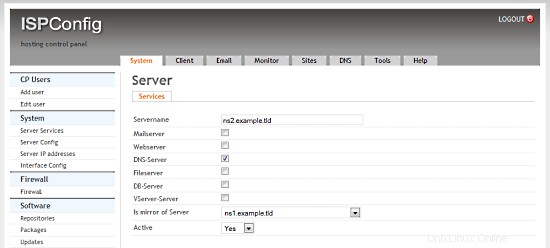
Haga clic en Sistema> Servicios del servidor> ns1.example.tld y desactive todas las casillas de verificación excepto la casilla de verificación Servidor DNS y haga clic en Guardar.
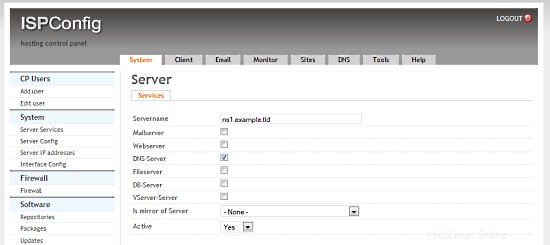
Haga clic en Sistema> Servicios del servidor> ns2.example.tld y desactive todas las casillas de verificación excepto la casilla de verificación Servidor DNS y seleccione ns1.example.tld en el cuadro de selección Is mirror of Server y haga clic en Guardar.
6.6 Configuración de DNS inverso
Dado que la mayoría de los servidores de correo buscan una entrada de DNS inversa válida, tenemos que configurar una para nuestro servidor de correo. Hetzner nos permite hacer esto en su interfaz web:
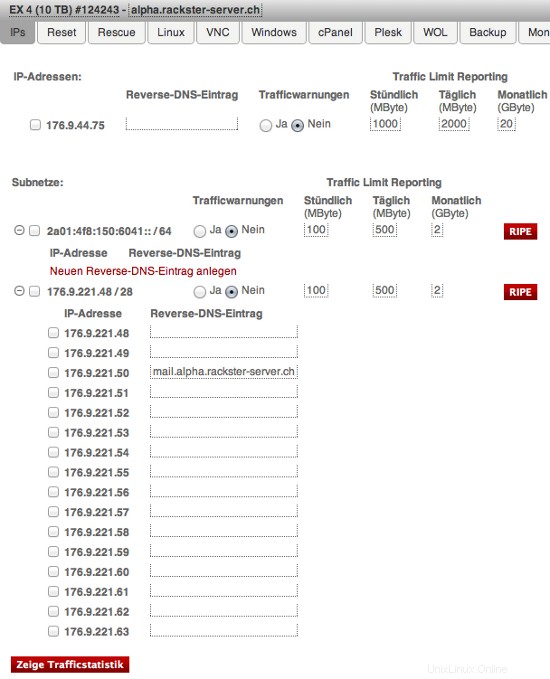
Tenga en cuenta la entrada para IP 176.9.221.50. Para usted, bajo IP 192.168.1.3 debe completar:mail.example.tld
Entorno multiservidor virtual con servidores Web y MySQL, correo electrónico y DNS dedicados en Debian Squeeze con ISPConfig 3 - Página 4
7 Extendiendo Nuestros Servidores
Ahora tenemos un entorno de trabajo perfecto de un servidor dedicado que ejecuta nuestros servidores virtuales. Sin embargo, hay muchos ajustes que podemos y debemos aplicarles. Haremos esto ahora. No es que todos estos sean opcionales, pero sí muy recomendables.
Los primeros pasos pueden repetirse en todos los servidores.
7.0.1 SSH con clave de autenticación en lugar de contraseña
El uso de la autenticación de clave SSH es mucho más seguro que la contraseña, ya que debe poseer la clave privada para acceder al servidor. Si aún no tiene uno, cree un par de claves RSA (en su máquina local):
ssh-keygen
Generating public/private rsa key pair.
Enter file in which to save the key (/home/username/.ssh/id_rsa):Enter passphrase (empty for no passphrase):
Enter same passphrase again:
Your identification has been saved in /home/username/.ssh/id_rsa.
Your public key has been saved in /home/username/.ssh/id_rsa.pub.
Once the public key is installed on the server, access will be granted with no password question. SSH usually comes with an utility called ssh-copy-id that simply adds the contents of client's ~/.ssh/id_rsa.pub to the server's ~/.ssh/authorized_keys:
ssh-copy-id -i .ssh/id_rsa.pub example@unixlinux.online
At this point, root account on the server can be locked for password authentication:
Please first try accessing the server using the key before running this command!
passwd -l root
7.0.2 Installing Logwatch
Logwatch is a little package that will send you detailed reports on what happend/is running on your server. It's absolutely useful for monitoring.
apt-get -y install logwatch
Then adjust its configuration:
nano /usr/share/logwatch/default.conf/logwatch.conf
and set these values:
Output = mail
Format = text
MailTo = example@unixlinux.online
Detail = High
Service = All
You now will receive an email from Logwatch every day. You'll see, this is awesome!
7.0.3 Enabling additional fail2ban rules
Fail2ban is a great way to block unwanted users from accessing our servers. Since we already have it installed on our Web &MySQL Server as well on our Mail Server, you can skip the first step on them. Run this on your node and both DNS servers:
apt-get -y install fail2ban
We now will tell fail2ban what services it should monitor and how to handle bad requests:
These have to be run on all servers (including the Web &MySQL server and the Mail server):
nano /etc/fail2ban/jail.local
and add the following to the file (do not replace already existing content!):
[ssh]
enables = true
port    = ssh
filter  = sshd
logpath  = /var/log/auth.log
maxretry = 3

[ssh-ddos]

enabled = true
port    = ssh
filter  = sshd-ddos
logpath  = /var/log/auth.log
maxretry = 5
Fail2ban will now detect SSH break-in attemps and block them. Finally, restart fail2ban:
/etc/init.d/fail2ban restart
7.1 Extending the Node Server
7.1.1 Installing Ajenti
Ajenti is a nice server control panel. I primary use it for managing the firewall and because of the built in filemanager, console and terminal.
First we have to add it's repository to our sources.list:
nano /etc/apt/sources.list
and add:
deb http://repo.ajenti.org/debian main main
Afterwards you have to import it's Key:
wget http://repo.ajenti.org/debian/key -O- | sudo apt-key add -
You should now be able to access the CP via:http://192.168.1.1:8000. The default username/password is:admin
If you plan to use the built in terminal you have to install the Python PIL module:
apt-get -y install python-imaging
7.1.2 Installing Archey
This is very optional, however I like it. Archey will show you some nice information on login.

To install it, simply run:
apt-get install lsb-release scrot
cd /tmp
wget https://github.com/downloads/djmelik/archey/archey-0.2.8.deb
dpkg -i archey-0.2.8.deb
rm archey-0.2.8.deb
nano /etc/bash.bashrc
At the very end, add:archey.
7.2 Extending The Web/DB Server
These steps are only run on our Web/DB server.
7.2.1 Installing cURL
apt-get -y install curl php5-curl libcurl3-dev
7.2.2 Installing ionCube Loader
You should now be able to do this by yourself. Just download the correct version over at http://www.ioncube.com/loaders.php and follow its introductions.
7.2.3 Installing APC and other useful apps
In this section we will install apc (php accelarator), which is developed by the guys who develop php and some apps (htop, iptraf, logwatch, tiger).
apt-get -y install php-apc htop iptraf tiger
Edit /etc/php5/conf.d/apc.ini, so as to increase the memory cache:
nano /etc/php5/conf.d/apc.ini
And append the following line:
apc.shm_size=128
Finally restart Apache:
/etc/init.d/apache2 restart
With htop you can see system info in a better way than top, with iptraf you can see real time statistics for your connection and with tiger you can have yourself mailed with a periodically report of your system's security vulnerabilities (if any exists).
As a lot of scripts/apps send a lot of mails to user root, you can alias root's mail, to a more 'real' email address. So, after you set up a 'real' mail for your example.tld domain, you can edit the aliases and add an alias to root user:
nano /etc/aliases
and change the line
root:root
to something like
root:example@unixlinux.online
After this execute:
newaliases
If you want to install Drupal (or other cms) you will propably need uploadprogress and json. To accomplish their installation, do:
apt-get -y install php5-dev php-services-json
pecl install uploadprogress
touch /etc/php5/apache2/conf.d/uploadprogress.ini
nano /etc/php5/apache2/conf.d/uploadprogress.ini
And append the following line:
extension=uploadprogress.so
Finally restart Apache:
/etc/init.d/apache2 restart
7.2.4 Installing mod_security
Install the apache mod-security 2 module with apt from the Debian repositories:
apt-get -y install libapache-mod-security
Create the folder for the mod-security configuration files:
mkdir /etc/apache2/mod-security
chmod 600 /etc/apache2/mod-security
Download and unpack the mod-security rules:
cd /tmp
wget http://www.modsecurity.org/download/modsecurity-core-rules_2.5-1.6.1.tar.gz
tar fvx modsecurity-core-rules_2.5-1.6.1.tar.gz
mv *.conf /etc/apache2/mod-security/
ln -s /var/log/apache2 /etc/apache2/logs
Configure apache to load the activated mod-security rules:
nano /etc/apache2/conf.d/mod-security.conf
Include /etc/apache2/mod-security/*.conf
To enable mod-security, edit the file
nano /etc/apache2/mod-security/modsecurity_crs_10_config.conf
and remove the # in front of the line:
SecDefaultAction
"phase:2,log,deny,status:403,t:lowercase,t:replaceNulls,t:compressWhitespace"
Then reload Apache.
/etc/init.d/apache2 force-reload
Mod security will now start to block hack attempts to your websites and log the actions in the file /var/log/apache2/modsec_audit.log.
tail /var/log/apache2/modsec_audit.log
You will see very likely some falsely blocked URL's. To whitelist them, you can add the ID's of the rules that should not be used in the whitelist file.
Example:
nano /etc/apache2/mod-security/modsecurity_crs_99_whitelist.conf
SecRuleRemoveById 960015
SecRuleRemoveById 960016
7.2.5 MySQL Tuning
Download tuning-primer.sh and mysqltuner.pl. These will help you to improve mysql's configuration file.
cd /root/scripts
wget http://www.day32.com/MySQL/tuning-primer.sh
wget http://mysqltuner.com/mysqltuner.pl
chmod 700 tuning-primer.sh mysqltuner.pl
To execute them:
perl /root/scripts/mysqltuner.pl
/root/scripts/tuning-primer.sh
The scripts will ask some simple questions (user/pass) and will display in red colour, their suggestions for critical settings. You can use their suggestions to boost the performance of mysql-server.
7.2.6 Installing RoundCube
Following the above instructions you can install roundcube via apt-get. However following another logic (if you have the time and the courage) you can install roundcube in it's own subdomain, manually.
In "Perfect Server ...." you usually install Squirrelmai. However if you don't want it you can remove it:
apt-get remove squirrelmail
rm /etc/apache2/conf.d/squirrelmail.conf
Install roundcube. (You MUST have the mysql administrator's password before you proceed -- Let dbconfig-common configure the database. You will be asked some questions about the password of the db administrator and the password of the new user that will be created for roundcube. Answer those questions and continue:
apt-get -y install roundcube roundcube-mysql
Examle answers:
"Configure database for roundcube with dbconfig-common?" .... Answer Yes
"Database type to be used by roundcube:...Answer mysql
"Password of the database's administrativeuser:" ... Answer your-admin-DB-password
"MySQL application password for roundcube:" ... Answer the-password-you-want-to-give-to-the-roundcube-user
"Password confirmation:"... Answer the-password-you-want-to-give-to-the-roundcube-user
If something goes wrong you can always run:
dpkg-reconfigure roundcube-core
For more information, please see this post.
For everyone to be able to access his webmail (under his domain name) you have to create or edit the file /etc/apache2/conf.d/roundcube so as to set the alias to 'webmail'. If you want SSL you should include the last two directives (IfModule mod_rewrite.c) to have apache ALWAYS redirect to your SSL installation of ISPConfig.
nano /etc/apache2/conf.d/roundcube
# Those aliases do not work properly with several hosts on your apache server
# Uncomment them to use it or adapt them to your configuration
#    Alias /roundcube/program/js/tiny_mce/ /usr/share/tinymce/www/
    Alias /roundcube /var/lib/roundcube
    Alias /webmail /var/lib/roundcube

# Access to tinymce files
<Directory "/usr/share/tinymce/www/">
      Options Indexes MultiViews FollowSymLinks
      AllowOverride None
      Order allow,deny
      allow from all
</Directory>

<Directory /var/lib/roundcube/>
  Options +FollowSymLinks
  # This is needed to parse /var/lib/roundcube/.htaccess. See its
  # content before setting AllowOverride to None.
  AllowOverride All
  order allow,deny
  allow from all
</Directory>

# Protecting basic directories:
<Directory /var/lib/roundcube/config>
        Options -FollowSymLinks
        AllowOverride None
</Directory>

<Directory /var/lib/roundcube/temp>
        Options -FollowSymLinks
        AllowOverride None
        Order allow,deny
        Deny from all
</Directory>

<Directory /var/lib/roundcube/logs>
        Options -FollowSymLinks
        AllowOverride None
        Order allow,deny
        Deny from all
</Directory>

<IfModule mod_rewrite.c>
  <IfModule mod_ssl.c>
    <Location /webmail>
      RewriteEngine on
      RewriteCond %{HTTPS} !^on$ [NC]
      RewriteRule . https://%{HTTP_HOST}:50443%{REQUEST_URI}  [L]
    </Location>
  </IfModule>
</IfModule>

<IfModule mod_rewrite.c>
  <IfModule mod_ssl.c>
    <Location /roundcube>
      RewriteEngine on
      RewriteCond %{HTTPS} !^on$ [NC]
      RewriteRule . https://%{HTTP_HOST}:50443%{REQUEST_URI}  [L]
    </Location>
  </IfModule>
</IfModule>
Edit /var/lib/roundcube/config/main.inc.php:
nano /var/lib/roundcube/config/main.inc.php
and SET some variables in the file (if this is the first time you edit the file the lines are 60 and 66):
auto_create_user = TRUE;
$rcmail_config['default_host'] = 'mail.example.tld';
If you will install the following plugin (the logger that helps fail2ban) you have to extend the list of plugins in the same file. Ifthe only plugin is the one that will be istalled right afterward you have to edit the line (42) as below:
$rcmail_config['plugins'] = array('fail2ban'); Install the roundcube logger plugin from http://mattrude.com/projects/roundcube-fail2ban-plugin/.
Basically you have to download the file (fail2ban.php) and paste it in the fail2ban folder in the plugins folder of roundcube. Finally you must have this file: /usr/share/roundcube/plugins/fail2ban/fail2ban.php. Execute:
cd /usr/share/roundcube/plugins/
wget --no-check-certificate http://cloud.github.com/downloads/mattrude/rc-plugin-fail2ban/roundcube-fail2ban-plugin.1.1.tgz
tar -xvzf roundcube-fail2ban-plugin.1.1.tgz
touch /var/log/roundcube/userlogins
rm roundcube-fail2ban-plugin.1.1.tgz
chown www-data:www-data /var/log/roundcube/userlogins
This plugin will update the log file with each failed login attempt:/var/log/roundcube/userlogins
Don't forget to edit the link for the webmail in ISPConfig (System -> Interface Config -> (tab) Mail) and set it to /webmail. Lastly, restart apache.
/etc/init.d/apache2 restart
You can now access webmail at http://web.example.tld/webmail
Virtual Multiserver Environment With Dedicated Web &MySQL, Email &DNS Servers On Debian Squeeze With ISPConfig 3 - Page 5
En esta página
- 7.2.7 Installing fail2ban
- 7.2.8 Installing mod_evasive With fail2ban Support
- 7.3 Extending the Mail Server
- 7.3.1 Enhanced e-mail SPAM protection
- 7.3.2 Installing Postgrey
- 7.4 Securing The Servers Using SSL
7.2.7 Installing fail2ban
Extend the jail.local file that falko suggests in ThePerfect Server - Debian Squeeze (Debian 6.0) With BIND &Courier [ISPConfig 3]:/etc/fail2ban/jail.local
nano /etc/fail2ban/jail.local
You have to append or edit the following:
[roundcube]
enabled  = true
port     = http
filter   = roundcube
logpath  = /var/log/roundcube/userlogins
maxretry = 5
Last (and very important) don't forget to create the roundcube.conf file /etc/fail2ban/filter.d/roundcube.conf.
nano /etc/fail2ban/filter.d/roundcube.conf
with the following contents:
[Definition]
failregex = FAILED login for .*. from <HOST>
ignoreregex =
Restart fail2ban:
/etc/init.d/fail2ban restart
You can check that all jails are active with the command:
iptables -L -n
7.2.8 Installing mod_evasive With fail2ban Support
mod_evasive is an Apache module for handling DDoS attacks. We will install it and configure fail2ban to auto ban/unban reported attacks.
apt-get install libapache2-mod-evasive
mkdir /var/lock/mod-evasive
chown www-data /var/lock/mod-evasive
ln -s /etc/alternatives/mail /bin/mail
nano /etc/apache2/mods-available/mod-evasive.conf
and paste:
<IfModule  mod_evasive20.c>
   DOSHashTableSize 3097
   DOSPageCount 3
   DOSSiteCount 60
   DOSPageInterval 1
   DOSSiteInterval 2
   DOSBlockingPeriod 15
   DOSEmailNotify example@unixlinux.online
   DOSLogDir "/var/lock/mod_evasive"
</IfModule>
Afterwards we activate the module and restart apache
a2enmod mod-evasive
/etc/init.d/apache2 restart
mod_evasive will not detect DDoS attacks. To ban them by IPTables, we have to create the file:/etc/fail2ban/filter.d/apache-dosevasive.conf:
# Fail2Ban configuration file
#
# Author: Xela
#
# $Revision: 728 $
#

[Definition]

# Option:  failregex
# Notes.:  regex to match the Forbidden log entrys in apache error.log
#          maybe (but not only) provided by mod_evasive
#
# Values:  TEXT
#
failregex = ^\[[^\]]*\]\s+\[error\]\s+\[client <HOST>\] client denied by server configuration:\s

# Option:  ignoreregex
# Notes.:  regex to ignore. If this regex matches, the line is ignored.
# Values:  TEXT
#
ignoreregex =
and to /etc/fail2ban/jail.local we add:
[apache-dosevasive]

enabled = true
filter  = apache-dosevasive
action = iptables-allports[name=dos]
logpath = /var/log/apache*/*error.log
bantime = 600
maxretry = 10
7.3 Extending the Mail Server
7.3.1 Enhanced e-mail SPAM protection
The command below enables a stricter SPAM handling for postfix on ISPConfig 3 servers.
postconf -e 'smtpd_recipient_restrictions = permit_mynetworks, permit_sasl_authenticated, reject_invalid_hostname, reject_non_fqdn_hostname, reject_unknown_recipient_domain, reject_non_fqdn_recipient, reject_unauth_destination, reject_non_fqdn_sender, reject_unknown_sender_domain, reject_unknown_recipient_domain, reject_rbl_client cbl.abuseat.org,reject_rbl_client dul.dnsbl.sorbs.net,reject_rbl_client ix.dnsbl.manitu.net, check_recipient_access mysql:/etc/postfix/mysql-virtual_recipient.cf, reject_unauth_destination'
Then restart postfix:
/etc/init.d/postfix restart
7.3.2 Installing Postgrey
Postgrey will eliminate 99% of all spam emails you receive. To install it, run these commands:
apt-get install postgrey
/etc/init.d/postgrey start
The Postfix configuration files are located in /etc/postfix. Edit /etc/postfix/main.cf and add check_policy_service inet:127.0.0.1:60000 to the smtpd_recipient_restrictions.
Then reload postfix's configuration:
postfix reload
7.4 Securing The Servers Using SSL
Last but not least you should follow this tutorial:https://www.howtoforge.com/securing-your-ispconfig-3-installation-with-a-free-class1-ssl-certificate-from-startssl. Don't forget to execute the commands on the right server!
8 Maintaining Our Servers
You should regulary run this to keep your servers up-to-date:
apt-get update && apt-get -y upgrade && apt-get -y dist-upgrade
9 Links/Credits/Sources
Since most is not from me, here are all the links used for this tutorial:
- http://www.faqforge.com/linux/enhanced-e-mail-spam-protection-in-ispconfig-3/
- https://www.howtoforge.com/greylisting_postfix_postgrey
- https://www.howtoforge.com/extending-perfect-server-debian-squeeze-ispconfig-3-p4
- http://spielwiese.la-evento.com/xelasblog/archives/56-Apache-DOS-Attacken-erschweren-mit-mod_evasive.html
- http://www.faqforge.com/linux/apache-mod-security-installation-on-debian-6-0-squeeze/
- http://forum.whmcs.com/showpost.php?s=f876c3e3a7d56bd2f325685a80d746cf&p=16768&postcount=4
- https://www.howtoforge.com/extending-perfect-server-debian-squeeze-ispconfig-3-p3
- http://debian.nimmervoll.eu/tag/debian-logwatch-einrichten/
- http://www.debian-administration.org/articles/530
- https://www.howtoforge.com/securing-your-ispconfig-3-installation-with-a-free-class1-ssl-certificate-from-startssl
- https://www.howtoforge.com/multiserver-setup-with-dedicated-web-email-dns-and-mysql-database-servers-on-debian-squeeze-with-ispconfig-3
- http://debian.nimmervoll.eu/archey-debian-installation/
- http://ajenti.org/
- http://code.google.com/p/ovz-web-panel/wiki/Installation
- https://www.howtoforge.com/installing-and-using-openvz-on-debian-squeeze-amd64