Este es un "copiar y pegar" Cómo! La forma más sencilla de seguir este tutorial es utilizar un cliente de línea de comandos/cliente SSH (como PuTTY para Windows) y simplemente copiar y pegar los comandos (excepto cuando tenga que proporcionar información propia como direcciones IP, nombres de host, contraseñas,... ). Esto ayuda a evitar errores tipográficos.
La configuración perfecta - Debian Woody (3.0)
Versión 1.6
Autor:Falko Timme
Esta es una descripción detallada sobre los pasos a seguir para configurar un Debian servidor basado en (Debian Woody alias Debian 3.0) que ofrece todos los servicios que necesitan los ISP y hosters (servidor web (compatible con SSL), servidor de correo (¡con SMTP-AUTH y TLS!), servidor DNS, servidor FTP, servidor MySQL, POP3/IMAP, cuota, cortafuegos, etc.).
Usaré el siguiente software:
- Servidor web:Apache 1.3.x
- Servidor de correo:Postfix (más fácil de configurar que sendmail; tiene un historial más corto de agujeros de seguridad que sendmail)
- Servidor DNS:BIND9
- Servidor FTP:proftpd (también puede usar vsftpd)
- POP3/IMAP:en este ejemplo, puede elegir entre el formato de buzón UNIX tradicional (si usa qpopper/uw-imapd) o el Formato Maildir (en este caso usaremos Courier-POP3/Courier-IMAP).
- Webalizer para estadísticas de sitios web
Al final, debe tener un sistema que funcione de manera confiable y esté listo para el panel de control de alojamiento web gratuito ISPConfig (es decir, ISPConfig se ejecuta en él fuera del caja).
Quiero decir primero que esta no es la única forma de configurar dicho sistema. Hay muchas maneras de lograr este objetivo, pero este es el camino que tomo. ¡No emito ninguna garantía de que esto funcione para usted!
Requisitos
Para instalar dicho sistema necesitará lo siguiente:
- CD 1 de la versión Debian Woody (Debian 3.0) (disponible en http://www.debian.org)
- CD 1 de la última versión de Mandrake Linux (9.2 en el momento de escribir este artículo) (disponible en http://www.mandrake -linux.com)(no lo necesita si no necesita crear particiones en su disco duro)
- una conexión a Internet ya que describiré una instalación de red en este documento
1 Sistema TheBase
Si tiene un disco duro sin usar, primero tendrá que crear particiones en él (puede omitir este paso si ya tiene particiones en su disco duro ). Puede usar el instalador de Debian para hacer esto, pero creo que es difícil de usar (especialmente para los novatos). Aquí es donde hago un poco de trampa:inserto el CD de Mandrake en mi CD-ROM y ejecuto el instalador de Mandrake (solo hasta después de mi Las particiones se han creado utilizando la herramienta de partición de Mandrake, que creo que es la mejor en el mundo de Linux).
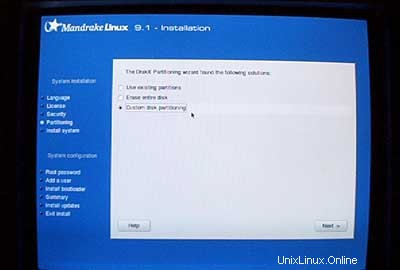
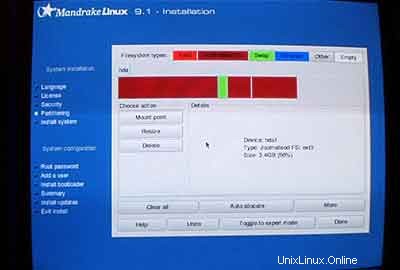
Creo dos particiones:/dev/hda1 (con /boot como punto de montaje) y /dev/hda6 (con / como punto de montaje). Además, creo una partición de intercambio (normalmente en /dev/hda5 ).Creo que 50 MB -100 MB es un buen tamaño para /dev/hda1;500 MB deberían ser suficientes para la partición de intercambio; el resto es para /dev/hda6 (donde estarán los sitios web de los usuarios, etc.).
Después de crear las particiones, detengo la instalación de Mandrake, inserto mi CD de Debian y reinicio el sistema.
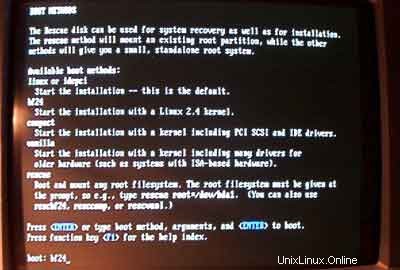
En el indicador de arranque, ingrese bf24 para instalar Debian con un kernel Linux 2.4:
Luego seleccione su idioma:
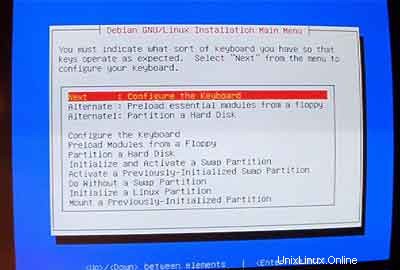
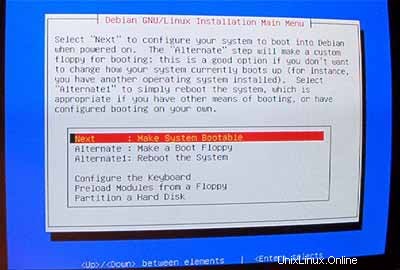
Luego, ingresará al menú principal del instalador de Debian. Configura tu teclado:
Inicializar y activar una partición de intercambio:
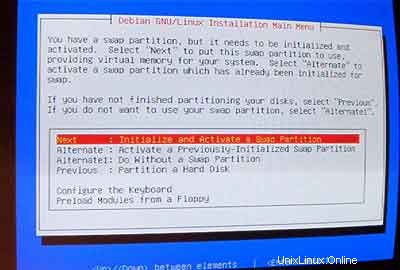
Cuando se le preguntó ¿Buscar bloques defectuosos? , elija No .
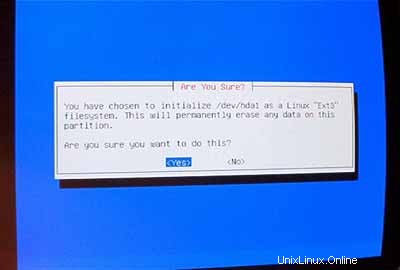
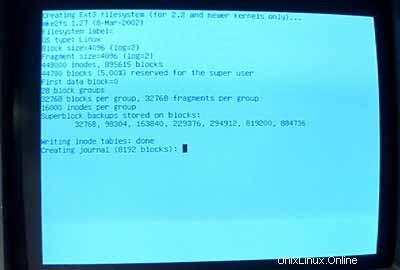
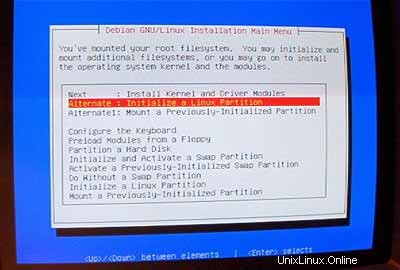
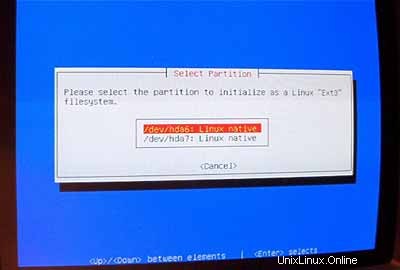
Luego inicialice una partición de Linux:
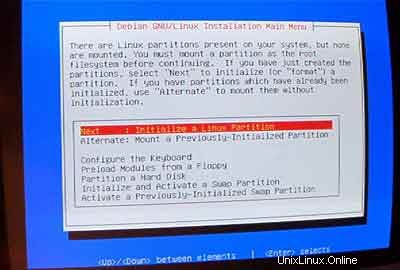
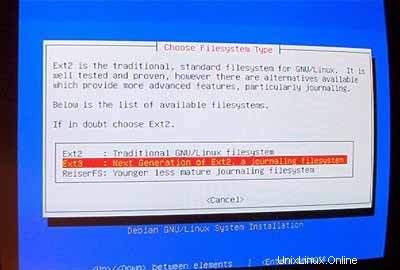
Seleccione el sistema de archivos que desee. Tomo ext3 aquí.
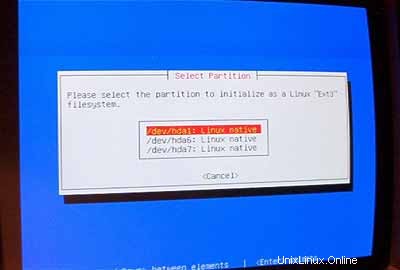
Seleccione /dev/hda1 como la partición a inicializar:
Cuando se le preguntó ¿Buscar bloques defectuosos? , ingresa No .
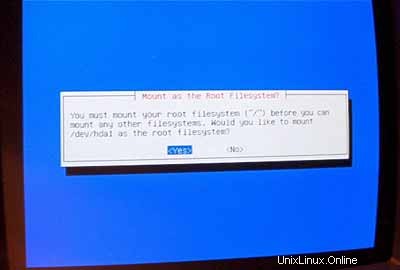
Seleccione /boot como punto de montaje para /dev/hda1 :
Ahora debe inicializar su segunda partición de Linux:
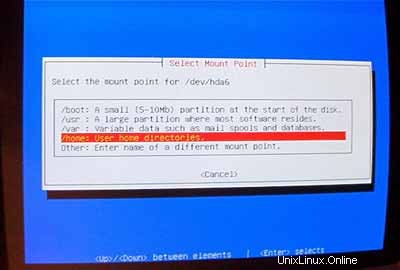
Seleccione su sistema de archivos preferido (nuevamente, tomo ext3 aquí). Luego seleccione /dev/hda6 como la partición a inicializar:
Cuando se le preguntó ¿Buscar bloques defectuosos? , ingresa No .
Seleccione / como punto de montaje para /dev/hda6 :
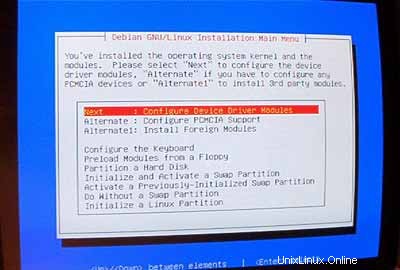
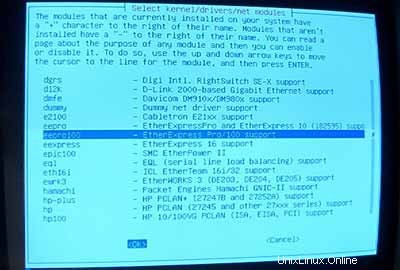
Después de formatear e inicializar sus particiones, seleccione InstallKernel and Driver Modules desde el menú principal. Creo que esto no necesita más explicación.
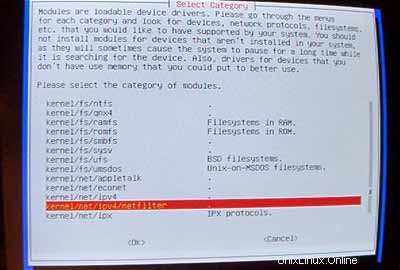
Configurar módulos DeviceDriver:
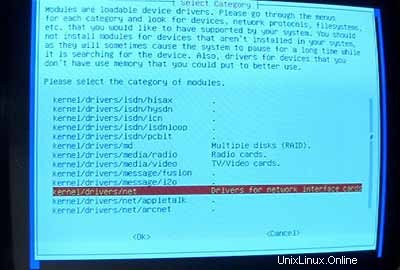
Asegúrese de instalar el controlador para su tarjeta de red (si no conoce el correcto, es seguro instalar varios controladores):
Ahora asegúrese de incluir compatibilidad con iptables (¡Firewall!) en su kernel:
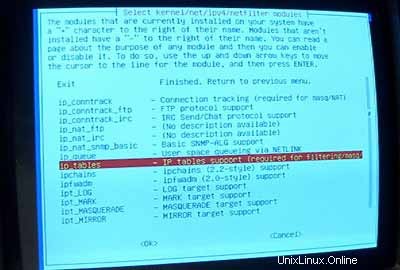
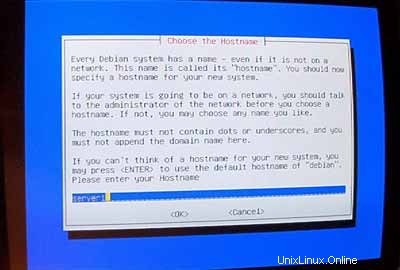
Después de haber salido del menú de módulos del controlador, debe configurar su red:
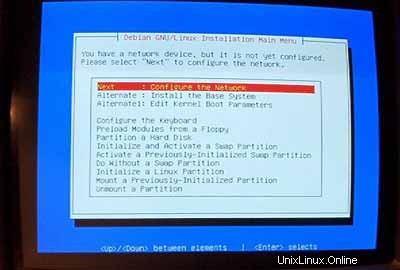
Para el nombre de host, recomiendo un subdominio que no se usará para un sitio virtual en ese servidor más adelante. Algo así como servidor1 ,servidor2 , ... sería bastante útil ya que le permite distinguir sus servidores si ejecuta varios de ellos. Entonces, si su dominio es example.com (¡se recomienda un dominio real!) puede comunicarse con el servidor en server1.example.com (no olvide actualizar el registro DNS para example.com !).
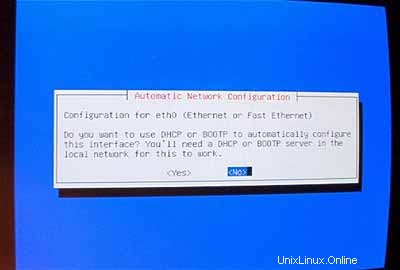
Cuando se le solicite Configuración automática de red , seleccione No .
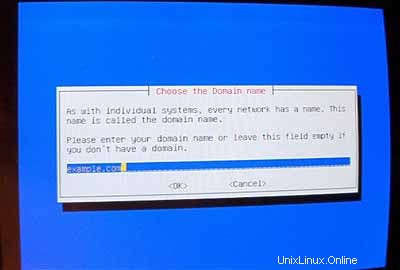
Luego ingrese la dirección IP principal del sistema, su máscara de red, la dirección de la puerta de enlace y el dominio del sistema (aquí:ejemplo.com ).
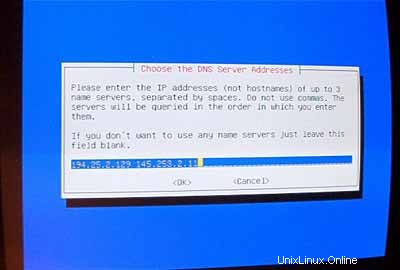
Especifique los servidores DNS que debe usar el sistema (por ejemplo, 193.174.32.18 y 145.253.2.11 ).
Instalar el sistema base:

Hacer que el sistema sea arrancable:
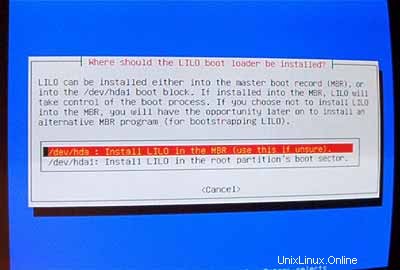
Seleccione Instalar LILO en el MBR :
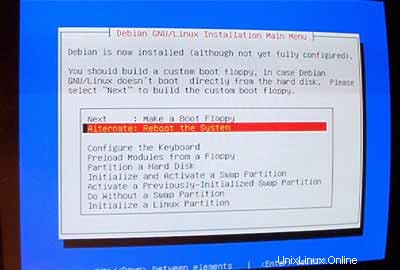
Luego reinicie el sistema. Asegúrese de quitar el CD de Debian de su CD-ROM:
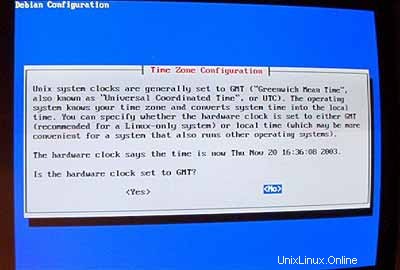
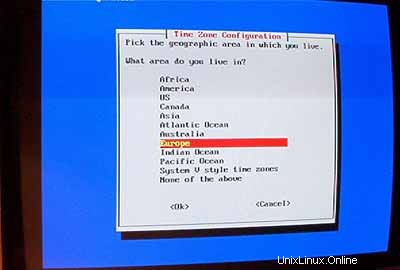
Después de reiniciar, configure su zona horaria:

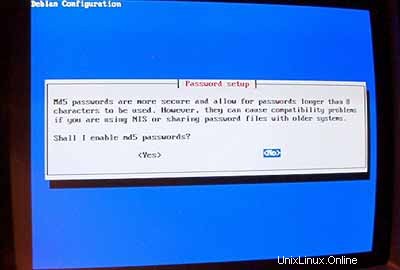
No habilitar contraseñas md5:
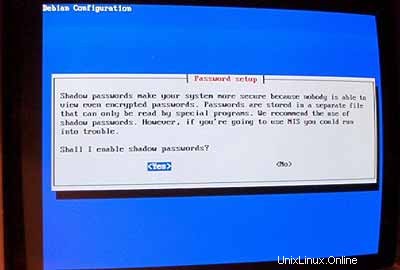
Habilitar contraseñas ocultas:
Luego configure la contraseña raíz , cree el usuario adicional admin e ingrese su contraseña.
Si no necesita paquetes pcmcia, elimínelos.
No use una conexión PPP para instalar el sistema (un servidor debe tener una conexión permanente a Internet):
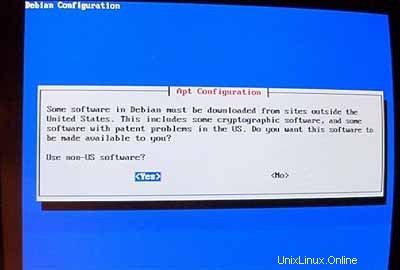
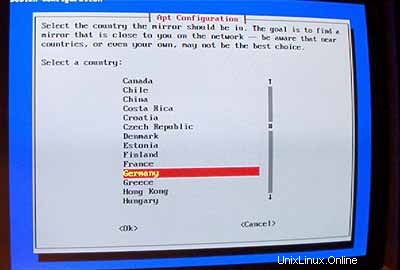
Quiero hacer una instalación en red (es por eso que solo necesito el disco 1 de los siete CD-ROM de Debian). Así que elijo http como método para acceder al archivo de Debian bajo AptConfiguration :

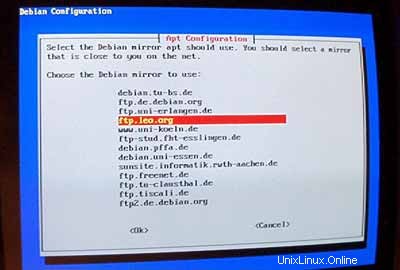
Seleccione un espejo que esté cerca de usted:
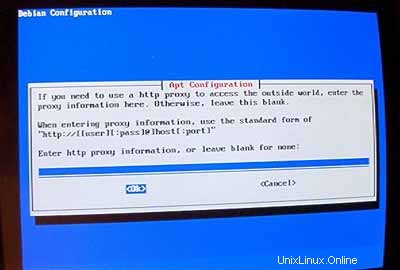
Normalmente, no usa un proxy, así que deje el campo vacío:
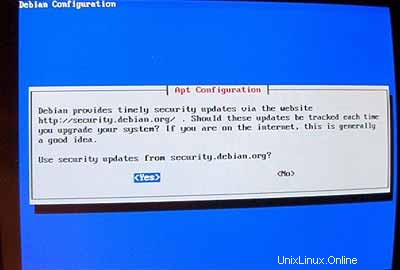
Cuando se le preguntó ¿Usar actualizaciones de seguridad de security.debian.org? responde Sí .
Importante: Desde junio de 2005, Debian Sarge (3.1) es la versión estable de Debian. Como queremos instalar Debian Woody (3.0) aquí en lugar de Sarge, tenemos que cambiar el archivo /etc/apt/sources.list ahora antes de continuar! El instalador de Woody todavía cree que Woody es la versión estable. Presiona Ctrl + Alt + F2 en tu teclado. Ahora estás en el caparazón. Inicie sesión como raíz . Luego edite /etc/apt/sources.list con un editor de texto (por ejemplo, vi ) y reemplace estable con leñoso dondequiera que aparezca. Luego ejecute
apt-getupdate
y presione Ctrl+Alt+F1 para volver a la pantalla de instalación.
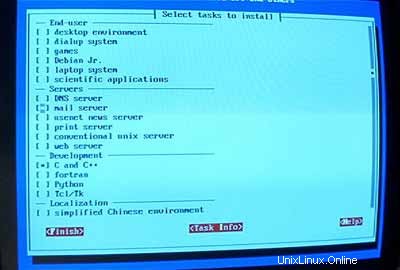
Luego ejecuta tasksel :
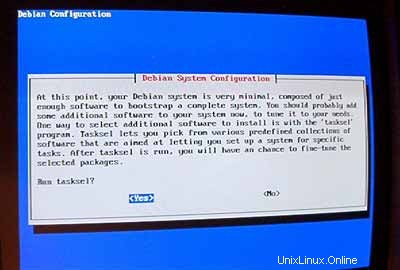
Quiero tener un sistema mínimo al principio, así que solo selecciono servidor de correo y C y C++ (para que pueda compilar fuentes si es necesario). El otro software se instalará más tarde.
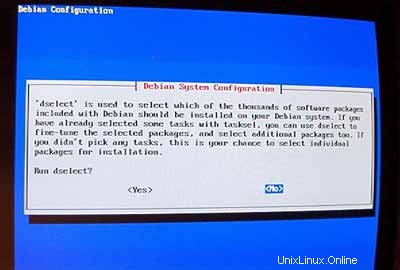
No ejecutar dselect (¡ni lo pienses, te perderás!):
Para los siguientes pasos, puede aceptar los valores predeterminados.
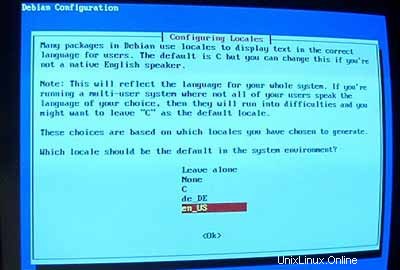
Luego configure sus locales. Al menos elige en_USISO-8859-1 :
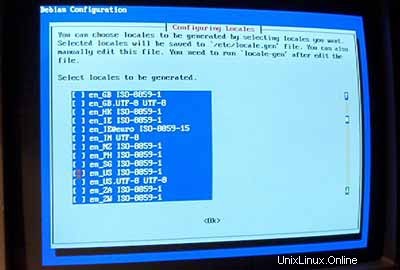
Como configuración regional predeterminada, selecciono en_US :
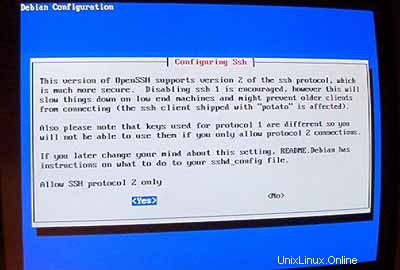
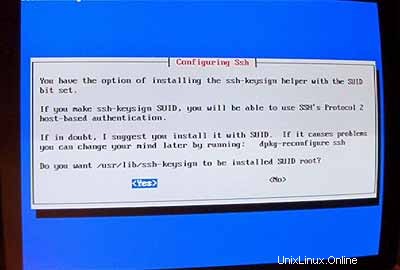
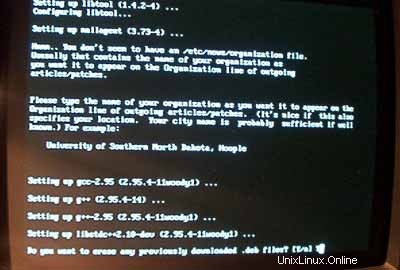
Luego configura tu servidor:
Comienza la instalación. Al final, se le preguntará si desea eliminar cualquier archivo .deb descargado previamente. Puede responder Y aquí.
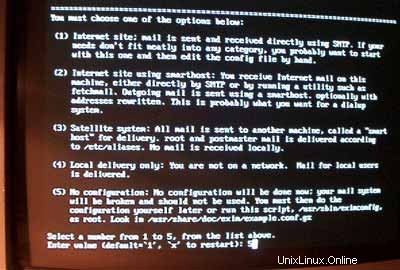
Cuando el instalador quiere configurar exim ingrese 5 (sin configuración) porque usaremos postfix como nuestro servidor de correo.
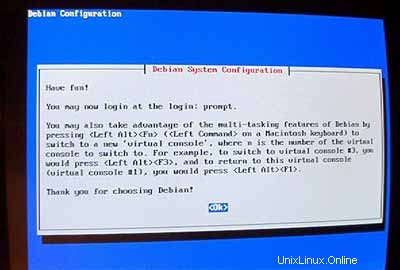
Ahora el sistema base está listo:
2 Instalación y configuración del resto del sistema
Configurar direcciones IP adicionales
Si tiene más de una dirección IP, puede agregar sus direcciones IP adicionales editando /etc/red/interfaces .Se verá similar a esto:
# /etc/network/interfaces -- configuration file for ifup(8), ifdown(8)

# The loopback interface
auto lo
iface lo inet loopback

# The first network card - this entry was created during the Debian installation
# (network, broadcast and gateway are optional)
auto eth0
iface eth0 inet static
        address 192.168.0.100
        netmask 255.255.255.0
        network 192.168.0.0
        broadcast 192.168.0.255
gateway 192.168.0.1 |
Si desea agregar la dirección IP 192.168.0.101 a la interfaz eth0 debe cambiar el archivo para que se vea así:
# /etc/network/interfaces -- configuration file for ifup(8), ifdown(8)

# The loopback interface
auto lo
iface lo inet loopback

# The first network card - this entry was created during the Debian installation
# (network, broadcast and gateway are optional)
auto eth0
iface eth0 inet static
        address 192.168.0.100
        netmask 255.255.255.0
        network 192.168.0.0
        broadcast 192.168.0.255
        gateway 192.168.0.1

auto eth0:0
iface eth0:0 inet static
        address 192.168.0.101
        netmask 255.255.255.0
        network 192.168.0.0
        broadcast 192.168.0.255
gateway 192.168.0.1 |
Luego reinicie su red:
/etc/init.d/networkingrestart
Configuración del nombre de host
echo server1.example.com> /etc/hostname
/bin/nombre de host -F /etc/nombre de host
Instalar/eliminar algún software
Añadir
deb http://backports.debian.skynet.be woody cyrus-sasl2
a /etc/apt/sources.list y corre
apt-getupdate
apt-get install wgetbzip2 rdate fetchmail libdb3++-dev descomprimir zip ncftp xlispstat libarchive-zip-perlzlib1g-dev libpopt -dev nmap abre SSL (¡1 línea!)
apt-get remove lpr nfs-commonportmap pidentd pcmcia-cs pppoe pppoeconf ppp pppconfig
update-rc.d -f exim remove
update-inetd --removedaytime
update-inetd --remove telnet
update-inetd - -remove time
update-inetd --remove finger
update-inetd --remove talk
update-inetd --remove ntalk
update-inetd --remove ftp
actualizar-inetd --eliminar descartar
<- Sí [y]
/etc/init.d/inetd reload
Cuota
apt-get install quota quotatool
Editar /etc/fstab para verse así (agregué ,usrquota,grpquota para particionar /dev/hda6 ):
# /etc/fstab: static file system information.
#
# <file system> <mount point>   <type>  <options>               <dump>  <pass>
/dev/hda1       /boot           ext3    errors=remount-ro       0       1
/dev/hda5       none            swap    sw                      0       0
proc            /proc           proc    defaults                0       0
/dev/fd0        /floppy         auto    user,noauto             0       0
/dev/cdrom      /cdrom          iso9660 ro,user,noauto          0       0
/dev/hda6 / ext3 defaults,usrquota,grpquota 0 2 |
Luego ejecuta:
touch /quota.user /quota.group
chmod 600 /cuota.*
mount -o remount /
quotacheck -avugm
quotaon -avug
Servidor DNS
apt-getinstall bind9
Por razones de seguridad, queremos ejecutar BIND en chroot, por lo que debemos realizar los siguientes pasos:
/etc/init.d/bind9 parada
Edite el script de inicio /etc/init.d/bind9 para que el demonio se ejecute como el usuario sin privilegios 'nadie ', enrutado a /var/lib/named .Modifique la línea:OPTS="" para que se lea OPTS="-ubody-t /var/lib/named" :
#!/bin/sh

PATH=/sbin:/bin:/usr/sbin:/usr/bin

# for a chrooted server: "-u nobody -t /var/lib/named"
OPTS="-u nobody -t /var/lib/named"

test -x /usr/sbin/named || exit 0

case "$1" in
    start)
        echo -n "Starting domain name service: named"
        start-stop-daemon --start --quiet \
            --pidfile /var/run/named.pid --exec /usr/sbin/named -- $OPTS
        echo "."
    ;;

    stop)
        echo -n "Stopping domain name service: named"
        /usr/sbin/rndc stop
        echo "."
    ;;

    reload)
        /usr/sbin/rndc reload
    ;;

    restart|force-reload)
        $0 stop
        sleep 2
        $0 start
    ;;

    *)
        echo "Usage: /etc/init.d/bind {start|stop|reload|restart|force-reload}" >&2
        exit 1
    ;;
esac

exit 0 |
Create the necessarydirectories under /var/lib :
mkdir -p /var/lib/named/etc
mkdir /var/lib/named/dev
mkdir -p /var/lib/named/var/cache/bind
mkdir /var/lib/named/var/run
Then move the configdirectory from /etc to /var/lib/named/etc :
mv /etc/bind /var/lib/named/etc
Create a symlinkto the new config directory from the old location (to avoid problems when bindis upgraded in the future):
ln -s /var/lib/named/etc/bind/etc/bind
Make null and randomdevices, and fix permissions of the directories:
mknod /var/lib/named/dev/nullc 1 3
mknod /var/lib/named/dev/random c 1 8
chmod 666 /var/lib/named/dev/null /var/lib/named/dev/random
chown -R nobody:nogroup /var/lib/named/var/*
chown -R nobody:nogroup /var/lib/named/etc/bind
We need to modifythe startup script /etc/init.d/sysklogd of sysklogd so that wecan still get important messages logged to the system logs. Modify the line: SYSLOGD="" so that it reads:SYSLOGD="-a/var/lib/named/dev/log" :
#! /bin/sh
# /etc/init.d/sysklogd: start the system log daemon.

PATH=/bin:/usr/bin:/sbin:/usr/sbin

pidfile=/var/run/syslogd.pid
binpath=/sbin/syslogd

test -x $binpath || exit 0

# Options for start/restart the daemons
#   For remote UDP logging use SYSLOGD="-r"
#
SYSLOGD="-a /var/lib/named/dev/log"

create_xconsole()
{
    if [ ! -e /dev/xconsole ]; then
        mknod -m 640 /dev/xconsole p
    else
        chmod 0640 /dev/xconsole
    fi
    chown root.adm /dev/xconsole
}

running()
{
    # No pidfile, probably no daemon present
    #
    if [ ! -f $pidfile ]
    then
        return 1
    fi

    pid=`cat $pidfile`

    # No pid, probably no daemon present
    #
    if [ -z "$pid" ]
    then
        return 1
    fi

    cmd=`cat /proc/$pid/cmdline | tr "\000" "\n"|head -1`

    # No syslogd?
    #
    if [ "$cmd" != "$binpath" ]
    then
        return 1
    fi

    return 0
}

case "$1" in
  start)
    echo -n "Starting system log daemon: syslogd"
    create_xconsole
    start-stop-daemon --start --quiet --exec $binpath -- $SYSLOGD
    echo "."
    ;;
  stop)
    echo -n "Stopping system log daemon: syslogd"
    start-stop-daemon --stop --quiet --exec $binpath --pidfile $pidfile
    echo "."
    ;;
  reload|force-reload)
    start-stop-daemon --stop --quiet --signal 1 --exec $binpath --pidfile $pidfile
    ;;
  restart)
    echo -n "Stopping system log daemon: syslogd"
    start-stop-daemon --stop --quiet --exec $binpath --pidfile $pidfile
    echo "."
    sleep 1
    echo -n "Starting system log daemon: syslogd"
    start-stop-daemon --start --quiet --exec $binpath -- $SYSLOGD
    echo "."
    ;;
  reload-or-restart)
    if running
    then
        start-stop-daemon --stop --quiet --signal 1 --exec $binpath --pidfile $pidfile
    else
        start-stop-daemon --start --quiet --exec $binpath -- $SYSLOGD
    fi
    ;;
  *)
    echo "Usage: /etc/init.d/sysklogd {start|stop|reload|restart|force-reload|reload-or-restart}"
    exit 1
esac

exit 0 |
Restart the loggingdaemon:
/etc/init.d/sysklogd restart
Start up BIND,and check /var/log/syslog for any errors:
/etc/init.d/bind9 start
MySQL
apt-getinstall mysql-server mysql-client libmysqlclient10-dev
<- No
<- Yes
mysqladmin -u root passwordyourrootsqlpassword
mysqladmin -h server1.example.com -u root password yourrootsqlpassword
In /etc/mysql/my.cnf comment out the following line:
skip-networking
It should now looksimilar to this:
# You can copy this to one of:
# /etc/mysql/my.cnf to set global options,
# mysql-data-dir/my.cnf to set server-specific options (in this
# installation this directory is /var/lib/mysql) or
# ~/.my.cnf to set user-specific options.
#
# One can use all long options that the program supports.
# Run the program with --help to get a list of available options

# This will be passed to all mysql clients
[client]
#password       = my_password
port            = 3306
socket          = /var/run/mysqld/mysqld.sock

# Here is entries for some specific programs
# The following values assume you have at least 32M ram

[safe_mysqld]
err-log         = /var/log/mysql/mysql.err

[mysqld]
user            = mysql
pid-file        = /var/run/mysqld/mysqld.pid
socket          = /var/run/mysqld/mysqld.sock
port            = 3306
#
# You can also put it into /var/log/mysql/mysql.log but I leave it in /var/log
# for backward compatibility. Both location gets rotated by the cronjob.
#log            = /var/log/mysql/mysql.log
log             = /var/log/mysql.log
basedir         = /usr
datadir         = /var/lib/mysql
tmpdir          = /tmp
language        = /usr/share/mysql/english
skip-locking
#
# The skip-networkin option will no longer be set via debconf menu.
# You have to manually change it if you want networking i.e. the server
# listening on port 3306. The default is "disable" - for security reasons.
#skip-networking
set-variable    = key_buffer=16M
set-variable    = max_allowed_packet=1M
set-variable    = thread_stack=128K
#
# Here you can see queries with especially long duration
#log-slow-queries       = /var/log/mysql/mysql-slow.log
#
# The following can be used as easy to replay backup logs or for replication
#server-id              = 1
#log-bin                = /var/log/mysql/mysql-bin.log
#binlog-do-db           = include_database_name
#binlog-ignore-db       = include_database_name
#
# Read the manual if you want to enable InnoDB!
skip-innodb

[mysqldump]
quick
set-variable    = max_allowed_packet=1M

[mysql]
#no-auto-rehash # faster start of mysql but no tab completition

[isamchk]
set-variable = key_buffer=16M |
Restart MySQL:
/etc/init.d/mysqlrestart
so that MySQL isaccessible on port 3306 (you can check that with netstat-tap ).
Postfix/Qpopper
addgroup sasl
apt-get install postfix-tlsqpopper sasl-bin libsasl-modules-plain libsasl2 libsasl-gssapi-mit libsasl-digestmd5-dessasl2-bin libsasl2-modules (1line!)
<- Kerberos:acceptdefault value (I don't want to use Kerberos so I don't really care about it)
<- Internetsite
<- Domainname
<- No
<- accept default values
<- Kerberos:accept default value
<- NONE
cd /etc/init.d/
wget http://hanselan.de/postfix/pwcheck
In case you cannotaccess http://hanselan.de/postfix/pwcheck here's the pwcheck script:
#! /bin/sh
#
# pwcheck       Startet pwcheck für SMTP-Auth mit Postfix
#

PATH=/usr/local/sbin:/usr/local/bin:/sbin:/bin:/usr/sbin:/usr/bin
DAEMON=/usr/sbin/pwcheck
NAME=pwcheck
DESC="pwcheck daemon"

test -x $DAEMON || exit 0

set -e

case "$1" in
  start)
        echo -n "Starting $DESC: $NAME"
        ln -s /var/spool/postfix/var/run/pwcheck /var/run/pwcheck
        $DAEMON
        echo "."
        ;;
  stop)
        echo -n "Stopping $DESC: $NAME "
        rm /var/run/pwcheck
        /usr/bin/killall -KILL $NAME
        echo "."
        ;;
  *)
        N=/etc/init.d/$NAME
        echo "Usage: $N {start|stop}" >&2
        exit 1
        ;;
esac

exit 0 |
chmod 755 /etc/init.d/pwcheck
update-rc.d pwcheck defaults
mkdir -p /var/spool/postfix/var/run/pwcheck
chown postfix.root /var/spool/postfix/var/run/pwcheck/
chmod 700 /var/spool/postfix/var/run/pwcheck/
ln -s /var/spool/postfix/var/run/pwcheck /var/run/pwcheck
postconf -e 'smtpd_sasl_local_domain=$myhostname'
postconf -e 'smtpd_sasl_auth_enable =yes'
postconf -e 'smtpd_sasl_security_options =noanonymous'
postconf -e 'broken_sasl_auth_clients =yes'
postconf -e 'smtpd_recipient_restrictions =permit_sasl_authenticated,permit_mynetworks,check_relay_domains'
postconf -e 'inet_interfaces =all'
echo 'pwcheck_method:pwcheck'>> /etc/postfix/sasl/smtpd.conf
mkdir /etc/postfix/ssl
cd /etc/postfix/ssl/
openssl genrsa -des3 -rand /etc/hosts -out smtpd.key 1024
chmod 600 smtpd.key
openssl req -new -key smtpd.key -out smtpd.csr
openssl x509 -req -days 3650 -in smtpd.csr -signkey smtpd.key -out smtpd.crt
openssl rsa -in smtpd.key -out smtpd.key.unencrypted
mv -f smtpd.key.unencrypted smtpd.key
openssl req -new -x509 -extensions v3_ca -keyout cakey.pem -out cacert.pem -days3650
postconf -e 'smtpd_tls_auth_only=no'
postconf -e 'smtp_use_tls =yes'
postconf -e 'smtpd_use_tls =yes'
postconf -e 'smtp_tls_note_starttls_offer =yes'
postconf -e 'smtpd_tls_key_file =/etc/postfix/ssl/smtpd.key'
postconf -e 'smtpd_tls_cert_file =/etc/postfix/ssl/smtpd.crt'
postconf -e 'smtpd_tls_CAfile =/etc/postfix/ssl/cacert.pem'
postconf -e 'smtpd_tls_loglevel =1'
postconf -e 'smtpd_tls_received_header =yes'
postconf -e 'smtpd_tls_session_cache_timeout =3600s'
postconf -e 'tls_random_source =dev:/dev/urandom'
The file /etc/postfix/main.cf should now look like this:
# see /usr/share/postfix/main.cf.dist for a commented, fuller
# version of this file.

# Do not change these directory settings - they are critical to Postfix
# operation.
command_directory = /usr/sbin
daemon_directory = /usr/lib/postfix
program_directory = /usr/lib/postfix

smtpd_banner = $myhostname ESMTP $mail_name (Debian/GNU)
setgid_group = postdrop
biff = no

# appending .domain is the MUA's job.
append_dot_mydomain = no
myhostname = server1.example.com
alias_maps = hash:/etc/aliases
alias_database = hash:/etc/aliases
myorigin = /etc/mailname
mydestination = server1.example.com, localhost.example.com, localhost
relayhost =
mynetworks = 127.0.0.0/8
mailbox_command = procmail -a "$EXTENSION"
mailbox_size_limit = 0
recipient_delimiter = +
smtpd_sasl_local_domain = $myhostname
smtpd_sasl_auth_enable = yes
smtpd_sasl_security_options = noanonymous
broken_sasl_auth_clients = yes
smtpd_recipient_restrictions = permit_sasl_authenticated,permit_mynetworks,check_relay_domains
inet_interfaces = all
smtpd_tls_auth_only = no
smtp_use_tls = yes
smtpd_use_tls = yes
smtp_tls_note_starttls_offer = yes
smtpd_tls_key_file = /etc/postfix/ssl/smtpd.key
smtpd_tls_cert_file = /etc/postfix/ssl/smtpd.crt
smtpd_tls_CAfile = /etc/postfix/ssl/cacert.pem
smtpd_tls_loglevel = 1
smtpd_tls_received_header = yes
smtpd_tls_session_cache_timeout = 3600s
tls_random_source = dev:/dev/urandom |
/etc/init.d/pwcheckstart
/etc/init.d/postfix restart
To see if SMTP-AUTHand TLS work properly now run the following command:
telnetlocalhost 25
After you haveestablished the connection to your postfix mail server type
ehlolocalhost
If you see thelines
250-STARTTLS
and
250-AUTH
everything is fine.
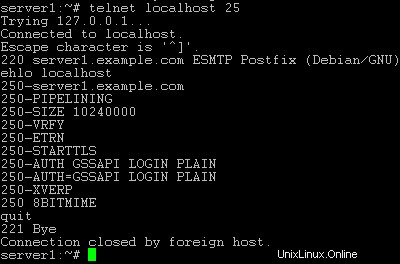
Type
quit
to return to thesystem's shell.
Courier-IMAP/Courier-POP3
If you want touse a POP3/IMAP daemon that has Maildir support (if you do not want to use thetraditional Unix mailbox format) you can install Courier-IMAP and Courier-POP3.Otherwise you can proceed with the Apache configuration.
apt-get install courier-imapcourier-pop
qpopper and UW-IMAPwill then be replaced.
Then configurePostfix to deliver emails to a user's Maildir*:
postconf -e 'home_mailbox=Maildir/'
postconf -e 'mailbox_command ='
/etc/init.d/postfix restart
*Please note:Youdo not have to do this if you intend to use ISPConfigon your system as ISPConfig does the necessary configuration using procmailrecipes. But please go sure to enable Maildir under Management -> Settings ->EMail in the ISPConfig web interface.
Apache
Add
deb http://packages.dotdeb.org ./
to /etc/apt/sources.list and run
apt-getupdate
apt-getinstall apache apache-doc libapache-mod-ssl libapache-mod-ssl-doc
apt-get install libapache-mod-php4php4 php4-cli php4-common php4-curl php4-dev php4-domxml php4-gd php4-gmp php4-imapphp4-ldap php4-mcal php4-mcrypt php4-mhash php4-ming php4-mysql php4-odbc php4-pearphp4-xslt curl libwww-perl imagemagick (1 line!)
Edit /etc/apache/httpd.conf .Under LoadModules add:
LoadModulephp4_module /usr/lib/apache/1.3/libphp4.so
LoadModule ssl_module /usr/lib/apache/1.3/mod_ssl.so
Under Listen add:
Listen80
Listen 443
Under "Addtypeapplication" insert:
AddType application/x-x509-ca-cert .crt
AddType application/x-pkcs7-crl .crl
Before "Section3 :Virtual Hosts" add:
SSLCACertificateFile /etc/apache/ssl.crt/ca-bundle.crt
SSLPassPhraseDialog builtin
SSLSessionCache dbm:/var/run/ssl_scache
SSLSessionCacheTimeout 300
SSLMutex file:/var/run/ssl_mutex
SSLRandomSeed startup builtin
SSLRandomSeed connect builtin
Change
DirectoryIndexindex.html index.htm index.shtml index.cgi
to
DirectoryIndexindex.html index.htm index.shtml index.cgi index.php index.php3 index.pl
Save /etc/apache/httpd.conf and run
/etc/init.d/apacherestart
Proftpd
apt-getinstall proftpd
<- No
For security reasonsyou can add the following lines to /etc/proftpd.conf (thanks to Reinaldo Carvalho; more information can be found here:http://proftpd.linux.co.uk/localsite/Userguide/linked/userguide.html):
DefaultRoot ~
IdentLookups off
ServerIdent on "FTP Server ready."
and restart Proftpd:
/etc/init.d/proftpd restart
Webalizer
apt-getinstall webalizer
<- accept default values
Synchronizethe System Clock
If you want tohave the system clock synchronized with an NTP server you can add the followinglines to /var/spool/cron/crontabs/root (if the file does not exist, create it by running
touch/var/spool/cron/crontabs/root ):
#update time with ntp server
0 3,9,15,21 * * * /usr/sbin/rdate time.nist.gov | logger -t NTP
Then run
chmod600 /var/spool/cron/crontabs/root
/etc/init.d/cronrestart
Install somePerl Modules needed by SpamAssassin (comes with ISPConfig)
Installationusing the Perl Shell
Login to your commandline as root and run the following command to start the Perl shell:
perl -MCPAN -e shell
If you run thePerl shell for the first time you will be asked some questions. In most casesthe default answers are ok.
Please note:Ifyou run a firewall on your system you might have to turn it off while workingon the Perl shell in order for the Perl shell to be able to fetch the neededmodules without a big delay. You can switch it on afterwards.
The big advantageof the Perl shell compared to the two other methods described here is that itcares about dependencies when installing new modules. I.e., if it turns outthat a prerequisite Perl module is missing when you install another module thePerl shell asks you if it should install the prerequisite module for you. Youshould answer that question with "Yes".
Run the followingcommands to install the modules needed by SpamAssassin:
install HTML::Parser
install DB_File
install Net::DNS (when prompted to enable tests, choose no)
install Digest::SHA1
q (to leave the Perl shell)
If a module isalready installed on your system you will get a message similar to this one:
HTML::Parseris up to date.
Successful installationof a module looks like this:
/usr/bin/makeinstall -- OK
Compile a CustomKernel
If you need tocompile a new kernel for some reason (e.g. because you want to use the latestbleeding-edge kernel or need a feature that the standard Debian kernel doesnot offer), you can find more information here:Debian-Kernel-Compile-Howto.
The End
The configurationof the server is now finished, and if you wish you can now install ISPConfigon it.
A Note On SuExec
If you want torun CGI scripts under suExec, you should specify /var/www as the home directory for websites created by ISPConfig as Debian's suExec iscompiled with /var/www as Doc_Root .Run /usr/lib/apache/suexec -V ,and the output should look like this:
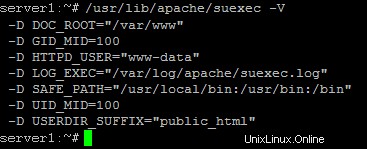
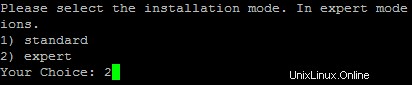
To select /var/www as the home directory for websites during the installation of ISPConfig do thefollowing:When you are asked for the installation mode, select the expertmode .
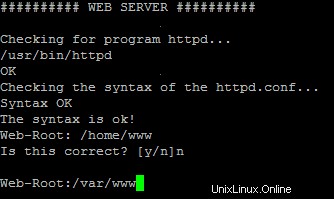
Later during theinstallation you are asked if the default directory /home/www should be the directory where ISPConfig will create websites in. Answer n and enter /var/www asthe home directory for websites.
Links
- http://www.debian.org
- http://www.debianplanet.org
- http://www.debianforum.de(German)
- http://www.debianhowto.de(German/English)
- http://www.ispconfig.org