Este tutorial muestra cómo configurar la sincronización de archivos entre dos servidores Debian 8 con Unison. Unison es una herramienta de sincronización de archivos similar a rsync, la gran diferencia es que rastrea/sincroniza los cambios en ambas direcciones, es decir, los archivos modificados en el servidor 1 se replicarán en el servidor 2 y viceversa.
1 nota preliminar
En este tutorial usaré los siguientes dos servidores Debian:
- servidor1.ejemplo.com con la dirección IP 192.168.1.101
- servidor2.ejemplo.com con la dirección IP 192.168.1.102
Quiero sincronizar el directorio /var/www entre los dos servidores. Ejecutaré Unison como usuario raíz en este tutorial para que Unison tenga suficientes permisos para sincronizar los permisos de usuario y grupo.
Todos los comandos de este tutorial se ejecutan como usuario root. Inicie sesión en ambos servidores en el shell como raíz y comience con el paso 2 "Instalación de Unison ".
2 Instalación de Unison
servidor1/servidor2:
Unison debe instalarse en server1 y server2; dado que nos conectamos del servidor 1 al servidor 2 usando SSH, también necesitamos los paquetes SSH e instalaré el editor nano para editar archivos en el shell. Esto se puede lograr de la siguiente manera:
apt-get -y install unison openssh-server ssh nano
3 Creación de un par de claves pública/privada en el servidor1
servidor1:
Ahora creamos un par de claves pública/privada en server1.example.com:
ssh-keygen -t dsa
[email protected]:~# ssh-keygen -t dsa
Generando par de claves dsa pública/privada.
Ingrese el archivo en el que guardar la clave (/root/.ssh/id_dsa): <-- ENTRAR
Directorio creado '/root/.ssh'.
Ingresar frase de contraseña (vacío para sin frase de contraseña): <-- ENTRAR
Ingresar la misma frase de contraseña nuevamente: <-- ENTRAR
Su la identificación se ha guardado en /root/.ssh/id_dsa.
Su clave pública se ha guardado en /root/.ssh/id_dsa.pub.
La huella digital de la clave es:
ba:82 :e1:a1:42:9b:d4:c8:99:c8:bd:8b:7d:4d:d4:66 [email protected]
La imagen aleatoria de la llave es:
+--- [DSA 1024]----+
| |
| |
| . |
| . E |
|+ * . S |
|.Ooo o |
|ooo+. + |
|oo=... o |
|.. oo.. |
+-----------------+
[correo electrónico protegido]:~#
Es importante que no ingrese una frase de contraseña; de lo contrario, la duplicación no funcionará sin la interacción humana, ¡simplemente presione ENTER!
A continuación, copiamos nuestra clave pública en server2.example.com:
ssh-copy-id -i $HOME/.ssh/id_dsa.pub [email protected]
# ssh-copy-id -i $HOME/.ssh/id_dsa.pub [email protected]
The authenticity of host '192.168.1.102 (192.168.1.102)' can't be established.
ECDSA key fingerprint is 51:7f:b4:ed:bd:e3:fc:16:2f:55:5c:e1:2c:d7:3d:a9.
Are you sure you want to continue connecting (yes/no)? <-- yes (you will see this only if this is the first time you connect to server2)
/usr/bin/ssh-copy-id: INFO: attempting to log in with the new key(s), to filter out any that are already installed
/usr/bin/ssh-copy-id: INFO: 1 key(s) remain to be installed -- if you are prompted now it is to install the new keys
[email protected]'s password: <-- server2 root password
Number of key(s) added: 1
Now try logging into the machine, with: "ssh '[email protected]'"
and check to make sure that only the key(s) you wanted were added.
Ahora compruebe en el servidor2 si la clave pública del servidor1 se ha transferido correctamente:
servidor2:
cat $HOME/.ssh/authorized_keys
[email protected]:/home/administrator# cat $HOME/.ssh/authorized_keysexample@unixlinux.online
ssh-dss AAAAB3NzaC1kc3MAAACBAKHLdAztIr8muZIlQYuE/4f75kmgTwWqJRZJ1dTqHDnHWsy48emDU8v85hxAPg43k9aF7/zAwpA0MNNNk5T9Tx/DyUkK/KcyVP2f4p8tvovrkUvoxsZACkTUmFqKdq2x6/AGfjsCRmkpLhZuad7r5rKEXHRh8KYGHqD1Id8wcpy5AAAAFQCww3OekKcKMshMAwBK3XQmmYEGUwAAAIEAgjztlwh8OFYxwQve/RrhI2sceCXwS/yjQyH7q0zdWB9Fr4s/16T2PLBT+7M3vb+JlPDO3JRqgaYbel1kS2F2iKrY0EX0FI3/9fVDfWoz3mhCscPLriqy5AcsHitxQNfiZgA5wDiSjWpk1v+FbIC+VuqbKdQuE4MBKj19N9YALIUAAACABQ4NDsa2UBc8jsxvghjoLhUWF7HChaCksXQcL6i98VNRcemtPC6wpIri75iR4Uhv1666bDOBAdmIBX9Qf7A/+czPKPaj4CGI1hVy1pgYMa3btnEvoSnH/ONtjpOz9q+3up1OOOn+5fud7xjJn+Fq8WoGROgarBpCbQU3w2GUUnM= [email protected]
4 Corriendo al unísono
servidor1:
Ahora podemos ejecutar Unison por primera vez para sincronizar el directorio /var/www en ambos servidores. En el servidor1 ejecuta:
unison /var/www ssh://192.168.1.102//var/www
El resultado será similar a este:es posible que deba responder algunas preguntas, ya que es la primera vez que se ejecuta Unison:
[email protected]:/var/www# unison /var/www ssh://192.168.1.102//var/www
Contacting server...
Connected [//server1//var/www -> //server2//var/www]
Looking for changes
Warning: No archive files were found for these roots, whose canonical names are:
 /var/www
 //server2//var/www
This can happen either
because this is the first time you have synchronized these roots,
or because you have upgraded Unison to a new version with a different
archive format.
Update detection may take a while on this run if the replicas are
large.
Unison will assume that the 'last synchronized state' of both replicas
was completely empty. This means that any files that are different
will be reported as conflicts, and any files that exist only on one
replica will be judged as new and propagated to the other replica.
If the two replicas are identical, then no changes will be reported.
If you see this message repeatedly, it may be because one of your machines
is getting its address from DHCP, which is causing its host name to change
between synchronizations. See the documentation for the UNISONLOCALHOSTNAME
environment variable for advice on how to correct this.
Donations to the Unison project are gratefully accepted:
http://www.cis.upenn.edu/~bcpierce/unison
Press return to continue.[<spc>] <-- Press Enter
Waiting for changes from server
Reconciling changes
local server2
dir ----> example.com [f] <-- Press Enter
dir ----> example.de [f] <-- Press Enter
Proceed with propagating updates? [] <-- Enter "y"
Propagating updates
UNISON 2.40.102 started propagating changes at 10:17:17.94 on 25 Sep 2015
[BGN] Copying example.com from /var/www to //server2//var/www
[BGN] Copying example.de from /var/www to //server2//var/www
Shortcut: copied /var/www/example.de/web/index.html from local file /var/www/.unison.example.com.d3783bddaaf59b9ba4d2ed0433f9db63.unison.tmp/web/index.html
[END] Copying example.de
[END] Copying example.com
UNISON 2.40.102 finished propagating changes at 10:17:17.94 on 25 Sep 2015
Saving synchronizer state
Synchronization complete at 10:17:17 (2 items transferred, 0 skipped, 0 failed)
Verifique el directorio /var/www en el servidor1 y el servidor2 ahora, y debería encontrar que ahora están sincronizados.
Por supuesto, no queremos ejecutar Unison de forma interactiva, por lo que podemos crear un archivo de preferencias (/root/.unison/default.prf) que contiene todas las configuraciones que, de lo contrario, tendríamos que especificar en la línea de comando:
nano /root/.unison/default.prf
# Roots of the synchronization
root = /var/www
root = ssh://192.168.1.102//var/www

# Paths to synchronize
#path = current
#path = common
#path = .netscape/bookmarks.html

# Some regexps specifying names and paths to ignore
#ignore = Path stats    ## ignores /var/www/stats
#ignore = Path stats/*  ## ignores /var/www/stats/*
#ignore = Path */stats  ## ignores /var/www/somedir/stats, but not /var/www/a/b/c/stats
#ignore = Name *stats   ## ignores all files/directories that end with "stats"
#ignore = Name stats*   ## ignores all files/directories that begin with "stats"
#ignore = Name *.tmp    ## ignores all files with the extension .tmp

#          When set to true, this flag causes the user interface to skip
#          asking for confirmations on non-conflicting changes. (More
#          precisely, when the user interface is done setting the
#          propagation direction for one entry and is about to move to the
#          next, it will skip over all non-conflicting entries and go
#          directly to the next conflict.)
auto=true

#          When this is set to true, the user interface will ask no
#          questions at all. Non-conflicting changes will be propagated;
#          conflicts will be skipped.
batch=true

#          !When this is set to true, Unison will request an extra
#          confirmation if it appears that the entire replica has been
#          deleted, before propagating the change. If the batch flag is
#          also set, synchronization will be aborted. When the path
#          preference is used, the same confirmation will be requested for
#          top-level paths. (At the moment, this flag only affects the
#          text user interface.) See also the mountpoint preference.
confirmbigdel=true

#          When this preference is set to true, Unison will use the
#          modification time and length of a file as a `pseudo inode
#          number' when scanning replicas for updates, instead of reading
#          the full contents of every file. Under Windows, this may cause
#          Unison to miss propagating an update if the modification time
#          and length of the file are both unchanged by the update.
#          However, Unison will never overwrite such an update with a
#          change from the other replica, since it always does a safe
#          check for updates just before propagating a change. Thus, it is
#          reasonable to use this switch under Windows most of the time
#          and occasionally run Unison once with fastcheck set to false,
#          if you are worried that Unison may have overlooked an update.
#          The default value of the preference is auto, which causes
#          Unison to use fast checking on Unix replicas (where it is safe)
#          and slow checking on Windows replicas. For backward
#          compatibility, yes, no, and default can be used in place of
#          true, false, and auto. See the section "Fast Checking" for more
#          information.
fastcheck=true

#          When this flag is set to true, the group attributes of the
#          files are synchronized. Whether the group names or the group
#          identifiers are synchronizeddepends on the preference numerids.
group=true

#          When this flag is set to true, the owner attributes of the
#          files are synchronized. Whether the owner names or the owner
#          identifiers are synchronizeddepends on the preference
#          extttnumerids.
owner=true

#          Including the preference -prefer root causes Unison always to
#          resolve conflicts in favor of root, rather than asking for
#          guidance from the user. (The syntax of root is the same as for
#          the root preference, plus the special values newer and older.)
#          This preference is overridden by the preferpartial preference.
#          This preference should be used only if you are sure you know
#          what you are doing!
prefer=newer

#          When this preference is set to true, the textual user interface
#          will print nothing at all, except in the case of errors.
#          Setting silent to true automatically sets the batch preference
#          to true.
silent=true

#          When this flag is set to true, file modification times (but not
#          directory modtimes) are propagated.
times=true
Los comentarios deben hacer que el archivo se explique por sí mismo, excepto las directivas de ruta. Si no especifica directivas de ruta, los directorios de las directivas raíz se sincronizarán. Si especifica directivas de ruta, entonces las rutas son relativas a la ruta raíz (por ejemplo, root =/var/www y ruta =actual se traduce a /var/www/actual), y solo se sincronizarán estos subdirectorios, no todo el directorio especificado en la directiva raíz.
Puede obtener más información sobre las opciones disponibles consultando la página del manual de Unison:
man unison
Ahora que hemos puesto todas las configuraciones en un archivo de preferencias (especialmente las directivas raíz (y opcionalmente la ruta)), podemos ejecutar Unison sin ningún argumento:
unison
5 Creando un trabajo cron para Unison
servidor1:
Queremos automatizar la sincronización, por eso creamos un trabajo cron para ello en server1.example.com:
crontab -e
*/5 * * * * /usr/bin/unison &> /dev/null
Esto ejecutaría Unison cada 5 minutos; ajústelo a sus necesidades (ver
man 5 crontab
). Uso la ruta completa al unísono aquí (/usr/bin/unison) solo para asegurarme de que cron sepa dónde encontrar el unísono. Su ubicación al unísono puede diferir. Ejecutar
which unison
para saber dónde está el tuyo.
6 Prueba al unísono
Ahora probaré la sincronización bidireccional de Unison para ver si la configuración funciona por completo.
Ejecute el siguiente comando en el servidor1 para crear un archivo de prueba con el contenido "Prueba 1":
Servidor1
echo "Test 1" > /var/www/test.txt
Ahora espere al menos 5 minutos (ya que creamos un cronjob que se ejecuta una vez cada 5 minutos). Luego ejecute en el servidor2:
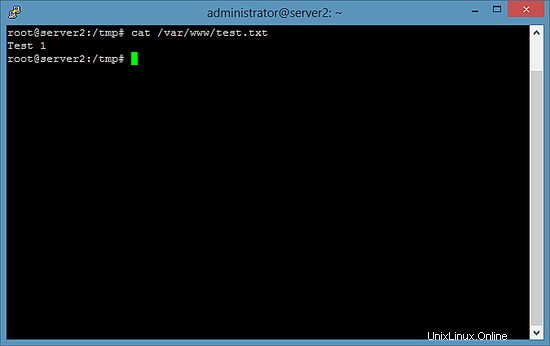
cat /var/www/test.txt
para mostrar el contenido del archivo test.txt en la pantalla. La salida debe ser similar a esta captura de pantalla.
Ahora ejecute este comando en el servidor2 que actualiza el contenido de nuestro archivo de prueba a "Prueba 2":
Servidor2
echo "Test 2" > /var/www/test.txt
Y espera al menos 5 minutos. Luego ejecute el comando cat en el servidor1:
Servidor1
cat /var/www/test.txt
El resultado debe ser como se muestra en la captura de pantalla.
7 Enlaces
- Unísono:http://www.cis.upenn.edu/~bcpierce/unison/
- Debian:http://www.debian.org/