Gitea es un sistema de control de versiones de código abierto y autohospedado escrito en Go. Es simple, liviano y se puede instalar en sistemas de baja potencia. Es una bifurcación de Gogs y una alternativa a GitHub y GitLab. Viene con muchas características que incluyen, editor de archivos de repositorio, seguimiento de problemas de proyectos, administración de usuarios, notificaciones, wiki incorporado y mucho más. Se puede instalar en todos los sistemas operativos modernos, incluidas las arquitecturas Linux, macOS, Windows, ARM y PowerPC.
En este tutorial, le mostraremos cómo instalar el servicio Gitea Git con Nginx y Let's Encrypt SSL en Ubuntu 20.04.
Requisitos
- Un servidor con Ubuntu 20.04.
- Un nombre de dominio válido apunta a su servidor.
- Se ha configurado una contraseña raíz en su servidor.
Instalar Git
Primero, deberá instalar el paquete Git en su servidor. Puede instalarlo ejecutando el siguiente comando:
apt-get install git -y
Una vez que el paquete Git esté instalado, puede continuar con el siguiente paso.
Instalar y configurar MariaDB
De forma predeterminada, MariaDB no está protegido. Por lo tanto, deberá asegurarlo primero. Puede asegurarlo ejecutando el script mysql_secure_installation:
mysql_secure_installation
Este script establecerá la contraseña de root, eliminará a los usuarios anónimos, no permitirá el inicio de sesión de root de forma remota y eliminará la base de datos de prueba como se muestra a continuación:
Enter current password for root (enter for none):
Set root password? [Y/n]: Y
Remove anonymous users? [Y/n]: Y
Disallow root login remotely? [Y/n]: Y
Remove test database and access to it? [Y/n]:  Y
Reload privilege tables now? [Y/n]:  Y
Una vez que MariaDB esté protegida, inicie sesión en el shell de MariaDB con el siguiente comando:
mysql -u root -p
Ingrese su contraseña de root cuando se le solicite. Luego, cambie GLOBAL innodeb_file_per_table a On:
MariaDB [(none)]>SET GLOBAL innodb_file_per_table = ON;
A continuación, cree una base de datos y un usuario para Gitea con el siguiente comando:
MariaDB [(none)]>CREATE DATABASE giteadb;
MariaDB [(none)]>CREATE USER 'gitea'@'localhost' IDENTIFIED BY 'password';
A continuación, otorgue todos los privilegios a la base de datos giteadb:
MariaDB [(none)]>GRANT ALL ON giteadb.* TO 'gitea'@'localhost' IDENTIFIED BY 'password' WITH GRANT OPTION;
A continuación, actualice el conjunto de caracteres de la base de datos con el siguiente comando:
MariaDB [(none)]>ALTER DATABASE giteadb CHARACTER SET = utf8mb4 COLLATE utf8mb4_unicode_ci;
Finalmente, elimine los privilegios y salga del shell de MariaDB con el siguiente comando:
MariaDB [(none)]>FLUSH PRIVILEGES;
MariaDB [(none)]>EXIT;
A continuación, deberá editar el archivo de configuración predeterminado de MariaDB y agregar parámetros de innodb:
nano /etc/mysql/mariadb.conf.d/50-server.cnf
Agregue las siguientes líneas dentro de la sección [mysqld]:
innodb_file_format = Barracuda
innodb_large_prefix = 1
innodb_default_row_format = dynamic
Guarde y cierre el archivo. Luego, reinicie el servicio MariaDB para aplicar los cambios:
systemctl restart mariadb
En este punto, su base de datos MariaDB está configurada. Ahora puede continuar con el siguiente paso.
Instalar y Configurar Gitea
Primero, deberá descargar la última versión del binario Gitea del repositorio de Git. Puedes descargarlo con el siguiente comando:
wget https://dl.gitea.io/gitea/1.12.1/gitea-1.12.1-linux-amd64
A continuación, copie el archivo descargado en el directorio /usr/bin/ y otorgue los permisos de ejecución:
cp gitea-1.12.1-linux-amd64 /usr/bin/gitea
chmod 755 /usr/bin/gitea
A continuación, cree un usuario del sistema para Gitea con el siguiente comando:
adduser --system --shell /bin/bash --group --disabled-password --home /home/git git
A continuación, cree una estructura de directorios para Gitea con el siguiente comando:
mkdir -p /etc/gitea /var/lib/gitea/{custom,data,indexers,public,log}
chown git:git /etc/gitea /var/lib/gitea/{custom,data,indexers,public,log}
chmod 750 /var/lib/gitea/{data,indexers,log}
chmod 770 /etc/gitea
Una vez que haya terminado, puede continuar con el siguiente paso.
Crear archivo de servicio Gitea Systemd
A continuación, deberá crear un archivo de servicio systemd para administrar el servicio de Gitea. Puedes crearlo con el siguiente comando:
nano /etc/systemd/system/gitea.service
Agregue las siguientes líneas:
[Unit]
Description=Gitea
After=syslog.target
After=network.target
After=mysql.service

[Service]
RestartSec=2s
Type=simple
User=git
Group=git
WorkingDirectory=/var/lib/gitea/
ExecStart=/usr/bin/gitea web -c /etc/gitea/app.ini
Restart=always
Environment=USER=git HOME=/home/git GITEA_WORK_DIR=/var/lib/gitea

[Install]
WantedBy=multi-user.target
Guarde y cierre el archivo. Luego, vuelva a cargar el demonio systemd e inicie el servicio Gitea con el siguiente comando:
systemctl daemon-reload
systemctl start gitea
Ahora puede verificar el estado del servicio de Gitea con el siguiente comando:
systemctl status gitea
Debería ver el siguiente resultado:
? gitea.service - Gitea
     Loaded: loaded (/etc/systemd/system/gitea.service; disabled; vendor preset: enabled)
     Active: active (running) since Thu 2020-06-25 08:23:01 UTC; 6s ago
   Main PID: 24046 (gitea)
      Tasks: 9 (limit: 2353)
     Memory: 134.3M
     CGroup: /system.slice/gitea.service
             ??24046 /usr/bin/gitea web -c /etc/gitea/app.ini

Jun 25 08:23:02 ubuntu20 gitea[24046]: 2020/06/25 08:23:02 routers/init.go:127:GlobalInit() [I] Delete all repository archives
Jun 25 08:23:02 ubuntu20 gitea[24046]: 2020/06/25 08:23:02 ...dules/setting/log.go:233:newLogService() [I] Gitea v1.12.1 built with GNU Make 4>
Jun 25 08:23:02 ubuntu20 gitea[24046]: 2020/06/25 08:23:02 ...dules/setting/log.go:279:newLogService() [I] Gitea Log Mode: Console(Console:inf>
Jun 25 08:23:02 ubuntu20 gitea[24046]: 2020/06/25 08:23:02 ...les/setting/cache.go:70:newCacheService() [I] Cache Service Enabled
Jun 25 08:23:02 ubuntu20 gitea[24046]: 2020/06/25 08:23:02 ...les/setting/cache.go:81:newCacheService() [I] Last Commit Cache Service Enabled
Jun 25 08:23:02 ubuntu20 gitea[24046]: 2020/06/25 08:23:02 ...s/setting/session.go:63:newSessionService() [I] Session Service Enabled
Jun 25 08:23:02 ubuntu20 gitea[24046]: 2020/06/25 08:23:02 routers/init.go:165:GlobalInit() [I] SQLite3 Supported
Jun 25 08:23:02 ubuntu20 gitea[24046]: 2020/06/25 08:23:02 routers/init.go:51:checkRunMode() [I] Run Mode: Development
Jun 25 08:23:03 ubuntu20 gitea[24046]: 2020/06/25 08:23:03 cmd/web.go:161:runWeb() [I] Listen: http://0.0.0.0:3000
Jun 25 08:23:03 ubuntu20 gitea[24046]: 2020/06/25 08:23:03 ...s/graceful/server.go:55:NewServer() [I] Starting new server: tcp:0.0.0.0:3000 on>
lines 1-19/19 (END)
A continuación, habilite el servicio de Gitea para que se inicie al reiniciar el sistema con el siguiente comando:
systemctl enable gitea
En este punto, Gitea se inicia y escucha en el puerto 3000. Ahora puede continuar con el siguiente paso.
Configurar Nginx para Gitea
De forma predeterminada, Gitea escucha en el puerto 3000. Por lo tanto, deberá configurar Nginx como proxy inverso para acceder a Gitea sin especificar el puerto.
Primero, instale el servidor web Nginx ejecutando el siguiente comando:
apt-get install nginx -y
Una vez instalado, cree un nuevo archivo de configuración de host virtual Nginx para Gitea:
nano /etc/nginx/sites-available/gitea
Agregue las siguientes líneas:
upstream gitea {
    server 127.0.0.1:3000;
}

server {
    listen 80;
    server_name gitea.linuxbuz.com;
    root /var/lib/gitea/public;
    access_log off;
    error_log off;

    location / {
      try_files maintain.html $uri $uri/index.html @node;
    }

    location @node {
      client_max_body_size 0;
      proxy_pass http://localhost:3000;
      proxy_set_header X-Forwarded-For $proxy_add_x_forwarded_for;
      proxy_set_header X-Real-IP $remote_addr;
      proxy_set_header Host $http_host;
      proxy_set_header X-Forwarded-Proto $scheme;
      proxy_max_temp_file_size 0;
      proxy_redirect off;
      proxy_read_timeout 120;
    }
}
Guarde y cierre el archivo. Luego, habilite el archivo de configuración del host virtual de Nginx con el siguiente comando:
ln -s /etc/nginx/sites-available/gitea /etc/nginx/sites-enabled/
Finalmente, reinicie el servicio Nginx con el siguiente comando:
systemctl restart nginx
También puede verificar el estado del servicio Nginx con el siguiente comando:
systemctl status nginx
Deberías obtener el siguiente resultado:
? nginx.service - A high performance web server and a reverse proxy server
     Loaded: loaded (/lib/systemd/system/nginx.service; enabled; vendor preset: enabled)
     Active: active (running) since Thu 2020-06-25 08:26:00 UTC; 1min 24s ago
       Docs: man:nginx(8)
    Process: 24866 ExecStartPre=/usr/sbin/nginx -t -q -g daemon on; master_process on; (code=exited, status=0/SUCCESS)
    Process: 24877 ExecStart=/usr/sbin/nginx -g daemon on; master_process on; (code=exited, status=0/SUCCESS)
   Main PID: 24879 (nginx)
      Tasks: 3 (limit: 2353)
     Memory: 3.6M
     CGroup: /system.slice/nginx.service
             ??24879 nginx: master process /usr/sbin/nginx -g daemon on; master_process on;
             ??24880 nginx: worker process
             ??24881 nginx: worker process

Jun 25 08:25:59 ubuntu20 systemd[1]: Starting A high performance web server and a reverse proxy server...
Jun 25 08:26:00 ubuntu20 systemd[1]: Started A high performance web server and a reverse proxy server.
En este punto, Nginx está configurado para servir a Gitea. Ahora puede continuar con el siguiente paso.
Asegure Gitea con Let's Encrypt SSL
Primero, deberá instalar el cliente Certbot para instalar y administrar Let's Encrypt SSL en su sistema. Puede instalarlo ejecutando el siguiente comando:
apt-get install certbot python3-certbot-nginx -y
Una vez que Certbot esté instalado, ejecute el siguiente comando para descargar e instalar el sitio web Let's Encrypt SSL para Gitea.
certbot --nginx -d gitea.linuxbuz.com
Proporcione su dirección de correo electrónico y acepte el término de servicio como se muestra a continuación:
Saving debug log to /var/log/letsencrypt/letsencrypt.log
Plugins selected: Authenticator nginx, Installer nginx
Enter email address (used for urgent renewal and security notices) (Enter 'c' to
cancel): [email protected]

- - - - - - - - - - - - - - - - - - - - - - - - - - - - - - - - - - - - - - - -
Please read the Terms of Service at
https://letsencrypt.org/documents/LE-SA-v1.2-November-15-2017.pdf. You must
agree in order to register with the ACME server at
https://acme-v02.api.letsencrypt.org/directory
- - - - - - - - - - - - - - - - - - - - - - - - - - - - - - - - - - - - - - - -
(A)gree/(C)ancel: A

- - - - - - - - - - - - - - - - - - - - - - - - - - - - - - - - - - - - - - - -
Would you be willing to share your email address with the Electronic Frontier
Foundation, a founding partner of the Let's Encrypt project and the non-profit
organization that develops Certbot? We'd like to send you email about our work
encrypting the web, EFF news, campaigns, and ways to support digital freedom.
- - - - - - - - - - - - - - - - - - - - - - - - - - - - - - - - - - - - - - - -
(Y)es/(N)o: Y
Obtaining a new certificate
Performing the following challenges:
http-01 challenge for gitea.linuxbuz.com
Waiting for verification...
Cleaning up challenges
Deploying Certificate to VirtualHost /etc/nginx/sites-enabled/gitea
A continuación, elija si desea o no redirigir el tráfico HTTP a HTTPS como se muestra a continuación:
Please choose whether or not to redirect HTTP traffic to HTTPS, removing HTTP access.
- - - - - - - - - - - - - - - - - - - - - - - - - - - - - - - - - - - - - - - -
1: No redirect - Make no further changes to the webserver configuration.
2: Redirect - Make all requests redirect to secure HTTPS access. Choose this for
new sites, or if you're confident your site works on HTTPS. You can undo this
change by editing your web server's configuration.
- - - - - - - - - - - - - - - - - - - - - - - - - - - - - - - - - - - - - - - -
Select the appropriate number [1-2] then [enter] (press 'c' to cancel): 2
Escriba 2 y presione Entrar para instalar el certificado como se muestra a continuación:
Redirecting all traffic on port 80 to ssl in /etc/nginx/sites-enabled/gitea

- - - - - - - - - - - - - - - - - - - - - - - - - - - - - - - - - - - - - - - -
Congratulations! You have successfully enabled https://gitea.linuxbuz.com

You should test your configuration at:
https://www.ssllabs.com/ssltest/analyze.html?d=gitea.linuxbuz.com
- - - - - - - - - - - - - - - - - - - - - - - - - - - - - - - - - - - - - - - -

IMPORTANT NOTES:
 - Congratulations! Your certificate and chain have been saved at:
   /etc/letsencrypt/live/gitea.linuxbuz.com/fullchain.pem
   Your key file has been saved at:
   /etc/letsencrypt/live/gitea.linuxbuz.com/privkey.pem
   Your cert will expire on 2020-09-23. To obtain a new or tweaked
   version of this certificate in the future, simply run certbot again
   with the "certonly" option. To non-interactively renew *all* of
   your certificates, run "certbot renew"
 - If you like Certbot, please consider supporting our work by:

   Donating to ISRG / Let's Encrypt:   https://letsencrypt.org/donate
   Donating to EFF:                    https://eff.org/donate-le
Ahora, su sitio web de Gitea está protegido con Let's Encrypt SSL. Ahora puede continuar con el siguiente paso.
Acceder a la interfaz web de Gitea
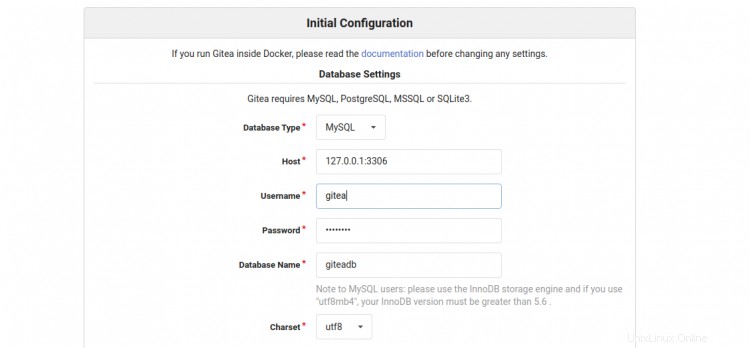
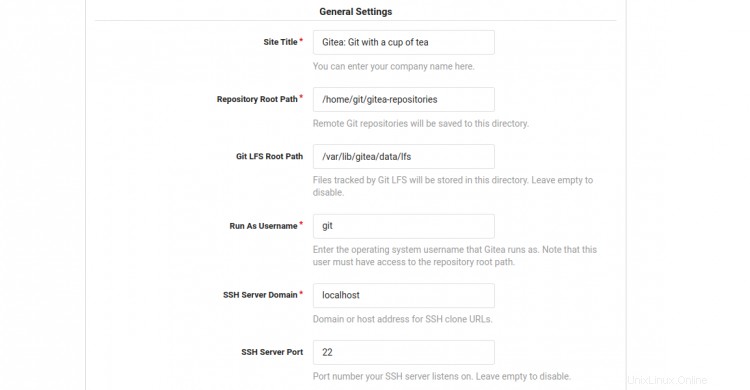
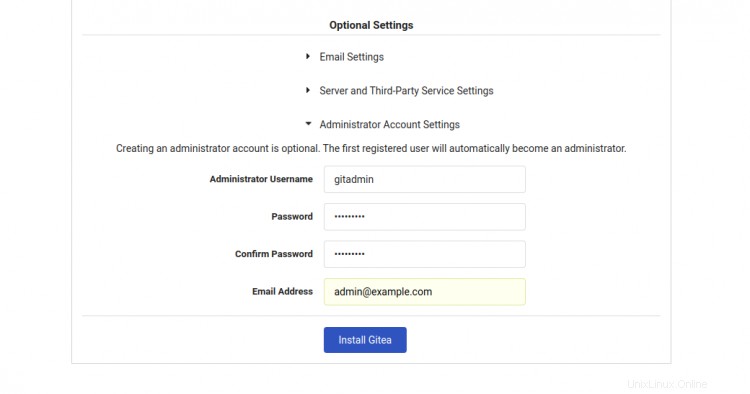
Ahora, abra su navegador web y escriba la URL https://gitea.linuxbuz.com/install. Será redirigido a la siguiente página:


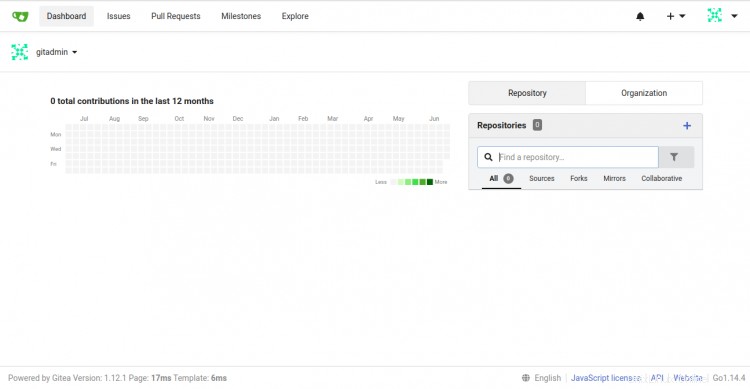
Proporcione su nombre de base de datos de Gitea, nombre de usuario, contraseña, ruta del repositorio, ejecutar como nombre de usuario, puerto de escucha, URL base de Gitea, ruta de registro, nombre de usuario de administrador de Gitea, contraseña y haga clic en Instalar Gitea botón. Una vez finalizada la instalación, debería ver el panel de control de Gitea en la siguiente pantalla:

Conclusión
¡Felicidades! ha instalado con éxito Gitea con Nginx y Let's Encrypt SSL en el servidor Ubuntu 20.04. Ahora puede explorar Gitea y crear su primer repositorio con Gitea. Para obtener más información, visite la documentación de Gitea.