Introducción
¿Qué es PostgreSQL?
PostgreSQL (también conocido como Postgres ) es un sistema de gestión de bases de datos relacionales (RDBMS) gratuito y de código abierto que hace hincapié en la extensibilidad y el cumplimiento de SQL. PostgreSQL se llamó originalmente POSTGRES, en referencia a sus orígenes como sucesor de Ingres base de datos. En 1996, se cambió el nombre del proyecto a PostgreSQL para reflejar su compatibilidad con SQL.
PostgreSQL presenta transacciones con propiedades de atomicidad, coherencia, aislamiento y durabilidad (ACID), vistas actualizables automáticamente, vistas materializadas, activadores, claves externas y procedimientos almacenados. Está diseñado para manejar una variedad de cargas de trabajo, desde máquinas individuales hasta almacenes de datos o servicios web con muchos usuarios simultáneos. Es la base de datos predeterminada para macOS. Server, y también está disponible para Linux, FreeBSD, OpenBSD y Windows.
¿Qué es pgAdmin?
pgAdmin es una herramienta de administración de interfaz gráfica de usuario (GUI) gratuita y de código abierto para servidores de bases de datos de Postgres.
Además, pgAdmin está disponible en interfaces web y de escritorio. pgAdmin es la más rica en funciones y la más popular entre las otras herramientas de administración para PostgreSQL.
Actualizar paquetes de servidor Linux
Actualice los paquetes del servidor Linux usando dnf comando.
# dnf update -yInstalación oficial de Postgres
Para instalar la última versión, debemos agregar el repositorio yum oficial de PostgreSQL en nuestro servidor Linux.
[root@unixcop ~]# dnf install https://download.postgresql.org/pub/repos/yum/reporpms/EL-8-x86_64/pgdg-redhat-repo-latest.noarch.rpm
Failed to set locale, defaulting to C.UTF-8
Last metadata expiration check: 21:31:22 ago on Sun Aug  8 10:39:31 2021.
pgdg-redhat-repo-latest.noarch.rpm               18 kB/s |  12 kB     00:00
Dependencies resolved.
================================================================================
 Package                 Architecture  Version        Repository           Size
================================================================================
Installing:
 pgdg-redhat-repo        noarch        42.0-19        @commandline         12 k

Transaction Summary
================================================================================
Install  1 Package

Total size: 12 k
Installed size: 12 k
Is this ok [y/N]: y
Downloading Packages:
Running transaction check
Transaction check succeeded.
Running transaction test
Transaction test succeeded.
Running transaction
  Preparing        :                                                        1/1
  Installing       : pgdg-redhat-repo-42.0-19.noarch                        1/1
  Verifying        : pgdg-redhat-repo-42.0-19.noarch                        1/1

Installed:
  pgdg-redhat-repo-42.0-19.noarch

Complete!
[root@unixcop ~]#
Deshabilite el módulo PostgreSQL en el repositorio yum estándar ejecutando el siguiente comando.
# dnf -qy module disable postgresqlInstalación del servidor de base de datos de Postgres en CentOS 8
Así que instale el servidor de base de datos Postgres 13 (más reciente en el momento de escribir este artículo) en su servidor Linux usando dnf comando.
[root@unixcop ~]# dnf install -y postgresql13-server
Last metadata expiration check: 0:01:38 ago on Mon Aug  9 10:31:26 2021.
Dependencies resolved.
======================================================================================================================================================
 Package                                    Architecture                  Version                                 Repository                     Size
======================================================================================================================================================
Installing:
 postgresql13-server                        x86_64                        13.3-2PGDG.rhel8                        pgdg13                        5.5 M
Installing dependencies:
 libicu                                     x86_64                        60.3-2.el8_1                            baseos                        8.8 M
 postgresql13                               x86_64                        13.3-2PGDG.rhel8                        pgdg13                        1.5 M
 postgresql13-libs                          x86_64                        13.3-2PGDG.rhel8                        pgdg13                        413 k

Transaction Summary
======================================================================================================================================================
Install  4 Packages

Total download size: 16 M
Installed size: 63 M
Downloading Packages:
(1/4): postgresql13-libs-13.3-2PGDG.rhel8.x86_64.rpm                                                                   69 kB/s | 413 kB     00:06
(2/4): postgresql13-13.3-2PGDG.rhel8.x86_64.rpm                                                                        92 kB/s | 1.5 MB     00:16
(3/4): postgresql13-server-13.3-2PGDG.rhel8.x86_64.rpm                                                                158 kB/s | 5.5 MB     00:35
(4/4): libicu-60.3-2.el8_1.x86_64.rpm                                                                                 190 kB/s | 8.8 MB     00:47
------------------------------------------------------------------------------------------------------------------------------------------------------
Total                                                                                                                 345 kB/s |  16 MB     00:48
warning: /var/cache/dnf/pgdg13-e81daebfc8b779ec/packages/postgresql13-13.3-2PGDG.rhel8.x86_64.rpm: Header V4 DSA/SHA1 Signature, key ID 442df0f8: NOKEY
PostgreSQL 13 for RHEL/CentOS 8 - x86_64                                                                              1.6 MB/s | 1.7 kB     00:00
Importing GPG key 0x442DF0F8:
 Userid     : "PostgreSQL RPM Building Project <[email protected]>"
 Fingerprint: 68C9 E2B9 1A37 D136 FE74 D176 1F16 D2E1 442D F0F8
 From       : /etc/pki/rpm-gpg/RPM-GPG-KEY-PGDG
Key imported successfully
Running transaction check
Transaction check succeeded.
Running transaction test
Transaction test succeeded.
Running transaction
  Preparing        :                                                                                                                              1/1
  Installing       : postgresql13-libs-13.3-2PGDG.rhel8.x86_64                                                                                    1/4
  Running scriptlet: postgresql13-libs-13.3-2PGDG.rhel8.x86_64                                                                                    1/4
  Installing       : libicu-60.3-2.el8_1.x86_64                                                                                                   2/4
  Running scriptlet: libicu-60.3-2.el8_1.x86_64                                                                                                   2/4
  Installing       : postgresql13-13.3-2PGDG.rhel8.x86_64                                                                                         3/4
  Running scriptlet: postgresql13-13.3-2PGDG.rhel8.x86_64                                                                                         3/4
  Running scriptlet: postgresql13-server-13.3-2PGDG.rhel8.x86_64                                                                                  4/4
  Installing       : postgresql13-server-13.3-2PGDG.rhel8.x86_64                                                                                  4/4
  Running scriptlet: postgresql13-server-13.3-2PGDG.rhel8.x86_64                                                                                  4/4
  Verifying        : libicu-60.3-2.el8_1.x86_64                                                                                                   1/4
  Verifying        : postgresql13-13.3-2PGDG.rhel8.x86_64                                                                                         2/4
  Verifying        : postgresql13-libs-13.3-2PGDG.rhel8.x86_64                                                                                    3/4
  Verifying        : postgresql13-server-13.3-2PGDG.rhel8.x86_64                                                                                  4/4

Installed:
  libicu-60.3-2.el8_1.x86_64                          postgresql13-13.3-2PGDG.rhel8.x86_64         postgresql13-libs-13.3-2PGDG.rhel8.x86_64
  postgresql13-server-13.3-2PGDG.rhel8.x86_64

Complete!
[root@unixcop ~]#
Debe ejecutar el siguiente comando una vez para inicializar la base de datos de Postgres.
[root@unixcop ~]# /usr/pgsql-13/bin/postgresql-13-setup initdb
Initializing database ... OK

[root@unixcop ~]#
También habilite, inicie y verifique el estado de la base de datos de Postgres con estos comandos.
[root@unixcop ~]# systemctl start postgresql-13
[root@unixcop ~]# systemctl enable postgresql-13
Created symlink /etc/systemd/system/multi-user.target.wants/postgresql-13.service → /usr/lib/systemd/system/postgresql-13.service.
[root@unixcop ~]# systemctl status postgresql-13
● postgresql-13.service - PostgreSQL 13 database server
   Loaded: loaded (/usr/lib/systemd/system/postgresql-13.service; enabled; vendor preset: disabled)
   Active: active (running) since Mon 2021-08-09 08:21:20 EDT; 21s ago
     Docs: https://www.postgresql.org/docs/13/static/
 Main PID: 2178 (postmaster)
    Tasks: 8 (limit: 11426)
   Memory: 16.8M
   CGroup: /system.slice/postgresql-13.service
           ├─2178 /usr/pgsql-13/bin/postmaster -D /var/lib/pgsql/13/data/
           ├─2179 postgres: logger
           ├─2181 postgres: checkpointer
           ├─2182 postgres: background writer
           ├─2183 postgres: walwriter
           ├─2184 postgres: autovacuum launcher
           ├─2185 postgres: stats collector
           └─2186 postgres: logical replication launcher

Aug 09 08:21:20 unixcop systemd[1]: Starting PostgreSQL 13 database server...
Aug 09 08:21:20 unixcop postmaster[2178]: 2021-08-09 08:21:20.237 EDT [2178] LOG:  redirecting log output to logging collector process
Aug 09 08:21:20 unixcop postmaster[2178]: 2021-08-09 08:21:20.237 EDT [2178] HINT:  Future log output will appear in directory "log".
Aug 09 08:21:20 unixcop systemd[1]: Started PostgreSQL 13 database server.
[root@unixcop ~]# systemctl is-enabled postgresql-13
enabled
[root@unixcop ~]#
También verifique la versión de PostgreSQL instalado.
[root@unixcop ~]# psql -V
psql (PostgreSQL) 13.3
[root@unixcop ~]#
Cambiar a postgres usuario y conéctese a psql shell para establecer la contraseña del usuario administrador.
[root@unixcop ~]# su - postgres
[postgres@unixcop ~]$ psql
psql (13.3)
Type "help" for help.

postgres=# ALTER USER postgres WITH PASSWORD 'unixcop';
ALTER ROLE
postgres=# \q
[postgres@unixcop ~]$ exit
logout
[root@unixcop ~]#
Configurar el acceso a la red para el servicio de base de datos de Postgres
Puede notar que el servicio PostgreSQL se ejecuta inicialmente solo en la interfaz localhost.
Por lo tanto, debe editar el archivo de configuración de PostgreSQL en vim editor de texto.
# vi /var/lib/pgsql/13/data/postgresql.confBusque la siguiente directiva allí.
# listen_addresses = 'localhost'Y reemplácelo con la siguiente directiva.
listen_addresses = '*'Su servicio de base de datos de Postgres ahora está configurado para escuchar en todas las interfaces de red.
Permita que los clientes de la red accedan al servicio PostgreSQL en pg_hba.conf archivo.
# echo "host all all 192.168.13.0/24 md5" >> /var/lib/pgsql/13/data/pg_hba.confReinicie el servicio de base de datos de Postgres para aplicar los cambios.
# systemctl restart postgresql-13.serviceEl servicio de Postgres ahora se está ejecutando en todas las interfaces de red.
Configurar el cortafuegos de Linux para la base de datos de Postgres
Permitiremos el servicio de Postgre usando el comando firewall-cmd.
[root@unixcop ~]# firewall-cmd --permanent --add-service=postgresql
success
[root@unixcop ~]# firewall-cmd --reload
success
[root@unixcop ~]#
Entonces, el servidor de base de datos Postgres se ha instalado en el servidor Linux.
Instalación del repositorio pgAdmin Yum en CentOS 8
pgAdmin es una interfaz web popular para la administración de bases de datos de bases de datos PostgreSQL.
Aunque pgAdmin también se proporciona dentro de los repositorios yum oficiales de PostgreSQL. Pero no funciona en nuestro servidor CentOS 8.
Por lo tanto, instalaremos la última versión estable de pgAdmin del repositorio oficial de yum de pgAdmin.
Debido a que agregaremos este repositorio de yum, primero debe eliminar los repositorios de yum de PostgreSQL de su servidor Linux.
# dnf remove -y pgdg-redhat-repoAgregue el repositorio yum oficial de pgAdmin en su sistema operativo Linux con el comando:
[root@unixcop ~]#  dnf install -y https://ftp.postgresql.org/pub/pgadmin/pgadmin4/yum/pgadmin4-redhat-repo-1-1.noarch.rpm
Last metadata expiration check: 1 day, 0:04:44 ago on Sun Aug  8 10:39:31 2021.
pgadmin4-redhat-repo-1-1.noarch.rpm                                                                                   5.6 kB/s | 6.6 kB     00:01
Dependencies resolved.
======================================================================================================================================================
 Package                                      Architecture                   Version                       Repository                            Size
======================================================================================================================================================
Installing:
 pgadmin4-redhat-repo                         noarch                         1-1                           @commandline                         6.6 k

Transaction Summary
======================================================================================================================================================
Install  1 Package

Total size: 6.6 k
Installed size: 4.0 k
Downloading Packages:
Running transaction check
Transaction check succeeded.
Running transaction test
Transaction test succeeded.
Running transaction
  Preparing        :                                                                                                                              1/1
  Installing       : pgadmin4-redhat-repo-1-1.noarch                                                                                              1/1
  Verifying        : pgadmin4-redhat-repo-1-1.noarch                                                                                              1/1

Installed:
  pgadmin4-redhat-repo-1-1.noarch

Complete!
[root@unixcop ~]#
Además, pgAdmin requiere algunos paquetes de software que no están disponibles en los repositorios estándar de yum.
Use el comando dnf e instale el repositorio EPEL yum.
# dnf install -y epel-releaseCree caché para repositorios yum recién instalados con el comando:
[root@unixcop ~]# dnf makecache
CentOS Linux 8 - AppStream                                                                                            2.6 kB/s | 4.3 kB     00:01
CentOS Linux 8 - BaseOS                                                                                               5.4 kB/s | 3.9 kB     00:00
CentOS Linux 8 - Extras                                                                                               2.8 kB/s | 1.5 kB     00:00
Extra Packages for Enterprise Linux Modular 8 - x86_64                                                                 21 kB/s |  36 kB     00:01
Extra Packages for Enterprise Linux 8 - x86_64                                                                         22 kB/s |  33 kB     00:01
pgadmin4                                                                                                              704  B/s | 833  B     00:01
pgadmin4                                                                                                              3.8 MB/s | 3.8 kB     00:00
Importing GPG key 0x210976F2:
 Userid     : "Package Manager (Package Signing Key) <[email protected]>"
 Fingerprint: E869 7E2E EF76 C02D 3A63 3277 8881 B2A8 2109 76F2
 From       : /etc/pki/rpm-gpg/PGADMIN_PKG_KEY
Is this ok [y/N]: y
pgadmin4                                                                                                              117 kB/s | 441 kB     00:03
Metadata cache created.
Instalación de la interfaz de usuario web de pgAdmin
Ahora puede instalar pgAdmin usando:
# dnf install -y pgadmin4NOTA IMPORTANTE:
Para configurar las políticas de SELinux, el script de configuración de pgAdmin requiere semanage comando, que se proporciona en los paquetes policycoreutils-python-utils. Por lo tanto, debe instalarlo antes de ejecutar el script de instalación de pgAdmin.
También puede visitar este enlace para solucionar este problema correctamente Cómo solucionar el error 'semanage command' Not Found en CentOS
# dnf install -y policycoreutils-python-utilsEl software pgAdmin viene con un script de configuración bien escrito para configurar el servicio web pgAdmin. Ejecútelo para crear un usuario administrador y un servidor web Apache para implementar el servicio web pgAdmin.
[root@unixcop ~]# /usr/pgadmin4/bin/setup-web.sh
Setting up pgAdmin 4 in web mode on a Redhat based platform...
Creating configuration database...
NOTE: Configuring authentication for SERVER mode.

Enter the email address and password to use for the initial pgAdmin user account:

Email address: [email protected]
Password:
Retype password:
pgAdmin 4 - Application Initialisation
======================================

Creating storage and log directories...
Configuring SELinux...

The Apache web server is not running. We can enable and start the web server for you to finish pgAdmin 4 installation. Continue (y/n)? y
Created symlink /etc/systemd/system/multi-user.target.wants/httpd.service → /usr/lib/systemd/system/httpd.service.
Apache successfully enabled.
Apache successfully started.
You can now start using pgAdmin 4 in web mode at http://127.0.0.1/pgadmin4
[root@unixcop ~]#
Inicie, habilite y verifique el estado del servicio httpd.
[root@unixcop ~]# systemctl start httpd
[root@unixcop ~]# systemctl enable httpd
Created symlink /etc/systemd/system/multi-user.target.wants/httpd.service → /usr/lib/systemd/system/httpd.service.
[root@unixcop ~]# systemctl status httpd
● httpd.service - The Apache HTTP Server
   Loaded: loaded (/usr/lib/systemd/system/httpd.service; enabled; vendor preset: disabled)
   Active: active (running) since Mon 2021-08-09 08:48:49 EDT; 16s ago
     Docs: man:httpd.service(8)
 Main PID: 3881 (httpd)
   Status: "Running, listening on: port 80"
    Tasks: 241 (limit: 11426)
   Memory: 44.2M
   CGroup: /system.slice/httpd.service
           ├─3881 /usr/sbin/httpd -DFOREGROUND
           ├─3882 /usr/sbin/httpd -DFOREGROUND
           ├─3883 /usr/sbin/httpd -DFOREGROUND
           ├─3884 /usr/sbin/httpd -DFOREGROUND
           ├─3885 /usr/sbin/httpd -DFOREGROUND
           └─3886 /usr/sbin/httpd -DFOREGROUND

Aug 09 08:48:47 unixcop systemd[1]: Starting The Apache HTTP Server...
Aug 09 08:48:47 unixcop httpd[3881]: [Mon Aug 09 08:48:47.749981 2021] [so:warn] [pid 3881:tid 140142522952000] AH01574: module wsgi_module is alread>
Aug 09 08:48:49 unixcop httpd[3881]: AH00558: httpd: Could not reliably determine the server's fully qualified domain name, using fe80::20c:29ff:feca>
Aug 09 08:48:49 unixcop systemd[1]: Started The Apache HTTP Server.
Aug 09 08:48:52 unixcop httpd[3881]: Server configured, listening on: port 80
lines 1-21/21 (END)
Configure el firewall de Linux para permitir el tráfico entrante al servidor web Apache
[root@unixcop ~]# firewall-cmd --permanent --add-service=http
success
[root@unixcop ~]# firewall-cmd --reload
success
[root@unixcop ~]#
Abrir URL http://tu_dirección_ip/pgadmin4/ en un navegador web.
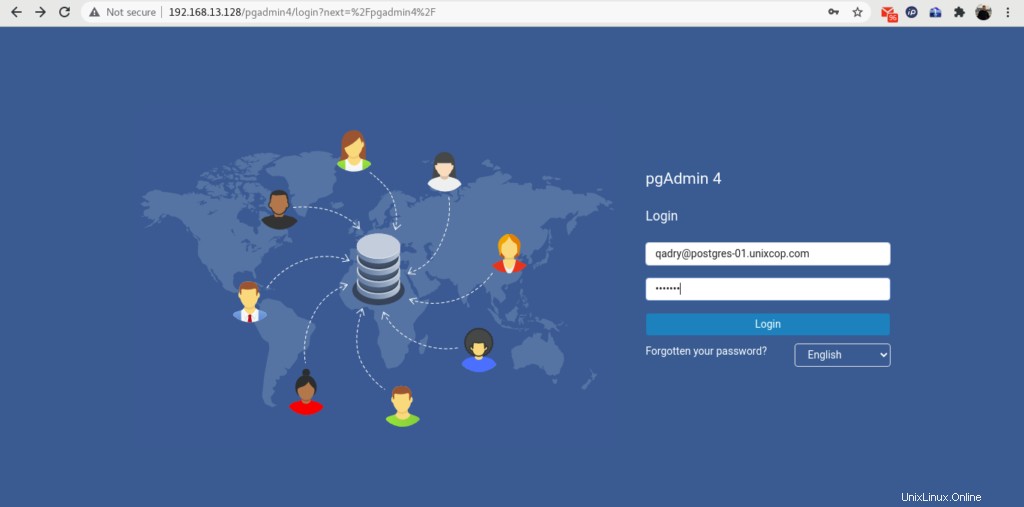
Inicie sesión en pgAdmin como usuario administrador que hemos creado por setup-web.sh guión.
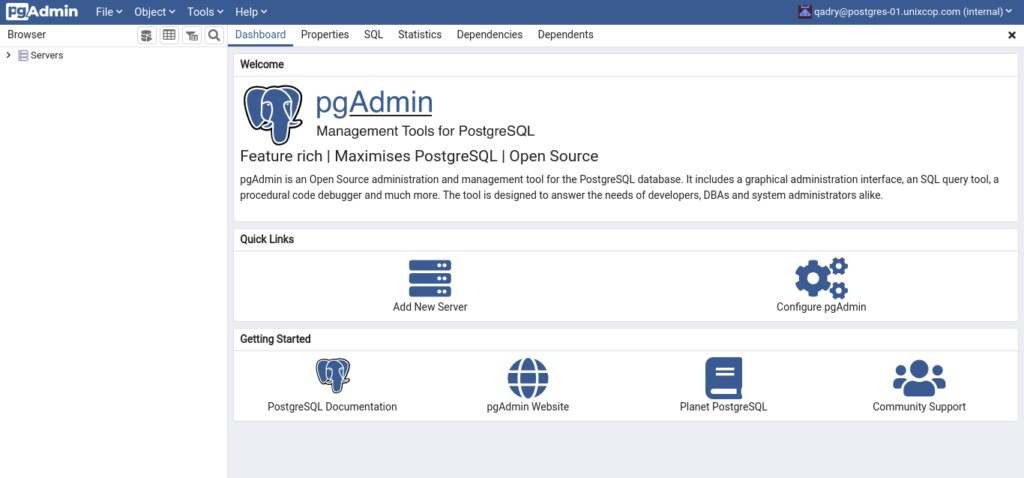
Para agregar su servidor de base de datos PostgreSQL en el inventario de pgAdmin, haga clic en “Agregar nuevo servidor”.
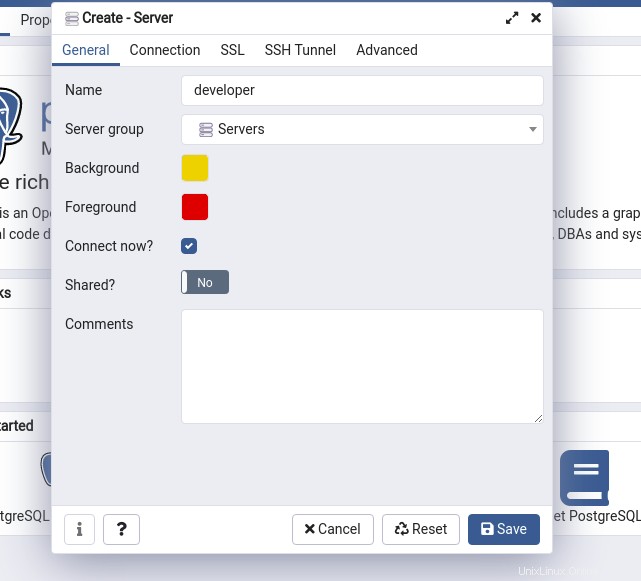
Proporcione el nombre del servidor y haga clic en “Conexión” pestaña.
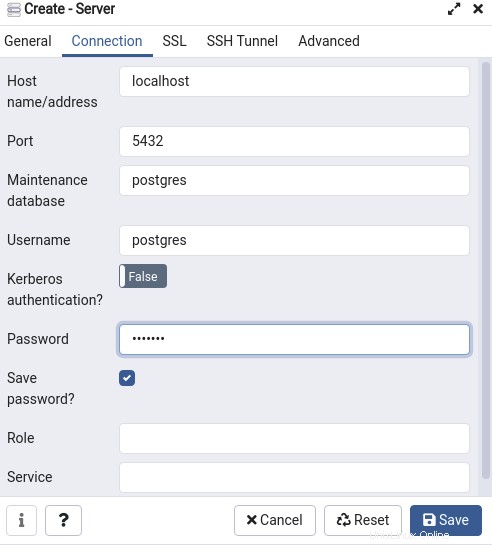
Proporcione la información de conexión de la base de datos en este cuadro de diálogo que creó.
Luego haga clic en "Guardar".
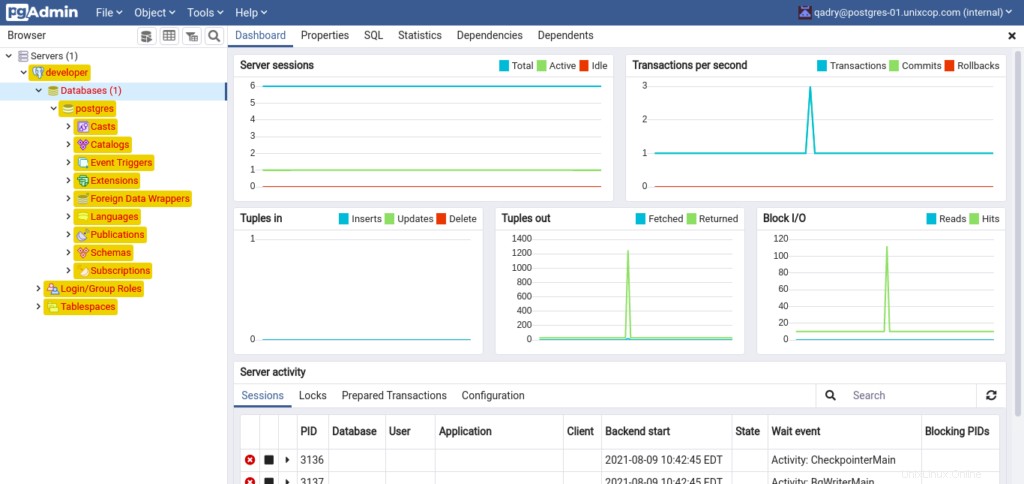
Nuestro servidor de base de datos Postgres se ha agregado en pgAdmin. Puede ver un árbol de su servidor de base de datos en el panel lateral izquierdo.
Conclusión
En este tutorial, ha aprendido a instalar PostgreSQL con pgAdmin en el servidor CentOS 8.