Let's Encrypt es una autoridad de certificación que proporciona certificados SSL gratuitos para el cifrado TLS, lanzado en abril de 2016.
Let's Encrypt no solo proporciona certificados SSL; también automatiza la creación, validación, firma, implementación y renovación de certificados para sitios web seguros.
Actualmente, Let's Encrypt admite la instalación automática de certificados en Apache, Nginx, Plex y Haproxy.
Requisitos
Le recomiendo que configure la pila LEMP en su sistema antes de continuar.
LEA: Cómo instalar la pila LEMP en Debian 10
LEA: Cómo instalar la pila LEMP en Debian 9
Configurar el certificado Let's Encrypt SSL con Nginx
Instalar Certbot
Para generar un certificado para su dominio, debe tener acceso a la terminal y al cliente Certbot ACME. El cliente de Certbot maneja la emisión e instalación de certificados sin tiempo de inactividad.
Certbot está disponible en el repositorio base de Debian. Por lo tanto, puede usar los siguientes comandos para instalarlo.
sudo apt update

sudo apt install -y certbot python-certbot-nginx
Crear servidor virtual
Ahora crearemos un host virtual para el dominio www.itzgeek.net.
Este host virtual sirve la versión HTTP de su dominio.sudo nano /etc/nginx/conf.d/www.itzgeek.net.conf
Utilice la siguiente información.
server {
   server_name www.itzgeek.net;
   root /opt/nginx/www.itzgeek.net;

   location / {
       index index.html index.htm index.php;
   }

   access_log /var/log/nginx/www.itzgeek.net.access.log;
   error_log /var/log/nginx/www.itzgeek.net.error.log;

   location ~ \.php$ {
      include /etc/nginx/fastcgi_params;
      fastcgi_pass 127.0.0.1:9000;
      fastcgi_index index.php;
      fastcgi_param SCRIPT_FILENAME /opt/nginx/www.itzgeek.net$fastcgi_script_name;
   }
}
Cree una raíz de documento para almacenar archivos HTML.
sudo mkdir -p /opt/nginx/www.itzgeek.net
Cambia el permiso del directorio.
sudo chown -R nginx:nginx /opt/nginx/www.itzgeek.net
Coloque el archivo HTML de muestra en la raíz del documento de su dominio.
echo "This is a test site @ www.itzgeek.net" | sudo tee /opt/nginx/www.itzgeek.net/index.html
Reinicie el servicio Nginx.
sudo systemctl restart nginx
Crear/Actualizar Registro DNS
Acceda a su herramienta de administración de DNS o registrador de dominios y cree un registro A/CNAME para el dominio. Ej:www.itzgeek.net.

Espere un tiempo para permitir que el registro se propague.
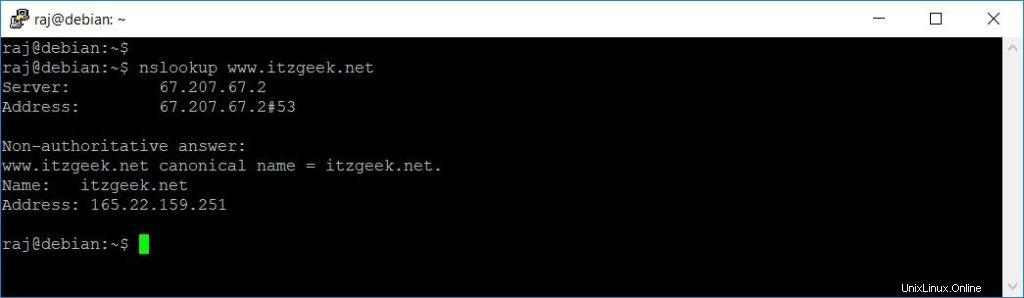
Compruebe la propagación de DNS con la utilidad Nslookup sudo apt install -y dnsutils.
Instalar certificado Let's Encrypt
Use el comando certbot para crear un certificado de Let's Encrypt y configure Nginx para usar el certificado.
sudo certbot --nginx
Siga las indicaciones interactivas e instale el certificado.
Saving debug log to /var/log/letsencrypt/letsencrypt.log
Plugins selected: Authenticator nginx, Installer nginx
Enter email address (used for urgent renewal and security notices) (Enter 'c' to
cancel): [email protected]  << Enter Email ID

- - - - - - - - - - - - - - - - - - - - - - - - - - - - - - - - - - - - - - - -
Please read the Terms of Service at
https://letsencrypt.org/documents/LE-SA-v1.2-November-15-2017.pdf. You must
agree in order to register with the ACME server at
https://acme-v02.api.letsencrypt.org/directory
- - - - - - - - - - - - - - - - - - - - - - - - - - - - - - - - - - - - - - - -
(A)gree/(C)ancel: A  << Agree to Terms and Conditions

- - - - - - - - - - - - - - - - - - - - - - - - - - - - - - - - - - - - - - - -
Would you be willing to share your email address with the Electronic Frontier
Foundation, a founding partner of the Let's Encrypt project and the non-profit
organization that develops Certbot? We'd like to send you email about our work
encrypting the web, EFF news, campaigns, and ways to support digital freedom.
- - - - - - - - - - - - - - - - - - - - - - - - - - - - - - - - - - - - - - - -
(Y)es/(N)o: Y  << Subscriber to Newsletter

Which names would you like to activate HTTPS for?
- - - - - - - - - - - - - - - - - - - - - - - - - - - - - - - - - - - - - - - -
1: www.itzgeek.net
- - - - - - - - - - - - - - - - - - - - - - - - - - - - - - - - - - - - - - - -
Select the appropriate numbers separated by commas and/or spaces, or leave input
blank to select all options shown (Enter 'c' to cancel): 1  << Choose Site to Install Let's Encrypt
Obtaining a new certificate
Performing the following challenges:
http-01 challenge for www.itzgeek.net
Waiting for verification...
Cleaning up challenges
Deploying Certificate to VirtualHost /etc/nginx/conf.d/www.itzgeek.net.conf

Please choose whether or not to redirect HTTP traffic to HTTPS, removing HTTP access.
- - - - - - - - - - - - - - - - - - - - - - - - - - - - - - - - - - - - - - - -
1: No redirect - Make no further changes to the webserver configuration.
2: Redirect - Make all requests redirect to secure HTTPS access. Choose this for
new sites, or if you're confident your site works on HTTPS. You can undo this
change by editing your web server's configuration.
- - - - - - - - - - - - - - - - - - - - - - - - - - - - - - - - - - - - - - - -
Select the appropriate number [1-2] then [enter] (press 'c' to cancel): 2  << Redirect HTTP to HTTPS
Redirecting all traffic on port 80 to ssl in /etc/nginx/conf.d/www.itzgeek.net.conf

- - - - - - - - - - - - - - - - - - - - - - - - - - - - - - - - - - - - - - - -
Congratulations! You have successfully enabled https://www.itzgeek.net

You should test your configuration at:
https://www.ssllabs.com/ssltest/analyze.html?d=www.itzgeek.net
- - - - - - - - - - - - - - - - - - - - - - - - - - - - - - - - - - - - - - - -

IMPORTANT NOTES:
 - Congratulations! Your certificate and chain have been saved at:
   /etc/letsencrypt/live/www.itzgeek.net/fullchain.pem
   Your key file has been saved at:
   /etc/letsencrypt/live/www.itzgeek.net/privkey.pem
   Your cert will expire on 2019-10-28. To obtain a new or tweaked
   version of this certificate in the future, simply run certbot again
   with the "certonly" option. To non-interactively renew *all* of
   your certificates, run "certbot renew"
 - Your account credentials have been saved in your Certbot
   configuration directory at /etc/letsencrypt. You should make a
   secure backup of this folder now. This configuration directory will
   also contain certificates and private keys obtained by Certbot so
   making regular backups of this folder is ideal.
 - If you like Certbot, please consider supporting our work by:

   Donating to ISRG / Let's Encrypt:   https://letsencrypt.org/donate
   Donating to EFF:                    https://eff.org/donate-le
Redirigir solicitudes HTTP que no sean www a www HTTPS con Nginx (opcional)
Ahora configuraremos el servidor Nginx para redirigir el tráfico que proviene del sitio HTTP que no es www al sitio WW HTTPS, es decir, http://itzgeek.net>> https://www.itzgeek.net .
Aquí, editaremos el mismo archivo de configuración que creamos para la versión HTTP del sitio.
sudo nano /etc/nginx/conf.d/www.itzgeek.net.conf
Agregue la siguiente información al final del archivo.
# Redirect NON-WWW HTTP to WWW HTTPS

server {
    if ($host = itzgeek.net) {
        return 301 https://www.itzgeek.net$request_uri;
    }


   server_name itzgeek.net;
    listen 80;
    return 404;

}
Reinicie el servicio Nginx.
sudo systemctl restart nginx
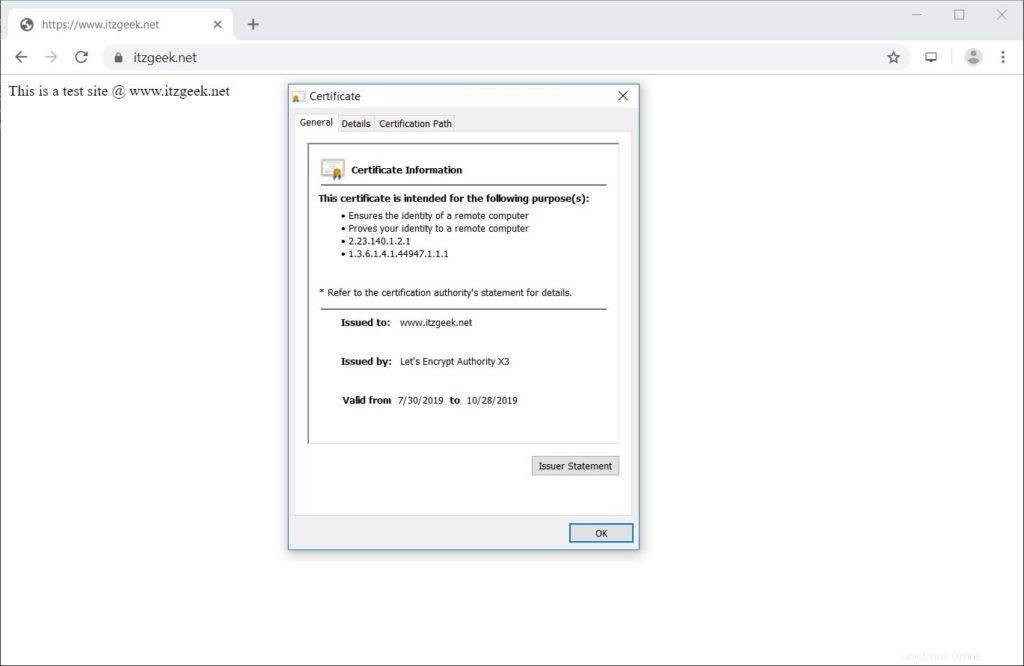
Verificar el certificado Let's Encrypt
Verifique el certificado de Let's Encrypt visitando su sitio web.
http://tu-http-sitio-webO
https://tu-https-sitio-webDebería obtener la versión HTTPS de su sitio ahora.
Certificado SSL de prueba
Pruebe su certificado SSL en busca de problemas y sus clasificaciones de seguridad yendo a la siguiente URL.
https://www.ssllabs.com/ssltest/analyze.html?d=www.itzgeek.net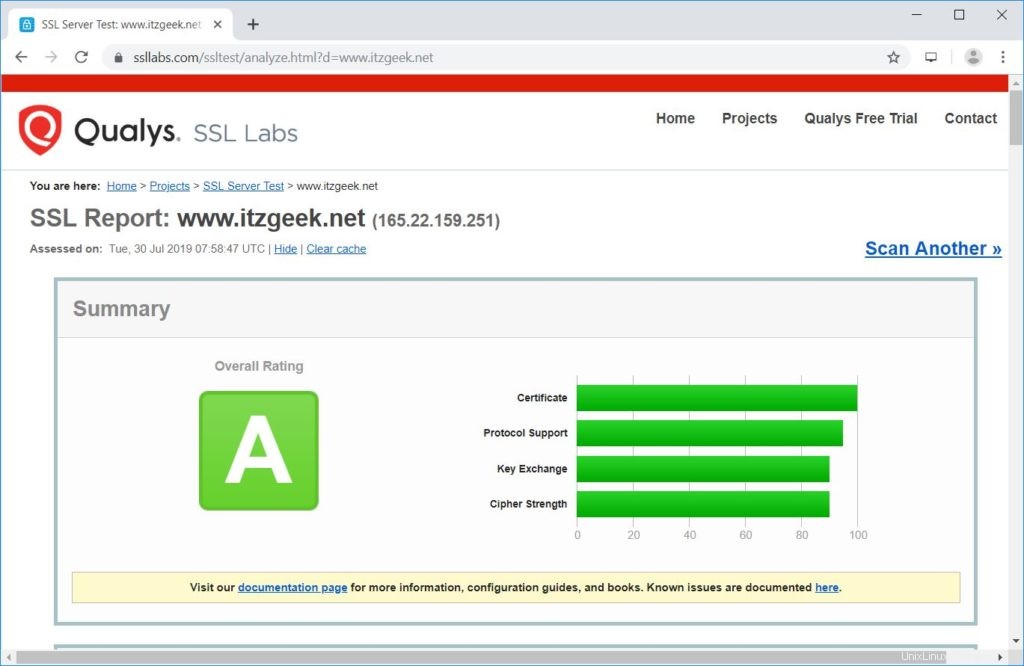
Renovar el certificado de Let's Encrypt
Los certificados de Let's Encrypt tienen una validez de 90 días, y es muy recomendable renovar sus certificados antes de que caduquen. Gracias a la entrada del programador integrada /etc/cron.d/certbot que se ejecuta dos veces al día para renovar los certificados que están a punto de caducar.
Pero le recomiendo que ejecute el siguiente comando para simular la renovación automática de su certificado.
sudo certbot renew --dry-run
Salida:
Saving debug log to /var/log/letsencrypt/letsencrypt.log

- - - - - - - - - - - - - - - - - - - - - - - - - - - - - - - - - - - - - - - -
Processing /etc/letsencrypt/renewal/www.itzgeek.net.conf
- - - - - - - - - - - - - - - - - - - - - - - - - - - - - - - - - - - - - - - -
Cert not due for renewal, but simulating renewal for dry run
Plugins selected: Authenticator nginx, Installer nginx
Renewing an existing certificate
Performing the following challenges:
http-01 challenge for www.itzgeek.net
Waiting for verification...
Cleaning up challenges

- - - - - - - - - - - - - - - - - - - - - - - - - - - - - - - - - - - - - - - -
new certificate deployed with reload of nginx server; fullchain is
/etc/letsencrypt/live/www.itzgeek.net/fullchain.pem
- - - - - - - - - - - - - - - - - - - - - - - - - - - - - - - - - - - - - - - -

- - - - - - - - - - - - - - - - - - - - - - - - - - - - - - - - - - - - - - - -
** DRY RUN: simulating 'certbot renew' close to cert expiry
**          (The test certificates below have not been saved.)

Congratulations, all renewals succeeded. The following certs have been renewed:
  /etc/letsencrypt/live/www.itzgeek.net/fullchain.pem (success)
** DRY RUN: simulating 'certbot renew' close to cert expiry
**          (The test certificates above have not been saved.)
- - - - - - - - - - - - - - - - - - - - - - - - - - - - - - - - - - - - - - - -

IMPORTANT NOTES:
 - Your account credentials have been saved in your Certbot
   configuration directory at /etc/letsencrypt. You should make a
   secure backup of this folder now. This configuration directory will
   also contain certificates and private keys obtained by Certbot so
   making regular backups of this folder is ideal.
Si el resultado confirma que la renovación está funcionando correctamente, la renovación automática ocurrirá como se esperaba.
Conclusión
Eso es todo. Espero que haya aprendido a configurar el certificado Let's Encrypt SSL con Nginx en Debian 10. Comparta sus comentarios en la sección de comentarios.