Naemon es la nueva suite de monitoreo que pretende ser rápida, estable e innovadora mientras le brinda una visión clara del estado de su red y aplicaciones. Este es un reemplazo para el servidor nagios y es muy estable y utiliza un tablero increíble llamado thruk. Configurar naemon es muy fácil y tiene un estado activo incorporado. En este tutorial, le mostraré cómo instalar y configurar naemon en un entorno de producción junto con pnp4nagios para gráficos. Naemon es muy estable, le mostraré cómo mantener las configuraciones en un entorno a gran escala.
En este tutorial, usaré cuatro servidores
- 192.168.1.170 - Servidor Naemon - centos 7
- 192.168.1.21 - cliente nrpe - centos 6
- 192.168.1.182 - cliente nrpe - ubuntu
- 192.168.1.75 - cliente nscp - servidor de Windows 2012R2
Instalación del Servidor Naemon
Estoy usando un host CentOS 7 con una instalación mínima, SELinux deshabilitado y firewalld habilitado.
[[email protected] ~]# sestatus
SELinux status:                 disabled
[[email protected] ~]#
Instalando el repositorio:
[[email protected] ~]# yum -y install https://labs.consol.de/repo/stable/rhel7/x86_64/labs-consol-stable.rhel7.noarch.rpm
habilitando el repositorio de epel:
yum -y install epel-release
Instalando el paquete Naemon:
[[email protected] ~]# yum install naemon*
Naemon usa el mismo complemento de Nagios y nrpe para monitorear hosts. Ahora los instalaremos:
[[email protected] ~]# yum install nagios-plugins nagios-plugins-all nagios-plugins-nrpe nrpe -y
Agregaremos las reglas de firewall:
[[email protected] ~]# firewall-cmd --add-service=http --permanent
success
[[email protected] ~]# firewall-cmd --add-service=https --permanent
success
[[email protected] ~]# firewall-cmd --reload
success
[[email protected] ~]# firewall-cmd --list-all
public (active)
  target: default
  icmp-block-inversion: no
  interfaces: eno16777736
  sources:
  services: dhcpv6-client http https ssh
  ports:
  protocols:
  masquerade: no
  forward-ports:
  sourceports:
  icmp-blocks:
  rich rules:

[[email protected] ~]#
Instalación de pnp4nagios.
yum install gcc-c++ rrdtool perl-Time-HiRes perl-rrdtool php-gd php php-cli wget
Descargando pnp4nagios.
[[email protected] ~]# wget https://svwh.dl.sourceforge.net/project/pnp4nagios/PNP-0.6/pnp4nagios-0.6.25.tar.gz
    [[email protected] ~]# tar -zxvf pnp4nagios-0.6.25.tar.gz
    [[email protected] ~]# cd pnp4nagios-0.6.25/
[[email protected] pnp4nagios-0.6.25]# ./configure --with-nagios-user=naemon --with-nagios-group=naemon
[[email protected] pnp4nagios-0.6.25]# make all
[[email protected] pnp4nagios-0.6.25]# make fullinstall
[[email protected] pnp4nagios-0.6.25]# make install-webconf
[[email protected] pnp4nagios-0.6.25]# make install-config
[[email protected] pnp4nagios-0.6.25]# make install-init
Reiniciando y habilitando el servicio.
    [[email protected] ~]# systemctl enable httpd && systemctl restart httpd
[[email protected] ~]# systemctl enable naemon && systemctl restart naemon
[[email protected] ~]# systemctl enable thruk && systemctl restart thruk
[[email protected] ~]# systemctl enable npcd && systemctl restart npcd
debería poder acceder a la URL desde http://192.168.1.170/thruk
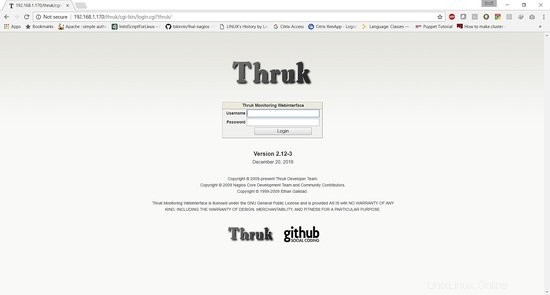
El nombre de usuario predeterminado es thrukadmin, la contraseña es thrukadmin.
En caso de que quiera cambiar la contraseña de thrukadmin, ejecute:
[[email protected] ~]# htpasswd /etc/thruk/htpasswd thrukadmin
Instalación de Monitoring Client para monitorear los nodos
Instalación de clientes nrpe para monitorear hosts Linux
192.168.1.21 - cliente nrpe - centos 6
Instalación del plugin de Nagios y cliente nrpe:
[[email protected] ~]# yum install nagios-plugins nagios-plugins-all nagios-plugins-nrpe nrpe -y
Realice una copia de seguridad de nrpe.cfg:
[[email protected] ~]# cp /etc/nagios/nrpe.cfg /etc/nagios/nrpe.cfg.bkp
Reemplace el contenido del archivo nrpe.conf con el siguiente contenido:
[[email protected] ~]# cat /etc/nagios/nrpe.cfg
log_facility=daemon
pid_file=/var/run/nrpe/nrpe.pid
nrpe_user=nrpe
nrpe_group=nrpe
allowed_hosts=127.0.0.1,192.168.1.170
dont_blame_nrpe=1
debug=0
command_timeout=60
connection_timeout=300
include_dir=/etc/nrpe.d/

[[email protected] ~]#
Debajo de allow_host agregue la dirección IP del servidor naemon aquí es 192.168.1.170.
Ahora necesitamos reiniciar el servicio nrpe:
	[[email protected] ~]# service nrpe restart
	[[email protected] ~]# chkconfig nrpe on
192.168.1.182 - cliente nrpe - ubuntu
[email protected]:~# apt-get install nagios-nrpe-server nagios-plugins -y
Realice una copia de seguridad de nrpe.cfg:
[[email protected] ~]# cp /etc/nagios/nrpe.cfg /etc/nagios/nrpe.cfg.bkp
Reemplace el contenido del archivo nrpe.conf con el siguiente contenido:
[email protected]:~# cat /etc/nagios/nrpe.cfg
log_facility=daemon
pid_file=/var/run/nagios/nrpe.pid
nrpe_user=nagios
nrpe_group=nagios
allowed_hosts=127.0.0.1,192.168.1.170
dont_blame_nrpe=1
debug=0
command_timeout=60
connection_timeout=300
include_dir=/etc/nagios/nrpe.d/
[email protected]:~#
Ahora necesitamos reiniciar el servicio nrpe:
	[email protected]:~# systemctl restart nagios-nrpe-server.service
	[email protected]:~# systemctl enable nagios-nrpe-server.service
Instalación de Nscp en Windows
192.168.1.75 - cliente nscp - servidor windows 2012R2
Descargue nscp de este sitio web:
https://www.nsclient.org/download/
Una vez descargado, siga las capturas de pantalla de instalación
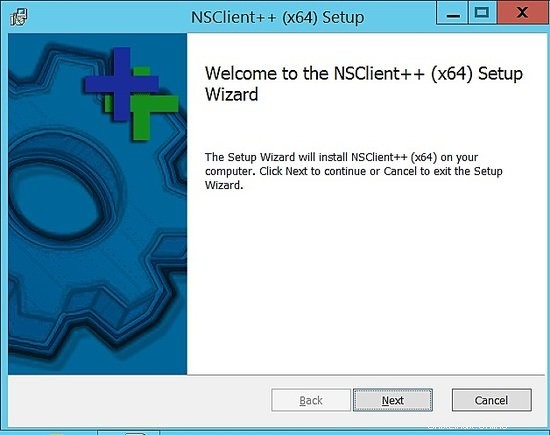
Elija genérico.
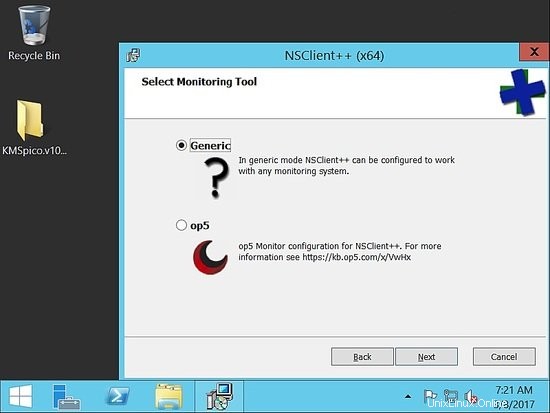
Elija completar:
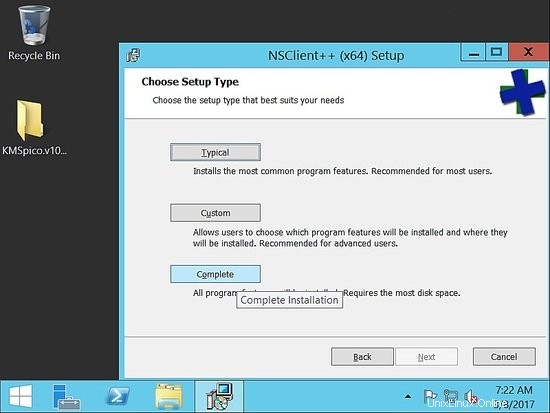
Elija la ruta predeterminada:
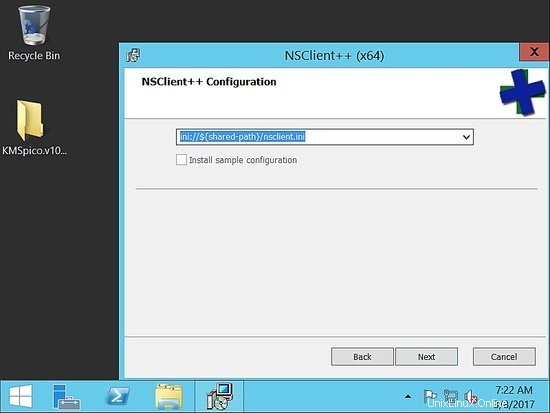
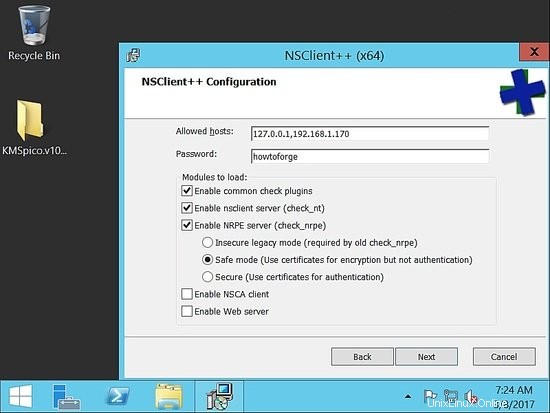
Ahora, en hosts permitidos, agregue el host naemon. Aquí en nuestra configuración es 192.168.1.170.
Asegúrese de proporcionar una contraseña compleja. Para este ejemplo, he usado la contraseña como "howtoforge". A continuación, compruebe habilitar nsclient y nrpe.
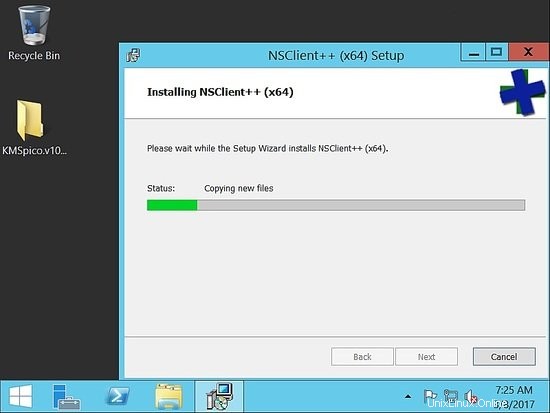
Una vez completada la instalación, asegúrese de que el servicio esté activo y funcionando.
Ahora validaremos desde el host naemon, para asegurarnos de que podamos alcanzarlo.
Validar nrpe y nscp desde el servidor Naemon para comprobar la conectividad
[[email protected] ~]# /usr/lib64/nagios/plugins/check_nrpe -H 192.168.1.182
NRPE v2.15
[[email protected] ~]# /usr/lib64/nagios/plugins/check_nrpe -H 192.168.1.21
NRPE v2.15
[[email protected] ~]#
[[email protected] ~]# /usr/lib64/nagios/plugins/check_nt -H 192.168.1.75 -p 12489 -v CLIENTVERSION -s 'howtoforge'
NSClient++ 0.5.0.62 2016-09-14
[[email protected] ~]#
Monitoreo de Servidores
Supervisaremos el rendimiento del servidor en este tutorial.
En un entorno de producción, necesitaremos monitorear la utilización de la CPU, la memoria y el disco duro, junto con la verificación del host activo.
Agregar las siguientes líneas en nrpe conf /etc/nrpe.d/base.cfg
192.168.1.21 - cliente nrpe - centos 6
  [[email protected] ~]# cat /etc/nrpe.d/base.cfg
command[check_disks]=/usr/lib64/nagios/plugins/check_disk -w $ARG1$ -c $ARG2$ -p $ARG3$
command[check_disk]=/usr/lib64/nagios/plugins/check_disk -X nfs -X cifs -X none -X tmpfs -w $ARG1$ -c $ARG2$
command[memory]=/usr/lib64/nagios/plugins/check_memory -w $ARG1$ -c $ARG2$
command[load]=/usr/lib64/nagios/plugins/check_load -w $ARG1$ -c $ARG2$
command[check_total_procs]=/usr/lib64/nagios/plugins/check_procs -w $ARG1$ -c $ARG2$
command[check_procs_c]=/usr/lib64/nagios/plugins/check_procs -c $ARG1$ -C $ARG2$
command[check_procs_a]=/usr/lib64/nagios/plugins/check_procs -c $ARG1$ -a $ARG2$
Guarde y reinicie el archivo, luego reinicie nrpe.
[[email protected] ~]# /etc/init.d/nrpe restart
Shutting down nrpe:                                        [FAILED]
Starting nrpe:                                             [  OK  ]
[[email protected] ~]#
El complemento de memoria no estará disponible como complemento predeterminado. Usaremos el siguiente complemento.
 [[email protected] ~]# cd  /usr/lib64/nagios/plugins/
 [[email protected] plugins]# vim check_memory
Agrega el siguiente contenido.
#! /usr/bin/perl -w
##Included Perf data
#The nagios plugins come with ABSOLUTELY NO WARRANTY. You may redistribute
#copies of the plugins under the terms of the GNU General Public License.
#
use strict;
use Getopt::Long;

my ($opt_f, $opt_h, $opt_c, $opt_w);
my ($result, $message, $ram_percent);

my $PROGNAME="check_memory";

$opt_f = "";

Getopt::Long::Configure('bundling');
GetOptions(
        "h"   => \$opt_h, "help"        => \$opt_h,
        "c=s" => \$opt_c, "Warning_Percentage"  => \$opt_c,
        "w=s" => \$opt_w, "Critical_Percentage" => \$opt_w,
);

if ($opt_h) {
        &print_help();
        exit 0;
}

$opt_w = shift unless ($opt_w);
$opt_c = shift unless ($opt_c);

if (! $opt_c && ! $opt_w) {
        print "Warning and Critical must be specified\n";
        exit 3;
}
if ($opt_c <= $opt_w){
        print "Critical must be greater than Warning CRITICAL: $opt_c WARNING: $opt_w\n";
        exit 3;
}


$result = 'OK';
open(FREE_M, "free -m|");
while (my $line = ){
        if ($line =~ /^Mem/){
                my ($junk,$total_mem,$used_mem,$free_mem,$shared_mem,$buffered_mem,$cached_mem)=split(/\s+/,$line);
                $ram_percent=int(($total_mem-($free_mem+$cached_mem+$buffered_mem))/$total_mem*100*100)/100;

        }
}
close(FREE_M);

if ($ram_percent > $opt_c){
print "Memory usage is: CRITICAL: ${ram_percent}% used | used=$ram_percent;$opt_w;$opt_c\n";
exit 2;
}elsif ($ram_percent > $opt_w) {
print "Memory usage is: WARNING: ${ram_percent}% used | used=$ram_percent;$opt_w;$opt_c\n";
exit 1;
}
else{
print "Memory usage is: $result: ${ram_percent}% used | used=$ram_percent;$opt_w;$opt_c\n";
exit 0;
}

sub print_usage () {
        print "Usage:\n";
        print "  $PROGNAME -f \n";
        print "  $PROGNAME -c \n";
        print "  $PROGNAME -w \n";
        print "  $PROGNAME [-h | --help]\n";
        print "  $PROGNAME [-V | --version]\n";
}

sub print_help () {
        print << EOF;
$PROGNAME v1.0.01
The nagios plugins come with ABSOLUTELY NO WARRANTY. You may redistribute
copies of the plugins under the terms of the GNU General Public License.
EOF
        &print_usage();
        print "\n";
        exit 3;
}
Enlace de descarga complemento check_memory
Tienes que dar permisos de ejecución al archivo:
[[email protected] plugins]# chmod 755 check_memory
Agregar las siguientes líneas en nrpe conf /etc/nagios/nrpe.d/base.cfg
192.168.1.182 - cliente nrpe - ubuntu
Aquí la ruta del archivo es diferente:
La carpeta del complemento es lib y no lib64.
  [email protected]:~# cat /etc/nagios/nrpe.d/base.cfg
command[check_disks]=/usr/lib/nagios/plugins/check_disk -w $ARG1$ -c $ARG2$ -p $ARG3$
command[check_disk]=/usr/lib/nagios/plugins/check_disk -X nfs -X cifs -X none -X tmpfs -w $ARG1$ -c $ARG2$
command[memory]=/usr/lib/nagios/plugins/check_memory -w $ARG1$ -c $ARG2$
command[load]=/usr/lib/nagios/plugins/check_load -w $ARG1$ -c $ARG2$
command[check_total_procs]=/usr/lib/nagios/plugins/check_procs -w $ARG1$ -c $ARG2$
command[check_procs_c]=/usr/lib/nagios/plugins/check_procs -c $ARG1$ -C $ARG2$
command[check_procs_a]=/usr/lib/nagios/plugins/check_procs -c $ARG1$ -a $ARG2$
Agregue el mismo script check_memory en /usr/lib/nagios/plugins.
  [email protected]:~# vim /usr/lib/nagios/plugins/check_memory
[email protected]:~# chmod 755 /usr/lib/nagios/plugins/check_memory
[email protected]:~# systemctl restart nagios-nrpe-server.service
[email protected]:~#
Configuración en el servidor Naemon
Iniciar sesión como usuario naemon:
[[email protected] ~]# su - naemon
Last login: Thu Mar  9 17:11:39 CET 2017 on pts/0
-sh-4.2$
Cambie el correo de administración en /etc/naemon/naemon.cfg
........
........
[email protected]
[email protected]
........
........
Ahora configuraremos los comandos personalizados para hacer el check in /etc/naemon/conf.d
Cree un comando personalizado llamado custom_commands.cfg con el contenido a continuación.
$ vim /etc/naemon/conf.d/custom_commands.cfg
## Host Alive check ##
# command 'check_icmp Host Alive'
define command{
    command_name                   host_alive
    command_line                   $USER1$/check_icmp -H $HOSTADDRESS$ -n 1 -w 3000.00,80% -c 5000.00,100%
    }
### Service Command ##
# command 'check_nrpe_disks'
define command{
    command_name                   check_nrpe_disks
    command_line                   $USER1$/check_nrpe -t 55 -u -H $HOSTADDRESS$ -c check_disks -a $ARG1$ $ARG2$ $ARG3$
    }

# command 'nrpe'
define command{
    command_name                   nrpe
    command_line                   $USER1$/check_nrpe -t 55 -u -H $HOSTADDRESS$ -c $ARG1$
    }

# NRPE With Arguements
define command{
    command_name                   check_nrpe_a
    command_line                   $USER1$/check_nrpe -t 55 -u -H $HOSTADDRESS$ -c $ARG1$ -a $ARG2$ $ARG3$ $ARG4$
    }
#####################################
# Windows NSClient++ Checks
# command 'check_nt'
define command{
    command_name                   nt
    command_line                   $USER1$/check_nt -H $HOSTADDRESS$ -p 12489 -v $ARG1$ $ARG2$ -s $USER4$
    }
Por motivos de seguridad, guarde la contraseña de los clientes nscp en /etc/naemon/resource.cfg
...........
...........
$USER4$=howtoforge
...........
............
Ahora necesitamos definir la configuración del host.
Creamos un archivo llamado linux.cfg.
$ vim /etc/naemon/conf.d/linux.cfg
define host {
  host_name                      centos6.sunil.cc
  alias                          Centos
  address                        192.168.1.21
  use                            linux-server
  hostgroups                     linux-servers
}
define host {
  host_name                      ubuntu.sunil.cc
  alias                          Ubuntu
  address                        192.168.1.182
  use                            linux-server
  hostgroups                     linux-servers
}
Hacemos lo mismo para el host de Windows.
$ vim /etc/naemon/conf.d/windows.cfg
define host {
  host_name                      ad.sunil.cc
  alias                          My Windows Server
  address                        192.168.1.75
  use                            windows-server
}

define hostgroup {
  hostgroup_name                 windows-servers
  alias                          Windows Servers
}
Ahora necesitamos definir la configuración del servicio.
$ vim linux_services.cfg
define service {
  service_description            Disks Status
  hostgroup_name                  linux-servers
  use                            generic-service
  check_command                  check_nrpe_a!check_disk!15%!5%
}
define service{
    use                            generic-service
    hostgroup_name                 linux-servers
    service_description            Load Average
    check_command                  check_nrpe_a!load!30,25,20!45,40,35
    }
define service{
    use                            generic-service
    hostgroup_name                 linux-servers
    service_description            Memory Usage
    check_command                  check_nrpe_a!memory!80!90
    }
Para Windows, creamos una configuración similar.
$ vim window_services.cfg
define service{
    use                            generic-service
    hostgroup_name                 windows-servers
    service_description            Disk - C:
    check_command                  nt!USEDDISKSPACE!-l c -w 80 -c 90
     }
define service{
    use                            generic-service
    hostgroup_name                 windows-servers
    service_description            Load Average
    check_command                  nt!CPULOAD!-l 60,90,95
    }
define service{
    use                            generic-service
    hostgroup_name                 windows-servers
    service_description            Memory Usage
    check_command                  nt!MEMUSE!-w 90 -c 95
    }
Ahora cambiaremos la dirección de correo electrónico de contacto.
$ vim contacts.cfg
define contact {
  contact_name                   naemonadmin                         ; Short name of user
  alias                          Naemon Admin                        ; Full name of user
  use                            generic-contact                     ; Inherit default values from generic-contact template (defined above)
  email                          [email protected]             ; <<***** CHANGE THIS TO YOUR EMAIL ADDRESS ******
}
Ahora eliminamos las configuraciones innecesarias que no son necesarias.
$ mv switch.cfg switch.cfg.bkp
$ mv printer.cfg printer.cfg.bkp
Para validar las configuraciones.
$ naemon -v /etc/naemon/naemon.cfg

Naemon Core 1.0.6-pkg
Copyright (c) 2013-present Naemon Core Development Team and Community Contributors
Copyright (c) 2009-2013 Nagios Core Development Team and Community Contributors
Copyright (c) 1999-2009 Ethan Galstad
License: GPL

Website: http://www.naemon.org
Reading configuration data...
   Read main config file okay...
   Read object config files okay...

Running pre-flight check on configuration data...

Checking objects...
        Checked 20 services.
        Checked 4 hosts.
        Checked 1 contacts.
        Checked 2 host groups.
        Checked 0 service groups.
        Checked 1 contact groups.
        Checked 29 commands.
        Checked 5 time periods.
        Checked 0 host escalations.
        Checked 0 service escalations.
Checking for circular paths...
        Checked 4 hosts
        Checked 0 service dependencies
        Checked 0 host dependencies
        Checked 5 timeperiods
Checking global event handlers...
Checking obsessive compulsive processor commands...
Checking misc settings...

Total Warnings: 0
Total Errors:   0

Things look okay - No serious problems were detected during the pre-flight check
-sh-4.2$
Inicie sesión como root y reinicie el servicio naemon.
[[email protected] conf.d]# systemctl restart naemon
[[email protected] conf.d]# systemctl status naemon
? naemon.service - Naemon Monitoring Daemon
   Loaded: loaded (/usr/lib/systemd/system/naemon.service; enabled; vendor preset: disabled)
   Active: active (running) since Thu 2017-03-09 19:14:36 CET; 7s ago
     Docs: http://naemon.org/documentation
  Process: 5112 ExecStart=/usr/bin/naemon --daemon /etc/naemon/naemon.cfg (code=exited, status=0/SUCCESS)
  Process: 5110 ExecStartPre=/usr/bin/chown -R naemon:naemon /var/run/naemon/ (code=exited, status=0/SUCCESS)
  Process: 5108 ExecStartPre=/usr/bin/mkdir /var/run/naemon (code=exited, status=1/FAILURE)
 Main PID: 5114 (naemon)
   CGroup: /system.slice/naemon.service
           ??5114 /usr/bin/naemon --daemon /etc/naemon/naemon.cfg
           ??5115 /usr/bin/naemon --worker /var/lib/naemon/naemon.qh
           ??5116 /usr/bin/naemon --worker /var/lib/naemon/naemon.qh
           ??5117 /usr/bin/naemon --worker /var/lib/naemon/naemon.qh
           ??5118 /usr/bin/naemon --worker /var/lib/naemon/naemon.qh
           ??5119 /usr/bin/naemon --daemon /etc/naemon/naemon.cfg

Mar 09 19:14:36 naemon.sunil.cc systemd[1]: Starting Naemon Monitoring Daemon...
Mar 09 19:14:36 naemon.sunil.cc systemd[1]: Failed to read PID from file /var/run/naemon/naemon.pid: Invalid argument
Mar 09 19:14:36 naemon.sunil.cc systemd[1]: Started Naemon Monitoring Daemon.
[[email protected] conf.d]#
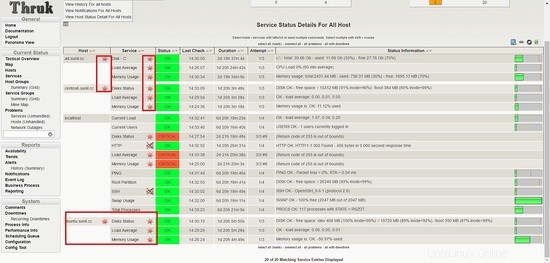
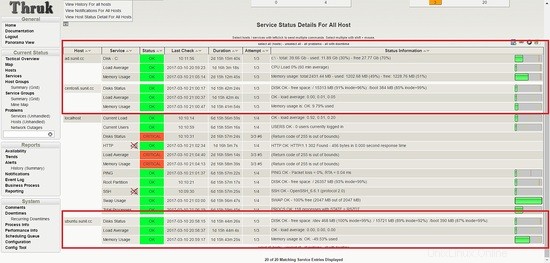
Inicie sesión en el panel y debería ver los servicios en funcionamiento.
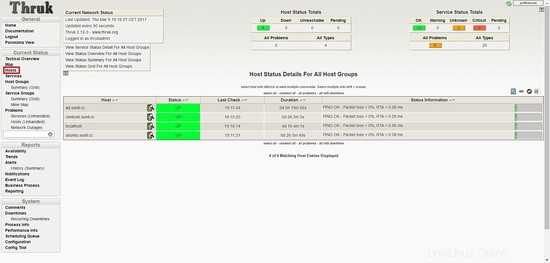
Vemos que los servicios fallan para el host de Ubuntu.
It is seen that nrpe package compiled for ubuntu had enable arguments disabled for security vulnerabily and that is the reason it is failing
Tendremos que volver a compilar el paquete para habilitar los argumentos, para administrar el ajuste de naemon.
El siguiente enlace muestra cómo se puede volver a compilar. También encontrará el paquete ya compilado con argumentos habilitados en este sitio. Usaré este paquete precompilado para este tutorial.
https://www.claudiokuenzler.com/blog/626/nrpe-debian-jessie-command-ags-arguments-not-working-error
[email protected]:~# wget https://www.claudiokuenzler.com/downloads/nrpe/nagios-nrpe-server_2.15-1ubuntu2_amd64.xenial.deb
Instale el paquete.
[email protected]:~# dpkg -i nagios-nrpe-server_2.15-1ubuntu2_amd64.xenial.deb
(Reading database ... 79576 files and directories currently installed.)
Preparing to unpack nagios-nrpe-server_2.15-1ubuntu2_amd64.xenial.deb ...
Unpacking nagios-nrpe-server (2.15-1ubuntu2) over (2.15-1ubuntu1) ...
Setting up nagios-nrpe-server (2.15-1ubuntu2) ...
Processing triggers for systemd (229-4ubuntu16) ...
Processing triggers for ureadahead (0.100.0-19) ...
Processing triggers for man-db (2.7.5-1) ...
[email protected]:~#
Reinicie NRPE.
[email protected]:~# systemctl restart nagios-nrpe-server.service
Ahora estamos monitoreando todos los hosts usando naemon.
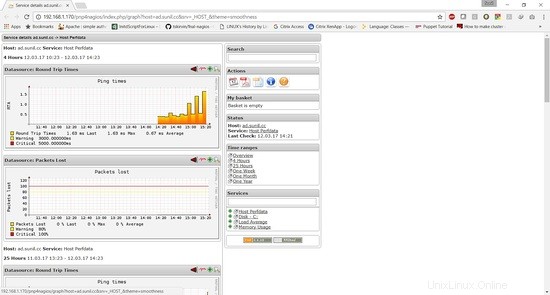
Configuracion de pnp4nagios
Tendremos que configurar pnp4nagios para el gráfico de rendimiento.
Ahora usaremos el mismo método de autenticación que el panel de thruk, primero haremos una copia de seguridad del archivo y cambiaremos las siguientes líneas.
[[email protected] conf.d]# cd /etc/httpd/conf.d/
[[email protected] conf.d]# cp pnp4nagios.conf pnp4nagios.conf.bkp
[[email protected] share]# cat /etc/httpd/conf.d/pnp4nagios.conf
# SAMPLE CONFIG SNIPPETS FOR APACHE WEB SERVER

Alias /pnp4nagios "/usr/local/pnp4nagios/share"

<Directory "/usr/local/pnp4nagios/share">
        AllowOverride None
        Order allow,deny
        Allow from all
        #
        # Use the same value as defined in nagios.conf
        #
        AuthName "Thruk Access"
        AuthType Basic
        AuthUserFile /etc/thruk/htpasswd
        Require valid-user

                # Turn on URL rewriting
                RewriteEngine On
                Options symLinksIfOwnerMatch
                # Installation directory
                RewriteBase /pnp4nagios/
                # Protect application and system files from being viewed
                RewriteRule "^(?:application|modules|system)/" - [F]
                # Allow any files or directories that exist to be displayed directly
                RewriteCond "%{REQUEST_FILENAME}" !-f
                RewriteCond "%{REQUEST_FILENAME}" !-d
                # Rewrite all other URLs to index.php/URL
                RewriteRule "^.*$" "index.php/$0" [PT]


[[email protected] share]#
[[email protected] conf.d]# systemctl restart httpd.service
Ahora necesitaremos cambiar la página de configuración.
[[email protected] share]# cd /usr/local/pnp4nagios/share/
[[email protected] share]# mv install.php install.php.txt
Ahora necesitaremos cambiar el archivo de configuración para pnp4nagios.
Cambie nagios a naemon en el archivo de configuración.
[[email protected] conf.d]# vi /usr/local/pnp4nagios/etc/config_local.php
............................
................................
$conf['nagios_base'] = "/naemon/cgi-bin";
..................................
............................
Habilite los datos de rendimiento de 0 a 1.
[[email protected] conf.d]# vi /etc/naemon/naemon.cfg
.....................
.....................
process_performance_data=1
......................
......................
Agregue las siguientes líneas al final de naemon.conf.
[[email protected] conf.d]# vi /etc/naemon/naemon.cfg
#
# service performance data
#
service_perfdata_file=/usr/local/pnp4nagios/var/service-perfdata
service_perfdata_file_template=DATATYPE::SERVICEPERFDATA\tTIMET::$TIMET$\tHOSTNAME::$HOSTNAME$\tSERVICEDESC::$SERVICEDESC$\tSERVICEPERFDATA::$SERVICEPERFDATA$\tSERVICECHECKCOMMAND::$SERVICECHECKCOMMAND$\tHOSTSTATE::$HOSTSTATE$\tHOSTSTATETYPE::$HOSTSTATETYPE$\tSERVICESTATE::$SERVICESTATE$\tSERVICESTATETYPE::$SERVICESTATETYPE$
service_perfdata_file_mode=a
service_perfdata_file_processing_interval=15
service_perfdata_file_processing_command=process-service-perfdata-file

#
#
#
host_perfdata_file=/usr/local/pnp4nagios/var/host-perfdata
host_perfdata_file_template=DATATYPE::HOSTPERFDATA\tTIMET::$TIMET$\tHOSTNAME::$HOSTNAME$\tHOSTPERFDATA::$HOSTPERFDATA$\tHOSTCHECKCOMMAND::$HOSTCHECKCOMMAND$\tHOSTSTATE::$HOSTSTATE$\tHOSTSTATETYPE::$HOSTSTATETYPE$
host_perfdata_file_mode=a
host_perfdata_file_processing_interval=15
host_perfdata_file_processing_command=process-host-perfdata-file
Ahora necesitamos agregar las siguientes líneas en custom_commands.conf.
[[email protected] conf.d]# vim /etc/naemon/conf.d/custom_commands.cfg
define command{
       command_name    process-service-perfdata-file
       command_line    /bin/mv /usr/local/pnp4nagios/var/service-perfdata /usr/local/pnp4nagios/var/spool/service-perfdata.$TIMET$
}

define command{
       command_name    process-host-perfdata-file
       command_line    /bin/mv /usr/local/pnp4nagios/var/host-perfdata /usr/local/pnp4nagios/var/spool/host-perfdata.$TIMET$
}
Ahora creamos una plantilla para el rendimiento del host y el gráfico de rendimiento del servicio.
$ cd /etc/naemon/conf.d/templates/
$ cat pnp.cfg
define host {
   name host-pnp
   process_perf_data 1
   action_url /pnp4nagios/index.php/graph?host=$HOSTNAME$&srv=_HOST_' class='tips' rel='/pnp4nagios/index.php/popup?host=$HOSTNAME$&srv=_HOST_
   register 0
}

define service {
   name service-pnp
   process_perf_data 1
   action_url /pnp4nagios/index.php/graph?host=$HOSTNAME$&srv=$SERVICEDESC$' class='tips' rel='/pnp4nagios/index.php/popup?host=$HOSTNAME$&srv=$SERVICEDESC$
   register 0
}
Ahora, para acceder al gráfico de rendimiento de los servicios que necesita, debemos actualizar el archivo service.cfg.
$ cat linux_services.cfg
define service {
  service_description            Disks Status
  hostgroup_name                  linux-servers
  use                            generic-service,service-pnp                       ; Name of service template to use
  check_command                  check_nrpe_a!check_disk!15%!5%
}
define service{
    use                            generic-service,service-pnp
    hostgroup_name                 linux-servers
    service_description            Load Average
    check_command                  check_nrpe_a!load!30,25,20!45,40,35
    }
define service{
    use                            generic-service,service-pnp
    hostgroup_name                 linux-servers
    service_description            Memory Usage
    check_command                  check_nrpe_a!memory!80!90
    }
$ cat window_services.cfg
define service{
    use                            generic-service,service-pnp
    hostgroup_name                 windows-servers
    service_description            Disk - C:
    check_command                  nt!USEDDISKSPACE!-l c -w 80 -c 90
     }
define service{
    use                            generic-service,service-pnp
    hostgroup_name                 windows-servers
    service_description            Load Average
    check_command                  nt!CPULOAD!-l 60,90,95
    }
define service{
    use                            generic-service,service-pnp
    hostgroup_name                 windows-servers
    service_description            Memory Usage
    check_command                  nt!MEMUSE!-w 90 -c 95
    }
Para verificar el gráfico de host, debemos incluirlo en el archivo a continuación.
$ cat linux.cfg
define host {
  host_name                      centos6.sunil.cc
  alias                          Centos
  address                        192.168.1.21
  use                            linux-server,host-pnp
  hostgroups                     linux-servers
}
define host {
  host_name                      ubuntu.sunil.cc
  alias                          Ubuntu
  address                        192.168.1.182
  use                            linux-server,host-pnp
  hostgroups                     linux-servers
}
$ cat windows.cfg
define host {
  host_name                      ad.sunil.cc
  alias                          My Windows Server
  address                        192.168.1.75
  use                            windows-server,host-pnp
}

define hostgroup {
  hostgroup_name                 windows-servers
  alias                          Windows Servers
}
Valide la configuración.
$ naemon -v /etc/naemon/naemon.cfg

Naemon Core 1.0.6-pkg
Copyright (c) 2013-present Naemon Core Development Team and Community Contributors
Copyright (c) 2009-2013 Nagios Core Development Team and Community Contributors
Copyright (c) 1999-2009 Ethan Galstad
License: GPL

Website: http://www.naemon.org
Reading configuration data...
   Read main config file okay...
   Read object config files okay...

Running pre-flight check on configuration data...

Checking objects...
        Checked 20 services.
        Checked 4 hosts.
        Checked 1 contacts.
        Checked 2 host groups.
        Checked 0 service groups.
        Checked 1 contact groups.
        Checked 31 commands.
        Checked 5 time periods.
        Checked 0 host escalations.
        Checked 0 service escalations.
Checking for circular paths...
        Checked 4 hosts
        Checked 0 service dependencies
        Checked 0 host dependencies
        Checked 5 timeperiods
Checking global event handlers...
Checking obsessive compulsive processor commands...
Checking misc settings...

Total Warnings: 0
Total Errors:   0

Things look okay - No serious problems were detected during the pre-flight check
Reinicie los servicios.
[[email protected] ~]# systemctl enable npcd
npcd.service is not a native service, redirecting to /sbin/chkconfig.
Executing /sbin/chkconfig npcd on
[[email protected] ~]# systemctl restart npcd
[[email protected] ~]# systemctl restart naemon