GNU/Linux >> Tutoriales Linux >  >> Panels >> Panels

El servidor perfecto - Debian Wheezy (Apache2, BIND, Dovecot, ISPConfig 3)

El servidor perfecto:Debian Wheezy (Apache2, BIND, Dovecot, ISPConfig 3)

Este tutorial muestra cómo preparar un servidor Debian Wheezy (con Apache2, BIND, Dovecot) para la instalación de ISPConfig 3 y cómo instalar ISPConfig 3. ISPConfig 3 es un panel de control de alojamiento web que le permite configurar los siguientes servicios a través de una web navegador:servidor web Apache o nginx, servidor de correo Postfix, servidor Courier o Dovecot IMAP/POP3, servidor de nombres MySQL, BIND o MyDNS, PureFTPd, SpamAssassin, ClamAV y muchos más. Esta configuración cubre Apache (en lugar de nginx), BIND (en lugar de MyDNS) y Dovecot (en lugar de Courier).

Tenga en cuenta que esta configuración no funciona para ISPConfig 2 ! ¡Es válido solo para ISPConfig 3!

¡No emito ninguna garantía de que esto funcione para usted!

Manual de ISPConfig 3

Para aprender a usar ISPConfig 3, recomiendo descargar el Manual de ISPConfig 3.

En más de 300 páginas, cubre el concepto detrás de ISPConfig (administrador, revendedores, clientes), explica cómo instalar y actualizar ISPConfig 3, incluye una referencia para todos los formularios y campos de formulario en ISPConfig junto con ejemplos de entradas válidas y proporciona tutoriales para las tareas más comunes en ISPConfig 3. También explica cómo hacer que su servidor sea más seguro y viene con una sección de resolución de problemas al final.

Aplicación ISPConfig Monitor para Android

Con la aplicación ISPConfig Monitor, puede verificar el estado de su servidor y averiguar si todos los servicios funcionan como se esperaba. Puede verificar los puertos TCP y UDP y hacer ping a sus servidores. Además de eso, puede usar esta aplicación para solicitar detalles de los servidores que tienen instalado ISPConfig (tenga en cuenta que la versión mínima instalada de ISPConfig 3 compatible con la aplicación ISPConfig Monitor es 3.0.3.3! ); estos detalles incluyen todo lo que sabe del módulo Monitor en el Panel de control de ISPConfig (por ejemplo, servicios, registros de correo y del sistema, cola de correo, información de CPU y memoria, uso del disco, cuota, detalles del sistema operativo, registro de RKHunter, etc.), y por supuesto , como ISPConfig tiene capacidad para varios servidores, puede verificar todos los servidores que están controlados desde su servidor maestro ISPConfig.

Para obtener instrucciones de uso y descarga, visite http://www.ispconfig.org/ispconfig-3/ispconfig-monitor-app-for-android/.

1 Requisitos

Para instalar dicho sistema, necesitará lo siguiente:

  • el CD de instalación de red de Debian Wheezy, disponible aquí:http://cdimage.debian.org/debian-cd/7.0.0/i386/iso-cd/debian-7.0.0-i386-netinst.iso (i386 ) o http://cdimage.debian.org/debian-cd/7.0.0/amd64/iso-cd/debian-7.0.0-amd64-netinst.iso (x86_64)
  • una conexión rápida a Internet.

2 Nota Preliminar

En este tutorial utilizo el nombre de host server1.example.com con la dirección IP 192.168.0.100 y la puerta de enlace 192.168.0.1. Estas configuraciones pueden diferir para usted, por lo que debe reemplazarlas cuando corresponda.

3 El Sistema Base

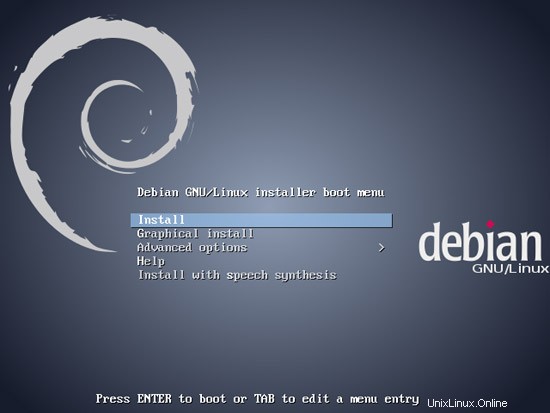
Inserte su CD de instalación de red de Debian Wheezy en su sistema y arranque desde allí. Seleccione Instalar (esto iniciará el instalador de texto; si prefiere un instalador gráfico, seleccione Instalación gráfica):
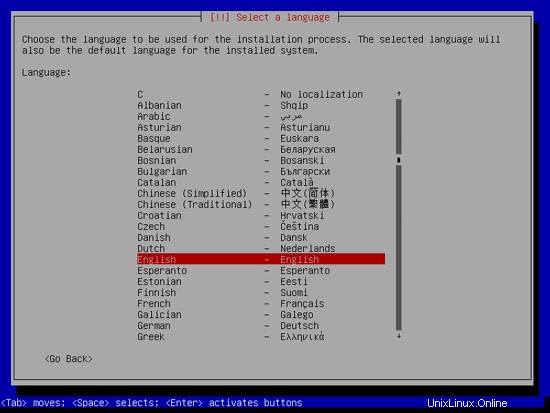
Elige tu idioma:

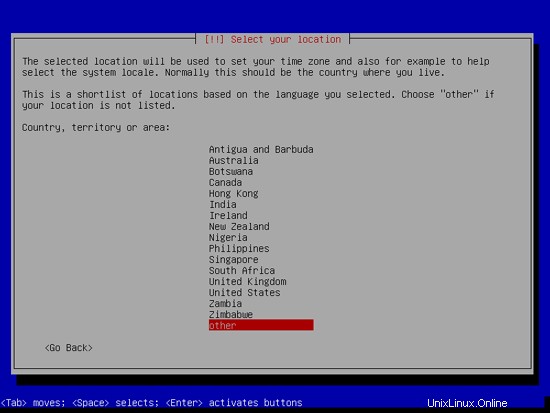
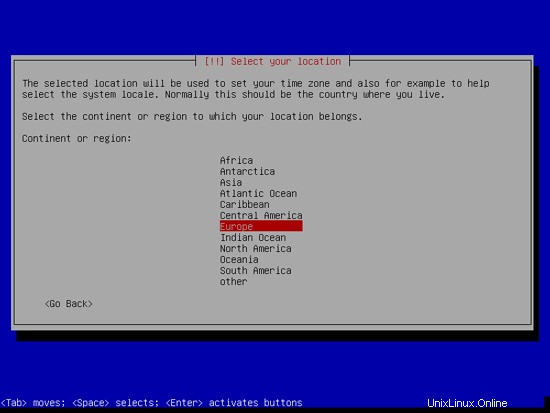
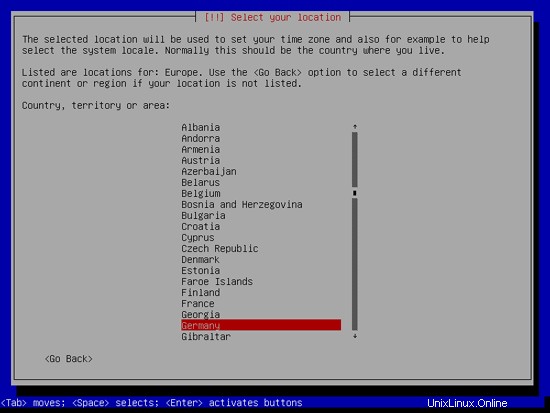
Luego seleccione su ubicación:

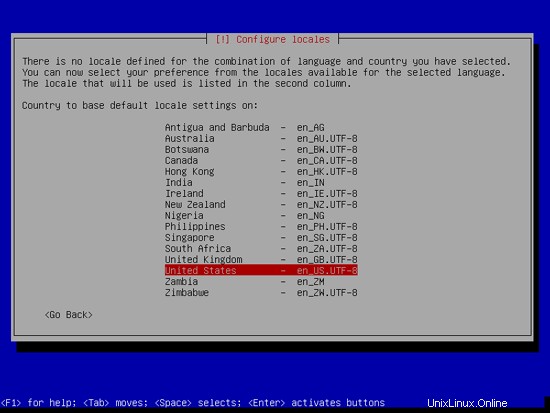
Si ha seleccionado una combinación poco común de idioma y ubicación (como inglés como idioma y Alemania como ubicación, como en mi caso), el instalador podría indicarle que no hay una configuración regional definida para esta combinación; en este caso, debe seleccionar la configuración regional manualmente. Selecciono en_US.UTF-8 aquí:

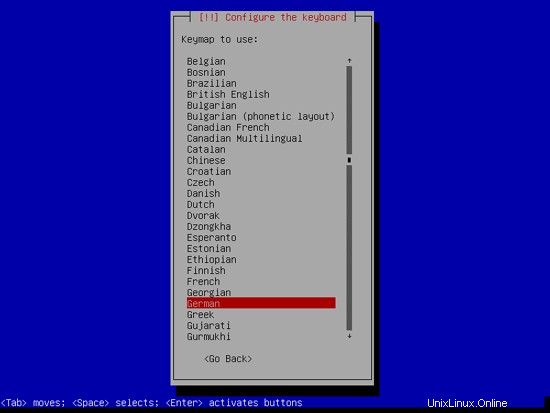
Elija un diseño de teclado:

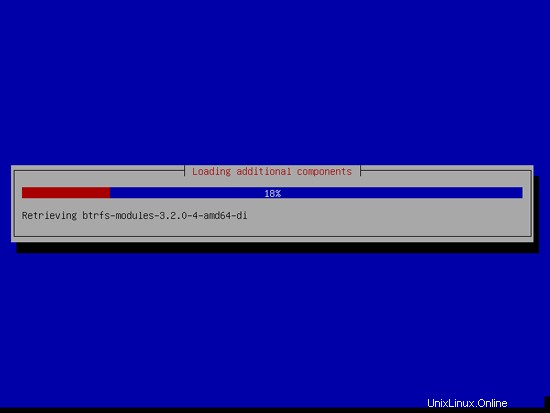
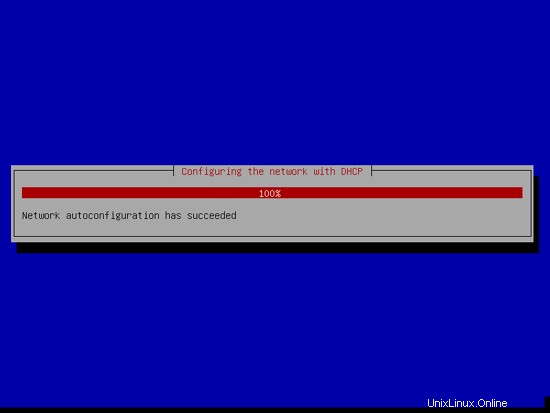
El instalador comprueba el CD de instalación, su hardware y configura la red con DHCP si hay un servidor DHCP en la red:

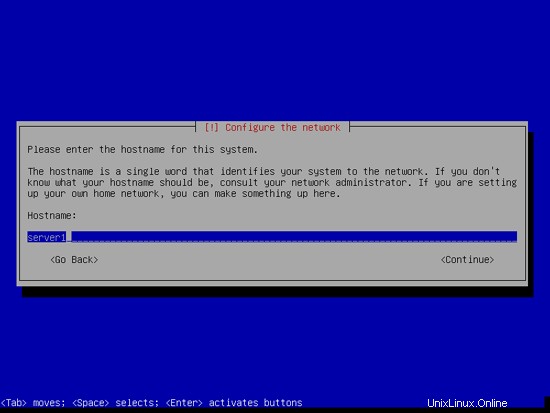
Introduzca el nombre de host. En este ejemplo, mi sistema se llama server1.example.com , así que ingreso server1 :

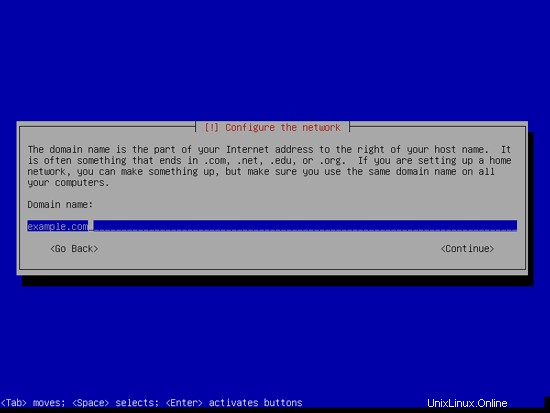
Introduzca su nombre de dominio. En este ejemplo, esto es ejemplo.com:

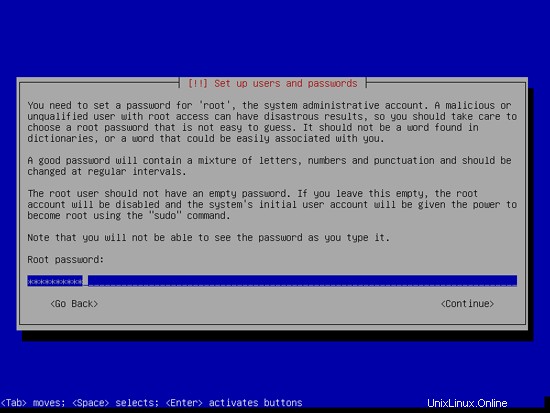
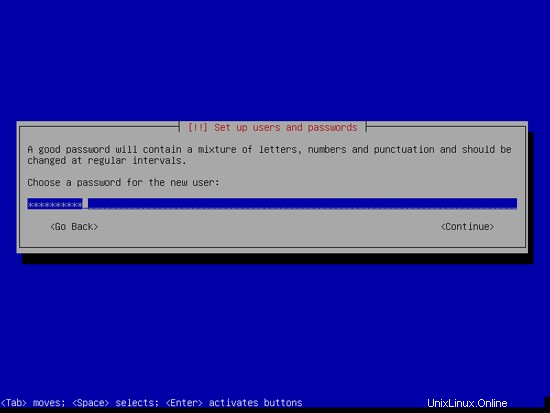
Luego, proporcione una contraseña al usuario root:

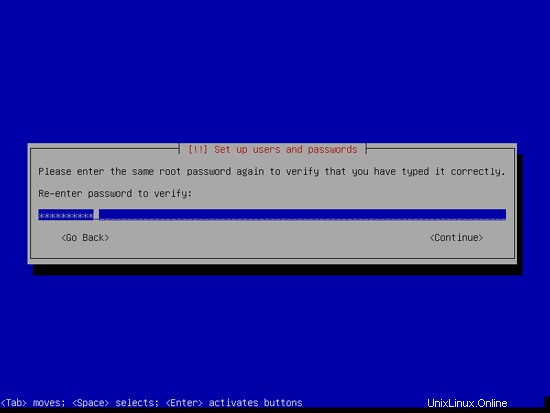
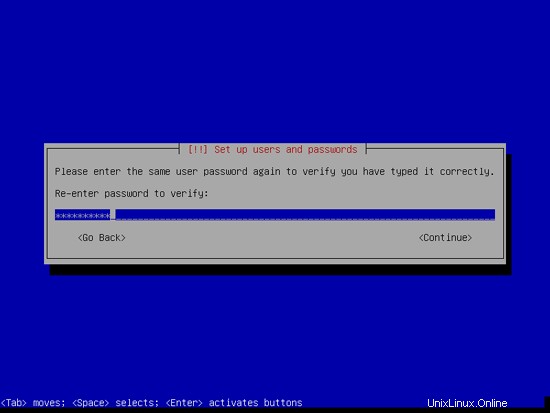
Confirme esa contraseña para evitar errores tipográficos:

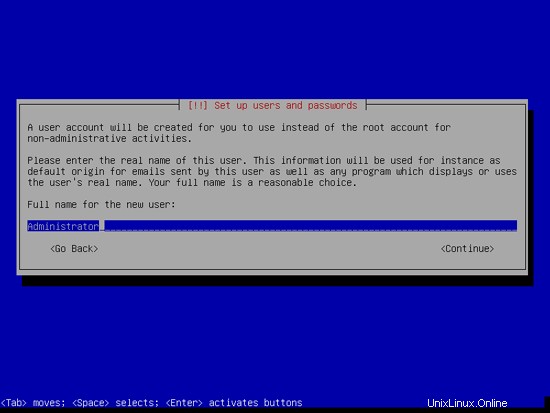
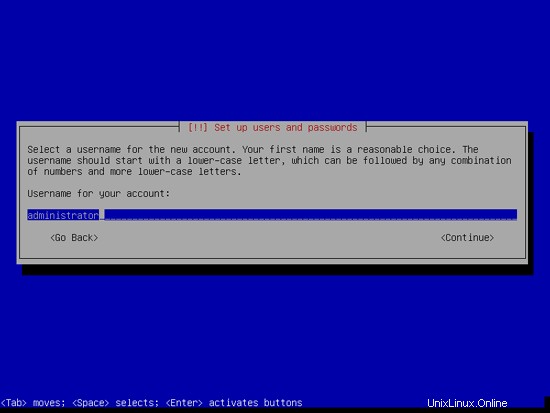
Cree una cuenta de usuario normal, por ejemplo, el usuario Administrador con el nombre de usuario administrador (no use el nombre de usuario admin ya que es un nombre reservado en Debian Wheezy):

El servidor perfecto - Debian Wheezy (Apache2, BIND, Dovecot, ISPConfig 3) - Página 2

4 Instalar el servidor SSH (opcional)

Si no instaló el servidor OpenSSH durante la instalación del sistema, puede hacerlo ahora:

apt-get install ssh openssh-server

A partir de ahora, puede usar un cliente SSH como PuTTY y conectarse desde su estación de trabajo a su servidor Debian Wheezy y seguir los pasos restantes de este tutorial.

5 Instalar vim-nox (Opcional)

Usaré vi como mi editor de texto en este tutorial. El programa vi predeterminado tiene un comportamiento extraño en Debian y Ubuntu; para arreglar esto, instalamos vim-nox:

apt-get install vim-nox

(No tienes que hacer esto si usas un editor de texto diferente como joe o nano).

6 Configurar la red

Debido a que el instalador de Debian Wheezy ha configurado nuestro sistema para obtener su configuración de red a través de DHCP, debemos cambiar eso ahora porque un servidor debe tener una dirección IP estática. Edite /etc/network/interfaces y ajústelo a sus necesidades (en esta configuración de ejemplo, usaré la dirección IP 192.168.0.100) (tenga en cuenta que reemplacé allow-hotplug eth0 con auto eth0; de lo contrario, reiniciar la red no funciona , y tendríamos que reiniciar todo el sistema):

vi /etc/network/interfaces

Luego reinicie su red:

/etc/init.d/networking restart

Luego edite /etc/hosts. Haz que se vea así:

vi /etc/hosts
# This file describes the network interfaces available on your system
# and how to activate them. For more information, see interfaces(5).

# The loopback network interface
auto lo
iface lo inet loopback

# The primary network interface
#allow-hotplug eth0
#iface eth0 inet dhcp
auto eth0
iface eth0 inet static
        address 192.168.0.100
        netmask 255.255.255.0
        network 192.168.0.0
        broadcast 192.168.0.255
        gateway 192.168.0.1

Ahora corre

echo server1.example.com > /etc/hostname
/etc/init.d/hostname.sh start

Luego, corre

hostname
hostname -f

¡Es importante que ambos muestren server1.example.com ahora!

7 Actualice su instalación de Debian

Primero, asegúrese de que su /etc/apt/sources.list contenga el repositorio de actualizaciones de wheezy (esto asegura que siempre obtenga las actualizaciones más recientes para el escáner de virus ClamAV; este proyecto publica lanzamientos con mucha frecuencia y, a veces, las versiones antiguas dejan de funcionar), y que los repositorios contrib y non-free estén habilitados (algunos paquetes como libapache2-mod-fastcgi no están en el repositorio principal).

vi /etc/apt/sources.list
127.0.0.1       localhost.localdomain   localhost
192.168.0.100   server1.example.com     server1

# The following lines are desirable for IPv6 capable hosts
::1     localhost ip6-localhost ip6-loopback
ff02::1 ip6-allnodes
ff02::2 ip6-allrouters

Ejecutar

apt-get update

para actualizar la base de datos de paquetes apt y

apt-get upgrade

para instalar las últimas actualizaciones (si las hay).

8 Cambiar el shell predeterminado

/bin/sh es un enlace simbólico a /bin/dash, sin embargo, necesitamos /bin/bash, no /bin/dash. Por lo tanto hacemos esto:

dpkg-reconfigure dash

¿Usar guión como shell del sistema predeterminado (/bin/sh)? <- no

Si no hace esto, la instalación de ISPConfig fallará.

9 Sincronizar el reloj del sistema

Es una buena idea sincronizar el reloj del sistema con un NTP (n red t tiempo p rotocol) servidor a través de Internet. Simplemente ejecuta

apt-get install ntp ntpdate

y la hora de su sistema siempre estará sincronizada.

10 Instalar Postfix, Dovecot, MySQL, phpMyAdmin, rkhunter, binutils

Podemos instalar Postfix, Dovecot, MySQL, rkhunter y binutils con un solo comando:

apt-get install postfix postfix-mysql postfix-doc mysql-client mysql-server openssl getmail4 rkhunter binutils dovecot-imapd dovecot-pop3d dovecot-mysql dovecot-sieve sudo

Se le harán las siguientes preguntas:

Tipo general de configuración de correo:<-- Sitio de Internet
Nombre de correo del sistema:<-- server1.example.com
Nueva contraseña para el usuario "root" de MySQL:<-- yourrootsqlpassword
Repetir contraseña para el usuario "root" de MySQL: <-- yourrootsqlpassword

A continuación, abra TLS/SSL y los puertos de envío en Postfix:

vi /etc/postfix/master.cf

Descomente las secciones de envío y smtps de la siguiente manera (deje -o milter_macro_daemon_name=ORIGINATING ya que no lo necesitamos):

deb http://ftp.de.debian.org/debian/ wheezy main contrib non-free
deb-src http://ftp.de.debian.org/debian/ wheezy main contrib non-free

deb http://security.debian.org/ wheezy/updates main contrib non-free
deb-src http://security.debian.org/ wheezy/updates main contrib non-free

# wheezy-updates, previously known as 'volatile'
deb http://ftp.de.debian.org/debian/ wheezy-updates main contrib non-free
deb-src http://ftp.de.debian.org/debian/ wheezy-updates main contrib non-free

Reinicie Postfix después:

/etc/init.d/postfix restart

Queremos que MySQL escuche en todas las interfaces, no solo en localhost, por lo tanto, editamos /etc/mysql/my.cnf y comentamos la línea bind-address =127.0.0.1:

vi /etc/mysql/my.cnf
[...]
submission inet n       -       -       -       -       smtpd
  -o syslog_name=postfix/submission
  -o smtpd_tls_security_level=encrypt
  -o smtpd_sasl_auth_enable=yes
  -o smtpd_client_restrictions=permit_sasl_authenticated,reject
#  -o milter_macro_daemon_name=ORIGINATING
smtps     inet  n       -       -       -       -       smtpd
  -o syslog_name=postfix/smtps
  -o smtpd_tls_wrappermode=yes
  -o smtpd_sasl_auth_enable=yes
  -o smtpd_client_restrictions=permit_sasl_authenticated,reject
#  -o milter_macro_daemon_name=ORIGINATING
[...]

Luego reiniciamos MySQL:

/etc/init.d/mysql restart

Ahora verifique que la red esté habilitada. Ejecutar

netstat -tap | grep mysql

La salida debería verse así:

[email protected]:~# netstat -tap | grep mysql
tcp        0      0 *:mysql                 *:*                     LISTEN      26757/mysqld
[email protected]:~#

11 Instale Amavisd-new, SpamAssassin y Clamav

Para instalar amavisd-new, SpamAssassin y ClamAV, ejecutamos

apt-get install amavisd-new spamassassin clamav clamav-daemon zoo unzip bzip2 arj nomarch lzop cabextract apt-listchanges libnet-ldap-perl libauthen-sasl-perl clamav-docs daemon libio-string-perl libio-socket-ssl-perl libnet-ident-perl zip libnet-dns-perl

La configuración de ISPConfig 3 usa amavisd que carga la biblioteca de filtros SpamAssassin internamente, por lo que podemos detener SpamAssassin para liberar RAM:

/etc/init.d/spamassassin stop
update-rc.d -f spamassassin remove

El servidor perfecto - Debian Wheezy (Apache2, BIND, Dovecot, ISPConfig 3) - Página 4

12 Instale Apache2, PHP5, phpMyAdmin, FCGI, suExec, Pear y mcrypt

Apache2, PHP5, phpMyAdmin, FCGI, suExec, Pear y mcrypt se pueden instalar de la siguiente manera:

apt-get install apache2 apache2.2-common apache2-doc apache2-mpm-prefork apache2-utils libexpat1 ssl-cert libapache2-mod-php5 php5 php5-common php5-gd php5-mysql php5-imap phpmyadmin php5-cli php5-cgi libapache2-mod-fcgid apache2-suexec php-pear php-auth php5-mcrypt mcrypt php5-imagick imagemagick libapache2-mod-suphp libruby libapache2-mod-ruby libapache2-mod-python php5-curl php5-intl php5-memcache php5-memcached php5-ming php5-ps php5-pspell php5-recode php5-snmp php5-sqlite php5-tidy php5-xmlrpc php5-xsl memcached

Verá la siguiente pregunta:

Web server to reconfigure automatically: <- apache2
Configure database for phpmyadmin with dbconfig-common? <- no

Luego ejecute el siguiente comando para habilitar los módulos de Apache suexec, rewrite, ssl, actions e include (además de dav, dav_fs y auth_digest si desea usar WebDAV):

a2enmod suexec rewrite ssl actions include
a2enmod dav_fs dav auth_digest

A continuación, abra /etc/apache2/mods-disponible/suphp.conf...

vi /etc/apache2/mods-available/suphp.conf

... y comente la sección y agregue la línea AddType application/x-httpd-suphp .php .php3 .php4 .php5 .phtml; de lo contrario, todos los archivos PHP será ejecutado por SuPHP:

[...]
# Instead of skip-networking the default is now to listen only on
# localhost which is more compatible and is not less secure.
#bind-address           = 127.0.0.1
[...]

Reinicie Apache después:

/etc/init.d/apache2 restart

Si desea alojar archivos Ruby con la extensión .rb en sus sitios web creados a través de ISPConfig, debe comentar la línea application/x-ruby rb en /etc/mime.types:

vi /etc/mime.types
<IfModule mod_suphp.c>
    #<FilesMatch "\.ph(p3?|tml)$">
    #    SetHandler application/x-httpd-suphp
    #</FilesMatch>
        AddType application/x-httpd-suphp .php .php3 .php4 .php5 .phtml
        suPHP_AddHandler application/x-httpd-suphp

    <Directory />
        suPHP_Engine on
    </Directory>

    # By default, disable suPHP for debian packaged web applications as files
    # are owned by root and cannot be executed by suPHP because of min_uid.
    <Directory /usr/share>
        suPHP_Engine off
    </Directory>

# # Use a specific php config file (a dir which contains a php.ini file)
#       suPHP_ConfigPath /etc/php5/cgi/suphp/
# # Tells mod_suphp NOT to handle requests with the type <mime-type>.
#       suPHP_RemoveHandler <mime-type>
</IfModule>

(Esto es necesario solo para archivos .rb; los archivos de Ruby con la extensión .rbx funcionan de inmediato).

Reinicie Apache después:

/etc/init.d/apache2 restart

12.1 Xcaché

Xcache es un caché de código de operación de PHP gratuito y abierto para almacenar en caché y optimizar el código intermedio de PHP. Es similar a otros cachés de código de operación de PHP, como eAccelerator y APC. Se recomienda encarecidamente tener uno de estos instalados para acelerar su página PHP.

Xcache se puede instalar de la siguiente manera:

apt-get install php5-xcache

Ahora reinicie Apache:

/etc/init.d/apache2 restart

12.2 PHP-FPM

A partir de ISPConfig 3.0.5, hay un modo PHP adicional que puede seleccionar para usar con Apache:PHP-FPM.

Para usar PHP-FPM con Apache, necesitamos el módulo de Apache mod_fastcgi (no mezcle esto con mod_fcgid; son muy similares, pero no puede usar PHP-FPM con mod_fcgid). Podemos instalar PHP-FPM y mod_fastcgi de la siguiente manera:

apt-get install libapache2-mod-fastcgi php5-fpm

Asegúrese de habilitar el módulo y reiniciar Apache:

a2enmod actions fastcgi alias
/etc/init.d/apache2 restart

12.3 Versiones adicionales de PHP

A partir de ISPConfig 3.0.5, es posible tener varias versiones de PHP en un servidor (seleccionables a través de ISPConfig) que se pueden ejecutar a través de FastCGI y PHP-FPM. Para obtener información sobre cómo crear versiones de PHP adicionales (PHP-FPM y FastCGI) y cómo configurar ISPConfig, consulte este tutorial:Cómo usar varias versiones de PHP (PHP-FPM y FastCGI) con ISPConfig 3 (Debian Wheezy).

13 Instalar Mailman

Desde la versión 3.0.4, ISPConfig también le permite administrar (crear/modificar/eliminar) listas de correo de Mailman. Si desea utilizar esta función, instale Mailman de la siguiente manera:

apt-get install mailman

Seleccione al menos un idioma, por ejemplo:

Languages to support: <-- en (English)
Missing site list <-- Ok

Antes de que podamos iniciar Mailman, se debe crear una primera lista de correo llamada mailman:

newlist mailman
[email protected]:~# newlist mailman
Enter the email of the person running the list: <-- admin email address, e.g. [email protected]
Initial mailman password: <-- admin password for the mailman list
To finish creating your mailing list, you must edit your /etc/aliases (or
equivalent) file by adding the following lines, and possibly running the
`newaliases' program:

## mailman mailing list
mailman:              "|/var/lib/mailman/mail/mailman post mailman"
mailman-admin:        "|/var/lib/mailman/mail/mailman admin mailman"
mailman-bounces:      "|/var/lib/mailman/mail/mailman bounces mailman"
mailman-confirm:      "|/var/lib/mailman/mail/mailman confirm mailman"
mailman-join:         "|/var/lib/mailman/mail/mailman join mailman"
mailman-leave:        "|/var/lib/mailman/mail/mailman leave mailman"
mailman-owner:        "|/var/lib/mailman/mail/mailman owner mailman"
mailman-request:      "|/var/lib/mailman/mail/mailman request mailman"
mailman-subscribe:    "|/var/lib/mailman/mail/mailman subscribe mailman"
mailman-unsubscribe:  "|/var/lib/mailman/mail/mailman unsubscribe mailman"

Hit enter to notify mailman owner... <-- ENTER

[email protected]:~#

Abra /etc/aliases luego...

vi /etc/aliases

... y agregue las siguientes líneas:

[...]
#application/x-ruby                             rb
[...]

Ejecutar

newaliases

después y reinicie Postfix:

/etc/init.d/postfix restart

Finalmente debemos habilitar la configuración de Mailman Apache:

ln -s /etc/mailman/apache.conf /etc/apache2/conf.d/mailman.conf

Esto define el alias /cgi-bin/mailman/ para todos los vhosts de Apache, lo que significa que puede acceder a la interfaz de administración de Mailman para obtener una lista en http:///cgi-bin/mailman/admin/, y la página web para los usuarios de se puede encontrar una lista de correo en http:///cgi-bin/mailman/listinfo/.

En http:///pipermail puede encontrar los archivos de la lista de correo.

Reinicie Apache después:

/etc/init.d/apache2 restart

Luego inicie el demonio Mailman:

/etc/init.d/mailman start

14 Instalar PureFTPd y cuota

PureFTPd y la cuota se pueden instalar con el siguiente comando:

apt-get install pure-ftpd-common pure-ftpd-mysql quota quotatool

Edite el archivo /etc/default/pure-ftpd-common...

vi /etc/default/pure-ftpd-common

... y asegúrese de que el modo de inicio esté configurado como autónomo y establezca VIRTUALCHROOT=true:

[...]
## mailman mailing list
mailman:              "|/var/lib/mailman/mail/mailman post mailman"
mailman-admin:        "|/var/lib/mailman/mail/mailman admin mailman"
mailman-bounces:      "|/var/lib/mailman/mail/mailman bounces mailman"
mailman-confirm:      "|/var/lib/mailman/mail/mailman confirm mailman"
mailman-join:         "|/var/lib/mailman/mail/mailman join mailman"
mailman-leave:        "|/var/lib/mailman/mail/mailman leave mailman"
mailman-owner:        "|/var/lib/mailman/mail/mailman owner mailman"
mailman-request:      "|/var/lib/mailman/mail/mailman request mailman"
mailman-subscribe:    "|/var/lib/mailman/mail/mailman subscribe mailman"
mailman-unsubscribe:  "|/var/lib/mailman/mail/mailman unsubscribe mailman"

Ahora configuramos PureFTPd para permitir sesiones FTP y TLS. FTP es un protocolo muy inseguro porque todas las contraseñas y todos los datos se transfieren en texto claro. Mediante el uso de TLS, toda la comunicación se puede cifrar, lo que hace que el FTP sea mucho más seguro.

Si desea permitir sesiones FTP y TLS, ejecute

echo 1 > /etc/pure-ftpd/conf/TLS

Para usar TLS, debemos crear un certificado SSL. Lo creo en /etc/ssl/private/, por lo tanto, primero creo ese directorio:

mkdir -p /etc/ssl/private/

Posteriormente, podemos generar el certificado SSL de la siguiente manera:

openssl req -x509 -nodes -days 7300 -newkey rsa:2048 -keyout /etc/ssl/private/pure-ftpd.pem -out /etc/ssl/private/pure-ftpd.pem
Country Name (2 letter code) [AU]: <-- Enter your Country Name (e.g., "DE").
State or Province Name (full name) [Some-State]: <-- Enter your State or Province Name.
Locality Name (eg, city) []: <-- Enter your City.
Organization Name (eg, company) [Internet Widgits Pty Ltd]: <-- Enter your Organization Name (e.g., the name of your company).
Organizational Unit Name (eg, section) []: <-- Enter your Organizational Unit Name (e.g. "IT Department").
Common Name (eg, YOUR name) []: <-- Enter the Fully Qualified Domain Name of the system (e.g. "server1.example.com").
Email Address []: <-- Enter your Email Address.

Cambiar los permisos del certificado SSL:

chmod 600 /etc/ssl/private/pure-ftpd.pem

Luego reinicie PureFTPd:

/etc/init.d/pure-ftpd-mysql restart

Edite /etc/fstab. El mío se ve así (agregué, usrjquota=quota.user,grpjquota=quota.group,jqfmt=vfsv0 a la partición con el punto de montaje /):

vi /etc/fstab
[...]
STANDALONE_OR_INETD=standalone
[...]
VIRTUALCHROOT=true
[...]

Para habilitar la cuota, ejecute estos comandos:

mount -o remount /
quotacheck -avugm
quotaon -avug

15 Instalar servidor BIND DNS

BIND se puede instalar de la siguiente manera:

apt-get install bind9 dnsutils

16 Instalar Vlogger, Webalizer y AWstats

Vlogger, webalizer y AWstats se pueden instalar de la siguiente manera:

apt-get install vlogger webalizer awstats geoip-database libclass-dbi-mysql-perl

Abra /etc/cron.d/awstats luego...

vi /etc/cron.d/awstats

... y comentar todo en ese archivo:

# /etc/fstab: static file system information.
#
# Use 'blkid' to print the universally unique identifier for a
# device; this may be used with UUID= as a more robust way to name devices
# that works even if disks are added and removed. See fstab(5).
#
#                
/dev/mapper/server1-root /               ext4    errors=remount-ro,usrjquota=quota.user,grpjquota=quota.group,jqfmt=vfsv0 0       1
# /boot was on /dev/sda1 during installation
UUID=46d1bd79-d761-4b23-80b8-ad20cb18e049 /boot           ext2    defaults        0       2
/dev/mapper/server1-swap_1 none            swap    sw              0       0
/dev/sr0        /media/cdrom0   udf,iso9660 user,noauto     0       0

17 Instalar Jailkit

Solo se necesita Jailkit si desea chrootear a los usuarios de SSH. Se puede instalar de la siguiente manera (importante:Jailkit se debe instalar antes de ISPConfig - ¡no se puede instalar después!):

apt-get install build-essential autoconf automake1.9 libtool flex bison debhelper binutils-gold
cd /tmp
wget http://olivier.sessink.nl/jailkit/jailkit-2.17.tar.gz
tar xvfz jailkit-2.17.tar.gz
cd jailkit-2.17
./debian/rules binary

Ahora puede instalar el paquete Jailkit .deb de la siguiente manera:

cd ..
dpkg -i jailkit_2.17-1_*.deb
rm -rf jailkit-2.17*

18 Instalar fail2ban

Esto es opcional pero recomendado, porque el monitor ISPConfig intenta mostrar el registro:

apt-get install fail2ban

Para hacer que fail2ban monitoree PureFTPd y Dovecot, cree el archivo /etc/fail2ban/jail.local:

vi /etc/fail2ban/jail.local

[pureftpd]
enabled  = true
port     = ftp
filter   = pureftpd
logpath  = /var/log/syslog
maxretry = 3

[dovecot-pop3imap]
enabled = true
filter = dovecot-pop3imap
action = iptables-multiport[name=dovecot-pop3imap, port="pop3,pop3s,imap,imaps", protocol=tcp]
logpath = /var/log/mail.log
maxretry = 5

[sasl]
enabled  = true
port     = smtp
filter   = sasl
logpath  = /var/log/mail.log
maxretry = 3

Luego cree los siguientes dos archivos de filtro:

vi /etc/fail2ban/filter.d/pureftpd.conf
[Definition]
failregex = .*pure-ftpd: \(.*@<HOST>\) \[WARNING\] Authentication failed for user.*
ignoreregex =
vi /etc/fail2ban/filter.d/dovecot-pop3imap.conf
[Definition]
failregex = (?: pop3-login|imap-login): .*(?:Authentication failure|Aborted login \(auth failed|Aborted login \(tried to use disabled|Disconnected \(auth failed|Aborted login \(\d+ authentication attempts).*rip=(?P<host>\S*),.*
ignoreregex =

Reinicie fail2ban después:

/etc/init.d/fail2ban restart

El servidor perfecto - Debian Wheezy (Apache2, BIND, Dovecot, ISPConfig 3) - Página 5

19 Instalar SquirrelMail

Para instalar el cliente de correo web SquirrelMail, ejecute

apt-get install squirrelmail

Luego configure SquirrelMail:

squirrelmail-configure

Debemos decirle a SquirrelMail que estamos usando Dovecot-IMAP/-POP3:

SquirrelMail Configuration : Read: config.php (1.4.0)
---------------------------------------------------------
Main Menu --
1.  Organization Preferences
2.  Server Settings
3.  Folder Defaults
4.  General Options
5.  Themes
6.  Address Books
7.  Message of the Day (MOTD)
8.  Plugins
9.  Database
10. Languages

D.  Set pre-defined settings for specific IMAP servers

C   Turn color on
S   Save data
Q   Quit

Command >> <-- D


SquirrelMail Configuration : Read: config.php
---------------------------------------------------------
While we have been building SquirrelMail, we have discovered some
preferences that work better with some servers that don't work so
well with others.  If you select your IMAP server, this option will
set some pre-defined settings for that server.

Please note that you will still need to go through and make sure
everything is correct.  This does not change everything.  There are
only a few settings that this will change.

Please select your IMAP server:
    bincimap    = Binc IMAP server
    courier     = Courier IMAP server
    cyrus       = Cyrus IMAP server
    dovecot     = Dovecot Secure IMAP server
    exchange    = Microsoft Exchange IMAP server
    hmailserver = hMailServer
    macosx      = Mac OS X Mailserver
    mercury32   = Mercury/32
    uw          = University of Washington's IMAP server
    gmail       = IMAP access to Google mail (Gmail) accounts

    quit        = Do not change anything
Command >> <-- dovecot


SquirrelMail Configuration : Read: config.php
---------------------------------------------------------
While we have been building SquirrelMail, we have discovered some
preferences that work better with some servers that don't work so
well with others.  If you select your IMAP server, this option will
set some pre-defined settings for that server.

Please note that you will still need to go through and make sure
everything is correct.  This does not change everything.  There are
only a few settings that this will change.

Please select your IMAP server:
    bincimap    = Binc IMAP server
    courier     = Courier IMAP server
    cyrus       = Cyrus IMAP server
    dovecot     = Dovecot Secure IMAP server
    exchange    = Microsoft Exchange IMAP server
    hmailserver = hMailServer
    macosx      = Mac OS X Mailserver
    mercury32   = Mercury/32
    uw          = University of Washington's IMAP server
    gmail       = IMAP access to Google mail (Gmail) accounts

    quit        = Do not change anything
Command >> dovecot

              imap_server_type = dovecot
         default_folder_prefix = 
                  trash_folder = Trash
                   sent_folder = Sent
                  draft_folder = Drafts
            show_prefix_option = false
          default_sub_of_inbox = false
show_contain_subfolders_option = false
            optional_delimiter = detect
                 delete_folder = false

Press any key to continue... <-- press a key

SquirrelMail Configuration : Read: config.php (1.4.0)
---------------------------------------------------------
Main Menu --
1.  Organization Preferences
2.  Server Settings
3.  Folder Defaults
4.  General Options
5.  Themes
6.  Address Books
7.  Message of the Day (MOTD)
8.  Plugins
9.  Database
10. Languages

D.  Set pre-defined settings for specific IMAP servers

C   Turn color on
S   Save data
Q   Quit

Command >> <-- S


SquirrelMail Configuration : Read: config.php (1.4.0)
---------------------------------------------------------
Main Menu --
1.  Organization Preferences
2.  Server Settings
3.  Folder Defaults
4.  General Options
5.  Themes
6.  Address Books
7.  Message of the Day (MOTD)
8.  Plugins
9.  Database
10. Languages

D.  Set pre-defined settings for specific IMAP servers

C   Turn color on
S   Save data
Q   Quit

Command >> <-- Q

Ahora configuraremos SquirrelMail para que pueda usarlo desde sus sitios web (creados a través de ISPConfig) usando los alias /squirrelmail o /webmail. Entonces, si su sitio web es www.example.com, podrá acceder a SquirrelMail usando www.example.com/squirrelmail o www.example.com/webmail.

La configuración de Apache de SquirrelMail está en el archivo /etc/squirrelmail/apache.conf, pero Apache no carga este archivo porque no está en el directorio /etc/apache2/conf.d/. Por lo tanto, creamos un enlace simbólico llamado squirrelmail.conf en el directorio /etc/apache2/conf.d/ que apunta a /etc/squirrelmail/apache.conf y recargamos Apache después:

cd /etc/apache2/conf.d/
ln -s ../../squirrelmail/apache.conf squirrelmail.conf
/etc/init.d/apache2 reload

Ahora abra /etc/apache2/conf.d/squirrelmail.conf...

vi /etc/apache2/conf.d/squirrelmail.conf

... y agregue las siguientes líneas al contenedor para asegurarse de que se use mod_php para acceder a SquirrelMail, independientemente del modo PHP que seleccione para su sitio web en ISPConfig:

[...]
<Directory /usr/share/squirrelmail>
  Options FollowSymLinks
  <IfModule mod_php5.c>
    AddType application/x-httpd-php .php
    php_flag magic_quotes_gpc Off
    php_flag track_vars On
    php_admin_flag allow_url_fopen Off
    php_value include_path .
    php_admin_value upload_tmp_dir /var/lib/squirrelmail/tmp
    php_admin_value open_basedir /usr/share/squirrelmail:/etc/squirrelmail:/var/lib/squirrelmail:/etc/hostname:/etc/mailname
    php_flag register_globals off
  </IfModule>
  <IfModule mod_dir.c>
    DirectoryIndex index.php
  </IfModule>

  # access to configtest is limited by default to prevent information leak
  <Files configtest.php>
    order deny,allow
    deny from all
    allow from 127.0.0.1
  </Files>
</Directory>
[...]

mkdir /var/lib/squirrelmail/tmpCrear el directorio /var/lib/squirrelmail/tmp...

... y hacerlo propiedad del usuario www-data:

chown www-data /var/lib/squirrelmail/tmp

Vuelva a cargar Apache:

/etc/init.d/apache2 reload

Eso es todo:/etc/apache2/conf.d/squirrelmail.conf define un alias llamado /squirrelmail que apunta al directorio de instalación de SquirrelMail /usr/share/squirrelmail.

Ahora puede acceder a SquirrelMail desde su sitio web de la siguiente manera:

http://192.168.0.100/squirrelmail
http://www.example.com/squirrelmail

También puede acceder desde el panel de control de ISPConfig vhost (después de haber instalado ISPConfig, consulte el siguiente capítulo) de la siguiente manera (esto no necesita ninguna configuración en ISPConfig):

http://server1.example.com:8080/squirrelmail

Si desea utilizar el alias /webmail en lugar de /squirrelmail, simplemente abra /etc/apache2/conf.d/squirrelmail.conf...

vi /etc/apache2/conf.d/squirrelmail.conf

... y agregue la línea Alias ​​/webmail /usr/share/squirrelmail:

Alias /squirrelmail /usr/share/squirrelmail
Alias /webmail /usr/share/squirrelmail
[...]

Luego recargar Apache:

/etc/init.d/apache2 reload

Ahora puede acceder a Squirrelmail de la siguiente manera:

http://192.168.0.100/webmail
http://www.example.com/webmail
http://server1.example.com:8080/webmail (después de haber instalado ISPConfig, consulte la próximo capítulo)

Si desea definir un host virtual como webmail.example.com donde sus usuarios pueden acceder a SquirrelMail, debe agregar la siguiente configuración de host virtual a /etc/apache2/conf.d/squirrelmail.conf:

vi /etc/apache2/conf.d/squirrelmail.conf

#MAILTO=root

#*/10 * * * * www-data [ -x /usr/share/awstats/tools/update.sh ] && /usr/share/awstats/tools/update.sh

# Generate static reports:
#10 03 * * * www-data [ -x /usr/share/awstats/tools/buildstatic.sh ] && /usr/share/awstats/tools/buildstatic.sh

/etc/init.d/apache2 reload Ahora vuelve a cargar Apache... Por supuesto, debe haber un registro DNS para webmail.example.com que apunte a la dirección IP que usas en la configuración de vhost. También asegúrese de que el vhost webmail.example.com no exista en ISPConfig (¡de lo contrario, ambos vhosts interferirán entre sí!).

... ¡y puede acceder a SquirrelMail en http://webmail.example.com!

20 Instalar ISPConfig 3

Para instalar ISPConfig 3 desde la última versión publicada, haga lo siguiente:

cd /tmp
wget http://www.ispconfig.org/downloads/ISPConfig-3-stable.tar.gz
tar xfz ISPConfig-3-stable.tar.gz
cd ispconfig3_install/install/

El siguiente paso es ejecutar

php -q install.php

Esto iniciará el instalador de ISPConfig 3. El instalador configurará todos los servicios como Postfix, Dovecot, etc. por usted. No es necesaria una configuración manual como se requiere para ISPConfig 2 (guías de configuración perfectas).

[email protected]:/tmp/ispconfig3_install/install# php -q install.php
PHP Deprecated:  Comments starting with '#' are deprecated in /etc/php5/cli/conf.d/ming.ini on line 1 in Unknown on line 0


--------------------------------------------------------------------------------
 _____ ___________   _____              __ _         ____
|_   _/  ___| ___ \ /  __ \            / _(_)       /__  \
  | | \ `--.| |_/ / | /  \/ ___  _ __ | |_ _  __ _    _/ /
  | |  `--. \  __/  | |    / _ \| '_ \|  _| |/ _` |  |_ |
 _| |_/\__/ / |     | \__/\ (_) | | | | | | | (_| | ___\ \
 \___/\____/\_|      \____/\___/|_| |_|_| |_|\__, | \____/
                                              __/ |
                                             |___/
--------------------------------------------------------------------------------


>> Initial configuration

Operating System: Debian or compatible, unknown version.

    Following will be a few questions for primary configuration so be careful.
    Default values are in [brackets] and can be accepted with .
    Tap in "quit" (without the quotes) to stop the installer.


Select language (en,de) [en]: <-- ENTER

Installation mode (standard,expert) [standard]: <-- ENTER

Full qualified hostname (FQDN) of the server, eg server1.domain.tld  [server1.example.com]: <-- ENTER

MySQL server hostname [localhost]: <-- ENTER

MySQL root username [root]: <-- ENTER

MySQL root password []: <-- yourrootsqlpassword

MySQL database to create [dbispconfig]: <-- ENTER

MySQL charset [utf8]: <-- ENTER

Generating a 4096 bit RSA private key
.............................................................++
.........................................................................................................................++
writing new private key to 'smtpd.key'
-----
You are about to be asked to enter information that will be incorporated
into your certificate request.
What you are about to enter is what is called a Distinguished Name or a DN.
There are quite a few fields but you can leave some blank
For some fields there will be a default value,
If you enter '.', the field will be left blank.
-----
Country Name (2 letter code) [AU]: <-- ENTER
State or Province Name (full name) [Some-State]: <-- ENTER
Locality Name (eg, city) []: <-- ENTER
Organization Name (eg, company) [Internet Widgits Pty Ltd]: <-- ENTER
Organizational Unit Name (eg, section) []: <-- ENTER
Common Name (e.g. server FQDN or YOUR name) []: <-- ENTER
Email Address []: <-- ENTER
Configuring Jailkit
Configuring Dovecot
Configuring Spamassassin
Configuring Amavisd
Configuring Getmail
Configuring Pureftpd
Configuring BIND
Configuring Apache
Configuring Vlogger
Configuring Apps vhost
Configuring Bastille Firewall
Configuring Fail2ban
Installing ISPConfig
ISPConfig Port [8080]: <-- ENTER

Do you want a secure (SSL) connection to the ISPConfig web interface (y,n) [y]: <-- ENTER

Generating RSA private key, 4096 bit long modulus
.................................................................................................++
........++
e is 65537 (0x10001)
You are about to be asked to enter information that will be incorporated
into your certificate request.
What you are about to enter is what is called a Distinguished Name or a DN.
There are quite a few fields but you can leave some blank
For some fields there will be a default value,
If you enter '.', the field will be left blank.
-----
Country Name (2 letter code) [AU]: <-- ENTER
State or Province Name (full name) [Some-State]: <-- ENTER
Locality Name (eg, city) []: <-- ENTER
Organization Name (eg, company) [Internet Widgits Pty Ltd]: <-- ENTER
Organizational Unit Name (eg, section) []: <-- ENTER
Common Name (e.g. server FQDN or YOUR name) []: <-- ENTER
Email Address []: <-- ENTER

Please enter the following 'extra' attributes
to be sent with your certificate request
A challenge password []: <-- ENTER
An optional company name []: <-- ENTER
writing RSA key
Configuring DBServer
Installing ISPConfig crontab
no crontab for root
no crontab for getmail
Restarting services ...
Stopping MySQL database server: mysqld.
Starting MySQL database server: mysqld ..
Checking for tables which need an upgrade, are corrupt or were
not closed cleanly..
Stopping Postfix Mail Transport Agent: postfix.
Starting Postfix Mail Transport Agent: postfix.
Stopping amavisd: amavisd-new.
Starting amavisd: amavisd-new.
Stopping ClamAV daemon: clamd.
Starting ClamAV daemon: clamd .
Restarting IMAP/POP3 mail server: dovecot.
[Tue May 07 02:36:22 2013] [warn] NameVirtualHost *:443 has no VirtualHosts
[Tue May 07 02:36:22 2013] [warn] NameVirtualHost *:80 has no VirtualHosts
[Tue May 07 02:36:23 2013] [warn] NameVirtualHost *:443 has no VirtualHosts
[Tue May 07 02:36:23 2013] [warn] NameVirtualHost *:80 has no VirtualHosts
Restarting web server: apache2 ... waiting .
Restarting ftp server: Running: /usr/sbin/pure-ftpd-mysql-virtualchroot -l mysql:/etc/pure-ftpd/db/mysql.conf -l pam -H -O clf:/var/log/pure-ftpd/transfer.log -Y 1 -D -u 1000 -A -E -b -8 UTF-8 -B
Installation completed.
[email protected]:/tmp/ispconfig3_install/install#

El instalador configura automáticamente todos los servicios subyacentes, por lo que no es necesaria una configuración manual.

Ahora también tiene la posibilidad de permitir que el instalador cree un vhost SSL para el panel de control de ISPConfig, de modo que se pueda acceder a ISPConfig usando https:// en lugar de http://. Para lograr esto, simplemente presione ENTER cuando vea esta pregunta:¿Desea una conexión segura (SSL) a la interfaz web de ISPConfig (y,n) [y]:.

Luego puede acceder a ISPConfig 3 en http(s)://server1.example.com:8080/ o http(s)://192.168.0.100:8080/ (http o https depende de lo que elija durante la instalación). Inicie sesión con el nombre de usuario admin y la contraseña admin (debe cambiar la contraseña predeterminada después de su primer inicio de sesión):

El sistema ahora está listo para ser utilizado.

20.1 Manual ISPConfig 3

Para aprender a usar ISPConfig 3, recomiendo descargar el Manual de ISPConfig 3.

En más de 300 páginas, cubre el concepto detrás de ISPConfig (administrador, revendedores, clientes), explica cómo instalar y actualizar ISPConfig 3, incluye una referencia para todos los formularios y campos de formulario en ISPConfig junto con ejemplos de entradas válidas y proporciona tutoriales para las tareas más comunes en ISPConfig 3. También explica cómo hacer que su servidor sea más seguro y viene con una sección de resolución de problemas al final.

20.2 Aplicación ISPConfig Monitor para Android

Con la aplicación ISPConfig Monitor, puede verificar el estado de su servidor y averiguar si todos los servicios funcionan como se esperaba. Puede verificar los puertos TCP y UDP y hacer ping a sus servidores. Además de eso, puede usar esta aplicación para solicitar detalles de los servidores que tienen instalado ISPConfig (tenga en cuenta que la versión mínima instalada de ISPConfig 3 compatible con la aplicación ISPConfig Monitor es 3.0.3.3! ); estos detalles incluyen todo lo que sabe del módulo Monitor en el Panel de control de ISPConfig (por ejemplo, servicios, registros de correo y del sistema, cola de correo, información de CPU y memoria, uso del disco, cuota, detalles del sistema operativo, registro de RKHunter, etc.), y por supuesto , como ISPConfig tiene capacidad para varios servidores, puede verificar todos los servidores que están controlados desde su servidor maestro ISPConfig.

Para obtener instrucciones de uso y descarga, visite http://www.ispconfig.org/ispconfig-3/ispconfig-monitor-app-for-android/.

21 Notas Adicionales

21.1 OpenVZ

Si el servidor Debian que acaba de configurar en este tutorial es un contenedor OpenVZ (máquina virtual), debe hacer esto en el sistema host (supongo que el ID del contenedor OpenVZ es 101; reemplácelo con el VPSID correcto en su sistema):

VPSID=101
for CAP in CHOWN DAC_READ_SEARCH SETGID SETUID NET_BIND_SERVICE NET_ADMIN SYS_CHROOT SYS_NICE CHOWN DAC_READ_SEARCH SETGID SETUID NET_BIND_SERVICE NET_ADMIN SYS_CHROOT SYS_NICE
do
  vzctl set $VPSID --capability ${CAP}:on --save
done

  • Debian:http://www.debian.org/
  • ISPConfig:http://www.ispconfig.org/

Panels
  1. El servidor perfecto:CentOS 7 (Apache2, Dovecot, ISPConfig 3)

  2. El servidor perfecto - Ubuntu 14.10 (nginx, BIND, Dovecot, ISPConfig 3)

  3. El servidor perfecto - OpenSUSE 12.3 x86_64 (Apache2, Dovecot, ISPConfig 3)

  4. El servidor perfecto:CentOS 7.1 con Apache2, Postfix, Dovecot, Pure-FTPD, BIND e ISPConfig 3

  5. El servidor perfecto - Debian 8 Jessie (Apache2, BIND, Dovecot, ISPConfig 3)

El servidor perfecto - Ubuntu 12.10 (Apache2, BIND, Dovecot, ISPConfig 3)

El servidor perfecto - OpenSUSE 12.2 x86_64 (nginx, Dovecot, ISPConfig 3)

El servidor perfecto - OpenSUSE 12.2 x86_64 (Apache2, Dovecot, ISPConfig 3)

El servidor perfecto - Debian Wheezy (nginx, BIND, Dovecot, ISPConfig 3)

El servidor perfecto - Ubuntu 13.04 (Apache2, BIND, Dovecot, ISPConfig 3)

El servidor perfecto - CentOS 6.4 x86_64 (Apache2, Dovecot, ISPConfig 3)

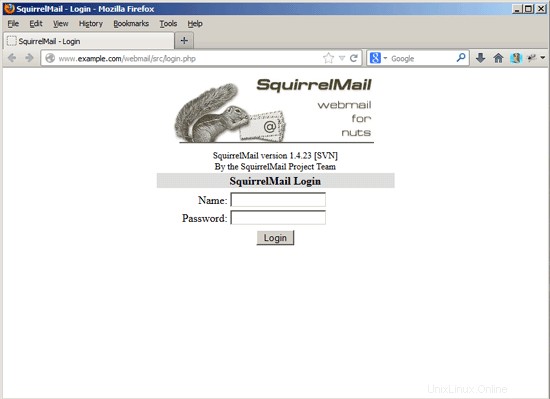
    [...]
    <VirtualHost *:80>
      DocumentRoot /usr/share/squirrelmail
      ServerName webmail.example.com
    </VirtualHost>