Introducción
Una red privada virtual (VPN) le permite atravesar redes que no son de confianza como si estuviera en una red privada. Le brinda la libertad de acceder a Internet de manera segura desde su teléfono inteligente o computadora portátil cuando está conectado a una red que no es de confianza, como el WiFi en un hotel o una cafetería.
Cuando se combina con conexiones HTTPS, esta configuración le permite asegurar sus inicios de sesión y transacciones inalámbricas. Puede eludir las restricciones geográficas y la censura, y proteger su ubicación y cualquier tráfico HTTP sin cifrar de redes no confiables.
OpenVPN es una solución VPN de seguridad de la capa de transporte (TLS) de código abierto con todas las funciones que se adapta a una amplia gama de configuraciones. En este tutorial, configurará OpenVPN en un servidor Ubuntu 22.04 y luego lo configurará para que sea accesible desde una máquina cliente.
Consulte esta página para obtener más información.
Requisitos
Para seguir este tutorial, necesitará:
- Un servidor Ubuntu 22.04 con un usuario sudo no root y un firewall habilitado. Para configurar esto, puede seguir nuestro tutorial Configuración inicial del servidor con Ubuntu 22.04. Nos referiremos a esto como el Servidor OpenVPN a lo largo de esta guía.
- Un servidor Ubuntu 22.04 separado configurado como una Autoridad de certificación (CA) privada, al que nos referiremos como el Servidor CA a lo largo de esta guía. Después de ejecutar los pasos de la Guía de configuración inicial del servidor en este servidor, puede seguir los pasos 1 a 3 de nuestra guía sobre Cómo establecer y configurar una autoridad de certificación (CA) en Ubuntu 22.04 para lograrlo.
Además de eso, necesitará una máquina cliente que usará para conectarse a su servidor OpenVPN. En esta guía, lo llamaremos el Cliente OpenVPN . A los efectos de este tutorial, se recomienda que utilice su máquina local como cliente de OpenVPN.
Con estos requisitos previos establecidos, está listo para comenzar a instalar y configurar un servidor OpenVPN en Ubuntu 22.04.
authorized_keys de la máquina CA. archivo y viceversa. Consulte Cómo configurar claves SSH en Ubuntu 22.04 para obtener instrucciones sobre cómo realizar cualquiera de estas soluciones.
Paso 1:Instalación de OpenVPN y Easy-RSA
El primer paso de este tutorial es instalar OpenVPN y Easy-RSA. Easy-RSA es una herramienta de administración de infraestructura de clave pública (PKI) que utilizará en el servidor OpenVPN para generar una solicitud de certificado que luego verificará y firmará en el servidor CA.
Para comenzar, actualice el índice de paquetes de su servidor OpenVPN e instale OpenVPN y Easy-RSA. Ambos paquetes están disponibles en los repositorios predeterminados de Ubuntu, por lo que puede usar apt para la instalación:
- sudo apt update
- sudo apt install openvpn easy-rsa
A continuación, deberá crear un nuevo directorio en el servidor OpenVPN como su usuario no root llamado ~/easy-rsa :
- mkdir ~/easy-rsa
Ahora deberá crear un enlace simbólico desde easyrsa script que el paquete instaló en ~/easy-rsa directorio que acaba de crear:
- ln -s /usr/share/easy-rsa/* ~/easy-rsa/
easy-rsa empaquetar archivos en su directorio PKI, este tutorial adopta un enfoque de enlace simbólico. Como resultado, cualquier actualización de easy-rsa el paquete se reflejará automáticamente en los scripts de su PKI.
Finalmente, asegúrese de que el propietario del directorio sea su usuario sudo no root y restrinja el acceso a ese usuario usando chmod :
- sudo chown sammy ~/easy-rsa
- chmod 700 ~/easy-rsa
Una vez que estos programas están instalados y se han movido a las ubicaciones correctas en su sistema, el siguiente paso es crear una infraestructura de clave pública (PKI) en el servidor OpenVPN para que pueda solicitar y administrar certificados TLS para clientes y otros servidores que conéctate a tu VPN.
Paso 2:Crear una PKI para OpenVPN
Antes de que pueda crear la clave privada y el certificado de su servidor OpenVPN, debe crear un directorio de infraestructura de clave pública local en su servidor OpenVPN. Utilizará este directorio para administrar las solicitudes de certificados del servidor y de los clientes en lugar de realizarlas directamente en su servidor de CA.
Para crear un directorio PKI en su servidor OpenVPN, deberá completar un archivo llamado vars con algunos valores predeterminados. Primero cd en el easy-rsa directorio, luego creará y editará el vars archivo usando nano o su editor de texto preferido.
- cd ~/easy-rsa
- nano vars
Una vez abierto el archivo, pegue las siguientes dos líneas:
~/easy-rsa/varsset_var EASYRSA_ALGO "ec"
set_var EASYRSA_DIGEST "sha512"
Estas son las únicas dos líneas que necesita en este vars archivo en su servidor OpenVPN, ya que no se utilizará como Autoridad de certificación. Se asegurarán de que sus claves privadas y solicitudes de certificados estén configuradas para utilizar la criptografía de curva elíptica (ECC) moderna para generar claves y firmas seguras para sus clientes y el servidor OpenVPN.
Configurar sus servidores OpenVPN y CA para usar ECC significa que cuando un cliente y un servidor intentan establecer una clave simétrica compartida, pueden usar algoritmos de curva elíptica para realizar su intercambio. Usar ECC para un intercambio de claves es significativamente más rápido que usar Diffie-Hellman simple con el algoritmo RSA clásico, ya que los números son mucho más pequeños y los cálculos son más rápidos.
Antecedentes: Cuando los clientes se conectan a OpenVPN, utilizan el cifrado asimétrico (también conocido como clave pública/privada) para realizar un protocolo de enlace TLS. Sin embargo, al transmitir tráfico VPN encriptado, el servidor y los clientes usan encriptación simétrica, que también se conoce como encriptación de clave compartida.
Hay mucha menos sobrecarga computacional con el cifrado simétrico en comparación con el asimétrico:los números que se utilizan son mucho más pequeños y las CPU modernas integran instrucciones para realizar operaciones de cifrado simétrico optimizadas. Para cambiar de cifrado asimétrico a simétrico, el servidor y el cliente OpenVPN utilizarán el algoritmo Elliptic Curve Diffie-Hellman (ECDH) para acordar una clave secreta compartida lo más rápido posible.
Una vez que haya rellenado las vars puede continuar con la creación del directorio PKI. Para hacerlo, ejecute easyrsa secuencia de comandos con init-pki opción. Aunque ya ejecutó este comando en el servidor CA como parte de los requisitos previos, es necesario ejecutarlo aquí porque su servidor OpenVPN y el servidor CA tienen directorios PKI separados:
- ./easyrsa init-pki
Tenga en cuenta que en su servidor OpenVPN no es necesario crear una Autoridad de certificación. Su servidor CA es el único responsable de validar y firmar certificados. La PKI en su servidor VPN solo se usa como un lugar conveniente y centralizado para almacenar solicitudes de certificados y certificados públicos.
Una vez que haya inicializado su PKI en el servidor OpenVPN, estará listo para pasar al siguiente paso, que es crear una solicitud de certificado de servidor OpenVPN y una clave privada.
Paso 3:Crear una solicitud de certificado de servidor OpenVPN y una clave privada
Ahora que su servidor OpenVPN tiene todos los requisitos previos instalados, el siguiente paso es generar una clave privada y una solicitud de firma de certificado (CSR) en su servidor OpenVPN. Después de eso, transferirá la solicitud a su CA para que la firme, creando el certificado requerido. Una vez que tenga un certificado firmado, lo transferirá nuevamente al servidor OpenVPN y lo instalará para que lo use el servidor.
Para comenzar, vaya a ~/easy-rsa directorio en su servidor OpenVPN como su usuario no root:
- cd ~/easy-rsa
Ahora llamarás al easyrsa con el gen-req opción seguida de un nombre común (CN) para la máquina. El CN puede ser lo que quieras, pero puede ser útil convertirlo en algo descriptivo. A lo largo de este tutorial, el CN del servidor OpenVPN será server . Asegúrese de incluir el nopass opción también. De lo contrario, se protegerá con contraseña el archivo de solicitud, lo que podría generar problemas de permisos más adelante.
server aquí, tendrá que ajustar algunas de las instrucciones a continuación. Por ejemplo, al copiar los archivos generados al /etc/openvpn directorio, tendrá que sustituir los nombres correctos. También tendrás que modificar el /etc/openvpn/server.conf archivo más tarde para apuntar al .crt correcto y .key archivos.
- ./easyrsa gen-req server nopass
OutputCommon Name (eg: your user, host, or server name) [server]:

Keypair and certificate request completed. Your files are:
req: /home/sammy/easy-rsa/pki/reqs/server.req
key: /home/sammy/easy-rsa/pki/private/server.key
Esto creará una clave privada para el servidor y un archivo de solicitud de certificado llamado server.req . Copie la clave del servidor en /etc/openvpn/server directorio:
- sudo cp /home/sammy/easy-rsa/pki/private/server.key /etc/openvpn/server/
Después de completar estos pasos, habrá creado con éxito una clave privada para su servidor OpenVPN. También ha generado una solicitud de firma de certificado para el servidor OpenVPN. El CSR ahora está listo para ser firmado por su CA. En la siguiente sección de este tutorial, aprenderá cómo firmar una CSR con la clave privada de su servidor CA.
Paso 4:firma de la solicitud de certificado del servidor OpenVPN
En el paso anterior, creó una solicitud de firma de certificado (CSR) y una clave privada para el servidor OpenVPN. Ahora el servidor de CA necesita saber sobre el server certificado y validarlo. Una vez que la CA valide y reenvíe el certificado al servidor OpenVPN, los clientes que confíen en su CA también podrán confiar en el servidor OpenVPN.
En el servidor OpenVPN, como usuario no root, use SCP u otro método de transferencia para copiar el server.req solicitud de certificado al servidor CA para firmar:
- scp /home/sammy/easy-rsa/pki/reqs/server.req sammy@your_ca_server_ip:/tmp
Si siguió el requisito previo Cómo establecer y configurar una autoridad de certificación (CA) en el tutorial de Ubuntu 22.04, el siguiente paso es iniciar sesión en el servidor de CA como el usuario no raíz que creó para administrar su CA. Vas a cd al ~/easy-rsa directorio donde creó su PK y luego importe la solicitud de certificado usando easyrsa guión:
- cd ~/easy-rsa
- ./easyrsa import-req /tmp/server.req server
Output. . .
The request has been successfully imported with a short name of: server
You may now use this name to perform signing operations on this request.
A continuación, firme la solicitud ejecutando easyrsa secuencia de comandos con sign-req opción, seguida del tipo de solicitud y el nombre común. El tipo de solicitud puede ser client o server . Dado que está trabajando con la solicitud de certificado del servidor OpenVPN, asegúrese de utilizar el server tipo de solicitud:
- ./easyrsa sign-req server server
En el resultado, se le pedirá que verifique que la solicitud proviene de una fuente confiable. Escribe yes luego presione ENTER para confirmar:
OutputYou are about to sign the following certificate.
Please check over the details shown below for accuracy. Note that this request
has not been cryptographically verified. Please be sure it came from a trusted
source or that you have verified the request checksum with the sender.

Request subject, to be signed as a server certificate for 3650 days:

subject=
commonName = server


Type the word 'yes' to continue, or any other input to abort.
Confirm request details: yes
. . .
Certificate created at: /home/sammy/easy-rsa/pki/issued/server.crt
Tenga en cuenta que si cifró su clave privada de CA, se le pedirá su contraseña en este punto.
Con esos pasos completos, ha firmado la solicitud de certificado del servidor OpenVPN utilizando la clave privada del servidor CA. El server.crt resultante El archivo contiene la clave de cifrado pública del servidor OpenVPN, así como una firma del servidor CA. El objetivo de la firma es decirle a cualquiera que confíe en el servidor CA que también puede confiar en el servidor OpenVPN cuando se conecta a él.
Para terminar de configurar los certificados, copie el server.crt y ca.crt archivos del servidor CA al servidor OpenVPN:
- scp pki/issued/server.crt sammy@your_vpn_server_ip:/tmp
- scp pki/ca.crt sammy@your_vpn_server_ip:/tmp
Ahora de vuelta en su servidor OpenVPN, copie los archivos de /tmp a /etc/openvpn/server :
- sudo cp /tmp/{server.crt,ca.crt} /etc/openvpn/server
Ahora su servidor OpenVPN está casi listo para aceptar conexiones. En el siguiente paso, realizará algunos pasos adicionales para aumentar la seguridad del servidor.
Paso 5:Configuración del material criptográfico de OpenVPN
Para una capa adicional de seguridad, agregue una clave secreta compartida adicional que el servidor y todos los clientes usarán con tls-crypt de OpenVPN directiva. Esta opción se usa para ofuscar el certificado TLS que se usa cuando un servidor y un cliente se conectan entre sí inicialmente. El servidor OpenVPN también lo utiliza para realizar comprobaciones rápidas de los paquetes entrantes:si un paquete se firma con la clave precompartida, el servidor lo procesa; si no está firmado, el servidor sabe que proviene de una fuente que no es de confianza y puede descartarlo sin tener que realizar un trabajo de descifrado adicional.
Esta opción ayudará a garantizar que su servidor OpenVPN pueda hacer frente al tráfico no autenticado, los escaneos de puertos y los ataques de denegación de servicio, que pueden ocupar los recursos del servidor. También hace que sea más difícil identificar el tráfico de la red OpenVPN.
Para generar el tls-crypt clave previamente compartida, ejecute lo siguiente en el servidor OpenVPN en ~/easy-rsa directorio:
- cd ~/easy-rsa
- openvpn --genkey secret ta.key
El resultado será un archivo llamado ta.key . Cópielo en /etc/openvpn/server/ directorio:
- sudo cp ta.key /etc/openvpn/server
Con estos archivos en su lugar en el servidor OpenVPN, está listo para crear certificados de cliente y archivos clave para sus usuarios, que utilizará para conectarse a la VPN.
Paso 6:generar un certificado de cliente y un par de claves
Aunque puede generar una clave privada y una solicitud de certificado en su máquina cliente y luego enviarla a la CA para que la firme, esta guía describe un proceso para generar la solicitud de certificado en el servidor OpenVPN. El beneficio de este enfoque es que puede crear una secuencia de comandos que generará automáticamente archivos de configuración del cliente que contienen todas las claves y certificados necesarios. Esto le permite evitar tener que transferir claves, certificados y archivos de configuración a los clientes y agiliza el proceso de unirse a la VPN.
Generará un solo par de certificado y clave de cliente para esta guía. Si tienes más de un cliente, puedes repetir este proceso para cada uno. Sin embargo, tenga en cuenta que deberá pasar un valor de nombre único al script para cada cliente. A lo largo de este tutorial, el primer par de certificado/clave se denomina client1 .
Comience creando una estructura de directorios dentro de su directorio de inicio para almacenar el certificado del cliente y los archivos clave:
- mkdir -p ~/client-configs/keys
Dado que almacenará los pares de certificados/claves de sus clientes y los archivos de configuración en este directorio, debe bloquear sus permisos ahora como medida de seguridad:
- chmod -R 700 ~/client-configs
A continuación, vuelva al directorio EasyRSA y ejecute easyrsa secuencia de comandos con gen-req y nopass opciones, junto con el nombre común para el cliente:
- cd ~/easy-rsa
- ./easyrsa gen-req client1 nopass
Presiona ENTER para confirmar el nombre común. Luego, copia el client1.key archivo al ~/client-configs/keys/ directorio que creó anteriormente:
- cp pki/private/client1.key ~/client-configs/keys/
A continuación, transfiera el client1.req archivo a su servidor CA usando un método seguro:
- scp pki/reqs/client1.req sammy@your_ca_server_ip:/tmp
Ahora inicie sesión en su servidor CA. Luego, navegue al directorio EasyRSA e importe la solicitud de certificado:
- cd ~/easy-rsa
- ./easyrsa import-req /tmp/client1.req client1
Luego, firme la solicitud de la misma manera que lo hizo para el servidor en el paso anterior. Esta vez, sin embargo, asegúrese de especificar el client tipo de solicitud:
- ./easyrsa sign-req client client1
Cuando se le solicite, ingrese yes para confirmar que tiene la intención de firmar la solicitud de certificado y que proviene de una fuente confiable:
OutputType the word 'yes' to continue, or any other input to abort.
Confirm request details: yes
Nuevamente, si encriptó su clave de CA, se le solicitará su contraseña aquí.
Esto creará un archivo de certificado de cliente llamado client1.crt . Transferir este archivo de vuelta al servidor:
- scp pki/issued/client1.crt sammy@your_server_ip:/tmp
De vuelta en su servidor OpenVPN, copie el certificado del cliente en ~/client-configs/keys/ directorio:
- cp /tmp/client1.crt ~/client-configs/keys/
A continuación, copie el ca.crt y ta.key archivos a ~/client-configs/keys/ directorio también, y configure los permisos apropiados para su usuario sudo:
- cp ~/easy-rsa/ta.key ~/client-configs/keys/
- sudo cp /etc/openvpn/server/ca.crt ~/client-configs/keys/
- sudo chown sammy.sammy ~/client-configs/keys/*
Con eso, los certificados y claves de su servidor y cliente se han generado y se almacenan en los directorios apropiados en su servidor OpenVPN. Todavía hay algunas acciones que deben realizarse con estos archivos, pero vendrán en un paso posterior. Por ahora, puede continuar con la configuración de OpenVPN.
Paso 7:Configuración de OpenVPN
Como muchas otras herramientas de código abierto ampliamente utilizadas, OpenVPN tiene numerosas opciones de configuración disponibles para personalizar su servidor según sus necesidades específicas. En esta sección, proporcionaremos instrucciones sobre cómo establecer una configuración de servidor OpenVPN basada en uno de los archivos de configuración de muestra que se incluyen en la documentación de este software.
Primero, copie el ejemplo server.conf archivo como punto de partida para su propio archivo de configuración:
- sudo cp /usr/share/doc/openvpn/examples/sample-config-files/server.conf /etc/openvpn/server/
Abra el nuevo archivo para editarlo con nano o el editor de texto de su elección:
- sudo nano /etc/openvpn/server/server.conf
Deberá cambiar algunas líneas en este archivo. Primero, encuentra el HMAC sección de la configuración buscando tls-auth directiva. Esta línea estará habilitada por defecto. Coméntalo agregando un ; al comienzo de la línea. Luego agregue una nueva línea después que contenga el valor tls-crypt ta.key solo:
;tls-auth ta.key 0 # This file is secret
tls-crypt ta.key
A continuación, busque la sección sobre cifrados criptográficos buscando el cipher líneas. El valor predeterminado se establece en AES-256-CBC , sin embargo, el AES-256-GCM cipher ofrece un mejor nivel de cifrado, rendimiento y es bien compatible con los clientes OpenVPN actualizados. Comente el valor predeterminado agregando un ; firme al comienzo de esta línea y luego agregue otra línea después que contenga el valor actualizado de AES-256-GCM :
;cipher AES-256-CBC
cipher AES-256-GCM
Inmediatamente después de esta línea, agregue un auth directiva para seleccionar el algoritmo de resumen de mensajes HMAC. Para ello, SHA256 es una buena elección:
auth SHA256
A continuación, busque la línea que contiene un dh directiva, que define los parámetros Diffie-Hellman. Dado que configuró todos los certificados para usar criptografía de curva elíptica, no es necesario un archivo semilla Diffie-Hellman. Comente la línea existente que parece dh dh2048.pem o dh dh.pem . El nombre de archivo de la clave Diffie-Hellman puede ser diferente al que se muestra en el archivo de configuración del servidor de ejemplo. Luego agregue una línea después con el contenido dh none :
;dh dh2048.pem
dh none
A continuación, OpenVPN debería ejecutarse sin privilegios una vez que se haya iniciado, por lo que deberá indicarle que se ejecute con un usuario nadie. y grupo ningún grupo . Para habilitar esto, busque y descomente el user nobody y group nogroup líneas eliminando ; firme desde el principio de cada línea:
user nobody
group nogroup
(Opcional) Enviar cambios de DNS para redirigir todo el tráfico a través de la VPN
La configuración anterior creará la conexión VPN entre su cliente y el servidor, pero no obligará a ninguna conexión a usar el túnel. Si desea utilizar la VPN para enrutar todo el tráfico de su cliente a través de la VPN, es probable que desee enviar algunas configuraciones adicionales a las computadoras cliente.
Para comenzar, busque y descomente la línea que contiene push "redirect-gateway def1 bypass-dhcp" . Hacer esto le dirá a su cliente que redirija todo su tráfico a través de su servidor OpenVPN. Tenga en cuenta que habilitar esta funcionalidad puede causar problemas de conectividad con otros servicios de red, como SSH:
push "redirect-gateway def1 bypass-dhcp"
Justo debajo de esta línea, busque la dhcp-option sección. Nuevamente, elimine el ; desde el principio de ambas líneas para descomentarlas:
push "dhcp-option DNS 208.67.222.222"
push "dhcp-option DNS 208.67.220.220"
Estas líneas le indicarán a su cliente que use los solucionadores de OpenDNS gratuitos en las direcciones IP enumeradas. Si prefiere otros solucionadores de DNS, puede sustituirlos en lugar de las IP resaltadas.
Esto ayudará a los clientes a reconfigurar sus ajustes de DNS para usar el túnel VPN como puerta de enlace predeterminada.
(Opcional) Ajustar el puerto y el protocolo
Por defecto, el servidor OpenVPN usa el puerto 1194 y el protocolo UDP para aceptar conexiones de clientes. Si necesita usar un puerto diferente debido a los entornos de red restrictivos en los que pueden estar sus clientes, puede cambiar el port opción. Si no está alojando contenido web en su servidor OpenVPN, puerto 443 es una opción popular ya que generalmente se permite a través de las reglas del firewall.
Para cambiar OpenVPN para escuchar en el puerto 443, abra el server.conf archivo y busque la línea que se ve así:
port 1194
Edítalo para que el puerto sea 443:
/etc/openvpn/server/server.conf# Optional!
port 443
A menudo, el protocolo también está restringido a ese puerto. Si es así, busca el proto línea debajo del port línea y cambiar el protocolo de udp a tcp :
# Optional!
proto tcp
Si haces cambie el protocolo a TCP, deberá cambiar el explicit-exit-notify valor de la directiva de 1 a 0 , ya que esta directiva solo la utiliza UDP. Si no lo hace mientras usa TCP, se producirán errores cuando inicie el servicio OpenVPN.
Encuentra la explicit-exit-notify línea al final del archivo y cambie el valor a 0 :
# Optional!
explicit-exit-notify 0
Si no necesita usar un puerto y protocolo diferente, es mejor dejar esta configuración sin cambios.
(Opcional) Apuntar a credenciales no predeterminadas
Si seleccionó un nombre diferente durante el ./easyrsa gen-req server comando anterior, modifique el cert y key líneas en el server.conf archivo de configuración para que apunten al .crt apropiado y .key archivos Si usó el nombre predeterminado, server , esto ya está configurado correctamente:
cert server.crt
key server.key
Cuando haya terminado, guarde y cierre el archivo.
Ahora ha terminado de configurar sus ajustes generales de OpenVPN. En el siguiente paso, personalizará las opciones de red del servidor.
Paso 8:Ajuste de la configuración de red del servidor OpenVPN
Hay algunos aspectos de la configuración de red del servidor que deben modificarse para que OpenVPN pueda enrutar correctamente el tráfico a través de la VPN. El primero de ellos es el reenvío de IP , un método para determinar dónde se debe enrutar el tráfico IP. Esto es esencial para la funcionalidad VPN que proporcionará su servidor.
Para ajustar la configuración de reenvío de IP predeterminada de su servidor OpenVPN, abra el /etc/sysctl.conf archivo usando nano o tu editor preferido:
- sudo nano /etc/sysctl.conf
Luego agregue la siguiente línea al final del archivo:
/etc/sysctl.confnet.ipv4.ip_forward = 1
Guarde y cierre el archivo cuando haya terminado.
Para leer el archivo y cargar los nuevos valores para la sesión actual, escriba:
- sudo sysctl -p
Outputnet.ipv4.ip_forward = 1
Ahora su servidor OpenVPN podrá reenviar el tráfico entrante de un dispositivo ethernet a otro. Esta configuración garantiza que el servidor pueda dirigir el tráfico de los clientes que se conectan en la interfaz VPN virtual a sus otros dispositivos físicos de Ethernet. Esta configuración enrutará todo el tráfico web de su cliente a través de la dirección IP de su servidor, y la dirección IP pública de su cliente se ocultará de manera efectiva.
En el siguiente paso, deberá configurar algunas reglas de firewall para garantizar que el tráfico hacia y desde su servidor OpenVPN fluya correctamente.
Paso 9:configuración del cortafuegos
Hasta ahora, instaló OpenVPN en su servidor, lo configuró y generó las claves y los certificados necesarios para que su cliente acceda a la VPN. Sin embargo, aún no ha proporcionado a OpenVPN ninguna instrucción sobre dónde enviar el tráfico web entrante de los clientes. Puede estipular cómo el servidor debe manejar el tráfico de clientes estableciendo algunas reglas de firewall y configuraciones de enrutamiento.
Suponiendo que siguió los requisitos previos al comienzo de este tutorial, ya debería tener ufw instalado y ejecutándose en su servidor. Para permitir OpenVPN a través del cortafuegos, deberá habilitar el enmascaramiento, un concepto de iptables que proporciona traducción dinámica de direcciones de red (NAT) sobre la marcha para enrutar correctamente las conexiones de los clientes.
Antes de abrir el archivo de configuración del firewall para agregar las reglas de enmascaramiento, primero debe encontrar la interfaz de red pública de su máquina. Para hacer esto, escriba:
- ip route list default
Su interfaz pública es la cadena que se encuentra dentro de la salida de este comando que sigue a la palabra "dev". Por ejemplo, este resultado muestra la interfaz llamada eth0 , que se destaca a continuación:
Outputdefault via 159.65.160.1 dev eth0 proto static
Cuando tenga la interfaz asociada con su ruta predeterminada, abra el /etc/ufw/before.rules archivo para agregar la configuración relevante:
- sudo nano /etc/ufw/before.rules
Las reglas UFW generalmente se agregan usando el ufw dominio. Reglas enumeradas en before.rules Sin embargo, el archivo se lee y se coloca antes de que se carguen las reglas convencionales de UFW. Hacia la parte superior del archivo, agregue las líneas resaltadas a continuación. This will set the default policy for the POSTROUTING chain in the nat table and masquerade any traffic coming from the VPN. Remember to replace eth0 in the -A POSTROUTING line below with the interface you found in the above command:
#
# rules.before
#
# Rules that should be run before the ufw command line added rules. Custom
# rules should be added to one of these chains:
#   ufw-before-input
#   ufw-before-output
#   ufw-before-forward
#

# START OPENVPN RULES
# NAT table rules
*nat
:POSTROUTING ACCEPT [0:0]
# Allow traffic from OpenVPN client to eth0 (change to the interface you discovered!)
-A POSTROUTING -s 10.8.0.0/8 -o eth0 -j MASQUERADE
COMMIT
# END OPENVPN RULES

# Don't delete these required lines, otherwise there will be errors
*filter
. . .
Guarde y cierre el archivo cuando haya terminado.
Next, you need to tell UFW to allow forwarded packets by default as well. To do this, open the /etc/default/ufw archivo:
- sudo nano /etc/default/ufw
Inside, find the DEFAULT_FORWARD_POLICY directive and change the value from DROP to ACCEPT :
DEFAULT_FORWARD_POLICY="ACCEPT"
Guarde y cierre el archivo cuando haya terminado.
Next, adjust the firewall itself to allow traffic to OpenVPN. If you did not change the port and protocol in the /etc/openvpn/server.conf file, you will need to open up UDP traffic to port 1194 . If you modified the port and/or protocol, substitute the values you selected here.
In case you forgot to add the SSH port when following the prerequisite tutorial, add it here as well:
- sudo ufw allow 1194/udp
- sudo ufw allow OpenSSH
Nota :If you are using a different firewall or have customized your UFW configuration, you may need to add additional firewall rules. For example, if you decide to tunnel all of your network traffic over the VPN connection, you will need to ensure that port 53 traffic is allowed for DNS requests, and ports like 80 and 443 for HTTP and HTTPS traffic respectively. If there are other protocols that you are using over the VPN then you will need to add rules for them as well.
After adding those rules, disable and re-enable UFW to restart it and load the changes from all of the files you’ve modified:
- sudo ufw disable
- sudo ufw enable
Your server is now configured to correctly handle OpenVPN traffic. With the firewall rules in place, you can start the OpenVPN service on the server.
Step 10 — Starting OpenVPN
OpenVPN runs as a systemd service, so you can use systemctl to manage it. You will configure OpenVPN to start up at boot so you can connect to your VPN at any time as long as your server is running. To do this, enable the OpenVPN service by adding it to systemctl :
- sudo systemctl -f enable openvpn-server@server.service
Then start the OpenVPN service:
- sudo systemctl start openvpn-server@server.service
Double check that the OpenVPN service is active with the following command. You should see active (running) en la salida:
- sudo systemctl status openvpn-server@server.service
Output● openvpn-server@server.service - OpenVPN service for server
     Loaded: loaded (/lib/systemd/system/openvpn-server@.service; enabled; vendor preset: enabled)
     Active: active (running) since Thu 2022-04-21 17:58:24 UTC; 6s ago
       Docs: man:openvpn(8)
             https://community.openvpn.net/openvpn/wiki/Openvpn24ManPage
             https://community.openvpn.net/openvpn/wiki/HOWTO
   Main PID: 144351 (openvpn)
     Status: "Initialization Sequence Completed"
      Tasks: 1 (limit: 4665)
     Memory: 1.8M
        CPU: 27ms
     CGroup: /system.slice/system-openvpn\x2dserver.slice/openvpn-server@server.service
             └─144351 /usr/sbin/openvpn --status /run/openvpn-server/status-server.log --status-version 2 --suppress-timestamps --config server.conf

. . .
You have now completed the server-side configuration for OpenVPN. Next, you will configure your client machine and connect to the OpenVPN Server.
Step 11 — Creating the Client Configuration Infrastructure
Creating configuration files for OpenVPN clients can be somewhat involved, as every client must have its own config and each must align with the settings outlined in the server’s configuration file. Rather than writing a single configuration file that can only be used on one client, this step outlines a process for building a client configuration infrastructure which you can use to generate config files on-the-fly. You will first create a “base” configuration file then build a script which will allow you to generate unique client config files, certificates, and keys as needed.
Get started by creating a new directory where you will store client configuration files within the client-configs directory you created earlier:
- mkdir -p ~/client-configs/files
Next, copy an example client configuration file into the client-configs directory to use as your base configuration:
- cp /usr/share/doc/openvpn/examples/sample-config-files/client.conf ~/client-configs/base.conf
Open this new file using nano or your preferred text editor:
- nano ~/client-configs/base.conf
Inside, locate the remote directiva. This points the client to your OpenVPN server address — the public IP address of your OpenVPN server. If you decided to change the port that the OpenVPN server is listening on, you will also need to change 1194 to the port you selected:
. . .
# The hostname/IP and port of the server.
# You can have multiple remote entries
# to load balance between the servers.
remote your_server_ip 1194
. . .
Be sure that the protocol matches the value you are using in the server configuration:
~/client-configs/base.confproto udp
Next, uncomment the user y group directives by removing the ; sign at the beginning of each line:
# Downgrade privileges after initialization (non-Windows only)
user nobody
group nogroup
Find the directives that set the ca , cert , and key . Comment out these directives since you will add the certs and keys within the file itself shortly:
# SSL/TLS parms.
# See the server config file for more
# description. It's best to use
# a separate .crt/.key file pair
# for each client. A single ca
# file can be used for all clients.
;ca ca.crt
;cert client.crt
;key client.key
Similarly, comment out the tls-auth directive, as you will add ta.key directly into the client configuration file (and the server is set up to use tls-crypt ):
# If a tls-auth key is used on the server
# then every client must also have the key.
;tls-auth ta.key 1
Mirror the cipher and auth settings that you set in the /etc/openvpn/server/server.conf archivo:
cipher AES-256-GCM
auth SHA256
Next, add the key-direction directive somewhere in the file. You must set this to “1” for the VPN to function correctly on the client machine:
key-direction 1
Finally, add a few commented out lines to handle various methods that Linux based VPN clients will use for DNS resolution. You’ll add two similar, but separate sets of commented out lines. The first set is for clients that do not use systemd-resolved to manage DNS. These clients rely on the resolvconf utility to update DNS information for Linux clients.
; script-security 2
; up /etc/openvpn/update-resolv-conf
; down /etc/openvpn/update-resolv-conf
Now add another set of lines for clients that use systemd-resolved for DNS resolution:
; script-security 2
; up /etc/openvpn/update-systemd-resolved
; down /etc/openvpn/update-systemd-resolved
; down-pre
; dhcp-option DOMAIN-ROUTE .
Guarde y cierre el archivo cuando haya terminado.
Later in Step 13 - Installing the Client Configuration step of this tutorial you will learn how to determine how DNS resolution works on Linux clients and which section to uncomment.
Next, you’ll create a script that will compile your base configuration with the relevant certificate, key, and encryption files and then place the generated configuration in the ~/client-configs/files directorio. Open a new file called make_config.sh within the ~/client-configs directorio:
- nano ~/client-configs/make_config.sh
Inside, add the following content:
~/client-configs/make_config.sh#!/bin/bash
# First argument: Client identifier
KEY_DIR=~/client-configs/keys
OUTPUT_DIR=~/client-configs/files
BASE_CONFIG=~/client-configs/base.conf
cat ${BASE_CONFIG} \
<(echo -e '<ca>') \
${KEY_DIR}/ca.crt \
<(echo -e '</ca>\n<cert>') \
${KEY_DIR}/${1}.crt \
<(echo -e '</cert>\n<key>') \
${KEY_DIR}/${1}.key \
<(echo -e '</key>\n<tls-crypt>') \
${KEY_DIR}/ta.key \
<(echo -e '</tls-crypt>') \
> ${OUTPUT_DIR}/${1}.ovpn
Guarde y cierre el archivo cuando haya terminado.
Before moving on, be sure to mark this file as executable by typing:
- chmod 700 ~/client-configs/make_config.sh
This script will make a copy of the base.conf file you made, collect all the certificate and key files you’ve created for your client, extract their contents, append them to the copy of the base configuration file, and export all of this content into a new client configuration file. This means that, rather than having to manage the client’s configuration, certificate, and key files separately, all the required information is stored in one place. The benefit of using this method is that if you ever need to add a client in the future, you can run this script to quickly create a new config file and ensure that all the important information is stored in a single, easy-to-access location.
Please note that any time you add a new client, you will need to generate new keys and certificates for it before you can run this script and generate its configuration file. You will get some practice using this script in the next step.
Step 12 — Generating Client Configurations
If you followed along with the guide, you created a client certificate and key named client1.crt and client1.key , respectively, in Step 6. You can generate a config file for these credentials by moving into your ~/client-configs directory and running the script you made at the end of the previous step:
- cd ~/client-configs
- ./make_config.sh client1
This will create a file named client1.ovpn in your ~/client-configs/files directorio:
- ls ~/client-configs/files
Outputclient1.ovpn
You need to transfer this file to the device you plan to use as the client. For instance, this could be your local computer or a mobile device.
While the exact applications used to accomplish this transfer will depend on your device’s operating system and your personal preferences, a dependable and secure method is to use SFTP (SSH file transfer protocol) or SCP (Secure Copy) on the backend. This will transport your client’s VPN authentication files over an encrypted connection.
Here is an example SFTP command which you can run from your local computer (macOS or Linux). This will copy the client1.ovpn file you created in the last step to your home directory:
- sftp sammy@openvpn_server_ip:client-configs/files/client1.ovpn ~/
Here are several tools and tutorials for securely transferring files from the OpenVPN server to a local computer:
- WinSCP
- How To Use SFTP to Securely Transfer Files with a Remote Server
- How To Use Filezilla to Transfer and Manage Files Securely on your VPS
Step 13 — Installing the Client Configuration
This section covers how to install a client VPN profile on Windows, macOS, Linux, iOS, and Android. None of these client instructions are dependent on one another, so feel free to skip to whichever is applicable to your device.
The OpenVPN connection will have the same name as whatever you called the .ovpn expediente. In regards to this tutorial, this means that the connection is named client1.ovpn , aligning with the first client file you generated.
Windows
Installing
Download the OpenVPN client application for Windows from OpenVPN’s Downloads page. Choose the appropriate installer version for your version of Windows.
Nota :OpenVPN needs administrative privileges to install.
After installing OpenVPN, copy the .ovpn file to:
C:\Program Files\OpenVPN\config
When you launch OpenVPN, it will automatically locate the profile and make it available.
You must run OpenVPN as an administrator each time it’s used, even by administrative accounts. To do this without having to right-click and select Run as administrator every time you use the VPN, you must preset this from an administrative account. This also means that standard users will need to enter the administrator’s password to use OpenVPN. On the other hand, standard users can’t properly connect to the server unless the OpenVPN application on the client has admin rights, so the elevated privileges are necessary.
To set the OpenVPN application to always run as an administrator, right-click on its shortcut icon and go to Properties . At the bottom of the Compatibility tab, click the button to Change settings for all users . In the new window, check Run this program as an administrator .
Connecting
Each time you launch the OpenVPN GUI, Windows will ask if you want to allow the program to make changes to your computer. Haz clic en Sí . Launching the OpenVPN client application only puts the applet in the system tray so that you can connect and disconnect the VPN as needed; it does not actually make the VPN connection.
Once OpenVPN is started, initiate a connection by going into the system tray applet and right-clicking on the OpenVPN applet icon. This opens the context menu. Select client1 at the top of the menu (that’s your client1.ovpn profile) and choose Connect .
A status window will open showing the log output while the connection is established, and a message will show once the client is connected.
Disconnect from the VPN the same way:Go into the system tray applet, right-click the OpenVPN applet icon, select the client profile and click Disconnect .
macOS
Installing
Tunnelblick is a free, open source OpenVPN client for macOS. You can download the latest disk image from the Tunnelblick Downloads page. Double-click the downloaded .dmg file and follow the prompts to install.
Towards the end of the installation process, Tunnelblick will ask if you have any configuration files. Answer I have configuration files and let Tunnelblick finish. Open a Finder window and double-click client1.ovpn . Tunnelblick will install the client profile. Administrative privileges are required.
Connecting
Launch Tunnelblick by double-clicking the Tunnelblick icon in the Applications carpeta. Once Tunnelblick has been launched, there will be a Tunnelblick icon in the menu bar at the top right of the screen for controlling connections. Click on the icon, and then the Connect client1 menu item to initiate the VPN connection. If you are using custom DNS settings with Tunnelblick, you may need check “Allow changes to manually-set network settings” in the advanced configuration dialog.
Linux
Installing
If you are using Linux, there are a variety of tools that you can use depending on your distribution. Your desktop environment or window manager might also include connection utilities.
The most universal way of connecting, however, is to just use the OpenVPN software.
On Ubuntu or Debian, you can install it just as you did on the server by typing:
- sudo apt update
- sudo apt install openvpn
On CentOS you can enable the EPEL repositories and then install it by typing:
- sudo dnf install epel-release
- sudo dnf install openvpn
Configuring Clients that use systemd-resolved
First determine if your system is using systemd-resolved to handle DNS resolution by checking the /etc/resolv.conf archivo:
- cat /etc/resolv.conf
Output# This file is managed by man:systemd-resolved(8). Do not edit.
. . .

nameserver 127.0.0.53
options edns0
If your system is configured to use systemd-resolved for DNS resolution, the IP address after the nameserver option will be 127.0.0.53 . There should also be comments in the file like the output that is shown that explain how systemd-resolved is managing the file. If you have a different IP address than 127.0.0.53 then chances are your system is not using systemd-resolved and you can go to the next section on configuring Linux clients that have an update-resolv-conf script instead.
To support these clients, first install the openvpn-systemd-resolved paquete. It provides scripts that will force systemd-resolved to use the VPN server for DNS resolution.
- sudo apt install openvpn-systemd-resolved
One that package is installed, configure the client to use it, and to send all DNS queries over the VPN interface. Open the client’s VPN file:
- nano client1.ovpn
Now uncomment the following lines that you added earlier:
client1.ovpnscript-security 2
up /etc/openvpn/update-systemd-resolved
down /etc/openvpn/update-systemd-resolved
down-pre
dhcp-option DOMAIN-ROUTE .
Configuring Clients that use update-resolv-conf
If your system is not using systemd-resolved to manage DNS, check to see if your distribution includes an /etc/openvpn/update-resolv-conf script instead:
- ls /etc/openvpn
Outputupdate-resolv-conf
If your client includes the update-resolv-conf file, then edit the OpenVPN client configuration file that you transferred earlier:
- nano client1.ovpn
Uncomment the three lines you added to adjust the DNS settings:
client1.ovpnscript-security 2
up /etc/openvpn/update-resolv-conf
down /etc/openvpn/update-resolv-conf
If you are using CentOS, change the group directive from nogroup to nobody to match the distribution’s available groups:
group nobody
Guarde y cierre el archivo.
Connecting
Now, you can connect to the VPN by just pointing the openvpn command to the client configuration file:
- sudo openvpn --config client1.ovpn
This should connect you to your VPN.
systemd-resolved to manage DNS, check the settings are applied correctly by running the systemd-resolve --status comando como este:
- systemd-resolve --status tun0
You should see output like the following:
OutputLink 22 (tun0)
. . .
         DNS Servers: 208.67.222.222
                      208.67.220.220
          DNS Domain: ~.
If you see the IP addresses of the DNS servers that you configured on the OpenVPN server, along with the ~. setting for DNS Domain in the output, then you have correctly configured your client to use the VPN server’s DNS resolver. You can also check that you are sending DNS queries over the VPN by using a site like DNS leak test.com.
iOS
Installing
From the iTunes App Store, search for and install OpenVPN Connect, the official iOS OpenVPN client application. To transfer your iOS client configuration onto the device, connect it directly to a computer.
The process of completing the transfer with iTunes is outlined here. Open iTunes on the computer and click on iPhone> apps . Scroll down to the bottom to the File Sharing section and click the OpenVPN app. The blank window to the right, OpenVPN Documents , is for sharing files. Drag the .ovpn file to the OpenVPN Documents window. 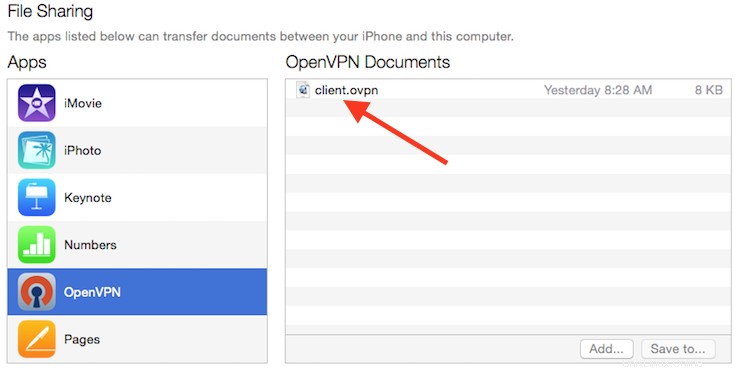
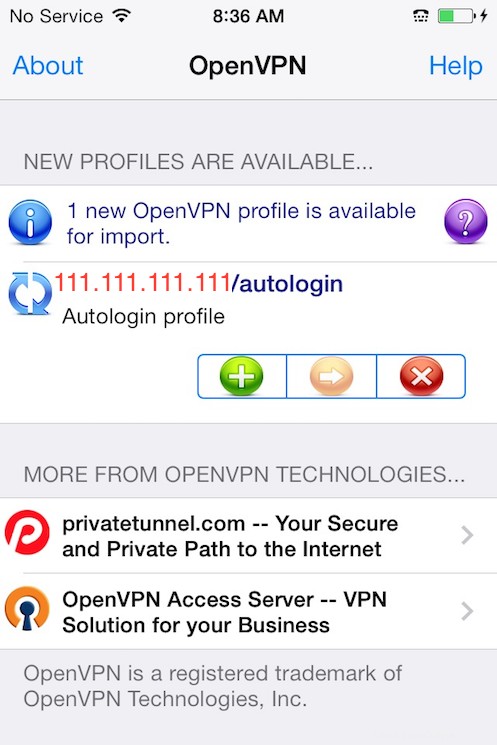
Now launch the OpenVPN app on the iPhone. You will receive a notification that a new profile is ready to import. Tap the green plus sign to import it.
 Connecting
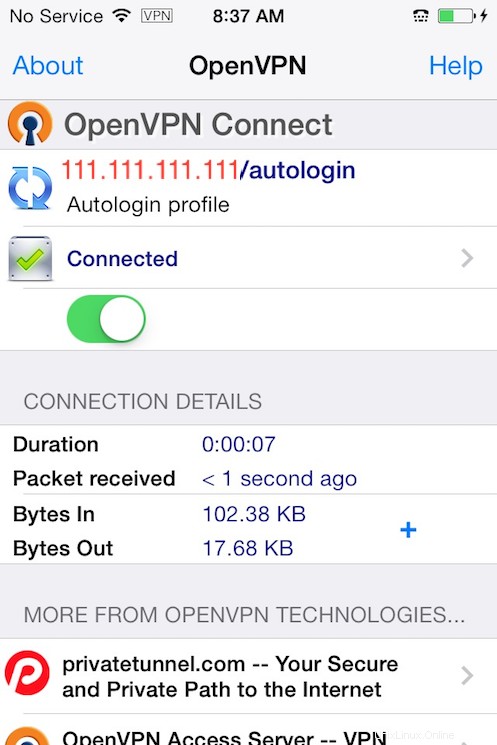
OpenVPN is now ready to use with the new profile. Start the connection by sliding the Connect button to the On posición. Disconnect by sliding the same button to Off .
Nota :The VPN switch under Settings cannot be used to connect to the VPN. If you try, you will receive a notice to only connect using the OpenVPN app.
Android
Installing
Open the Google Play Store. Search for and install Android OpenVPN Connect, the official Android OpenVPN client application.
You can transfer the .ovpn profile by connecting the Android device to your computer by USB and copying the file over. Alternatively, if you have an SD card reader, you can remove the device’s SD card, copy the profile onto it and then insert the card back into the Android device.
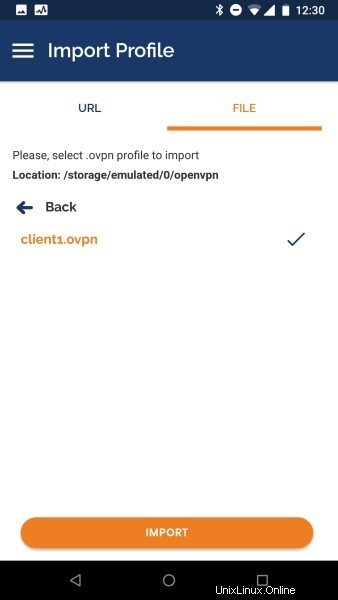
Start the OpenVPN app and tap the FILE menu to import the profile.
Then navigate to the location of the saved profile (the screenshot uses /storage/emulated/0/openvpn ) and select your .ovpn expediente. Tap the IMPORT button to finish importing this profile.
Connecting Once the profile is added, you will see a screen like this:
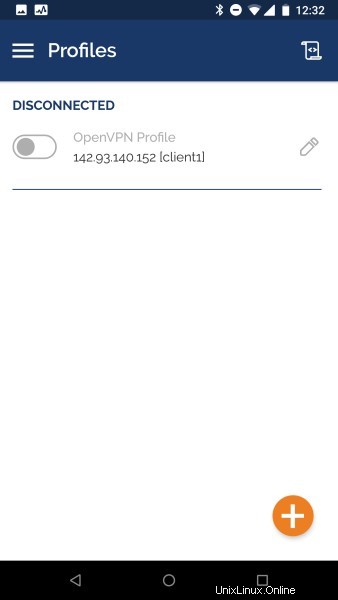
To connect, tap the toggle button close to the profile you want to use. You’ll see real time stats of your connection and traffic being routed through your OpenVPN server: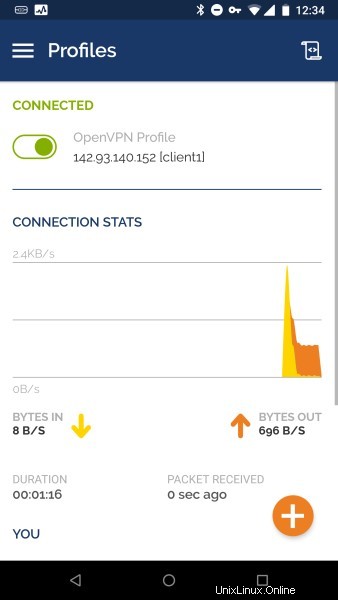
To disconnect, just tap the toggle button on the top left once again. You will be prompted to confirm that you want to disconnect from your VPN.
Step 14 — Testing Your VPN Connection (Optional)
server.conf file for OpenVPN.
Once everything is installed, a simple check confirms everything is working properly. Without having a VPN connection enabled, open a browser and go to DNSLeakTest.
The site will return the IP address assigned by your internet service provider and as you appear to the rest of the world. To check your DNS settings through the same website, click on Extended Test and it will tell you which DNS servers you are using.
Now connect the OpenVPN client to your Droplet’s VPN and refresh the browser. A completely different IP address (that of your VPN server) should now appear, and this is how you appear to the world. Again, DNSLeakTest’s Extended Test will check your DNS settings and confirm you are now using the DNS resolvers pushed by your VPN.
Step 15 — Revoking Client Certificates
Occasionally, you may need to revoke a client certificate to prevent further access to the OpenVPN server.
To do so, follow the example in the prerequisite tutorial on How to Set Up and Configure a Certificate Authority on Ubuntu 22.04 under the Revoking a Certificate sección.
Once you have revoked a certificate for a client using those instructions, you’ll need to copy the generated crl.pem file to your OpenVPN server in the /etc/openvpn/server directorio:
- sudo cp /tmp/crl.pem /etc/openvpn/server/
Next, open the OpenVPN server configuration file:
- sudo nano /etc/openvpn/server/server.conf
At the bottom of the file, add the crl-verify option, which will instruct the OpenVPN server to check the certificate revocation list that you created each time a connection attempt is made:
crl-verify crl.pem
Guarde y cierre el archivo.
Finally, restart OpenVPN to implement the certificate revocation:
- sudo systemctl restart openvpn-server@server.service
The client should no longer be able to successfully connect to the server using the old credential.
To revoke additional clients, follow this process:
- Revoke the certificate with the
./easyrsa revoke client_namecomando - Generate a new CRL
- Transfer the new
crl.pemfile to your OpenVPN server and copy it to the/etc/openvpn/server/directory to overwrite the old list. - Restart the OpenVPN service.
You can use this process to revoke any certificates that you’ve previously issued for your server.
Conclusión
You should now have a fully operational virtual private network running on your OpenVPN Server. You can browse the web and download content without worrying about malicious actors tracking your activity.
There are several steps you could take to customize your OpenVPN installation even further, such as configuring your client to connect to the VPN automatically or configuring client-specific rules and access policies. For these and other OpenVPN customizations, you should consult the official OpenVPN documentation.
To configure more clients, you only need to follow steps 6 and 11-13 for each additional device. To revoke access to clients, follow step 15 .