En esta página el protocolo DNS y el servidor DNS BIND se explican, así como el módulo de Webmin para la creación y gestión de dominios DNS.
- Ver Introducción al Sistema de Nombres de Dominio
Contenido
El módulo del servidor DNS BIND
BIND (Berkeley Internet Name Domain) es el servidor DNS más común para sistemas Unix. Se han lanzado varias versiones a lo largo de los años, la más reciente es la versión 9. El módulo BIND DNS Server (que se encuentra en la categoría Servidores) admite la configuración de las versiones 8 y 9. La versión anterior 4 tiene un formato de archivo de configuración diferente y puede configurarse utilizando el módulo del servidor DNS BIND 4, documentado en una sección posterior de este capítulo.
Debido a que BIND está disponible para casi todos los sistemas Unix y funciona de manera idéntica independientemente del sistema operativo, las instrucciones de este capítulo se aplican no solo a Linux sino también a otras versiones de Unix. La mayoría de las versiones de Unix y Linux incluyen BIND 8 o 9 como paquete estándar, por lo que rara vez es necesario instalarlo. Si el módulo no puede encontrar el servidor DNS, se mostrará un mensaje de error en la página principal; si esto sucede, consulte el CD de su sistema operativo o el sitio web en busca de un paquete BIND, o descargue y compile la fuente desde http://www.isc .org/.
El archivo de configuración principal de BIND es /etc/named.conf, que contiene todas las zonas que aloja el servidor y los valores de configuración global que se aplican a todas las zonas. Los registros de cada zona se almacenan en archivos separados, que normalmente se encuentran en el directorio /var/named. Este módulo de Webmin siempre actualiza todos estos archivos directamente, en lugar de comunicarse con el proceso BIND en ejecución. Esto significa que si está ejecutando algún otro programa que actualice zonas dinámicamente comunicándose con BIND (como un servidor DHCP), entonces este módulo no debe usarse ya que puede interferir con estos cambios. Sin embargo, muy pocos sistemas tienen activado este tipo de actualización dinámica.
La versión 9 de BIND tiene algunas características que la versión 8 no tiene. El más importante que admite este módulo de Webmin son las vistas. Una vista es un conjunto de zonas que solo son visibles para algunos clientes DNS. Normalmente, todos los clientes ven las mismas zonas, pero con BIND 9 puede restringir la visibilidad de algunos dominios solo a clientes particulares, identificados por sus direcciones IP. Esto puede ser útil para crear zonas que solo son visibles para los sistemas en una red interna, incluso si su servidor DNS está conectado a Internet.
Si nunca configuró BIND en su sistema, cuando ingrese al módulo por primera vez, la página principal mostrará un formulario para configurar el servidor DNS, como se muestra a continuación. Este formulario solo se muestra si Webmin detecta que el archivo de configuración named.conf no existe, o si el directorio de archivos de zona que se especifica no existe. Si está seguro de que su configuración de BIND es válida y que el servidor DNS ya se está ejecutando, no haga clic en Crear botón, ya que su archivo named.conf se sobrescribirá. En su lugar, haga clic en Configuración del módulo enlace y verifique que todas las rutas sean correctas para su sistema.
-
 Instalación enlazada
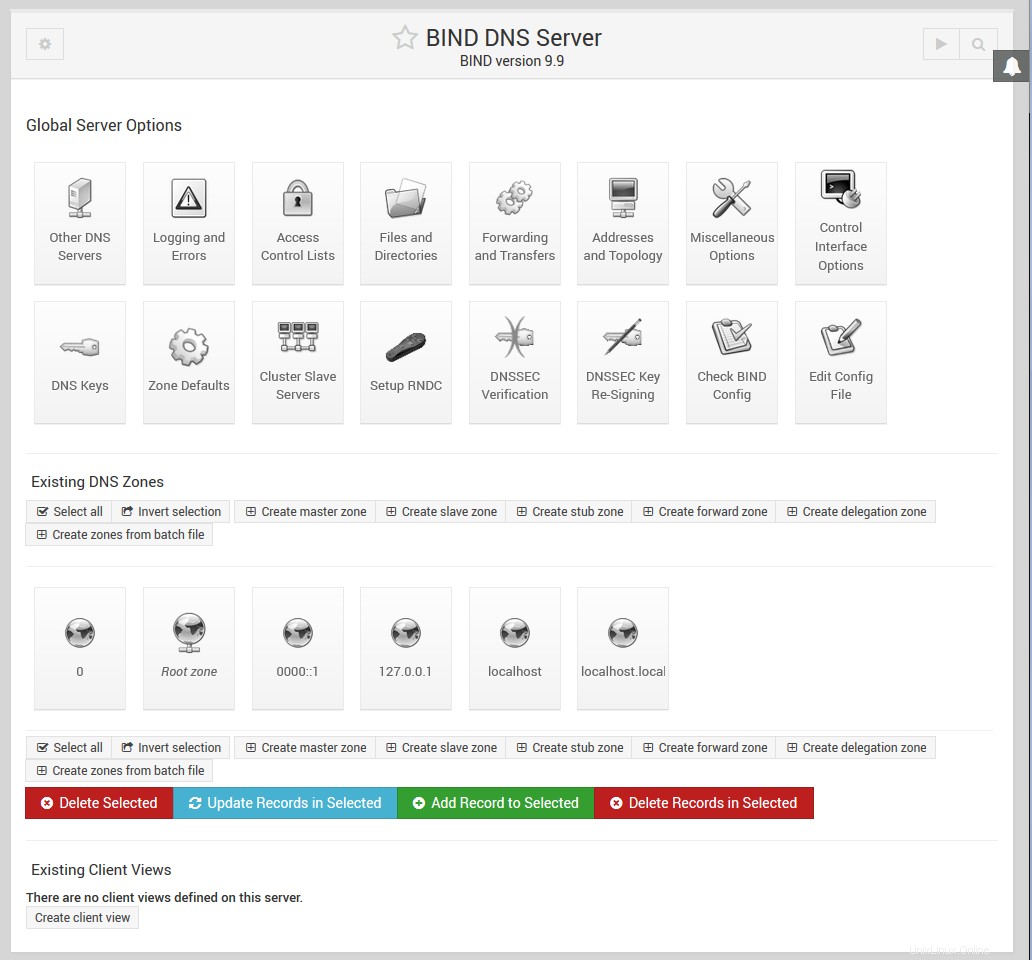
Cuando se haya configurado BIND en su sistema, la página principal aparecerá como se muestra en la siguiente captura de pantalla. En la parte superior hay una tabla de iconos para configurar opciones globales que se aplican a todo su servidor DNS. Debajo de ellos hay íconos para cada una de las zonas que aloja su servidor, seguidos de íconos para vistas si está ejecutando BIND versión 9. En la parte inferior hay botones para aplicar la configuración DNS actual o iniciar el servidor BIND.
Si acaba de configurar BIND por primera vez, probablemente solo habrá un icono de zona:la zona raíz. Algunas distribuciones de Linux que incluyen un paquete BIND vienen con un archivo de configuración básico que define zonas como localdomain y 127.0.0, que se utilizan para resolver el host local y el nombre de host de bucle invertido 127.0.0.l y la dirección IP.
-
 Vincular página principal del servidor DNS
Crear una nueva zona maestra
Una zona maestra es aquella para la cual su servidor DNS es la fuente autorizada de información. Una sola zona puede estar alojada en varios servidores, pero solo uno es el maestro; todos los demás son esclavos. Si desea agregar una nueva zona maestra a la configuración de su servidor, los pasos a seguir son:
- Decida un nombre para la nueva zona, como ejemplo.com o interna. Si este va a ser un dominio de Internet que será visible para otras personas en el mundo, el nombre de dominio no debe haber sido registrado por nadie más todavía. Sin embargo, normalmente no puede registrarlo usted mismo hasta que su servidor DNS se haya configurado para alojarlo.
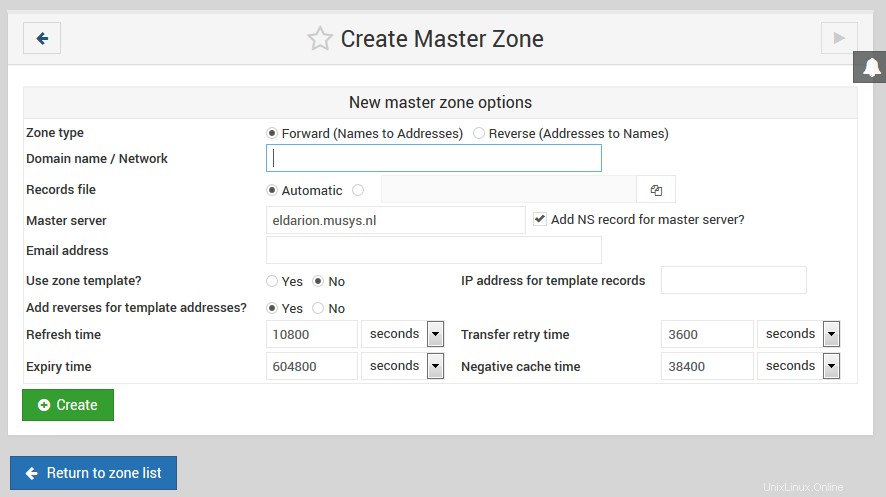
- En la página principal del módulo, haga clic en Crear una nueva zona maestra enlace debajo de la tabla de zonas existentes. Esto lo llevará a la página que se muestra en la imagen a continuación para ingresar los detalles de la nueva zona.
- Si va a ser una zona de reenvío como ejemplo.com o foo.com.au, deje el Tipo de zona campo establecido en Adelante . Sin embargo, si se trata de una zona inversa para buscar nombres de host a partir de direcciones IP, establezca el campo en Reverse .
- En el Nombre de dominio/Red campo, ingrese el nombre de la zona sin ningún punto final. Para una zona inversa, simplemente ingrese la dirección de red como 192.168.1. Webmin lo convertirá automáticamente al formato in-addr.arpa cuando se cree el dominio.
- El archivo de registros El campo controla dónde se almacena el archivo de configuración que contiene los registros de la zona. Si lo deja configurado en Automático , el nombre del archivo se determinará automáticamente según la configuración del módulo y la configuración del directorio en el archivo named.conf. Esta suele ser la mejor opción, ya que dará como resultado que el archivo de registros se cree en el mismo directorio que cualquier zona existente, como /var/named. Sin embargo, si anula la selección de Automático e ingrese un nombre de archivo en su lugar, todos los registros de la zona se escribirán en ese archivo. Si ingresa el nombre de un archivo existente, se sobrescribirá cuando se cree el dominio.
- En el servidor maestro campo, ingrese el nombre de dominio completo del servidor DNS maestro para esta zona. Este debe ser el nombre canónico de su sistema, como server.example.com, no un nombre corto como server. Este servidor (y los valores del siguiente
- campos) se utilizan para crear el registro SOA de la nueva zona.
- En la Dirección de correo electrónico campo, ingrese la dirección de la persona responsable de esta zona. Puede usar el símbolo @ en la dirección, que Webmin convertirá automáticamente en un punto para incluirlo en el registro SOA.
- El Tiempo de actualización El campo determina la frecuencia con la que los servidores secundarios deben verificar con este servidor maestro las actualizaciones de la zona. El valor predeterminado es razonable, pero es posible que desee aumentarlo para las zonas que rara vez cambian o disminuirlo para las que se actualizan con frecuencia.
- El Tiempo de reintento de transferencia determina cuánto tiempo debe esperar un servidor secundario después de una transferencia de zona fallida antes de volver a intentarlo.
- El tiempo de caducidad El campo controla la cantidad máxima de tiempo que un servidor DNS secundario para la zona debe almacenar en caché los registros antes de volver a transferirlos desde el maestro.
- El período de vida predeterminado El campo determina el TTL de los registros en la zona que no tienen uno establecido explícitamente.
- Haga clic en Crear botón en la parte inferior de la página. Siempre que el formulario se haya completado correctamente y la zona aún no exista en su servidor, se le llevará a una página para agregar nuevos registros a la zona.
- Vuelva a la página principal del módulo, que ahora incluirá un icono para su nueva zona, y haga clic en Aplicar cambios. botón en la parte inferior para activarlo.
- Crear Master Zone.png
Una zona recién creada contendrá solo un registro (a menos que haya configurado una plantilla). Para agregar más, siga las instrucciones en la siguiente sección. Una vez que haya configurado los registros básicos en su dominio, puede registrarlo con la autoridad que administra el dominio principal, como .com o .com.au. Algunas autoridades de dominio no le permitirán registrar zonas que no tengan al menos dos servidores (uno maestro y un esclavo) y registros de servidores de nombres en la zona para esos servidores.
Agregar y editar registros
-
 Vincular - Editar zona maestra
La característica más útil del módulo Servidor DNS BIND es la capacidad de agregar, editar y eliminar registros en las zonas maestras alojadas por su servidor. Por ejemplo, si desea configurar un servidor web en su dominio ejemplo.com, deberá agregar un registro de Dirección para www.ejemplo.com con la dirección IP del servidor. Para agregar un nuevo registro como este, los pasos a seguir son:
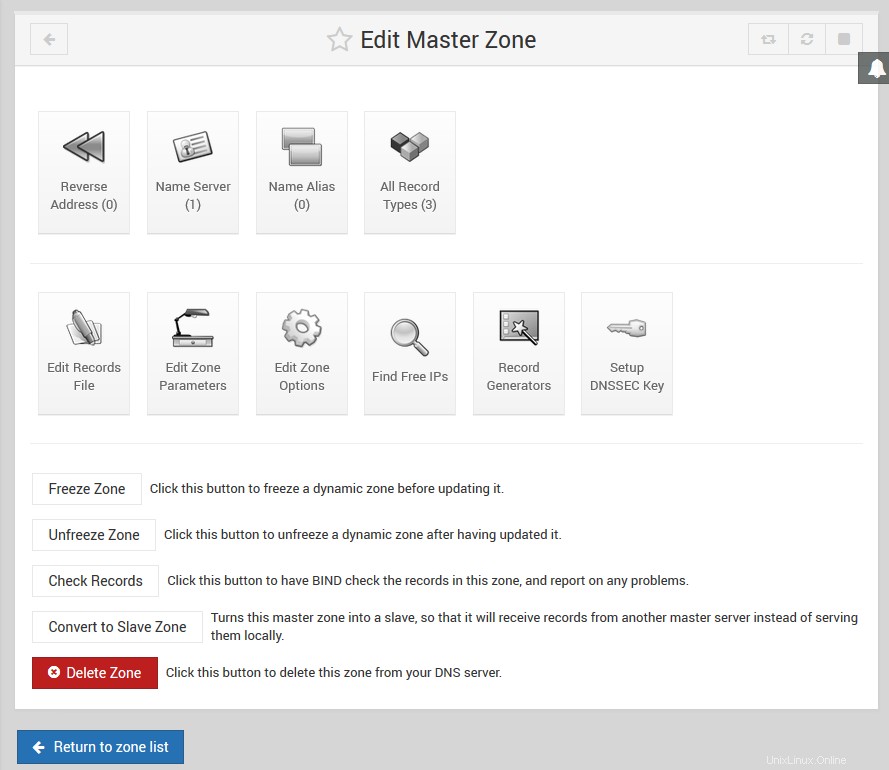
- En la página principal del módulo, haga clic en el icono de la zona a la que desea agregar. Esto abrirá la página que se muestra a continuación, en la parte superior de la cual hay una tabla de iconos, uno para cada tipo de registro.
- Haga clic en el icono del tipo de registro que desea agregar. El tipo más común es Dirección , que asocia una dirección IP con un nombre de host. Ver los #Tipos de registro a continuación para obtener una lista completa de todos los tipos de registro admitidos.
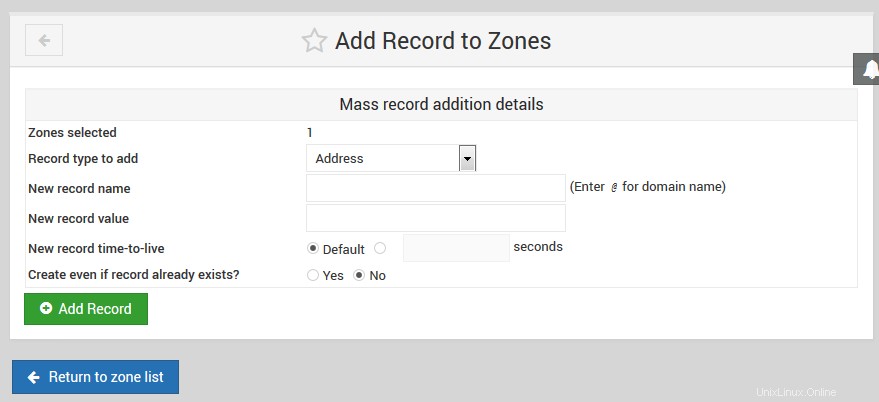
- Al hacer clic en el ícono, accederá a una página que enumera todos los registros existentes de ese tipo. Encima de la lista hay un formulario para ingresar un nuevo registro.
- En el Nombre campo, ingrese el nombre del nuevo registro relativo al nombre de la zona. Por ejemplo, si desea agregar el registro www.example.com, solo debe ingresar www . También es posible ingresar el nombre completo del registro, siempre que tenga un punto al final para indicar que no es relativo a la zona. No ingrese solo www.example.com , ya que se convertirá a www.example.com.example.com, que probablemente no sea lo que desea.
- Si este registro va a cambiar con más frecuencia que el resto de la zona, cambie el Tiempo de vida campo de Predeterminado al tiempo estimado entre cambios. Esto determina durante cuánto tiempo los clientes DNS y otros servidores almacenarán en caché el registro.
- Si está agregando un registro de Dirección, ingrese la dirección IP completa del host en la Dirección campo. Consulte la siguiente tabla para obtener una descripción de los campos que aparecen al agregar otros tipos de registros y lo que significan.
- El campo ¿Actualizar al revés? solo aparece cuando se agrega un registro de dirección. Controla la creación automática de un registro correspondiente en una zona inversa que asocia el nombre de host con la dirección IP. Naturalmente, esto solo se puede hacer si la IP que ingresa está en una red para la que su sistema es el servidor DNS inverso principal. Esto mantiene sincronizadas las zonas de avance y retroceso, lo que puede ser muy útil. Si Sí se selecciona, se agregará un registro de dirección inversa siempre que no exista uno en la zona inversa para la misma dirección IP. A menudo, muchos nombres de host tendrán la misma IP, como los que se usan para el alojamiento virtual basado en nombres. En casos como estos, no desea cambiar el mapeo inverso si ya existe uno. La opción *Sí (y reemplazar la existente)* funciona igual que Sí , pero si ya existe un registro inverso para la dirección IP, se actualizará con el nuevo nombre de host. Esto puede ser útil si sabe que hay un registro existente que desea reemplazar. Si No está seleccionado, no se creará ninguna dirección inversa incluso si es posible.
- Cuando haya terminado de completar el formulario, haga clic en Crear botón en la parte inferior. Siempre que se complete correctamente, el registro se agregará a la lista debajo del formulario. Al escribir en el archivo de registros de la zona, Webmin utilizará el formato canónico completo para el nombre del registro, como www.example.com, incluso si solo ingresa www.
- Para activar el nuevo registro para que los clientes DNS y otros servidores puedan buscarlo, deberá hacer clic en Aplicar cambios en la página principal del módulo. Si planea agregar o editar varios registros, generalmente es mejor esperar hasta que se completen todos los cambios antes de presionar el botón Aplicar. Si está disponible, puede utilizar en su lugar Aplicar cambios en la parte inferior de la página de la zona maestra que se muestra a continuación. Esto usa el comando ndc para decirle a BIND que vuelva a leer solo el archivo para esta zona, lo que puede ser mucho más rápido en un sistema que aloja una gran cantidad de dominios.
-
 Vincular - Agregar registro a zonas
Aunque las instrucciones anteriores se centran en agregar un registro de dirección, el proceso de agregar otros tipos de registro a una zona de reenvío es casi idéntico. El ¿Actualizar al revés? el campo no existe y la Dirección El campo se reemplaza con uno o más campos diferentes. Los tipos de registro La siguiente sección explica en detalle qué campos están disponibles para cada tipo de registro conocido por Webmin.
Al agregar un registro de dirección inversa a una zona inversa, el formulario es bastante diferente. La Dirección el campo aparece antes del Hostname , y el nombre de host siempre debe ingresarse en forma canónica con un punto al final, como www.example.com. . El ¿Actualizar al revés? el campo se reemplaza con ¿Actualizar hacia adelante? , que controla la creación automática de un registro en la zona de reenvío correspondiente. Sin embargo, no existe la opción de sobrescribir un registro de reenvío existente; si ya existe uno con el mismo nombre, no se tocará incluso si Sí es seleccionado.
Cada vez que se agrega o actualiza un registro en una zona usando Webmin, su número de serie se incrementará automáticamente. Esto también se aplica a las zonas inversas que se actualizan automáticamente al agregar un registro de dirección y viceversa. Esto significa que cuando aplique los cambios, otros servidores DNS podrán detectar que la zona ha cambiado comparando el nuevo número de serie con el anterior que han almacenado en caché.
Para editar un registro existente en una zona, los pasos a seguir son:
- En la página principal del módulo, haga clic en el icono de la zona que desea editar, lo que lo llevará a la página que se muestra arriba.
- Haga clic en el icono del tipo de registro que desea cambiar, lo que mostrará una página con una lista de todos los registros de ese tipo en la zona. Alternativamente, puede hacer clic en Todos los tipos de registro icono que mostrará una lista de todos los registros de la zona, independientemente del tipo.
- Haga clic en el nombre del registro que desea editar. Su navegador mostrará un formulario similar al utilizado para agregar un registro, pero con los campos ya completados con los detalles de la dirección existente.
- Para cambiar el nombre del registro, edite el contenido del Nombre campo. Se mostrará en forma canónica con un punto al final inicialmente, pero puede cambiarlo a un nombre relativo al dominio si lo desea.
- Ajuste el Tiempo de vida campo en el que desea que este registro tenga un TTL diferente, o configúrelo como Predeterminado para que sea igual al resto de la zona.
- Si se trata de un registro de Dirección, cambie la IP en la Dirección campo. Para otros tipos de registros, los campos son los mismos que los del formulario de creación de registros y tienen los mismos significados.
- Para registros de direcciones, el campo ¿Actualizar al revés? se visualiza. Seleccionando Sí hará que se cambie el nombre y la dirección del registro correspondiente en la zona inversa para que coincida con este registro directo. Si cambia la IP para que la dirección inversa ya no esté en la misma red, se eliminará de la zona inversa anterior y se agregará a la nueva zona inversa (si está alojada en su servidor).
- Para los registros de dirección inversa, el campo ¿Actualizar hacia adelante? se muestra en su lugar. Si Sí está seleccionado, el registro de dirección correspondiente en su zona de reenvío se cambiará para que coincida con cualquier cambio que realice en este formulario.
- Haga clic en Guardar para actualizar el registro en el archivo de zona y volver a la lista de tipos de registro.
- Para activar los cambios, haga clic en Aplicar cambios botón de regreso en la página principal del módulo.
Para eliminar un registro de una zona, haga clic en Eliminar en el formulario de edición en lugar de Guardar . Para registros de direcciones, si ¿Actualizar al revés? el campo está establecido en Sí , el registro de dirección inversa correspondiente también se eliminará. Aparte de eso, el proceso de eliminación de un registro es idéntico sin importar de qué tipo sea. Lo mismo sucede cuando se elimina un registro de dirección inverso:el registro de dirección coincidente también se elimina, siempre que ¿Actualizar hacia adelante? el campo está establecido en Sí .
La lista de registros en una zona se ordena inicialmente de acuerdo con la configuración del módulo, lo que generalmente significa que los registros se mostrarán en el orden en que se agregaron. Para cambiar esto, puede hacer clic en el encabezado de una columna como Nombre , Dirección o Nombre real para ordenarlos por esa columna en su lugar. Sin embargo, la clasificación es solo temporal y se perderá si regresa a la página principal y vuelve a abrir la zona. Para cambiarlo de forma permanente, consulte el Orden para mostrar registros en campo en la sección sobre Configuración del módulo BIND DNS Server .
Tipos de registros
Webmin no admite todos los tipos de registro que conoce BIND, solo aquellos que se usan con mayor frecuencia. La siguiente lista cubre todos los tipos admitidos y explica para qué se utilizan y qué campos están disponibles al agregar o editar un registro de ese tipo en Webmin. Junto a cada nombre de tipo se encuentra el código abreviado utilizado por BIND para identificar el tipo en el archivo de registros.
- Dirección (A)
- Un registro de dirección asocia una dirección IPv4 con un nombre de host. Cualquier sistema al que desee poder conectarse a través de HTTP, telnet o algún otro protocolo utilizando su nombre de host debe tener un registro de dirección para que los clientes puedan buscar su IP. Un solo nombre de host puede tener más de un registro de dirección, lo que a menudo se hace para distribuir la carga de un sitio web en varios servidores. También es válido crear múltiples registros de este tipo con diferentes nombres pero con la misma IP, como cuando se configuran servidores virtuales Apache basados en nombres. Al crear o editar un registro de Dirección, el campo Dirección se muestra para ingresar la IP asociada con el nombre de host. Un campo etiquetado como ¿Actualizar al revés? también aparece, que controla la creación y modificación automáticas de un registro de dirección inversa en la zona inversa adecuada. Ver Adición y edición de registros sección anterior para más detalles.
- Dirección IPv6 (AAAA)
- Un registro de dirección IPv6 asocia una dirección IPv6 con un nombre de host similar a un registro A.
- Servidor de nombres (NS)
- Los registros de este tipo definen un servidor de nombres que es responsable de una zona. Cada zona debe tener al menos un registro de servidor de nombres para sí misma y puede tener registros adicionales que especifiquen los servidores DNS responsables de los subdominios. Si configura un servidor DNS secundario para una zona, asegúrese de agregar un registro de servidor de nombres para la zona en el servidor maestro. En este caso, el nombre del registro será el nombre canónico de la zona, como example.com. . Al crear o editar un registro de este tipo, un campo denominado Servidor de nombres será mostrado. Esto se debe completar con la dirección IP o el nombre de host del servidor DNS responsable de la zona. Si ingresa un nombre de host, debe tener una dirección IP establecida por un registro de dirección en alguna zona de su servidor.
- Alias de nombre (CNAME)
- Este tipo de registro crea un nombre adicional para un registro de Dirección o Dirección inversa existente. Cuando un cliente DNS solicita la dirección IP de un registro de este tipo, obtendrá la IP del registro al que apunta el alias de nombre. Este tipo de registro puede ser útil si tiene un solo host al que se debe acceder con varios nombres diferentes, como un servidor web que realiza un alojamiento virtual basado en nombres. Aunque esto también se puede hacer mediante la creación de varios registros de direcciones, la creación de una sola dirección y varios alias de nombre es más flexible, ya que permite una actualización más sencilla si la dirección IP del host cambia alguna vez. Los formularios para editar y crear registros de alias de nombre contienen un campo denominado Nombre real . Debe completarse con el nombre canónico del registro al que apunta el alias (como webserver.example.com. ), o con un nombre corto relativo a la zona en la que se encuentra el registro de alias de nombre.
- Servidor de correo (MX)
- Los registros del servidor de correo le indican a los programas de entrega de correo como Sendmail y Qmail qué sistema deben contactar cuando entregan correo a un dominio o host. Sin un registro de este tipo, el correo de un dominio se entregará al sistema cuya IP se especifica en el registro de Dirección de la propia zona. Esto no siempre es deseable, ya que es posible que desee que esa IP sea la dirección de un servidor web, para que los navegadores web puedan conectarse a http://example.com/ así como a http://www.example.com/. Un registro de servidor de correo puede resolver este problema enviando solo el correo electrónico de example.com a otros hosts y todo el resto del tráfico al servidor web. Cada registro del servidor de correo tiene una prioridad, que le indica a los programas de entrega de correo qué servidor de correo se debe probar primero. El registro con la prioridad más baja debe apuntar al sistema que realmente recibe y almacena correo electrónico para el dominio, mientras que aquellos con prioridades más altas generalmente apuntan a sistemas que simplemente retransmitirán correo. Los programas de entrega probarán cada uno a la vez, comenzando con el más bajo, de modo que si el servidor de correo principal está inactivo, el correo electrónico aún se enviará a un retransmisor que puede retenerlo hasta que el servidor principal vuelva a funcionar.
- Al agregar o editar un registro del servidor de correo, se muestran dos campos adicionales. El primero está etiquetado como Servidor de correo , y debe completarse con el nombre de host canónico o relativo de un sistema que pueda aceptar correo para el dominio o nombre de host ingresado en el Nombre campo. El segundo tiene la etiqueta Prioridad , y debe usarse para especificar una prioridad numérica para este servidor de correo en particular. Normalmente, se utiliza una prioridad de 5 para el servidor de correo principal y 10 para las retransmisiones de respaldo. Si solo tiene un servidor de correo para su dominio, realmente no importa qué número se ingrese en este campo. Es posible que dos servidores tengan la misma prioridad, en cuyo caso se elegirá uno al azar para realizar la entrega. Un registro de servidor de correo puede usar el comodín * en su nombre, lo que indica a los programas de correo que un servidor de correo en particular es responsable de todos los hosts en un dominio. Por ejemplo, un registro llamado *.example.com coincidiría con el nombre de host pc1.example.com y cualquier otro host en la zona. Esto puede ser útil si desea forzar el correo que, de otro modo, se enviaría directamente a las estaciones de trabajo de su dominio para que pase por un servidor de correo central. Webmin no le permitirá usar comodines a menos que Permitir comodines la opción de configuración del módulo está establecida en Sí sin embargo, como se explica en la sección *Configuración del módulo del servidor DNS BIND*.
- Información del anfitrión (HINFO)
- Los registros de este tipo se utilizan para registrar información sobre el hardware y el sistema operativo de un host en particular. Por ejemplo, puede crear uno que diga que servidor1.ejemplo.com es una PC x86 con Linux. Sin embargo, rara vez se usan y, de hecho, se consideran un riesgo para la seguridad, ya que brindan información a posibles atacantes que podrían usarse para apoderarse de un servidor. Al crear o editar un registro de información del host, los campos Hardware y Sistema operativo se muestran para ingresar la arquitectura y el tipo de sistema operativo de un host. Los valores que ingrese no deben contener espacios; por lo general, se reemplazan en el tipo de hardware y las cadenas del sistema operativo con caracteres _.
- Texto (TXT)
- Un registro de texto asocia un mensaje arbitrario de algún tipo con un nombre. Los registros TXT se pueden usar para proporcionar información de propiedad a las instalaciones de correo como SPF y DKIM. Sin embargo, tenga en cuenta que cualquier comentario de este tipo estará disponible para cualquier persona en Internet que pueda buscar registros en su dominio y, por lo tanto, no debe contener información confidencial. El campo Mensaje se muestra al ingresar o editar un registro de texto. Puede ingresar cualquier texto que desee, incluidos los espacios.
- Servicio conocido (WKS)
- Un registro de este tipo asocia un nombre de host, puerto y protocolo con un nombre. Se puede considerar como una variante generalizada del registro del servidor de correo, que les dice a los clientes qué host proporciona un servicio particular para algún dominio o nombre de host. Sin embargo, casi ningún programa busca registros WKS, por lo que en la práctica son bastante inútiles. Al agregar o editar uno de estos registros, los campos Dirección , Protocolo y Servicios están disponibles. El primero es para ingresar la dirección IP de un host que brinda los servicios para el host o dominio ingresado en el Nombre campo. El segundo es para seleccionar el protocolo de red que utilizan los servicios, ya sea TCP o UDP. El último es para ingresar una lista de números de puerto o nombres (desde el archivo /etc/services) para los servicios que proporciona el host.
- Persona Responsable (PR)
- Este tipo de registro se utiliza para especificar la persona o grupo responsable de un host en particular. Cada uno de estos registros tiene dos valores asociados:una dirección de correo electrónico y el nombre del registro de texto que contiene el nombre de la persona. Los registros de la persona responsable rara vez se ven y no son utilizados por ningún programa de entrega de correo o cliente de Internet. La dirección de correo electrónico El campo que se muestra al editar o agregar uno de estos registros es para ingresar la dirección completa (como jcameron@example.com ) de la persona responsable del host cuyo nombre se ingresa en el Nombre campo. El Nombre del registro de texto El campo es para ingresar el nombre relativo o canónico de un registro de Texto que contiene el nombre real de la persona.
- Ubicación (LOC)
- Los registros de ubicación se utilizan para especificar la ubicación física en latitud y longitud de un host. Casi nunca se ven y, por lo tanto, muchos programas no los utilizan. Sin embargo, pueden ser útiles en organizaciones grandes que tienen anfitriones en muchos países. Al agregar o editar un registro de Ubicación, se muestra el campo *Latitud y Longitud* para ingresar la ubicación del host en el Nombre campo. Debe tener el formato _42 21 43.528 N 71 05 06.284 W 12.00m 30.00m 10000.00m 10.00m_.
- Dirección de servicio (SRV)
- Los registros de este tipo se utilizan para asociar un nombre de dominio, un nombre de servicio y un protocolo con un host en particular. Le permiten especificar a qué servidor debe contactar un cliente para un servicio y nombre de host en particular, en lugar de simplemente conectarse al host. En cierto modo, son como los registros del servidor de correo pero mucho más flexibles. Por ejemplo, puede especificar que el servidor POP3 para example.com sea mail.example.com , pero el servidor web es www.example.com . En el momento de escribir este artículo, los sistemas cliente de Windows utilizan principalmente los registros SRV. Al agregar o editar un registro de Dirección de servicio, los campos Protocolo y Nombre del servicio se muestran cerca del Nombre caja de texto. Para el protocolo, debe seleccionar TCP o UDP en el menú. Para el nombre del servicio, debe ingresar un nombre conocido del archivo /etc/services, como pop3 o telnet . Para buscar un registro SRV, un cliente combina el nombre del servicio, el protocolo y el nombre para obtener un nombre de registro como ___telnet.___tcp.example.com . Webmin hace esto automáticamente cuando edita o agrega un registro de Dirección de servicio, pero puede ver el nombre combinado en la página que enumera los registros de este tipo. Webmin también agregó automáticamente los _s antes del servicio y el protocolo, pero los oculta cuando se muestra o edita un registro SRV. Esto significa que no hay necesidad de ingresar manualmente al crear o editar un registro de este tipo. La Prioridad El campo debe usarse para ingresar una prioridad numérica para este servidor, que tiene el mismo significado que la prioridad en un registro de servidor de correo. El Peso El campo debe contener una ponderación para este servidor en particular, o cero si solo hay un registro con el mismo nombre, protocolo y nombre de servicio. Una ponderación más alta les dice a los clientes que prueben este servidor con más frecuencia que uno con una ponderación más baja. El Puerto El campo debe contener un número de puerto para que los clientes se conecten al servidor, que no necesariamente tiene que ser el puerto estándar para el servicio. En el Servidor campo, debe ingresar el nombre de host o la dirección IP del sistema que realmente brinda el servicio y al que los clientes realmente se conectan.
Los tipos de registro que soporta Webmin en zonas inversas son:
- Dirección inversa (PTR)
- Un registro de dirección inversa asocia un nombre de host con una dirección IP en una zona inversa. Para que los clientes DNS puedan buscar nombres de host desde direcciones IP en su red, deberá crear un registro de este tipo para cada host. Sin embargo, la mayoría de las veces Webmin lo hace automáticamente al agregar y editar registros de direcciones. Si crea sus propios registros de direcciones inversas, asegúrese de que estén sincronizados con los registros de direcciones coincidentes. Al agregar o editar un registro de este tipo, los campos Dirección y Nombre de host son mostrados. El primero es para ingresar una dirección IP completa, como 192.168.1.10 . Webmin lo convertirá automáticamente al formato in-addr.arpa utilizado internamente por el sistema DNS para direcciones inversas. El segundo campo es para ingresar un nombre de host en forma canónica, como pc1.example.com. , asegúrese de poner siempre un punto al final, de lo contrario, el nombre de host será relativo a la zona inversa, que definitivamente no es lo que desea.
- Servidor de nombres (NS)
- Los registros del servidor de nombres en una zona inversa tienen el mismo propósito que los de un dominio directo:le dicen a otros servidores DNS la dirección IP o el nombre de host de un servidor responsable de la zona o un subdominio. Esto significa que se debe agregar uno para cada servidor DNS principal o secundario de la zona. El campo *Nombre de zona* que aparece al agregar o editar un registro de este tipo es para ingresar el nombre de la zona de la que es responsable el servidor, que normalmente será la zona que contiene el registro. Sin embargo, a diferencia de los registros de dirección inversa, este campo no se convierte automáticamente al formato in-addr.arpa. En su lugar, debe ingresarlo en forma completa como 1.168.192.in-addr.arpa. si define un servidor de nombres para el 192.168.1 red. En el campo *Servidor de nombres*, debe ingresar una dirección IP o un nombre de host de forma canónica para el servidor DNS, como ns1.example.com. .
- Alias de nombre (CNAME)
- Los registros de este tipo se comportan exactamente igual en las zonas inversas que en los dominios directos. Sin embargo, debe completar el Nombre y Nombre real campos con nombres inversos en formato in-addr.arpa, ya que Webmin no los convertirá por usted. Los campos de alias de nombre son más útiles en zonas inversas para realizar una delegación de subred parcial, como se explica en la sección *Delegación inversa parcial* a continuación.
Editing a master zone
You can use Webmin to edit many of the settings that apply to an entire master zone, such as the expiry and retry times, and the clients that are allowed to query it. These settings effectively apply to all records in the zone, although some (such as the TTL) can be overridden on a per-record basis.
Webmin uses the term zone parameters to refer to all information stored in the domain's SOA record, including the primary nameserver, administrator email address and retry and expiry times. All of these are set when the zone is created, but you can edit them at any time by following these steps:
- On the module's main page, click on the icon for the zone that you want to edit.
- Click on the Zone Parameters icon, which will bring up a form for editing the parameters.
- The Master server field only needs to be edited if the Internet hostname of the DNS server has changed. Enter a fully-qualified hostname, with a dot at the end.
- To change the address of the person responsible for the zone, edit the Email address campo. Any @ symbols that it contains will be automatically converted to dots for use in the SOA record, as BIND requires.
- The Refresh time , Transfer retry time , Expiry time and Default time-to-live fields all have the same meanings as explained in the section on Creating a new master zone . If records in your zone are going to be changing frequently in future, you may want to reduce some of these times. However, any changes, may not be detected by secondary servers and DNS clients until the old refresh or expiry time has elapsed, even if the new times are much lower. This is because they will wait for the old times to elapse before checking with the master server again to discovered the new ones.
- Haga clic en Guardar button at the bottom of the page when you are done, and then the Apply Changes button back on the module's main page. The serial number in the SOA record will be automatically incremented when the form is saved, so that secondaries now that the zone has changed.
There is another set of options that you can edit for a master zone, stored in the named.conf file in the zone's section. These control which servers and clients are allowed to query records in the zone, do zone transfers and update records over the network. The most useful of these options specifies a list of slave DNS servers for the zone that should be notified when a change occurs, so that they can perform immediate zone transfers and thus remain synchronized.
To edit these master zone options, the process to follow is:
- On the module's main page, click on the icon for the zone that you want to edit. This will take you to the form shown in Figure 30-4.
- Click on the Edit Zone Options icon, which will bring up a form showing the existing settings.
- The Check names? field determines the level of checking that BIND performs on records in this zone when it reads the records file. The available options are :
- Warn
- If an invalid record is found, an error will be written to the system log file but processing of other records continues normally.
- Fail
- Invalid records cause the entire zone to be rejected, but other zones will still be processed normally.
- Ignore
- No checking is done at all.
- Default
- The global default from the Zone Defaults page is used. If it is not set, then the default complied into BIND will be used instead, which is to fail when invalid records are encounterd.
- To have secondary servers notified when records in the zone change, set the Notify slaves of changes? field to Yes . BIND works out which slaves will be notified by looking at the Name Server records for the zone, and the list of IP addresses in the Also notify slaves campo. If your zone has an secondary servers, then you should definitely turn this option on.
- To allow some systems to update records in the zone dynamically, fill in the Allow updates from field with a list of IP addresses, IP networks (like 192.168.1.0/24) and BIND ACL names. Only those hosts that match will be able to modify records using commands like nsupdate, and if the list is left empty updates will not be allowed at all. You should be careful allowing the dynamic update of zones in which Webmin is also being used to edit records, as it is very likely that updates made dynamically will be overwritten by changes made in this module, or vice-versa.
- By default, all DNS clients and servers will be able to lookup records in the zone. This may not be what you want for a zone that is used only on an internal network, as it may give away sensitive information to potential attackers. To restrict queries, fill in the Allow queries from field with a list of IP addresses, IP networks and BIND ACL names. If the field is left empty, the field with the same name on the global Zone Defaults page determines which clients are allowed.
- To restrict the clients and servers that are allowed to perform zone transfers of all the records in this domain, fill in the Allow transfers from campo. Often you will only want to allow secondary servers to perform transfers, especially if your zone is very large or contains records that you want to hide from attackers. Enter a list of IP addresses, IP networks and ACL names into the field to limit transfers to only matching clients. If it is left empty, the Allow transfers from field on the Zone Defaults page applies instead.
- To specify additional slave servers to be notified when the zone changes, fill in the Also notify slaves field with a list of IP addresses. BIND normally works out with addresses of all secondary servers for the zone from its Name Server records, but this may not always be complete.
- When you are done, click the Save button at the bottom of the page to update the BIND configuration file with your changes. You will need to use the Apply Changes button on the module's main page to make them active.
If a master zone is no longer needed, you can use this Webmin module to totally delete it along with all the records that it contains. To do this, the steps to follow are:
- On the module's main page, click on the icon for the zone that you want to edit.
- Click on the Delete Zone button at the bottom of the page.
- When deleting a forward zone, the field *Delete reverse records in other zones?* controls whether matching Reverse Address records in hosted reverse zones for all of the Address records in this one should be removed as well. This is generally safe to set to Yes , as only records with the exact same IP address and hostname will be deleted.
- Similarly, when deleting a reverse zone the field *Delete forward records in other zones?* determines whether matching forward records should be deleted too.
- Once you have made your selection and are sure you want to go ahead with the deletion, click the Delete botón. The zone's entry in the named.conf file will be removed, and its records file deleted.
You can convert a master zone to a slave zone of the same name without needing to delete and re-create it. This can be useful if the new server is taking over as the master for some domain, or if the master and secondary servers are switching roles. The section on Editing a slave zone explains how to carry out the reverse action of converting a slave zone to a master, which may be useful in this situation.
To convert a zone, the steps to follow are:
- On the module's main page, click on the icon for the zone that you want to edit, then on the Edit Zone Options icon.
- When you click on the Convert to slave zone button , zone's entry in named.conf will be immediately updated to convert it to a slave zone. The browser will then return to the module's main page.
- Normally, every slave zone has a list of master server IP addresses that it can use to perform zone transfers from. In the case of converted zones, this list will be initially empty unless the Default master server(s) for slave zones module configuration option is set. Follow the instructions in the *Edit a slave zone* section to set the master servers addresses correctly.
- To activate the change, click on the Apply Changes button the module's main page.
Creating a new slave zone
A slave or secondary zone is one for which your DNS server gets the list of records from a master server for the zone. Generally, slave servers are used to reduce the load on the primary server, or act as a backup in case it goes down. For important zones (such as a company's Internet domain), you should always have at least one slave server so that your website is still accessible and email can still be delivered even if the primary goes down.
The secondary DNS server for a domain should not usually be located on the same network as the master, so that the failure of that network cannot take them both down. Many ISPs and hosting companies will host secondary zones for their customer's domains for free, on their own DNS servers. If your ISP provides this service and you want to set up a secondary server for an Internet domain, you should take advantage of it. If so, most of this section can be skipped. However, if you want to add a slave server for an internal domain or have a large company network with many connections to the Internet, then the instructions below explain how to set it up:
- On the main page of the BIND DNS Server module, click on the Create a new slave zone link above or below the list of existing zones. This will bring up the form shown below, for entering the details of the new domain.
- For a forward zone like example.com , set the Zone type field to Forward and enter the zone name into the *Domain name / Network* field. For a reverse zone that maps IP addresses to hostnames for a network, choose the Reverse option and enter the network address (like 192.168.1 ) into the *Domain name / Network* text field.
- The Records file field determines if BIND keeps a cache of the records in this zone in a file, and if so where that file is located. If the option None is chosen, records that the DNS server transfers from the master will be kept in memory only, and lost when the server is re-started. This should only be chosen if there is a good network connect between the master and slave servers, as it will increase the number of zone transfers that your server must perform. If you choose Automatic , Webmin will generate a filename in the zone files directory specified in the named.conf file (usually /var/named). Whenever your server does a zone transfer, all records will be written to this file in the standard format. If the final option is selected, you can enter the full path to a file in which records should be stored into the field next to. This can be useful if you want to separate the records files for master and slave zones.
- In the Master servers field, enter the IP addresses of the master DNS server and any other secondary servers for the zone. BIND will try these servers in order when doing a zone transfer, so the master should be first on the list. You must enter at least one address, so that your server knows where to get records from.
- Haga clic en Crear button to have the new slave zone added to your server's configuration. Your browser will be re-directed to a page for editing options for the zone.
- Return to the module's main page, and click the Apply Changes button on the main page to make the addition active.
- On the master server, add a new Name Server (NS) record for the zone with the IP address of the secondary server. This can be easily done in Webmin by following the instructions in the Adding and editing records sección.
- Configure the master DNS server to notify this slave of any changes to records in the zone. The steps in the section on Editing a master zone explain how.
- If this is an Internet domain, notify the registrar for the parent zone of the new secondary server. Most provide online forms for editing the list of nameservers for a domain, to which you can add the secondary's IP. This is necessary so that other hosts on the Internet know to use the slave server is the master is down.

The slave zone creation form
Another type of zone that is closely related to the slave zone is the stub. They are like slave zones, but only contain Name Server records that have been transferred from a master server, instead of all the records. Stub zones are rarely used, but can be useful for ensuring that the Name Server records in a zone for its sub-domains are the same as those use in the sub-domain itself. The steps for creating one are almost identical to those above, but in step 1 you must use the Create a new stub zone link on the main page instead.
Editing a slave zone
After a slave zone has been created, it is still possible to edit several options that apply to it. Naturally there is no way to add or edit the actual records within the zone, but you can still change the list of master servers, the records file and the clients that allowed to query it. To change these setting, the steps to follow are:
- On the module's main page, click on the icon for the slave zone that you want to edit. Your browser will display the form shown in the screenshot below.
- Scroll down to the Zone Options form at the bottom of the page.
- To edit the list of other master and slave servers for this zone, change the IP addresses in the *Master servers *field. If a new secondary server has been added, it should be added to this list on all other secondaries so that they can do zone transfers from it. If the IP address of the master has changed, the list must be updated with the new address.
- To change the amount of time that the server will wait before giving up on a zone transfer, de-select Default for the Maximum transfer time field and enter a number of minutes into the text box next to it.
- If the Records file field is set to None , records transferred from the master server for this zone will be kept in memory only. However if a filename is entered, records will be written to that file instead in the standard format. This is the best option, as it minimizes zone transfers and allows you to view the records on the secondary server, as explained below.
- To have this DNS server notify others when the zone changes, change the Notify slaves of changes? field to Yes . This is only really useful if there are other secondary servers that perform zone transfers from this one, and may not be able to receive update notifications from the master server. The DNS servers to notify are determined from the Name Server records for the zone, and the contents of the *Also notify slaves* field.
- By default, all DNS clients and servers will be able to lookup records in the zone. To change this, fill in the *Allow queries from* field with a list of IP addresses, IP networks and BIND ACL names. If the field is left empty, the field with the same name on the global Zone Defaults page determines which clients are allowed.
- To restrict the clients and servers that are allowed to perform zone transfers of all the records in this domain, fill in the Allow transfers from field with a list of IP addresses, IP networks and ACL names. If it is left empty, the *Allow transfers from* field on the Zone Defaults page applies instead.
- The other fields on the form such as Check names? and *Allow updates from?* are not really used for slave zones, and so can be left unchanged.
- When you are done making changes, click the Save button. As long as there were no syntax errors in your input, you will be returned to the module's main page. Click the Apply Changes button there to make the modifications active. Note that this will not always force a re-transfer of the zone, even if the master servers have changed. For slave zones that use records files, BIND will only do a transfer when it the zone expires or the server receives notification of a change.

The slave zone editing form
When editing a slave zones that uses a records file, it is possible to browse the records in Webmin. At the top of the page that appears when you click on the slave zone's icon is a table of record types, just like the one that appears on the master zone form. Each can be clicked on to list the names and values of records of that type in the zone, as known to the secondary server. Editing or adding to them is impossible of course, as any changes must be made on the master server which is the authoritative source of records for the domain.
To stop your system acting as a slave server for a zone, you will need to delete it from the BIND configuration. This is generally a safe procedure, as the all the records in the zone have been copied from a master server and can be easily replaced. However, you should update the Name Server records in the zone and notify the parent domain's registrar that you system is no longer a secondary for the zone, so that other DNS servers do not waste time querying it.
To delete a slave zone, the steps to follow are:
- On the module's main page, click on the icon for the slave zone that you want to edit. This will take you to the form shown in the screenshot above.
- Click on the Delete button in the bottom right-hand corner of the page, which will display a confirmation form.
- Hit the Delete button if you are sure you want to delete the zone.
- After your browser returns to the module's main page, click on Apply Changes to make the deletion active.
- On the master server, remove the Name Server (NS) record for this secondary server from the zone.
- If this is an Internet domain, notify the parent zone registrar of the removal of this secondary server. Failure to do so could cause problems if other DNS servers attempt to query this one for records in the domain when it cannot provide answers.
The final thing that you can do to a slave zone is convert it to a master. This is only possible for zones that use a records file, so that Webmin can view and edit that file in future. If you do such a conversion, make sure that the original master server is changed to become a slave or stops hosting the zone altogether - the same domain cannot be served by two masters.
The steps to convert a zone are:
- Click on its icon on the module's main page.
- Scroll down to the bottom of the slave zone page, and hit the Convert to master zone botón. This will immediately update the named.conf file to change the zone's type, but will not make any other changes.
- To make the conversion active, click on the Apply Changes button on the module's main page.
- You can now edit records in the domain just as you would with any normal master zone, by following the instructions in the section on Adding and editing records .
Creating and editing a forward zone
A forward zone is one for which your DNS server simply forwards queries to another server on behalf of whoever is making the request. They can be useful if the zone is actually hosted by another server that cannot be reached by clients of this server. It is possible to set up BIND to forward all requests for any non-hosted zones to another server, as explained in the *Configuring forwarding and transfers* section below. A forward zone entry does the same thing, but for just a single domain.
To set one up, the steps to follow are:
- On the module's main page, click on the *Create a new forward zone* link above or below the list of existing domain icons. This will take you to the zone creation form.
- Set the Zone type field to either Forward or Reverse , as when creating master and slave zones.
- For a forward zone, enter its full name (without a dot at the end) into the Domain name / Network campo. For a reverse zone, enter its network (like 192.168.1 ) into the field instead - Webmin will automatically convert it to in-addr.arpa format when the zone is added.
- In the Master servers field, enter a list of IP addresses for the DNS servers that can be queried to lookup records in the zone. These must all be master, slave or forward hosts for the domain. If no addresses are entered at all, BIND will always perform normal lookups of records in the zone instead of forwarding requests to another server. This can be used to override the global forwarding settings on the Forwarding and Transfers page for a single zone.
- Haga clic en Crear button to have the zone added to BIND's configuration file. Your browser will be taken to a page for editing options in the new domain.
- Return to the module's main page, and hit the Apply Changes button to make it active.
After a forward zone has been created, you can delete it or edit the few settings that it has by following these steps :
- Click on the icon for the zone on the module's main page, which will bring your browser to a small form for editing its options.
- To change the list of DNS servers that requests are forwarded to, edit the IP addresses in the Master servers campo. If none are entered, requests for records in this domain will be looked up directly.
- If the Try other servers? field is set to Yes , BIND will try a normal direct lookup for requests in this zone if it cannot contact any of the listed servers.
- Haga clic en Guardar button to store your changes, and then Apply Changes back on the main page to activate them. Or to delete the forward zone, click on Delete and then Delete again on the confirmation page.
Creating a root zone
As the introduction explains, a root zone is one that contains the information that your DNS server needs to contain the Internet root servers. Without one, it is impossible to resolve records in domains other than those hosted by your server. Fortunately, one will almost always exist already in your BIND configuration, created either by Webmin or included as part of the default setup.
You may need to create a root zone if one does not exist yet because you selected the internal non-internet use only option when setting up the module for the first time, but have now connected your system to the Internet. Adding a second root zone can also be useful when views have been configured, as explained in the Using BIND views sección.
Webmin will only allow you to create a root zone if none exists yet, or if a view exists that does not contain one, because there is no point having two such zones. To add one, the steps to follow are:
- On the module's main page, click on the Create a new root zone icon.
- Fill in the Store root servers in file field with a filename to use for the root zone file. If one already exists, then this field will already contain its path - otherwise, you should enter something like /var/named/db.cache.
- The Get root servers from field controls where Webmin copies the root file from. The choices are :*Download from root FTP server *This is the best option, as it tells the module to make an FTP connection to rs.internic.net and download the latest version of the file. However, this may not work if your system cannot make perform FTP downloads due to a firewall. *Use Webmin's older root server information *This option should be used if the first will not work. If selected, the module will use a copy of the root zone file that comes with Webmin, which will work but may not be up to date. *Existing root servers in file *If the file entered in step 2 already exists, then this option should be chosen. If you are adding a root zone to a view and one already exists in another view, it will be selected by default so that the file can be shared between both zones.
- Haga clic en Crear button to add the zone and return to the module's main page. Then hit Apply Changes to make it active.
Once a root zone has been added, an icon representing it will appear on the main page. You can delete it by clicking on the icon and hitting the Delete button - however, this may prevent the lookup of records in non-hosted Internet domains from working as explained above.
Editing zone defaults
Defaults for new master zones
If you add lots of zones that contain similar records, then it can be a lot of work to add them manually after creating each one. For example, in a web hosting company all of your domains might contain a www Address record for the IP address of your webserver, and an Mail Server record that directs mail to a central server. Fortunately, Webmin allows you to create a list of records that get added to all new domains, called a zone template.
A template consists of one or more records, each of which has a name, type and value. For Address records, the value can be option which indicates that it can be entered by the user at zone creation time. This is useful if one of the records (such as www) in the new domains does not have a fixed address, and you want to be able to easily set it when the zone is added. Templates can only be used when creating forward zones, as they do not make much sense for reverse zones.
It is also possible to edit the default expiry, refresh, TTL and retry times for new zones. Webmin's initial defaults are reasonable, but may not be appropriate for your network. To change these defaults and set up template records, the steps to follow are:
- On the module's main page, click on the Zone Defaults icon. The form at the top of the page labeled Defaults for new master zones contains all the fields that need to be edited.
- Edit the Refresh time , Transfer retry time , Expiry time and Default time-to-live fields if you want to change the defaults times for new zones. Existing master zones will not be effected by any changes you make here though.
- If all your new domains are managed by the same person, enter his address into the Default email address campo. This will save you from having to type it in on the master zone creation page every time.
- In the Template records table, two blanks rows appear for entering new records. To add more than two, you will need to save this page and re-edit it. The records in existing rows can be edited by just changing their fields, or deleted by clearing out the record name. Under the Record name column you must enter the name of the record relative to the zone, such as www or ftp. To create a record for the zone itself (such as a Mail Server record for the domain), just enter a single dot. Under the Type column, select a type for the record from the list. See the #Record types section for more information on what each is used for. As its name suggests, the field under the Value column is for entering a value for the new record. For the Address type, you can select From form in which case you will be able to enter an address when creating a new domain, which will be used by all template records that have this option selected. For Mail Server records, both the priority and server name must be entered separated by a space, such as _5 mail.example.com._. Values for records of all other types should be entered in the same format as is used when adding a record to a zone.
- If you are familiar with the records file format used by BIND, you can create your own file of records to be included in new zones. If a filename is entered into the Additional template file field, its contents will be added to the zone file created by Webmin for new master domains.
- When you are done adding template records, click the Save button at the bottom of the page. The changes will apply to any new master zones created from now on.
Now that you have created a template, you can choose whether or not to use it for each new master zone that you create. On the creation form (explained in the Creating a new master zone section) is a field labeled Use zone template? , which is set to Yes by default if there are any template records. Next to it is a field named IP address for template records , which used for entering the IP for records for which the From form option is selected. If you chose to use a template and if there are any records that do not have an IP address specified, then this field must be filled in.
Default zone settings
At the bottom of the Zone Defaults page you will find several options that apply to all existing domains, but can all be set or overridden on a per-zone basis as explained in the Editing a master zone sección. You can control which clients are allowed to query the server, and what kind of checking is done for the records of various domain types. Being able to limit the allowed client hosts is particularly useful, so that you can stop non-internal clients using your DNS server. However, you should make sure that master Internet zones hosted by your server are accessible to everyone, so that other DNS servers on the Internet can look them up.
To change these global options, the steps to follow are:
- On the module's main page, click on the Zone Defaults icon and scroll down to the Default zone settings sección.
- To control which hosts are allowed to query your DNS server, change the Allow queries from field to Listed and enter a list of IP addresses, IP networks (like 192.168.1.0/24) and ACL names into the text box below. Clients that do not match any entry on the list will be denied, unless they are requesting a record in a zone which has its own separate settings allowing them.
- To control which hosts are allowed to perform zone transfers from your server, change the Allow transfers from field to Listed and fill in the text box below with a list of IP addresses, IP networks and ACL names. Only servers that are acting as secondaries for zones that this server hosts really need to be able to do transfers, so it is usually a good idea to enter just their IP addresses. If you are restricting queries, this field must be filled in so that hosts that cannot lookup records are not allowed to perform transfers either.
- The fields Check names in master zones? and Check names in slave zones? control the checking of records in all zone files for master and slave zones respectively. The available options for each are:
- Warn
- If an invalid record is found, an error will be written to the system log file but processing of other records continues normally.
- Fail
- Invalid records cause the entire zone to be rejected, but other zones will still be processed normally.
- Ignore
- No checking is done at all.
- Default
- The default checking level is used, which is Fail .
- To have BIND check responses that it receives from other DNS servers, set the Check names in responses? field to Warn or Fail . The default is simply to pass potentially erroneous responses on to clients.
- The Notify slaves of changes? field determines whether BIND sends a notification to all slaves of master zones hosted by this server when they change. To turn this on, select Yes - otherwise, select No or Default . Enabling notification is a good idea, as it ensures that secondary servers are kept in sync with the master.
- Cuando haya terminado, haga clic en Guardar button at the bottom of the page to update the BIND configuration file, and then the Apply Changes button on the module's main page to make the changes active. The new settings will apply to all zones that do not explicitly override them on their own options pages.
Configuring forwarding and transfers
BIND can be configured to forward all requests for zones that it is not the master or slave for to another DNS server. When doing this, it acts like a DNS client itself, accepting requests from real clients and then sending them off to another server or servers for resolution instead of carrying out the normal process of contacting the root zone servers and finding the correct server for the domain. This can be useful if your DNS server is unable to contact the rest of the Internet, but can still communicate with a DNS server that does have full network access. For example, it may be on an internal network behind a firewall that only allows connections to a limited set of destinations.
To set up forwarding, the steps to follow are:
- On the module's main page, click on the Forwarding and Transfers icon.
- In the form that appears, fill in the Servers to forward queries to field the IP addresses of DNS servers that requests should be sent to. BIND will try them in order until one returns a positive or negative a response. If the list is empty, the server will revert to the normal method of looking up records by contacting the root servers and so on.
- If you want your server to attempt to resolve a client's query directly when it cannot contact any of the forwarding servers, set the Lookup directly if no response from forwarder field to Yes . This is only useful if your server is actually capable of doing lookups.
- Haga clic en Guardar button at the bottom of the page, and then hit Apply Changes back on the main page to make the new setting active. Assuming the forwarding list was filled in, your server will now send all client queries to the listed servers.
The same form also contains fields for configuring BIND's behavior when doing zone transfers. You can control how long it will wait for a transfer to complete, the protocol used for transfers and the number that can be active at the same time. To edit these settings, follow these steps:
- On the module's main page, click on the Forwarding and Transfers icon.
- By default, BIND will wait 120 minutes (2 hours) for a zone transfer from a master to complete. To change this, enter a different number of minutes into the *Maximum zone transfer time* field. This can also be set or overridden on a per-slave zone basis.
- BIND versions before 8.1 only support the transfer of a single zone at a time. Because this can be slow when transferring many zones from the same master server, the *Zone transfer format* field can be set to Many to use a new format that combines multiple domains into the same transfer. If One at a time or Default is chosen, then each zone will be transferred separately. This is the best choice unless you are sure that all slave servers are running BIND 8.1 or above.
- By default, your nameserver will not carry out more than 2 concurrent zone transfers from the same master server. To increase this limit, change the *Maximum concurrent zone transfers* field to something higher. This can speed up the process of transferring a large number of domains, but at the expense of putting a higher load on the master server.
- Haga clic en Guardar button when you are done making changes, and then Apply Changes on the main page to activate them. The new settings will apply to all subsequent zone transfers.
Editing access control lists
An access control list (or ACL) is list of IP addresses, IP networks or other ACLs that are grouped together under a single name. The ACL name can then be used when specifying the list of clients allowed to query, update or perform zone transfers from a zone. This can make be used to reduce the amount of duplication in your BIND configuration, and to make it clearer. For example, the ACL corpnet might match the IP networks 192.168.1.0/24 , 192.168.2.0/24 and 1.2.3.0/24 , which are all part of your company's network. When configuring who can query a zone, you could just enter corpnet instead of that list of network addresses. To view and edit ACLs in Webmin, the steps to follow are :
- On the module's main page, click on the Access Control Lists icon. This will take you to a page listing existing ACLs and allowing the addition of one more. If you want to add more than one ACL, you will need to save the form and re-edit it to force the display of a new blank row.
- To add a new ACL, find the blank row at the bottom of the table and enter a short name consisting of only letters and numbers in the ACL Name column. Then in the field under *Matching addresses, networks and ACLs*, enter a list of IP addresses, IP networks and other ACL names that this new ACL will contain. IP addresses must be entered in their standard format like 192.168.1.1 , but hostnames are not allowed. IP networks must be entered in network/prefix format like 192.168.1.0/24 or 192.168.1/24 . You can also precede any address, network or ACL name with a ! to negate it, so for example the entry !192.168.1.0/24 would match all hosts outside the_ 192.168.1 _network.
- Existing entries in the list can be edited by changing their fields in the table, and ACLs can be deleted by clearing out the field containing their names.
- When you are done adding and editing ACLs, click the Save botón. To activate the changes, hit Apply Changes back on the main page. As soon as an ACL is created, it can be used in other query, transfer and update restrictions of other zones.
BIND has four built-in ACLs that can be used in all the same places that user-defined ACLs can. They are:
- any
- Matches any client address.
- none
- Matches nothing.
- localhost
- Matches the IP addresses of all network interfaces on your system. Even though it is called localhost, it doesn't just match 127.0.0.1.
- localnets
- Matches all clients on all networks that your system is directly connected to. BIND works this out by looking at the IP addresses and netmasks of all network interfaces.
Setting up partial reverse delegation
Partial reverse zone delegation is method for transferring the management of a small set of reverse IP addresses to another DNS server. Normally, reverse zones cover an entire class C network containing 256 addresses. However, many organizations have networks much smaller than this, containing maybe 16 or 32 addresses. Normally, this would make it impossible for the organization to manage its own reverse address mappings, as the addresses come from a network that is owned by an ISP or hosting company.
Fortunately, there is a solution - the ISP can set up Name Alias (CNAME) records in the reverse zone for the parent network that point to Reverse Address records in a special zone on the organization's DNS server. The parent zone must also contain a Name Server (NS) record for the special sub-zone that points to the customer's server, so that other DNS clients know where to look when resolving the Name Alias records.
An example may make this clearer - imagine for example than an ISP had granted addresses in the range 192.168.1.100 to 192.168.1.110 to Example Corporation, which owns the example.com domain. The company already runs its own DNS server to host the example.com zone, but wants to control reverse address resolution for its IP range as well. The ISP would create Name Alias records in the 192.168.1 zone pointing to the special sub-zone 192.168.1.100-110, which will contain the actual Reverse Address records named like 192.168.1.100-100.101. The ISP also needs to create a Name Server record for 192.168.1.100-110 which tells other servers that Example Corporation's DNS server should be used to find records under that zone.
Webmin handles reverse address delegation well, and automatically converts special network zones like 192.168.1.100-110 to and from the real zone names used by BIND such as 100-110.1.168.192.in-addr.arpa. The exact steps to follow on both the server that hosts the actual class C network zone and the server that a subset of it is being delegated to are :
- Decide on the range of addresses that are being delegated, such as 192.168.1.100 to 192.168.1.110 . Typically, the sub-zone name is based on the range of addresses being delegated, but this does not have to be the case as long as it is under the parent network domain.
- On the server that hosts the class C network zone, add a Name Server record for 192.168.1.100-110 with the server set to the IP address or name of the sub-zone's DNS server.
- For each address in the range, add a Name Alias record to the reverse zone named like 101.1.168.192.in-addr.arpa. with the Real Name set like 101.100-110.1.168.192.in-addr.arpa . As you can see, the alias points to a record inside the zone for the sub-network.
- When all of the Name Alias records have been created, everything that needs to be done on this server is finished and you can hit Apply Changes .
- On the DNS server for the sub-network, create a new master zone for the reverse network 192.168.1.100-110 . Webmin will automatically convert this to the correct in-addr.arpa format for you.
- Add Reverse Address records to the new zone as normal for IP addresses like 192.168.1.100-110.101 . Adding a record for the IP 192.168.1.101 will not work.
- When you are done creating reverse records, click the *Apply Changes* button to make them active. You should now be able to look them up using a command like nslookup on the server for the parent network zone.
The instructions above can be used to delegate multiple ranges from a single class C network to several different DNS servers. There is no limit on the size of ranges, nor any requirement that they follow normal network block boundaries - however, for routing reasons most IP allocation is done in power-of-two sized blocks (like 4, 8, 16 and so on), which means that any sub-zone ranges will be the same size.
The only problem with reverse address delegation when using Webmin is that Reverse Address are not automatically created and updated when Address records are. This means that you will have to create all such records manually on the sub-zone server, as in the steps above.
One inconvenience in setting up partial reverse delegation is the number of similar Name Alias records that must be created on the parent network zone server. Fortunately, there is a simpler alternative - record generators. A generator is a special BIND configuration entry that creates multiple similar records using an incrementing counter. This module allows you to created and edit generators, by following these steps :
- On the module's main page, click on the icon for the reverse zone that you want to create records in. This will typically be a class C network domain that is going to have a range of addresses delegated to some other Server.
- Click on the Record Generators icon. This takes you to a page containing a table of existing generators, with a blank row for adding a new one.
- In the empty row, select CNAME from the menu under the Type column.
- Under the Range column, enter numbers for the start and end of the address range into the first two fields, such as 100 and 110 . The third field is for entering the gap between each step, and should be left blank. If you were to enter 2, then the range would go 100 , 102 , 104 y así.
- In the Address pattern field, enter _$_ (a single dollar sign). When the records are created, the $ will be replaced with the number of each record, which will in turn resolve to an IP address in the range. You could also enter $.1.168.192.in-addr.arpa. , which makes things more obvious but is longer to type.
- In the Hostname pattern field, enter $.100-110 . Similarly, the $ will be replace with the number of each record, which will resolve to something like 101.100-110. 1.168.192.in-addr.arpa. .
- If you like, enter a comment that describes what this generator is for into the Comment campo.
- Haga clic en Guardar button, return to the module's main page and click on Apply Changes .
A generator can replace the Name Alias records that the first set of instructions in this section tell you to create, so there is no need for them anymore. Note that the automatically generated replacements will not be visible or editable in the normal way, only through the Record Generators page.
Using BIND views
BIND version 9 introduced the concept of views, which are groups of zones that are visible only to certain DNS clients. Views can be used to hide internal zones from the Internet, to present the same zone in two different ways, or to stop non-local clients resolving non-hosted domains through your server. Every view has a unique name, and a list of matching IPs addresses and IP networks that determines which clients and servers it is visible to.
When it detects that you are running BIND 9, several additional features are available in the module. You can create views, move zones from one view to another, and choose which view zones are created in. On the main page, each current view is represented by an icon under Existing Client Views heading, and each zone icon has a label that indicates which view it is in.
If any views exist, then every zone must be in a view. Only if none are defined will Webmin allow the creation of zones outside views, as this is not supported by BIND. This includes the root zone, which must be available to a client for DNS requests for records in domains not hosted by this server to succeed. For this reason, it often makes sense to put the root zone in a view that is available to all clients.
To add a new view to your BIND configuration, the steps to follow are:
- On the module's main page, click on the Create a new view link in the Existing Client Views sección. This will take you to a form for entering its details.
- Enter a short alphanumeric name for the view (such as internal or everyone ) into the View name campo. Each view must have a unique name.
- Leave the DNS records class field set to Default .
- If this zones in this view are to be visible to everyone, set the Apply this view to clients field to All clients . Otherwise, choose Selected addresses, networks and ACLs and enter a list of IP addresses, IP networks and BIND ACL names into the text box below. Only clients that match one of the entries in this list will have access to the view.
- Haga clic en Crear button at the bottom of the form. You will be returned to the main page, which will include an icon for your new view.
- Move any existing zones that you want to be in this view into it. A zone can be moved by clicking on its icon, then on *Edit Zone Options*, and then selecting the new view from the menu next to the Move to view button before clicking it. If this is your first view, all existing zones must be moved into it (or another view) before the new configuration will be accepted by BIND.
- When you are done moving zones, click the Apply Changes button on the main page.
Once a view has been created, you can change the list of addresses and networks that it matches by clicking on its icon on the main page and updating the Apply this view to clients campo. Then hit the Save button followed by Apply Changes to make the new client list active.
A view can be deleted by clicking the Delete button on the same form. This will bring up a confirmation page that allows you to choose what should happen to the zones that it contains, if any. The available options are:
- Delete totally
- All zones in the view are deleted, along with their records files.
- Move out of views
- Zones in the view are moved out to the top level. This option should only be used when deleting the last view, for the reasons explained above.
- Move to view
- Zones are moved to a different existing view.
When one or more views have been defined on your system, you can choose which one to use when adding new zones. This is done using the Create in view field on the master, slave, forward and root zone creation forms, which allows you to select a view from its menu. Naturally, there is no option for creating a zone outside of any views as this is not allowed by BIND.
One common use of views is hiding internal zones from clients outside your internal network. This is a good way of hiding the structure of your network and the hosts on it from potential attackers. To set it up, the steps to follow are:
- Create a new view called internal that matches clients on your internal LAN.
- Create a second view called everyone that matches all clients.
- Move any zones that are for internal use only into the internal view. Zones for Internet domains such as example.com must not be put in this view, as that would make them inaccessible to the rest of the world.
- Move all other zones (including the root zone) to the everyone view.
Views can also be used to prevent clients outside your network looking up non-hosted domains on your server, as follows:
- Create a new view called internal that matches clients on your internal LAN.
- Create a second view called everyone that matches all clients.
- Move the root zone to the internal view, which will prevent the server from looking up records for non-local clients that require contact with the root servers.
- Move all other zones to the everyone view.
Module access control
Like others, the BIND DNS Server module allows you to control which of its features are available to a particular Webmin user or group. This can be useful for giving people the rights to manage only records in their own zones and nobody else's. Even though this would normally require root access to the records files, with Webmin it can be granted to people without giving them level of power that a root login would allow.
Once you have created a user with access to the module as explained on WebminUsers, the steps to limit his access to only certain zones are:
- Click on the BIND DNS Server next to the name of the user in the Webmin Users module. This will being up a page of access control options.
- Cambie ¿Puede editar la configuración del módulo? campo a No , so that the user is not allowed to change the paths that the module uses to named.conf and other files.
- For the *Domains this user can edit *field, choose *Selected zones* and select the ones that you want him to have access to from the list to its right. If you want him to be able to edit almost all zones, it may be better to choose All except selected and select only those that he should not be allowed to manage records in. If your DNS server uses views, you can use the *Zones in view* options to allow or deny access to all zones in a view as well.
- Change the fields Can create master zones? , *Can create slave/stub zones?*, Can create forward zones? and *Can edit global options?* to No .
- If you want Reverse Address records in zones that the user does not have access to to be updated by changes to Address records in zones that he does, set the *Can update reverse addresses in any domain?* field to Yes . This may not be a good idea from a security point of view though, as he would be able to change almost any existing Reverse Address record on your system. For that reason, I suggest that this field be set to No .
- To stop the user creating more than one Address record with the same IP, set the *Can multiple addresses have the same IP? field to *No . Even though creating multiple records is harmless, you may want to set this to No to prevent the user allocating the same IP twice.
- Leave the Read-only access mode? field set to No . If it is changed to Yes , the user will only be able to view zones and records using the module, and not change anything. This might be useful for creating a different kind of restricted user though - one who can see all settings, but not edit them.
- Leave the Can apply changes? field set to Yes , so that he can use the Apply Changes button to make his additions and modifications active.
- Unless you want the user to be able to edit his records file manually, change the Can edit records file? campo a No . Most un-trusted users are not smart enough to perform manual editing.
- The Can edit zone parameters? field determines if the user can see and use the Edit Zone Parameters icon for his domains. Setting this to Yes is quite safe, as the user can only harm his own zones by setting the parameters to silly values.
- Similarly, the Can edit zone options? field determines if the Edit Zone Options icon is visible or not. You should set this to No , as it is possible for a user to create a syntax error in named.conf by improper use of the zone options form.
- Unless you want the user to be able to delete his own domains, change the Can delete zones? campo a No . Users should contact the master administrator instead if they can to delete zones.
- The Can edit record generators? field can be left set to Yes , as it simply allows the creation of multiple records at once. However, some users may get confused by this feature so it might be a good idea to change the field to No .
- The Can lookup WHOIS information? And *Can search for free IP numbers?* fields can also be left on Yes , as those features mere display information to the user.
- Change the Can create and edit views? campo a No , so that the user cannot manage BIND 9 views. If the user is allowed to create zones, you can use the *Views this user can edit and add zones to* field to limit those that he can create zones in.
- Can create slave zones on remote servers? should be set to No , but this doesn't really matter as the user is not going to be allowed to create master or slave zones anyway.
- Finally, click the Save button to make the new restrictions for the user active.
See also:
- Resolution for Virtual Hosts