MySQL es el sistema de gestión de bases de datos relacionales más popular. Como suposición, cada tercer sitio web que se ejecuta en Internet utiliza MySQL. El equipo oficial de MySQL proporciona los paquetes Debian para que MySQL 8 se instale en sistemas Ubuntu.
Este tutorial lo ayudará a instalar el servidor MySQL en los sistemas Ubuntu 18.04 Bionic Beaver.
Requisitos
Inicie sesión en su sistema Ubuntu 18.04 usando el acceso de shell. Para sistemas remotos, conéctese con SSH. Los usuarios de Windows pueden usar Putty u otras aplicaciones alternativas para la conexión SSH.
ssh [email protected]
Ejecute los siguientes comandos para actualizar los paquetes actuales a la última versión.
sudo apt update && sudo apt upgrade
Paso 1:configurar MySQL PPA
El equipo de MySQL proporciona MySQL PPA oficial para los sistemas operativos Ubuntu. Puede descargar e instalar el paquete en su sistema Ubuntu 18.04, que agregará un archivo PPA a su sistema. Ejecute el siguiente comando para habilitar PPA.
wget http://repo.mysql.com/mysql-apt-config_0.8.10-1_all.deb
sudo dpkg -i mysql-apt-config_0.8.10-1_all.deb
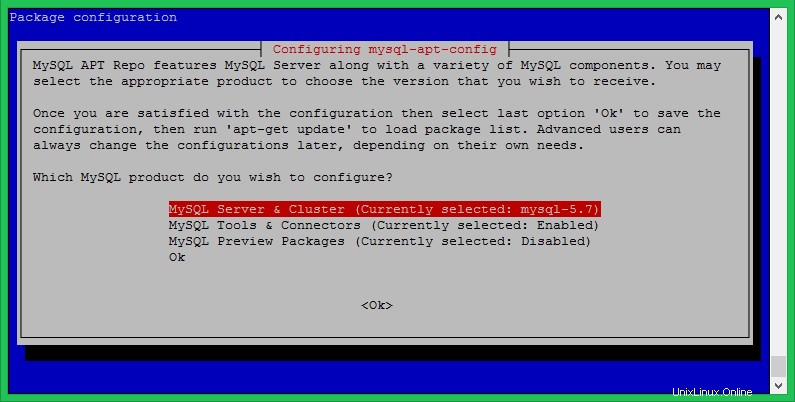
Durante la instalación del paquete MySQL apt config. Seleccione la primera línea como se muestra en la siguiente captura de pantalla y presione enter. Aquí puede seleccionar la versión de MySQL (8.0 o 5.7) para instalar en su sistema. Después de eso, seleccione la última línea con el texto Ok y presione enter para completar esto.
Paso 2:instale MySQL 8 en Ubuntu 18.04
Su sistema está listo para la instalación de MySQL. Ejecute los siguientes comandos para instalar MySQL en el sistema Ubuntu 18.04.
sudo apt-key adv --keyserver keys.gnupg.net --recv-keys 8C718D3B5072E1F5
sudo apt update
sudo apt install mysql-server
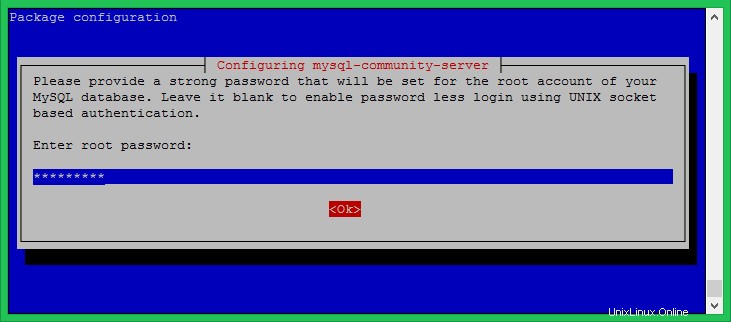
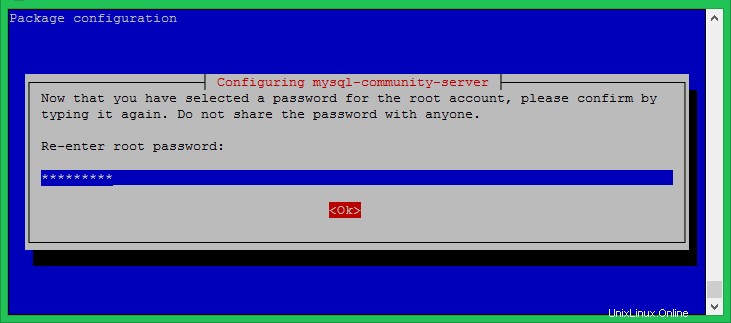
El proceso de instalación le pedirá que establezca la contraseña raíz como predeterminada. Ingrese una contraseña segura y lo mismo para confirmar la ventana de contraseña. Esta será la contraseña de usuario raíz de MySQL requerida para iniciar sesión en el servidor MySQL.
Paso 3:instalación segura de MySQL
Ejecute el siguiente comando en su sistema para realizar cambios de seguridad en su servidor de base de datos. Esto generará algunas preguntas. ¿La alta seguridad proporciona todas las respuestas a sí? .
sudo mysql_secure_installation
Aquí puede habilitar/deshabilitar el complemento de validación de contraseña, establecer la fuerza requerida para las contraseñas, eliminar usuarios anónimos, prohibir el inicio de sesión raíz de forma remota, eliminar la base de datos de prueba y acceder a ella y recargar los privilegios de recarga después de los cambios aplicados.
Vea el siguiente resultado y la acción tomada por mí:
Securing the MySQL server deployment.

Enter password for user root:

VALIDATE PASSWORD PLUGIN can be used to test passwords
and improve security. It checks the strength of password
and allows the users to set only those passwords which are
secure enough. Would you like to setup VALIDATE PASSWORD plugin?

Press y|Y for Yes, any other key for No: y

There are three levels of password validation policy:

LOW    Length >= 8
MEDIUM Length >= 8, numeric, mixed case, and special characters
STRONG Length >= 8, numeric, mixed case, special characters and dictionary file

Please enter 0 = LOW, 1 = MEDIUM and 2 = STRONG: 2
Using existing password for root.

Estimated strength of the password: 50
Change the password for root ? ((Press y|Y for Yes, any other key for No) : y

New password:

Re-enter new password:

Estimated strength of the password: 100
Do you wish to continue with the password provided?(Press y|Y for Yes, any other key for No) : y
By default, a MySQL installation has an anonymous user,
allowing anyone to log into MySQL without having to have
a user account created for them. This is intended only for
testing, and to make the installation go a bit smoother.
You should remove them before moving into a production
environment.

Remove anonymous users? (Press y|Y for Yes, any other key for No) : y
Success.


Normally, root should only be allowed to connect from
'localhost'. This ensures that someone cannot guess at
the root password from the network.

Disallow root login remotely? (Press y|Y for Yes, any other key for No) : y
Success.

By default, MySQL comes with a database named 'test' that
anyone can access. This is also intended only for testing,
and should be removed before moving into a production
environment.


Remove test database and access to it? (Press y|Y for Yes, any other key for No) : y
 - Dropping test database...
Success.

 - Removing privileges on test database...
Success.

Reloading the privilege tables will ensure that all changes
made so far will take effect immediately.

Reload privilege tables now? (Press y|Y for Yes, any other key for No) : y
Success.

All done!
Paso 4:Conéctese a MySQL
El servidor MySQL ha sido instalado en su sistema. Ahora conéctese a la base de datos MySQL usando la línea de comando. Use la contraseña de la cuenta raíz establecida en el paso anterior.
 mysql -u root -p

Enter password:
Welcome to the MySQL monitor.  Commands end with ; or \g.
Your MySQL connection id is 8
Server version: 8.0.17 MySQL Community Server - GPL

Copyright (c) 2000, 2019, Oracle and/or its affiliates. All rights reserved.

Oracle is a registered trademark of Oracle Corporation and/or its
affiliates. Other names may be trademarks of their respective
owners.

Type 'help;' or '\h' for help. Type '\c' to clear the current input statement.

mysql>
Conclusión
Este tutorial lo ayudó a instalar MySQL 8 en el sistema Ubuntu 18.04 LTS Linux.