En este tutorial, lo guiaré sobre cómo configurar e instalar Oracle Weblogic en el sistema operativo CentOS 7. Oracle Weblogic es una herramienta de middleware ampliamente utilizada por grandes empresas para servir aplicaciones que utilizan Java EE como lenguaje de programación. Con su genial interfaz de usuario, funciones comprobadas como el módulo de coherencia (para fines de almacenamiento en caché), agrupación de bases de datos (para manejar múltiples conexiones de bases de datos), Oracle Weblogic muestra ventajas bastante impresionantes en comparación con otras herramientas similares como Apache Tomcat, JBoss y WebSphere. Según lo declarado por el mismo Oracle, WebLogic proporciona un conjunto completo de servicios para esos módulos y maneja muchos detalles del comportamiento de la aplicación automáticamente, sin necesidad de programación. A continuación se muestra un ejemplo de dónde se encuentra Oracle Weblogic en un diseño de alto nivel:

1. Nota Preliminar
Para este tutorial, usaré CentOS 7.4 en la versión de 64 bits. Tenga en cuenta que, aunque la configuración se realiza en CentOS 7, los pasos y la modificación son básicamente los mismos cuando se usa RedHat u Oracle Linux. La razón por la que mencioné esto es que la mayoría de las instalaciones de producción para Oracle Weblogic usarán Oracle Linux como sistema operativo.
Al final de este tutorial, habremos logrado abrir 2 nodos de servidor que actuarán como servidores administrados de Weblogic que fueron creados por un servidor de administración de Weblogic. Aparte de eso, utilizaremos el panel de administración del servidor para combinar ambos servidores administrados en un grupo de clústeres.
2. Fase de instalación
Dado que el propósito de Oracle Weblogic es proporcionar código de aplicación de alto rendimiento en el lenguaje de programación JAVA, es bastante obvio que la instalación del servidor de middleware en sí requeriría la integración del tiempo de ejecución de Java. Por lo tanto, para el requisito previo de instalación, necesitaremos instalar JAVA. paquete en nuestro servidor de administración y los dos nodos administrados. Los pasos son los siguientes:
 [[email protected]_mgr opt]# wget --no-cookies --no-check-certificate --header "Cookie: gpw_e24=http%3A%2F%2Fwww.oracle.com%2F; oraclelicense=accept-securebackup-cookie" "http://download.oracle.com/otn-pub/java/jdk/8u131-b11/d54c1d3a095b4ff2b6607d096fa80163/jdk-8u131-linux-x64.rpm"
--2018-06-09 12:57:05-- http://download.oracle.com/otn-pub/java/jdk/8u131-b11/d54c1d3a095b4ff2b6607d096fa80163/jdk-8u131-linux-x64.rpm
Resolving download.oracle.com (download.oracle.com)... 23.49.16.62
Connecting to download.oracle.com (download.oracle.com)|23.49.16.62|:80... connected.
HTTP request sent, awaiting response... 302 Moved Temporarily
Location: https://edelivery.oracle.com/otn-pub/java/jdk/8u131-b11/d54c1d3a095b4ff2b6607d096fa80163/jdk-8u131-linux-x64.rpm [following]
--2018-06-09 12:57:10-- https://edelivery.oracle.com/otn-pub/java/jdk/8u131-b11/d54c1d3a095b4ff2b6607d096fa80163/jdk-8u131-linux-x64.rpm
Resolving edelivery.oracle.com (edelivery.oracle.com)... 104.103.48.174, 2600:1417:58:181::2d3e, 2600:1417:58:188::2d3e
Connecting to edelivery.oracle.com (edelivery.oracle.com)|104.103.48.174|:443... connected.
HTTP request sent, awaiting response... 302 Moved Temporarily
Location: http://download.oracle.com/otn-pub/java/jdk/8u131-b11/d54c1d3a095b4ff2b6607d096fa80163/jdk-8u131-linux-x64.rpm?AuthParam=1528549151_b1fd01d854bc0423600a83c36240028e [following]
--2018-06-09 12:57:11-- http://download.oracle.com/otn-pub/java/jdk/8u131-b11/d54c1d3a095b4ff2b6607d096fa80163/jdk-8u131-linux-x64.rpm?AuthParam=1528549151_b1fd01d854bc0423600a83c36240028e
Connecting to download.oracle.com (download.oracle.com)|23.49.16.62|:80... connected.
HTTP request sent, awaiting response... 200 OK
Length: 169983496 (162M) [application/x-redhat-package-manager]
Saving to: ‘jdk-8u131-linux-x64.rpm’

100%[==============================================================================>] 169,983,496 2.56MB/s in 64s

2018-06-09 12:58:15 (2.54 MB/s) - ‘jdk-8u131-linux-x64.rpm’ saved [169983496/169983496]

[[email protected]_mgr opt]# yum localinstall -y jdk-8u131-linux-x64.rpm
Una vez hecho esto, continuamos modificando la ruta del entorno para crear la variable JAVA_HOME dentro de cada nodo del servidor. A continuación se muestran los pasos:
 [[email protected]_mgr opt]# vi /root/.bash_profile
export JAVA_HOME=/usr/java/jdk1.8.0_131
PATH=$JAVA_HOME/bin:$PATH:$HOME/bin
export PATH
 [[email protected]_mgr opt]# source /root/.bash_profile
[[email protected]_mgr opt]# java -version
java version "1.8.0_131"
Java(TM) SE Runtime Environment (build 1.8.0_131-b11)
Java HotSpot(TM) 64-Bit Server VM (build 25.131-b11, mixed mode)
Para la instalación de la base de datos de Oracle, es un requisito que la instalación se realice con un usuario que no sea root. Eso también se aplica a la instalación de Oracle Weblogic. En cuanto a esa política, para continuar, creemos un usuario adicional para que sea propietario de Oracle Weblogic. A continuación se muestran los pasos:
[[email protected]_mgr opt]# useradd -s /bin/bash shahril
 [[email protected]_mgr opt]# passwd shahril
Changing password for user shahril.
New password:
BAD PASSWORD: The password fails the dictionary check - it is too simplistic/systematic
Retype new password:
passwd: all authentication tokens updated successfully.

[[email protected]_mgr opt]# su - shahril
[[email protected]_mgr ~]$ pwd
/home/shahril
Antes de continuar, configuremos las variables de entorno para el usuario propietario de weblogic para las variables requeridas. A continuación se encuentran las variables de mejores prácticas que deben asignarse:
- ORACLE_BASE ::Ubicación predeterminada del directorio del instalador de Oracle
- ORACLE_HOME ::Ubicación predeterminada del directorio de la base de datos de Oracle / opcional si tiene un cliente de Oracle dentro
- MW_HOME ::Ubicación predeterminada del directorio del instalador de Middleware
- WLS_HOME ::Ubicación predeterminada del directorio del servidor administrado de Oracle Weblogic
- WL_HOME ::Ubicación predeterminada del directorio del servidor de administración de Oracle Weblogic
- DOMAIN_BASE ::Dominio global predeterminado de Oracle Weblogic
- DOMAIN_HOME ::Dominio específico predeterminado de Oracle Weblogic
 [shahr[email protected]_mgr wls]$ vi /home/shahril/.bash_profile

export ORACLE_BASE=/home/shahril/wls/oracle
export ORACLE_HOME=$ORACLE_BASE/product/fmw12
export MW_HOME=$ORACLE_HOME
export WLS_HOME=$MW_HOME/wlserver
export WL_HOME=$WLS_HOME
export DOMAIN_BASE=$ORACLE_BASE/config/domains
export DOMAIN_HOME=$DOMAIN_BASE/TEST

export JAVA_HOME=/usr/java/jdk1.8.0_131
PATH=$JAVA_HOME/bin:$PATH:$HOME/bin
export PATH

[[email protected]_mgr wls]$ source /home/shahril/.bash_profile
[[email protected]_mgr wls]$ mkdir -p $ORACLE_BASE
[[email protected]_mgr wls]$ mkdir -p $DOMAIN_BASE
[[email protected]_mgr wls]$ mkdir -p $ORACLE_HOME
[[email protected]_mgr wls]$ mkdir -p $ORACLE_BASE/config/applications
[[email protected]_mgr wls]$ mkdir -p /home/shahril/wls/oraInventory
Una vez hecho esto, vamos a crear un archivo llamado oraInst.loc y wls.rsp. Para el nombre de archivo oraInst.loc:este archivo es necesario para definir una ubicación de inventario durante la instalación de Oracle Weblogic. Para el nombre de archivo wls.rsp, es opcional ya que actúa como un archivo de respuesta que se usará durante la instalación. Sin embargo, a medida que avancemos, haremos la instalación desde la interfaz de línea de comandos (CLI), el wls.rsp sería obligatorio para nosotros. Ahora, procedamos con los pasos que se indican a continuación:
 [[email protected]_mgr wls]$ pwd
/home/shahril/wls
[[email protected]_mgr wls]$ vi oraInst.loc

inventory_loc=/home/shahril/wls/oraInventory
inst_group=shahril

[[email protected]_mgr wls]$ vi wls.rsp

[ENGINE]
Response File Version=1.0.0.0.0
[GENERIC]
ORACLE_HOME=/home/shahril/wls/oracle/product/fmw12
INSTALL_TYPE=WebLogic Server
DECLINE_SECURITY_UPDATES=true
SECURITY_UPDATES_VIA_MYORACLESUPPORT=false
Como todo está en su lugar, procedamos con la descarga del instalador de Oracle Weblogic. Puede ir a la URL del sitio web aquí y elegir su versión favorita de Oracle Weblogic.
En nuestro caso, procederemos a descargar la versión 12.1.3 de Oracle Weblogic, ya que ahora es la versión más actualizada y estable (según mi experiencia actual). A continuación se muestran los pasos:
 [[email protected]_mgr ~]$ cd $ORACLE_BASE
[[email protected]_mgr oracle]$ wget http://download.oracle.com/otn/nt/middleware/12c/wls/1213/fmw_12.1.3.0.0_wls.jar?AuthParam=1530174357_1de6ededa212d8bc86524a0fb78ac0df
--2018-06-28 16:24:15-- http://download.oracle.com/otn/nt/middleware/12c/wls/1213/fmw_12.1.3.0.0_wls.jar?AuthParam=1530174357_1de6ededa212d8bc86524a0fb78ac0df
Resolving download.oracle.com (download.oracle.com)... 23.74.208.198
Connecting to download.oracle.com (download.oracle.com)|23.74.208.198|:80... connected.
HTTP request sent, awaiting response... 200 OK
Length: 923179081 (880M) [application/x-jar]
Saving to: ‘fmw_12.1.3.0.0_wls.jar?AuthParam=1530174357_1de6ededa212d8bc86524a0fb78ac0df’

100%[=================================================================>] 923,179,081 1.05MB/s in 16m 4s

2018-06-28 16:40:24 (935 KB/s) - ‘fmw_12.1.3.0.0_wls.jar?AuthParam=1530174357_1de6ededa212d8bc86524a0fb78ac0df’ saved [923179081/923179081]

[[email protected]_mgr oracle]$ mv fmw_12.1.3.0.0_wls.jar?AuthParam=1530174357_1de6ededa212d8bc86524a0fb78ac0df fmw_12.1.3.0.0_wls.jar
A continuación, proceda con la instalación. Los pasos son los que se muestran a continuación:
 [[email protected]_mgr wls]$ java -jar /home/shahril/wls/oracle/fmw_12.1.3.0.0_wls.jar -silent -responseFile /home/shahril/wls/wls.rsp -invPtrLoc /home/shahril/wls/oraInst.loc
Launcher log file is /tmp/OraInstall2018-06-10_12-44-24PM/launcher2018-06-10_12-44-24PM.log.
Extracting files.......
Starting Oracle Universal Installer

Checking if CPU speed is above 300 MHz. Actual 3199.968 MHz Passed
Checking swap space: must be greater than 512 MB. Actual 7815164 MB Passed
Checking if this platform requires a 64-bit JVM. Actual 64 Passed (64-bit not required)
Checking temp space: must be greater than 300 MB. Actual 393285 MB Passed


Preparing to launch the Oracle Universal Installer from /tmp/OraInstall2018-06-10_12-44-24PM
Java HotSpot(TM) 64-Bit Server VM warning: ignoring option MaxPermSize=512m; support was removed in 8.0
Log: /tmp/OraInstall2018-06-10_12-44-24PM/install2018-06-10_12-44-24PM.log
Copyright (c) 1996, 2014, Oracle and/or its affiliates. All rights reserved.
Reading response file..
Starting check : CertifiedVersions
/bin/cat: /proc/sys/net/core/wmem_default: No such file or directory
Starting check : CheckJDKVersion
Expected result: 1.7.0_15
Actual Result: 1.8.0_131
Check complete. The overall result of this check is: Passed
CheckJDKVersion Check: Success.
Validations are enabled for this session.
Verifying data......
Copying Files...
You can find the log of this install session at:
/tmp/OraInstall2018-06-10_12-44-24PM/install2018-06-10_12-44-24PM.log
-----------20%----------40%----------60%----------80%--------100%

The installation of Oracle Fusion Middleware 12c WebLogic Server and Coherence 12.1.3.0.0 completed successfully.
Logs successfully copied to /home/shahril/wls/oraInventory/logs.
¡Excelente! Ahora hemos instalado con éxito Oracle Weblogic en nuestro servidor CentOS 7. A continuación, procederemos con la fase de configuración.
3. Fase de Configuración
Ahora estamos en la parte de configuración, habrá 2 niveles de configuración que deben realizarse, que son:
- Configuración de Weblogic
- Configuración de dominio
Para un servidor de administración de Weblogic, debemos realizar ambas configuraciones, ya que el comando principal de weblogic se encuentra en la configuración de weblogic. Pero para cada servidor administrado de Weblogic que actuará como nodo de instancia, solo necesita configurar la configuración de Weblogic solo durante la inicialización del dominio, el administrador puede decidir qué nodo de instancia se usará para qué dominio de proyecto. A continuación se muestra un ejemplo simple de cómo funciona el dominio weblogic:

Para cada servidor administrado por weblogic, puede crear tantos nodos de instancia como necesite, esto depende de la asignación de recursos del servidor porque cada nodo de instancia apuntará a su dominio de proyecto dedicado. Para señalar qué dominio a qué nodo de instancia se puede hacer fácilmente mediante el panel del servidor de administración.
Según el resumen, ahora configuremos la configuración para weblogic y la configuración del dominio para la parte del servidor de administración. Solo para simplificar el proceso del tutorial, solo crearemos 1 dominio llamado PRUEBA. A continuación se muestran los pasos:-
 [[email protected]_mgr wls]$ cd $WL_HOME
[[email protected]_mgr wlserver]$ cd common/bin/
[[email protected]_mgr bin]$ ./commEnv.sh
[[email protected]_mgr bin]$ ./wlst.sh
Java HotSpot(TM) 64-Bit Server VM warning: ignoring option MaxPermSize=256m; support was removed in 8.0
Initializing WebLogic Scripting Tool (WLST) ...
Jython scans all the jar files it can find at first startup. Depending on the system, this process may take a few minutes to complete, and WLST may not return a prompt right away.

Welcome to WebLogic Server Administration Scripting Shell

Type help() for help on available commands

wls:/offline> readTemplate('/home/shahril/wls/oracle/product/fmw12/wlserver/common/templates/wls/wls.jar')
wls:/offline/base_domain>cd('Servers/AdminServer')
wls:/offline/base_domain/Server/AdminServer>set('ListenAddress','172.17.0.6')
wls:/offline/base_domain/Server/AdminServer>set('ListenPort',7001) ## Port that will be assign to each domain

wls:/offline/base_domain/Server/AdminServer>create('AdminServer','SSL')
Proxy for AdminServer: Name=AdminServer, Type=SSL

wls:/offline/base_domain/Server/AdminServer>cd('SSL/AdminServer')
wls:/offline/base_domain/Server/AdminServer/SSL/AdminServer>set('Enabled','True')
wls:/offline/base_domain/Server/AdminServer/SSL/AdminServer>set('ListenPort',7002)

wls:/offline/base_domain/Server/AdminServer/SSL/AdminServer>cd('/')
wls:/offline/base_domain>cd('Security/base_domain/User/weblogic')
wls:/offline/base_domain/Security/base_domain/User/weblogic>cmo.setPassword('Test1234')
wls:/offline/base_domain/Security/base_domain/User/weblogic>setOption('OverwriteDomain','true')
wls:/offline/base_domain/Security/base_domain/User/weblogic>writeDomain('/home/shahril/wls/oracle/config/domains/TEST')

wls:/offline/TEST/Security/TEST/User/weblogic>closeTemplate()
wls:/offline>exit()

Exiting WebLogic Scripting Tool.
Genial, ahora hemos hecho la configuración para ambos, ahora iniciemos los servicios weblogic y TEST en el servidor de administración. A continuación se muestran los pasos:
 [[email protected]_mgr bin]$ cd $DOMAIN_HOME
[[email protected]_mgr TEST]$ cd bin/
[[email protected]_mgr bin]$ pwd
/home/shahril/wls/oracle/config/domains/TEST/bin

[[email protected]_mgr bin]$ ./startWebLogic.sh &
[1] 19303
[[email protected]_mgr bin]$ .
.
JAVA Memory arguments: -Xms256m -Xmx512m -XX:CompileThreshold=8000 -XX:PermSize=128m -XX:MaxPermSize=256m
.
CLASSPATH=/usr/java/jdk1.8.0_131/lib/tools.jar:/home/shahril/wls/oracle/product/fmw12/wlserver/server/lib/weblogic_sp.jar:/home/shahril/wls/oracle/product/fmw12/wlserver/server/lib/weblogic.jar:/home/shahril/wls/oracle/product/fmw12/oracle_common/modules/net.sf.antcontrib_1.1.0.0_1-0b3/lib/ant-contrib.jar:/home/shahril/wls/oracle/product/fmw12/wlserver/modules/features/oracle.wls.common.nodemanager_2.0.0.0.jar:/home/shahril/wls/oracle/product/fmw12/oracle_common/modules/com.oracle.cie.config-wls-online_8.1.0.0.jar:/home/shahril/wls/oracle/product/fmw12/wlserver/common/derby/lib/derbyclient.jar:/home/shahril/wls/oracle/product/fmw12/wlserver/common/derby/lib/derby.jar:/home/shahril/wls/oracle/product/fmw12/wlserver/server/lib/xqrl.jar .
PATH=/home/shahril/wls/oracle/product/fmw12/wlserver/server/bin:/home/shahril/wls/oracle/product/fmw12/oracle_common/modules/org.apache.ant_1.9.2/bin:/usr/java/jdk1.8.0_131/jre/bin:/usr/java/jdk1.8.0_131/bin:/usr/java/jdk1.8.0_131/bin:/usr/java/jdk1.8.0_131/bin:/usr/java/jdk1.8.0_131/bin:/usr/local/bin:/bin:/usr/bin:/usr/local/sbin:/usr/sbin:/home/shahril/bin:/home/shahril/bin:/home/shahril/bin .
***************************************************
* To start WebLogic Server, use a username and *
* password assigned to an admin-level user. For *
* server administration, use the WebLogic Server *
* console at http://hostname:port/console *
***************************************************
starting weblogic with Java version:
java version "1.8.0_131"
Java(TM) SE Runtime Environment (build 1.8.0_131-b11)
Java HotSpot(TM) 64-Bit Server VM (build 25.131-b11, mixed mode)
Starting WLS with line:
/usr/java/jdk1.8.0_131/bin/java -server -Xms256m -Xmx512m -XX:CompileThreshold=8000 -XX:PermSize=128m -XX:MaxPermSize=256m -Dweblogic.Name=AdminServer -Djava.security.policy=/home/shahril/wls/oracle/product/fmw12/wlserver/server/lib/weblogic.policy -Xverify:none -Djava.endorsed.dirs=/usr/java/jdk1.8.0_131/jre/lib/endorsed:/home/shahril/wls/oracle/product/fmw12/oracle_common/modules/endorsed -da -Dwls.home=/home/shahril/wls/oracle/product/fmw12/wlserver/server -Dweblogic.home=/home/shahril/wls/oracle/product/fmw12/wlserver/server -Dweblogic.utils.cmm.lowertier.ServiceDisabled=true weblogic.Server
Java HotSpot(TM) 64-Bit Server VM warning: ignoring option PermSize=128m; support was removed in 8.0
Java HotSpot(TM) 64-Bit Server VM warning: ignoring option MaxPermSize=256m; support was removed in 8.0
Jun 10, 2018 1:11:46 PM UTC Info Security BEA-090905 Disabling the CryptoJ JCE Provider self-integrity check for better startup performance. To enable this check, specify -Dweblogic.security.allowCryptoJDefaultJCEVerification=true.
Jun 10, 2018 1:11:46 PM UTC Info Security BEA-090906 Changing the default Random Number Generator in RSA CryptoJ from ECDRBG128 to FIPS186PRNG. To disable this change, specify -Dweblogic.security.allowCryptoJDefaultPRNG=true.
Jun 10, 2018 1:11:47 PM UTC Info WebLogicServer BEA-000377 Starting WebLogic Server with Java HotSpot(TM) 64-Bit Server VM Version 25.131-b11 from Oracle Corporation.
Jun 10, 2018 1:11:47 PM UTC Info Management BEA-141107 Version: WebLogic Server 12.1.3.0.0 Wed May 21 18:53:34 PDT 2014 1604337
Jun 10, 2018 1:11:48 PM UTC Notice WebLogicServer BEA-000365 Server state changed to STARTING.
Jun 10, 2018 1:11:48 PM UTC Info WorkManager BEA-002900 Initializing self-tuning thread pool.
Jun 10, 2018 1:11:48 PM UTC Info WorkManager BEA-002942 CMM memory level becomes 0. Setting standby thread pool size to 256.
Jun 10, 2018 1:11:48 PM UTC Notice Log Management BEA-170019 The server log file /home/shahril/wls/oracle/config/domains/TEST/servers/AdminServer/logs/AdminServer.log is opened. All server side log events will be written to this file.
Jun 10, 2018 1:11:50 PM UTC Notice Security BEA-090082 Security initializing using security realm myrealm.
Jun 10, 2018 1:11:51 PM UTC Notice WebLogicServer BEA-000365 Server state changed to STANDBY.
Jun 10, 2018 1:11:51 PM UTC Notice WebLogicServer BEA-000365 Server state changed to STARTING.
Jun 10, 2018 1:11:51 PM weblogic.wsee.WseeCoreMessages logWseeServiceStarting

INFO: The Wsee Service is starting

Jun 10, 2018 1:11:51 PM UTC Notice Log Management BEA-170027 The server has successfully established a connection with the Domain level Diagnostic Service.
Jun 10, 2018 1:11:51 PM UTC Notice WebLogicServer BEA-000365 Server state changed to ADMIN.
Jun 10, 2018 1:11:51 PM UTC Notice WebLogicServer BEA-000365 Server state changed to RESUMING.
Jun 10, 2018 1:11:51 PM UTC Notice Security BEA-090171 Loading the identity certificate and private key stored under the alias DemoIdentity from the jks keystore file /home/shahril/wls/oracle/config/domains/TEST/security/DemoIdentity.jks.
Jun 10, 2018 1:11:51 PM UTC Notice Security BEA-090169 Loading trusted certificates from the jks keystore file /home/shahril/wls/oracle/product/fmw12/wlserver/server/lib/DemoTrust.jks.
Jun 10, 2018 1:11:51 PM UTC Notice Security BEA-090169 Loading trusted certificates from the jks keystore file /usr/java/jdk1.8.0_131/jre/lib/security/cacerts.
Jun 10, 2018 1:11:51 PM UTC Notice Server BEA-002613 Channel "DefaultSecure" is now listening on 172.17.0.6:7002 for protocols iiops, t3s, ldaps, https.
Jun 10, 2018 1:11:51 PM UTC Notice Server BEA-002613 Channel "Default" is now listening on 172.17.0.6:7001 for protocols iiop, t3, ldap, snmp, http.
Jun 10, 2018 1:11:51 PM UTC Notice WebLogicServer BEA-000331 Started the WebLogic Server Administration Server "AdminServer" for domain "TEST" running in development mode.
Jun 10, 2018 1:11:51 PM UTC Notice WebLogicServer BEA-000360 The server started in RUNNING mode.
Jun 10, 2018 1:11:52 PM UTC Notice WebLogicServer BEA-000365 Server state changed to RUNNING.

[[email protected]_mgr bin]$ netstat -apn|grep -i :70
(Not all processes could be identified, non-owned process info
will not be shown, you would have to be root to see it all.)
tcp 0 0 172.17.0.6:7001 0.0.0.0:* LISTEN 19360/java
tcp 0 0 172.17.0.6:7002 0.0.0.0:* LISTEN 19360/java
¡Excelente! Ahora hemos realizado la configuración completa en la parte del servidor de administración. Ahora que se han hecho las partes complicadas, puede relajarse, tomar una taza de café y luego hacer una copia de la configuración de Weblogic SOLAMENTE y pegarla en cada nodo del servidor administrado. A continuación se muestran los pasos:-
 [[email protected]_mgr bin]$ $WL_HOME/common/bin/pack.sh -domain=$DOMAIN_HOME -template=$WL_HOME/common/templates/domains/TEST_template.jar -template_name=TEST -managed=true
Java HotSpot(TM) 64-Bit Server VM warning: ignoring option MaxPermSize=256m; support was removed in 8.0
<< read domain from "/home/shahril/wls/oracle/config/domains/TEST"
>> succeed: read domain from "/home/shahril/wls/oracle/config/domains/TEST"
<< set config option Managed to "true"
>> succeed: set config option Managed to "true"
<< write template to "/home/shahril/wls/oracle/product/fmw12/wlserver/common/templates/domains/TEST_template.jar"
..........................................................................................
>> succeed: write template to "/home/shahril/wls/oracle/product/fmw12/wlserver/common/templates/domains/TEST_template.jar"
<< close template
>> succeed: close template

[[email protected]_mgr ~]$ ls -lh $WL_HOME/common/templates/domains/TEST_template.jar
-rw-r----- 1 shahril shahril 51K Jun 10 14:11 /home/shahril/wls/oracle/product/fmw12/wlserver/common/templates/domains/TEST_template.jar
Como se muestra arriba, hicimos una copia de la configuración de weblogic en un archivo jar. Traeremos solo este archivo jar a cada servidor administrado por weblogic y lo configuraremos desde allí.
 [[email protected]_mgr ~]$ scp -r /home/shahril/wls/oracle/product/fmw12/wlserver/common/templates/domains/TEST_template.jar 172.17.0.7:/home/shahril/wls/
[email protected]'s password:
TEST_template.jar 100% 50KB 58.2MB/s 00:00
Ahora vaya al servidor administrado y extraiga el archivo jar copiado. No se necesita configuración, ya que traerá el dominio relacionado que hemos creado. A continuación se muestran los pasos:
 [[email protected]_node1 ~]$ cd $WL_HOME
[[email protected]_node1 wlserver]$ pwd
/home/shahril/wls/oracle/product/fmw12/wlserver
[[email protected]_node1 wlserver]$ $WL_HOME/common/bin/unpack.sh -template=/home/shahril/wls/TEST_template.jar -domain=$DOMAIN_HOME
Java HotSpot(TM) 64-Bit Server VM warning: ignoring option MaxPermSize=256m; support was removed in 8.0
<< read template from "/home/shahril/wls/TEST_template.jar"
>> succeed: read template from "/home/shahril/wls/TEST_template.jar"
<< set config option DomainName to "TEST"
>> succeed: set config option DomainName to "TEST"
<< write Domain to "/home/shahril/wls/oracle/config/domains/TEST"
....................................................................................................
>> succeed: write Domain to "/home/shahril/wls/oracle/config/domains/TEST"
<< close template
>> succeed: close template
¡Excelente! Hemos extraído con éxito la configuración weblogic copiada. Siguiente paso, iniciemos el servicio Weblogic en el servidor administrado. A continuación se muestran los pasos:
 [[email protected]_node1 wlserver]$ cd $DOMAIN_HOME
[[email protected]_node1 TEST]$ cd bin/
[[email protected]_node1 bin]$ ./stopManagedWebLogic.sh Node_Server01 t3://172.17.0.6:7001 weblogic Test1234
Stopping Weblogic Server...
Java HotSpot(TM) 64-Bit Server VM warning: ignoring option PermSize=128m; support was removed in 8.0
Java HotSpot(TM) 64-Bit Server VM warning: ignoring option MaxPermSize=256m; support was removed in 8.0
Initializing WebLogic Scripting Tool (WLST) ...
Jython scans all the jar files it can find at first startup. Depending on the system, this process may take a few minutes to complete, and WLST may not return a prompt right away.

Welcome to WebLogic Server Administration Scripting Shell

Type help() for help on available commands

Connecting to t3://172.17.0.6:7001 with userid weblogic ...
Successfully connected to Admin Server "AdminServer" that belongs to domain "TEST".

Warning: An insecure protocol was used to connect to the
server. To ensure on-the-wire security, the SSL port or
Admin port should be used instead.

Shutting down the server Node_Server01 with force=false while connected to AdminServer ...
No stack trace available.
Problem invoking WLST - Traceback (innermost last):
File "/home/shahril/wls/oracle/config/domains/TEST/shutdown-Node_Server01.py", line 4, in ?
File "", line 1199, in shutdown
File "", line 552, in raiseWLSTException
WLSTException: Error occurred while performing shutdown : No Server with name "Node_Server01" configured in the domain

Done
Stopping Derby Server...


[[email protected]_node1 bin]$ ./startManagedWebLogic.sh Node_Server01 t3://172.17.0.6:7001 &
[1] 5378
[[email protected]_node1 bin]$ .
.
JAVA Memory arguments: -Xms256m -Xmx512m -XX:CompileThreshold=8000 -XX:PermSize=128m -XX:MaxPermSize=256m
.
CLASSPATH=/usr/java/jdk1.8.0_131/lib/tools.jar:/home/shahril/wls/oracle/product/fmw12/wlserver/server/lib/weblogic_sp.jar:/home/shahril/wls/oracle/product/fmw12/wlserver/server/lib/weblogic.jar:/home/shahril/wls/oracle/product/fmw12/oracle_common/modules/net.sf.antcontrib_1.1.0.0_1-0b3/lib/ant-contrib.jar:/home/shahril/wls/oracle/product/fmw12/wlserver/modules/features/oracle.wls.common.nodemanager_2.0.0.0.jar:/home/shahril/wls/oracle/product/fmw12/wlserver/common/derby/lib/derbyclient.jar:/home/shahril/wls/oracle/product/fmw12/wlserver/common/derby/lib/derby.jar:/home/shahril/wls/oracle/product/fmw12/wlserver/server/lib/xqrl.jar
.
PATH=/home/shahril/wls/oracle/product/fmw12/wlserver/server/bin:/home/shahril/wls/oracle/product/fmw12/oracle_common/modules/org.apache.ant_1.9.2/bin:/usr/java/jdk1.8.0_131/jre/bin:/usr/java/jdk1.8.0_131/bin:/usr/java/jdk1.8.0_131/bin:/usr/local/bin:/bin:/usr/bin:/usr/local/sbin:/usr/sbin:/home/shahril/bin
.
***************************************************
* To start WebLogic Server, use a username and *
* password assigned to an admin-level user. For *
* server administration, use the WebLogic Server *
* console at http://hostname:port/console *
***************************************************
starting weblogic with Java version:
java version "1.8.0_131"
Java(TM) SE Runtime Environment (build 1.8.0_131-b11)
Java HotSpot(TM) 64-Bit Server VM (build 25.131-b11, mixed mode)
Starting WLS with line:
/usr/java/jdk1.8.0_131/bin/java -server -Xms256m -Xmx512m -XX:CompileThreshold=8000 -XX:PermSize=128m -XX:MaxPermSize=256m -Dweblogic.Name=Node_Server01 -Djava.security.policy=/home/shahril/wls/oracle/product/fmw12/wlserver/server/lib/weblogic.policy -Dweblogic.security.SSL.trustedCAKeyStore=/home/shahril/wls/oracle/product/fmw12/wlserver/server/lib/cacerts -Xverify:none -Djava.endorsed.dirs=/usr/java/jdk1.8.0_131/jre/lib/endorsed:/home/shahril/wls/oracle/product/fmw12/oracle_common/modules/endorsed -da -Dwls.home=/home/shahril/wls/oracle/product/fmw12/wlserver/server -Dweblogic.home=/home/shahril/wls/oracle/product/fmw12/wlserver/server -Dweblogic.management.server=t3://172.17.0.6:7001 -Dweblogic.utils.cmm.lowertier.ServiceDisabled=true weblogic.Server
Java HotSpot(TM) 64-Bit Server VM warning: ignoring option PermSize=128m; support was removed in 8.0
Java HotSpot(TM) 64-Bit Server VM warning: ignoring option MaxPermSize=256m; support was removed in 8.0
Jun 10, 2018 3:29:41 PM UTC Info Security BEA-090905 Disabling the CryptoJ JCE Provider self-integrity check for better startup performance. To enable this check, specify -Dweblogic.security.allowCryptoJDefaultJCEVerification=true.
Jun 10, 2018 3:29:41 PM UTC Info Security BEA-090906 Changing the default Random Number Generator in RSA CryptoJ from ECDRBG128 to FIPS186PRNG. To disable this change, specify -Dweblogic.security.allowCryptoJDefaultPRNG=true.
Jun 10, 2018 3:29:42 PM UTC Info WebLogicServer BEA-000377 Starting WebLogic Server with Java HotSpot(TM) 64-Bit Server VM Version 25.131-b11 from Oracle Corporation.
Jun 10, 2018 3:29:42 PM UTC Info Management BEA-141107 Version: WebLogic Server 12.1.3.0.0 Wed May 21 18:53:34 PDT 2014 1604337
Jun 10, 2018 3:29:43 PM UTC Notice WebLogicServer BEA-000365 Server state changed to STARTING.
Jun 10, 2018 3:29:43 PM UTC Info WorkManager BEA-002900 Initializing self-tuning thread pool.
Jun 10, 2018 3:29:43 PM UTC Info WorkManager BEA-002942 CMM memory level becomes 0. Setting standby thread pool size to 256.
Jun 10, 2018 3:29:43 PM UTC Notice Log Management BEA-170019 The server log file /home/shahril/wls/oracle/config/domains/TEST/servers/Node_Server01/logs/Node_Server01.log is opened. All server side log events will be written to this file.
Jun 10, 2018 3:29:45 PM UTC Notice Security BEA-090082 Security initializing using security realm myrealm.
Jun 10, 2018 3:29:46 PM UTC Notice WebLogicServer BEA-000365 Server state changed to STANDBY.
Jun 10, 2018 3:29:46 PM UTC Notice WebLogicServer BEA-000365 Server state changed to STARTING.
Jun 10, 2018 3:29:46 PM weblogic.wsee.WseeCoreMessages logWseeServiceStarting
INFO: The Wsee Service is starting

Jun 10, 2018 3:29:48 PM UTC Notice Log Management BEA-170027 The server has successfully established a connection with the Domain level Diagnostic Service.
Jun 10, 2018 3:29:48 PM UTC Notice Cluster BEA-000197 Listening for announcements from cluster using unicast cluster messaging
Jun 10, 2018 3:29:48 PM UTC Notice WebLogicServer BEA-000365 Server state changed to ADMIN.
Jun 10, 2018 3:29:48 PM UTC Notice WebLogicServer BEA-000365 Server state changed to RESUMING.
Jun 10, 2018 3:29:48 PM UTC Notice Cluster BEA-000162 Starting "async" replication service with remote cluster address "null"
Jun 10, 2018 3:29:48 PM UTC Notice Server BEA-002613 Channel "Default" is now listening on 172.17.0.7:8001 for protocols iiop, t3, CLUSTER-BROADCAST, ldap, snmp, http.
Jun 10, 2018 3:29:48 PM UTC Notice WebLogicServer BEA-000332 Started the WebLogic Server Managed Server "Node_Server01" for domain "TEST" running in development mode.
Jun 10, 2018 3:29:48 PM UTC Notice WebLogicServer BEA-000360 The server started in RUNNING mode.
Jun 10, 2018 3:29:48 PM UTC Notice WebLogicServer BEA-000365 Server state changed to RUNNING.
¡Estupendo! Now we have successfully configured the weblogic services on the managed servers. You can do the process to other managed server and later we will define the cluster grouping from administration server dashboard.
4. Testing Phase
To ensure that our Weblogic architecture works as expected, we'll just apply a simple test configuration on our servers. For this test, we will open the Weblogic admin server dashboard and from the dashboard console itself we will add our 2 managed servers into the environment and define them as a cluster.
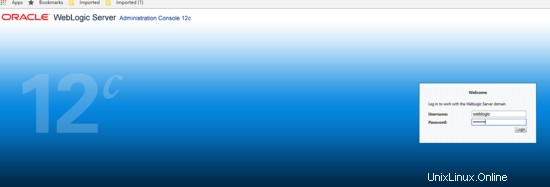
Now, let's open up our admin dashboard via http://172.17.0.6:7001/console . As mentioned before, for this test, we are've just creating only 1 DOMAIN which is TEST therefore the default port 7001 are dedicated for this domain. For multiple domains, the configuration can be seperated by its own dedicated port. Once you have launched the URL in the browser, you should see the console like below, enter the username and password that we've defined during configuration above. For this test, it's weblogic/Test1234 :-
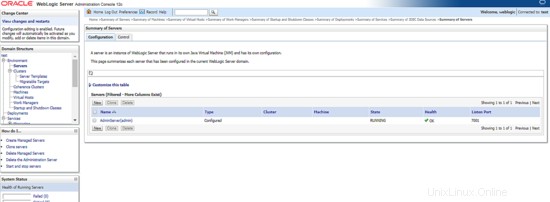
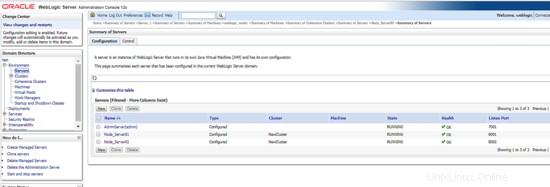
Once you have login successfully, you will see a complete dashboard like shown below:

To proceed with our test, from the dashboard click on Environment -> Servers tab . You will see the results as shown like below which automatically the Weblogic Admin server already included inside TEST domain.
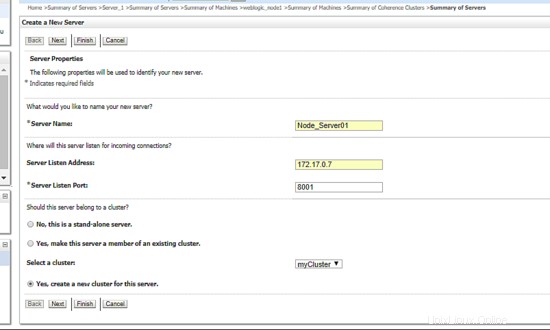
Next, click on the button  , it will forward you to page below. Fill in the Weblogic Managed Server information like it's IP addresses and the weblogic port as per shown then click next.
After that, define the new cluster name you want to the click next. Remain others as per default like example below:
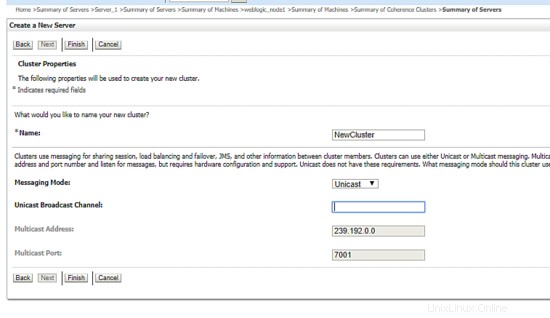
Great, now you've include an instance node inside your newly created weblogic cluster. Below are the example snapshot:
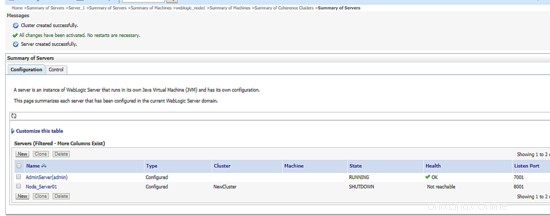
Now, let's bring up the instance node. For this case, we'll go back to CLI shell and start up the weblogic managed server like command we use before like below:
 [[email protected]_node1 wlserver]$ cd $DOMAIN_HOME
[[email protected]_node1 TEST]$ cd bin/
[[email protected]_node1 bin]$ ./startManagedWebLogic.sh Node_Server01 t3://172.17.0.6:7001 &
Once done, go back to admin URL and refresh the dashboard. You will see that now the instance node you've established are up and running. Below is the example screenshot:
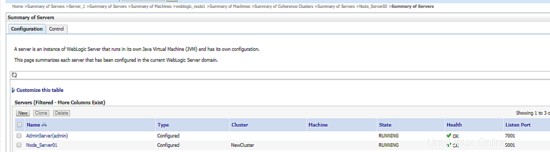
Next, use the same process to add another Weblogic Managed Server into the defined cluster. As the final result, you will see all instance nodes you've added are up and running and in load balancing mode. Below is the example result:
¡Felicidades! Now you've successfully created a new weblogic cluster architecture.