Chef es una plataforma de automatización que configura y administra su infraestructura. Transforma la infraestructura en código. Es una herramienta de gestión de configuración basada en Ruby. Esta plataforma de automatización consta de una estación de trabajo Chef, un servidor Chef y clientes chef que son los nodos administrados por el servidor Chef. Todos los archivos de configuración del chef, recetas, libros de cocina, plantillas, etc. se crean y prueban en la estación de trabajo Chef y se cargan en Chef Server, luego los distribuye entre todos los nodos posibles registrados dentro de las organizaciones. Es un marco de automatización ideal para Ceph y OpenStack. No solo nos da un control total, sino que es muy fácil trabajar con él.
En este artículo, explico los pasos que seguí para implementar un entorno de automatización Chef en mis servidores CentOS 7.
Requisitos previos
- Se recomienda tener un nombre de host FQDN
- Chef solo admite arquitectura de 64 bits
- Se recomiendan configuraciones adecuadas de red/cortafuegos/hosts
¿Cómo funciona Chef?
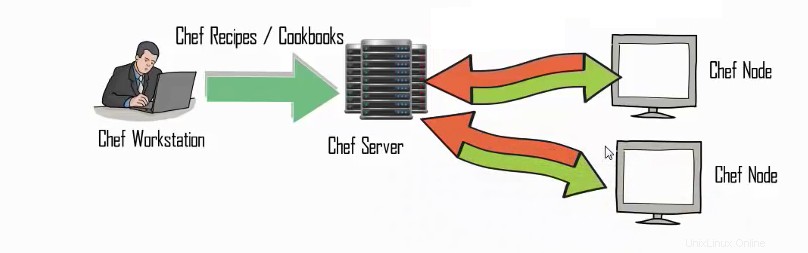
Chef se compone de una estación de trabajo que está configurada para desarrollar las recetas y libros de cocina. También está configurado para ejecutar el cuchillo y se sincroniza con el chef-repo para mantenerlo actualizado. Ayuda a configurar la política de la organización, incluida la definición de roles y entornos, y garantiza que los datos críticos se almacenen en paquetes de datos. Una vez que estas recetas/libros de cocina se prueban en las estaciones de trabajo, podemos subirlo a nuestro servidor Chef. El servidor Chef almacena estas recetas y las asigna a los nodos según sus requisitos. Básicamente, los nodos se comunican solo con el servidor del chef y reciben instrucciones y recetas de allí.
En mi configuración de demostración, tengo tres servidores, a saber
- chefserver.test20.com - Servidor Chef
- chefwork.test20.com - Estación de trabajo de Chef
- chefnode.test20.com - Nodo Chef
Comencemos con la construcción de la estación de trabajo.
Configurar una estación de trabajo
En primer lugar, inicie sesión en nuestro servidor chefwork, luego descargue el paquete de desarrollo Chef. Una vez que se descarga el paquete, podemos instalarlo usando el comando rpm.
root@chefwork ~]# wget https://packages.chef.io/stable/el/7/chefdk-0.14.25-1.el7.x86_64.rpm
--2016-05-20 03:47:31-- https://packages.chef.io/stable/el/7/chefdk-0.14.25-1.el7.x86_64.rpm
Resolving packages.chef.io (packages.chef.io)... 75.126.118.188, 108.168.243.150
Connecting to packages.chef.io (packages.chef.io)|75.126.118.188|:443... connected.
HTTP request sent, awaiting response... 302
Location: https://akamai.bintray.com/87/879656c7736ef2a061937c1f45c623e99fd57aaa2f6d802e9799d333d7e5342f?__gda__=exp=1463716772~hmac=ef9ce287129ab2f035449b76a1adc32b7bf8cae37f018f59da5a642d3e2650fc&response-content-disposition=attachment%3Bfilename%3D%22chefdk-0.14.25-1.el7.x86_64.rpm%22&response-content-type=application%2Foctet-stream [following]
--2016-05-20 03:47:32-- https://akamai.bintray.com/87/879656c7736ef2a061937c1f45c623e99fd57aaa2f6d802e9799d333d7e5342f?__gda__=exp=1463716772~hmac=ef9ce287129ab2f035449b76a1adc32b7bf8cae37f018f59da5a642d3e2650fc&response-content-disposition=attachment%3Bfilename%3D%22chefdk-0.14.25-1.el7.x86_64.rpm%22&response-content-type=application%2Foctet-stream
Resolving akamai.bintray.com (akamai.bintray.com)... 104.123.250.232
Connecting to akamai.bintray.com (akamai.bintray.com)|104.123.250.232|:443... connected.
HTTP request sent, awaiting response... 200 OK
Length: 143927478 (137M) [application/octet-stream]
Saving to: ‘chefdk-0.14.25-1.el7.x86_64.rpm’

100%[====================================================================================================>] 14,39,27,478 2.52MB/s in 55s

2016-05-20 03:48:29 (2.49 MB/s) - ‘chefdk-0.14.25-1.el7.x86_64.rpm’ saved [143927478/143927478]

[root@chefwork ~]# rpm -ivh chefdk-0.14.25-1.el7.x86_64.rpm
warning: chefdk-0.14.25-1.el7.x86_64.rpm: Header V4 DSA/SHA1 Signature, key ID 83ef826a: NOKEY
Preparing... ################################# [100%]
Updating / installing...
1:chefdk-0.14.25-1.el7 ################################# [100%]
Thank you for installing Chef Development Kit!
¿Qué es ChefDK?
El kit de desarrollo de Chef contiene todo lo necesario para comenzar con Chef, junto con las herramientas esenciales para la gestión de código.
- Contiene una nueva herramienta de línea de comandos, "chef"
- El administrador de dependencias de libros de cocina Berkshelf
- El marco de pruebas de integración de Test Kitchen.
- ChefSpec para probar la sintaxis del libro de cocina
- Foodcritic, una herramienta para hacer análisis de código estático en libros de cocina.
- También tiene todas las herramientas de Chef como Chef Client, Knife, Ohai y Chef Zero
Comencemos con la creación de algunas recetas en la estación de trabajo y pruébalo localmente para asegurarte de que funciona.
Cree una carpeta llamada chef-repo en /root/ y dentro de esa carpeta podemos crear nuestras recetas.
[root@chefwork ~]# mkdir chef-repo
[root@chefwork ~]# cd chef-repo

Creating a recipe called hello.rb.
[root@chefwork chef-repo]# vim hello.rb
[root@chefwork chef-repo]#
[root@chefwork chef-repo]# cat hello.rb
file '/etc/motd' do
content 'Welcome to Chef'
end
Esta receta hello.rb crea un archivo llamado /etc/motd con contenido "Bienvenido a Chef". Esta receta utiliza el archivo de recursos para mejorar esta tarea. Ahora podemos ejecutar esta receta para comprobar que funciona.
[root@chefwork chef-repo]# chef-apply hello.rb
Recipe: (chef-apply cookbook)::(chef-apply recipe)
* file[/etc/motd] action create (up to date)

Confirm the recipe execution:

[root@chefwork chef-repo]# cat /etc/motd
Welcome to Chef
Eliminar el archivo
Podemos modificar nuestro archivo de receta para eliminar el archivo creado y ejecutarlo usando el comando chef-apply como se muestra a continuación:
[root@chefwork chef-repo]# cat hello.rb
file '/etc/motd' do
action :delete
end

[root@chefwork chef-repo]# chef-apply hello.rb
Recipe: (chef-apply cookbook)::(chef-apply recipe)
* file[/etc/motd] action delete
- delete file /etc/motd
Instalar un paquete
Estamos modificando nuestro archivo de receta para instalar el paquete httpd en nuestro servidor y copiamos un archivo index.html en la raíz del documento predeterminado para confirmar la instalación. El paquete y los recursos del servicio se utilizan para implementar esto. La acción predeterminada para un recurso de paquete es la instalación, por lo tanto, no necesitamos especificar esa acción por separado.
[root@chefwork chef-conf]# cat hello.rb
package 'httpd'
service 'httpd' do
action [:enable, :start]
end

file '/var/www/html/index.html' do
content 'Welcome to Apache in Chef'
end
[root@chefwork chef-conf]# chef-apply hello.rb
Recipe: (chef-apply cookbook)::(chef-apply recipe)
* yum_package[httpd] action install
 - install version 2.4.6-40.el7.centos.1 of package httpd
 * service[httpd] action enable
 - enable service service[httpd]
 * service[httpd] action start
 - start service service[httpd]
 * file[/var/www/html/index.html] action create (up to date)
La ejecución del comando describe claramente cada instancia en la receta. Instala el paquete Apache, habilita e inicia el servicio httpd en el servidor. Y crea un archivo index.html en la raíz del documento predeterminado con el contenido "Bienvenido a Apache en Chef". Entonces podemos verificarlo ejecutando la IP del servidor en el navegador.

Creación de libros de cocina
Ahora podemos crear nuestro primer libro de cocina, crear una carpeta llamada chef-repo en el directorio /root y ejecutar el comando "chef generar libro de cocina [nombre del libro de cocina]" para generar nuestro libro de cocina.
root@chefwork chef-repo]# mkdir cookbooks
[root@chefwork chef-repo]# cd cookbooks/
[root@chefwork cookbooks]# chef generate cookbook httpd_deploy
Installing Cookbook Gems:
Compiling Cookbooks...
Recipe: code_generator::cookbook
* directory[/root/chef-repo/cookbook/httpd_deploy] action create
- create new directory /root/chef-repo/cookbook/httpd_deploy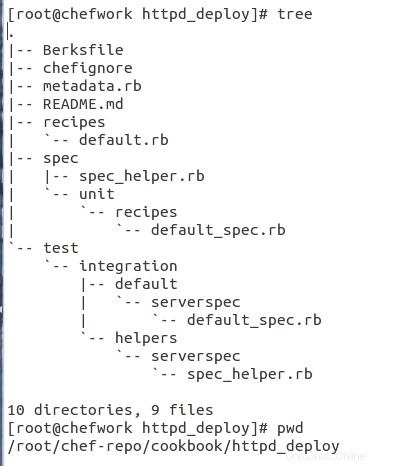
Esta es la estructura de archivos del libro de recetas creado, veamos el uso de estos archivos/carpetas dentro del libro de recetas uno por uno.
Archivo Berks :Es el archivo de configuración, que principalmente le dice a BerkShelf cuáles son las dependencias del libro de cocina, que se pueden especificar directamente dentro de este archivo o indirectamente a través de metadata.rb. También le dice a Berkshelf dónde debe buscar esas dependencias.
Chefignore :Le dice a Chef qué archivos deben ignorarse al cargar un libro de recetas en el servidor de Chef.
metadatos.rb :Contiene metainformación sobre su libro de cocina, como nombre, contactos o descripción. También puede indicar las dependencias del libro de cocina.
LÉAME.md :Contiene el punto de entrada de la documentación para el repositorio.
Recetas :Contiene las recetas del libro de cocina. Comienza con la ejecución del archivo default.rb.
predeterminado.rb :El formato de receta predeterminado.
especificaciones :Almacenará los casos de prueba unitarios de sus bibliotecas.
prueba :Almacenará los casos de prueba unitarios de sus recetas.
Crear una plantilla
A continuación, vamos a crear un archivo de plantilla para nosotros. Anteriormente, creamos un archivo con algunos contenidos, pero eso no puede encajar con nuestras recetas y estructuras de libros de cocina. así que veamos cómo podemos crear una plantilla.
[root@chefwork cookbook]# chef generate template httpd_deploy index.html
Installing Cookbook Gems:
Compiling Cookbooks...
Recipe: code_generator::template
* directory[./httpd_deploy/templates/default] action create
- create new directory ./httpd_deploy/templates/default
* template[./httpd_deploy/templates/default/index.html.erb] action create
- create new file ./httpd_deploy/templates/default/index.html.erb
- update content in file ./httpd_deploy/templates/default/index.html.erb from none to e3b0c4
(diff output suppressed by config)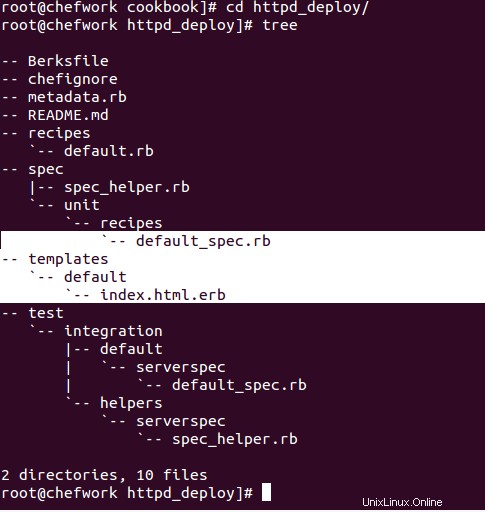
Ahora, si ve la estructura de archivos de nuestro libro de cocina, hay una carpeta creada con la plantilla de nombre con index.html.erb expediente. Podemos editar nuestro archivo de plantilla index.html.erb y agregarlo a nuestra receta de la siguiente manera:
root@chefwork default]# cat index.html.erb
Welcome to Chef Apache Deployment
[root@chefwork default]# pwd
/root/chef-repo/cookbook/httpd_deploy/templates/default
Creando la receta con esta plantilla
[root@chefwork recipes]# pwd
/root/chef-repo/cookbook/httpd_deploy/recipes
[root@chefwork recipes]# cat default.rb
#
# Cookbook Name:: httpd_deploy
# Recipe:: default
#
# Copyright (c) 2016 The Authors, All Rights Reserved.
package 'httpd'
service 'httpd' do
action [:enable, :start]
end

template '/var/www/html/index.html' do
 source 'index.html.erb'
end
Ahora regrese a nuestra carpeta chef-repo y ejecute/pruebe nuestra receta en nuestra estación de trabajo.
[root@chefwork chef-repo]# chef-client --local-mode --runlist 'recipe[httpd_deploy]'
[2016-05-20T05:44:40+00:00] WARN: No config file found or specified on command line, using command line options.
Starting Chef Client, version 12.10.24
resolving cookbooks for run list: ["httpd_deploy"]
Synchronizing Cookbooks:
- httpd_deploy (0.1.0)
Installing Cookbook Gems:
Compiling Cookbooks...
Converging 3 resources
Recipe: httpd_deploy::default
* yum_package[httpd] action install
 - install version 2.4.6-40.el7.centos.1 of package httpd
 * service[httpd] action enable
 - enable service service[httpd]
 * service[httpd] action start
 - start service service[httpd]
* template[/var/www/html/index.html] action create
 - update content in file /var/www/html/index.html from 152204 to 748cbd
 --- /var/www/html/index.html 2016-05-20 04:18:38.553231745 +0000
 +++ /var/www/html/.chef-index.html20160520-20425-1bez4qs 2016-05-20 05:44:47.344848833 +0000
 @@ -1,2 +1,2 @@
 -Welcome to Apache in Chef
 +Welcome to Chef Apache Deployment

Running handlers:
Running handlers complete
Chef Client finished, 4/4 resources updated in 06 seconds

[root@chefwork chef-repo]# cat /var/www/html/index.html
Welcome to Chef Apache Deployment
Según nuestra receta, Apache está instalado en nuestra estación de trabajo, el servicio se inicia y habilita en el arranque. Y se ha creado un archivo de plantilla en nuestra raíz de documentos predeterminada.
Ahora hemos probado nuestra estación de trabajo. Es hora de configurar el servidor Chef.
Configuración del Servidor Chef
En primer lugar, inicie sesión en nuestro servidor Chef "chefserver.test20.com" y descargue el paquete del servidor Chef compatible con nuestra versión del sistema operativo.
[root@chefserver ~]# wget https://packages.chef.io/stable/el/7/chef-server-core-12.6.0-1.el7.x86_64.rpm
--2016-05-20 07:23:46-- https://packages.chef.io/stable/el/7/chef-server-core-12.6.0-1.el7.x86_64.rpm
Resolving packages.chef.io (packages.chef.io)... 75.126.118.188, 108.168.243.150
Connecting to packages.chef.io (packages.chef.io)|75.126.118.188|:443... connected.
HTTP request sent, awaiting response... 302
Location: https://akamai.bintray.com/5a/5a36d0ffa692bf788e90315171582a758d4c5d8033a892dca9a81d3c03c44d14?__gda__=exp=1463729747~hmac=86e28bf2d5197154c84b571330b4c897006c2cb7f14cc9fc386c62d8b6e34c2d&response-content-disposition=attachment%3Bfilename%3D%22chef-server-core-12.6.0-1.el7.x86_64.rpm%22&response-content-type=application%2Foctet-stream [following]
--2016-05-20 07:23:47-- https://akamai.bintray.com/5a/5a36d0ffa692bf788e90315171582a758d4c5d8033a892dca9a81d3c03c44d14?__gda__=exp=1463729747~hmac=86e28bf2d5197154c84b571330b4c897006c2cb7f14cc9fc386c62d8b6e34c2d&response-content-disposition=attachment%3Bfilename%3D%22chef-server-core-12.6.0-1.el7.x86_64.rpm%22&response-content-type=application%2Foctet-stream
Resolving akamai.bintray.com (akamai.bintray.com)... 23.15.249.68
Connecting to akamai.bintray.com (akamai.bintray.com)|23.15.249.68|:443... connected.
HTTP request sent, awaiting response... 200 OK
Length: 481817688 (459M) [application/octet-stream]
Saving to: ‘chef-server-core-12.6.0-1.el7.x86_64.rpm’

100%[====================================================================================================>] 48,18,17,688 2.90MB/s in 3m 53s

[root@chefserver ~]# rpm -ivh chef-server-core-12.6.0-1.el7.x86_64.rpm
warning: chef-server-core-12.6.0-1.el7.x86_64.rpm: Header V4 DSA/SHA1 Signature, key ID 83ef826a: NOKEY
Preparing... ################################# [100%]
Updating / installing...
1:chef-server-core-12.6.0-1.el7 ################################# [100%]
Ahora nuestro servidor Chef está instalado. Pero necesitamos reconfigurar el servidor Chef para habilitar e iniciar todos los servicios que se componen en el servidor Chef. Podemos ejecutar este comando para reconfigurar.
root@chefserver ~]# chef-server-ctl reconfigure
Starting Chef Client, version 12.10.26
resolving cookbooks for run list: ["private-chef::default"]
Synchronizing Cookbooks:
- enterprise (0.10.0)
- apt (2.9.2)
- yum (3.10.0)
- openssl (4.4.0)
- chef-sugar (3.3.0)
- packagecloud (0.0.18)
- runit (1.6.0)
- private-chef (0.1.0)
Installing Cookbook Gems:
Compiling Cookbooks...
[2016-05-19T02:38:37+00:00] WARN: Chef::Provider::AptRepository already exists! Cannot create deprecation class for LWRP provider apt_repository from cookbook apt
Chef Client finished, 394/459 resources updated in 04 minutes 05 seconds
Chef Server Reconfigured!
Confirme el estado del servicio y sus pid ejecutando este comando.
[root@chefserver ~]# chef-server-ctl status
run: bookshelf: (pid 6140) 162s; run: log: (pid 6156) 162s
run: nginx: (pid 6051) 165s; run: log: (pid 6295) 156s
run: oc_bifrost: (pid 5987) 167s; run: log: (pid 6022) 167s
run: oc_id: (pid 6038) 165s; run: log: (pid 6042) 165s
run: opscode-erchef: (pid 6226) 159s; run: log: (pid 6214) 161s
run: opscode-expander: (pid 6102) 162s; run: log: (pid 6133) 162s
run: opscode-solr4: (pid 6067) 164s; run: log: (pid 6095) 163s
run: postgresql: (pid 5918) 168s; run: log: (pid 5960) 168s
run: rabbitmq: (pid 5876) 168s; run: log: (pid 5869) 169s
run: redis_lb: (pid 5795) 290s; run: log: (pid 6280) 156s
¡¡Viva!! Nuestro Servidor Chef está listo :). Ahora podemos instalar la consola de administración para obtener una interfaz web para administrar nuestro servidor Chef.
Instalación de Management Console para Chef Server
Podemos instalar la consola de administración simplemente ejecutando este comando "chef-server-ctl install chef-manag e" del servidor del chef.
[root@chefserver ~]# chef-server-ctl install chef-manage
Starting Chef Client, version 12.10.26
resolving cookbooks for run list: ["private-chef::add_ons_wrapper"]
Synchronizing Cookbooks:
- enterprise (0.10.0)
- apt (2.9.2)
- yum (3.10.0)
- openssl (4.4.0)
- runit (1.6.0)
- chef-sugar (3.3.0)
- packagecloud (0.0.18)
- private-chef (0.1.0)
Installing Cookbook Gems:
Compiling Cookbooks...
Converging 4 resources
Recipe: private-chef::add_ons_wrapper
* ruby_block[addon_install_notification_chef-manage] action nothing (skipped due to action :nothing)
* remote_file[/var/opt/opscode/local-mode-cache/chef-manage-2.3.0-1.el7.x86_64.rpm] action create
- create new file /var/opt/opscode/local-mode-cache/chef-manage-2.3.0-1.el7.x86_64.rpm
- update content in file /var/opt/opscode/local-mode-cache/chef-manage-2.3.0-1.el7.x86_64.rpm from none to 098cc4
(file sizes exceed 10000000 bytes, diff output suppressed)
* ruby_block[locate_addon_package_chef-manage] action run
- execute the ruby block locate_addon_package_chef-manage
* yum_package[chef-manage] action install
- install version 2.3.0-1.el7 of package chef-manage
* ruby_block[addon_install_notification_chef-manage] action create
- execute the ruby block addon_install_notification_chef-manage

Running handlers:
-- Installed Add-On Package: chef-manage
- #<Class:0x00000006032b80>::AddonInstallHandler
Running handlers complete
Chef Client finished, 4/5 resources updated in 02 minutes 39 seconds
Después de instalar la consola de administración, debemos reconfigurar el servidor chef para reiniciar el servidor chef y sus servicios para actualizar estos cambios.
[root@chefserver ~]# opscode-manage-ctl reconfigure
To use this software, you must agree to the terms of the software license agreement.
Press any key to continue.
Type 'yes' to accept the software license agreement, or anything else to cancel.
yes
Starting Chef Client, version 12.4.1
resolving cookbooks for run list: ["omnibus-chef-manage::default"]
Synchronizing Cookbooks:
- omnibus-chef-manage
- chef-server-ingredient
- enterprise
Recipe: omnibus-chef-manage::default
* private_chef_addon[chef-manage] action create (up to date)
Recipe: omnibus-chef-manage::config
Running handlers:
Running handlers complete
Chef Client finished, 62/79 resources updated in 44.764229437 seconds
chef-manage Reconfigured!

[root@chefserver ~]# chef-server-ctl reconfigure
Ahora que nuestra consola de administración está lista, debemos configurar nuestro usuario administrador para administrar nuestro Chef Server.
Creación de usuario administrador/organización
Creé el usuario administrador llamado chefadmin con una organización linox en mi servidor chef para administrarlo. Podemos crear el usuario usando el comando chef chef-server-ctl user-create y organización usando el comando chef-server-ctl org-create.
root@chefserver ~]# chef-server-ctl user-create chefadmin saheetha shameer saheetha@gmail.com 'chef123' --filename /root/.chef/chefadmin.pem
[root@chefserver ~]#

[root@chefserver .chef]# chef-server-ctl org-create linox Chef Linoxide --association_user chefadmin --filename /root/.chef/linoxvalidator.pem
Nuestras claves se guardan dentro de la carpeta /root/.chef. Necesitamos copiar estas claves del servidor Chef a la estación de trabajo para iniciar la comunicación entre nuestro servidor Chef y la estación de trabajo.
Copiar las claves
Estoy copiando mis claves de usuario y validador del servidor Chef a la estación de trabajo para mejorar la conexión entre los servidores.
[root@chefserver .chef]# scp chefadmin.pem root@139.162.35.39:/root/chef-repo/.chef/
The authenticity of host '139.162.35.39 (139.162.35.39)' can't be established.
ECDSA key fingerprint is 5b:0b:07:85:9a:fb:b6:59:51:07:7f:14:1b:07:07:f0.
Are you sure you want to continue connecting (yes/no)? yes
Warning: Permanently added '139.162.35.39' (ECDSA) to the list of known hosts.
root@139.162.35.39's password:
chefadmin.pem 100% 1678 1.6KB/s 00:00
[root@chefserver .chef]#

[root@chefserver .chef]# scp linoxvalidator.pem root@139.162.35.39:/root/chef-repo/.chef/
The authenticity of host '139.162.35.39 (139.162.35.39)' can't be established.
ECDSA key fingerprint is 5b:0b:07:85:9a:fb:b6:59:51:07:7f:14:1b:07:07:f0.
Are you sure you want to continue connecting (yes/no)? yes
Warning: Permanently added '139.162.35.39' (ECDSA) to the list of known hosts.
root@139.162.35.39's password:
linoxvalidator.pem 100% 1678 1.6KB/s 00:00
[root@chefserver .chef]#

Now login to our Management console for our Chef server with the user/password  "chefadmin" created.
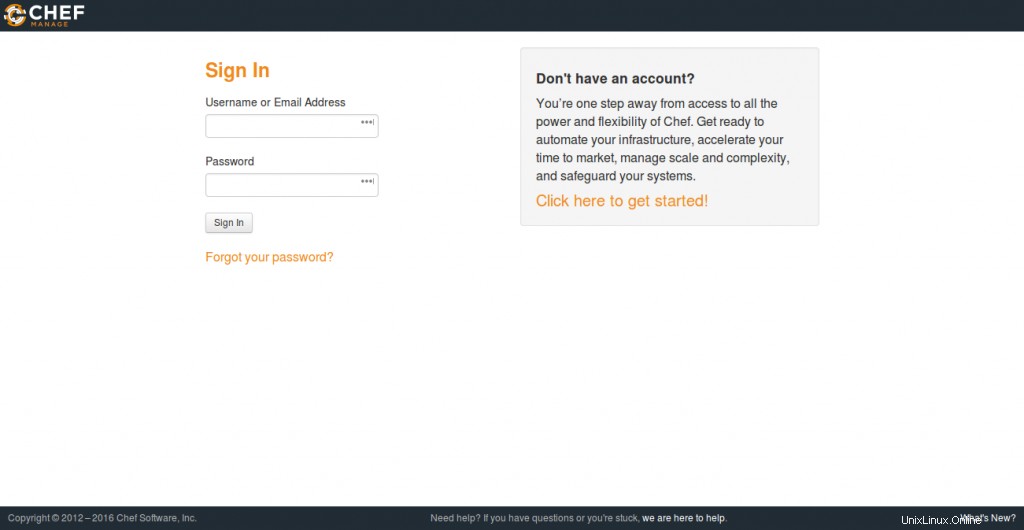
Le pedirá que cree una organización desde el Panel de registro. Solo crea uno diferente.
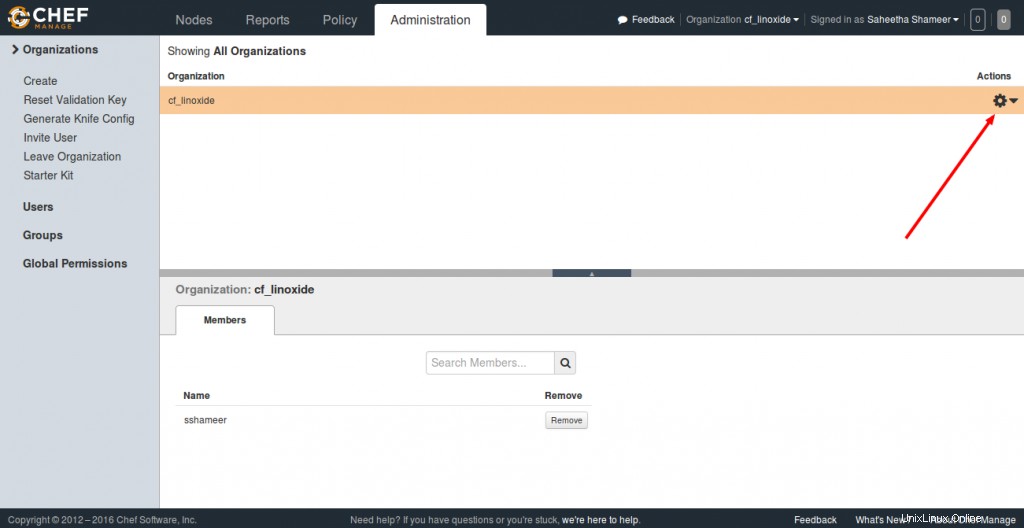
Descargue el kit de inicio para WorkStation
Elija cualquiera de su organización y descargue el kit de inicio desde Chef Server a nuestra estación de trabajo.
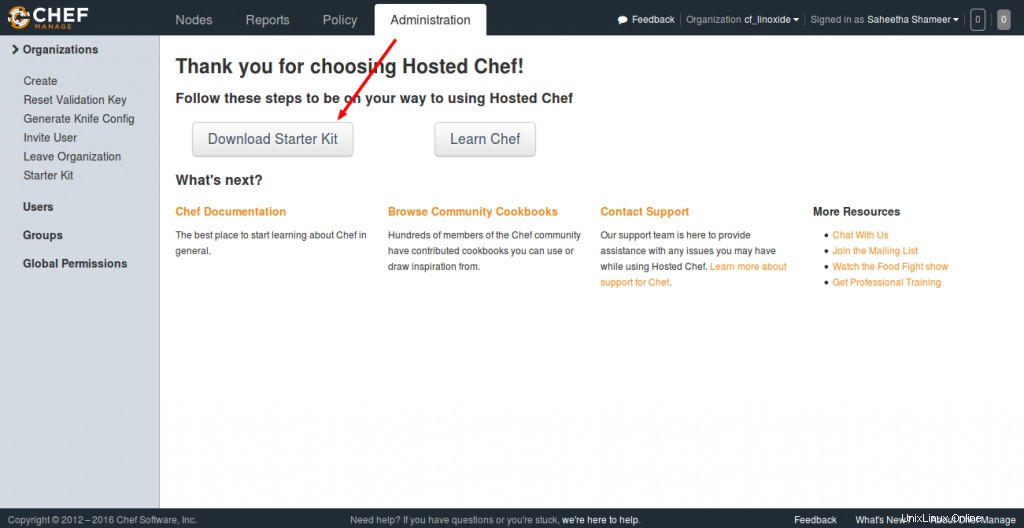
Después de descargar este kit. Muévalo a la carpeta raíz de su estación de trabajo y extráigalo. Esto le proporciona un kit de inicio predeterminado para comenzar con su servidor Chef. Incluye un chef-repo.
root@chefwork ~]# ls
chef-starter.zip hello.rb
[root@chefwork~]# unzip chef-starter.zip
Archive: chef-starter.zip
creating: chef-repo/cookbooks/
creating: chef-repo/cookbooks/starter/
creating: chef-repo/cookbooks/starter/recipes/
inflating: chef-repo/cookbooks/starter/recipes/default.rb
creating: chef-repo/cookbooks/starter/files/
creating: chef-repo/cookbooks/starter/files/default/
inflating: chef-repo/cookbooks/starter/files/default/sample.txt
creating: chef-repo/cookbooks/starter/templates/
creating: chef-repo/cookbooks/starter/templates/default/
inflating: chef-repo/cookbooks/starter/templates/default/sample.erb
inflating: chef-repo/cookbooks/starter/metadata.rb
creating: chef-repo/cookbooks/starter/attributes/
inflating: chef-repo/cookbooks/starter/attributes/default.rb
inflating: chef-repo/cookbooks/chefignore
inflating: chef-repo/README.md
inflating: chef-repo/.gitignore
creating: chef-repo/.chef/
creating: chef-repo/roles/
inflating: chef-repo/.chef/knife.rb
inflating: chef-repo/roles/starter.rb
inflating: chef-repo/.chef/chefadmin.pem
inflating: chef-repo/.chef/ln_blog-validator.pem
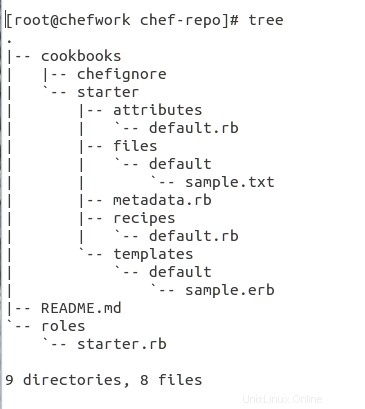
Esta es la estructura de archivos para el repositorio de Chef descargado. Contiene todas las estructuras de archivos necesarias para empezar.
Supermercado de libros de cocina
Los libros de cocina del Chef están disponibles en el Cookbook Super Market, podemos ir al Chef SuperMarket aquí. Descargue los libros de cocina requeridos desde allí. Estoy descargando uno de los libros de cocina para instalar Apache desde allí.
root@chefwork chef-repo]# knife cookbook site download learn_chef_httpd
Downloading learn_chef_httpd from Supermarket at version 0.2.0 to /root/chef-repo/learn_chef_httpd-0.2.0.tar.gz
Cookbook saved: /root/chef-repo/learn_chef_httpd-0.2.0.tar.gz

Extract this cookbook inside the "cookbooks" folder.

[root@chefwork chef-repo]# tar -xvf learn_chef_httpd-0.2.0.tar.gz

Todos los archivos necesarios se crean automáticamente en este libro de recetas. No requerimos hacer ninguna modificación. Revisemos la descripción de nuestra receta dentro de nuestra carpeta de recetas.
[root@chefwork recipes]# cat default.rb
#
# Cookbook Name:: learn_chef_httpd
# Recipe:: default
#
# Copyright (C) 2014
#
#
#
package 'httpd'

service 'httpd' do
 action [:enable, :start]
end

template '/var/www/html/index.html' do
 source 'index.html.erb'
end

service 'iptables' do
 action :stop
end
[root@chefwork recipes]#
[root@chefwork recipes]# pwd
/root/chef-repo/cookbooks/learn_chef_httpd/recipes
[root@chefwork recipes]#
Así que solo tenemos que subir este libro de cocina a nuestro servidor de Chef, ya que se ve perfecto.
Validación de la conexión entre el servidor y la estación de trabajo
Antes de cargar el libro de recetas, debemos verificar y confirmar la conexión entre nuestro servidor Chef y la estación de trabajo. En primer lugar, asegúrese de tener el archivo de configuración de Knife adecuado.
[root@chefwork .chef]# cat knife.rb
current_dir = File.dirname(__FILE__)
log_level :info
log_location STDOUT
node_name "chefadmin"
client_key "#{current_dir}/chefadmin.pem"
validation_client_name "linox-validator"
validation_key "#{current_dir}/linox-validator.pem"
chef_server_url "https://chefserver.test20.com:443/organizations/linox"

cookbook_path ["#{current_dir}/../cookbooks"]
Este archivo de configuración se encuentra en /root/chef-repo/.chef carpeta. Las porciones resaltadas son las principales cosas a tener en cuenta. Ahora puede ejecutar este comando para verificar las conexiones.
root@chefwork .chef]# knife client list
ERROR: SSL Validation failure connecting to host: chefserver.test20.com - SSL_connect returned=1 errno=0 state=error: certificate verify failed
ERROR: Could not establish a secure connection to the server.
Use `knife ssl check` to troubleshoot your SSL configuration.
If your Chef Server uses a self-signed certificate, you can use
`knife ssl fetch` to make knife trust the server's certificates.

Original Exception: OpenSSL::SSL::SSLError: SSL Error connecting to https://chefserver.test20.com/clients - SSL_connect returned=1 errno=0 state=error: certificate verify failed
Puede ver un informe de error de SSL. Para corregir este error, debemos buscar el certificado SSL para nuestro Chef Server y almacenarlo dentro de la carpeta /root/.chef/trusted_certs. Podemos hacer esto ejecutando este comando.
root@chefwork .chef]# knife ssl fetch
WARNING: Certificates from chefserver.test20.com will be fetched and placed in your trusted_cert
directory (/root/chef-repo/.chef/trusted_certs).

Knife has no means to verify these are the correct certificates. You should
verify the authenticity of these certificates after downloading.

Adding certificate for chefserver.test20.com in /root/chef-repo/.chef/trusted_certs/chefserver_test20_com.crt

Verifying the SSL:

[root@chefwork .chef]# knife ssl check
Connecting to host chefserver.test20.com:443
Successfully verified certificates from `chefserver.test20.com'

[root@chefwork .chef]# knife client list
chefnode
linox-validator
[root@chefwork .chef]# knife user list
chefadmin
Subir el libro de cocina
Podemos cargar nuestro libro de cocina a nuestro servidor de chef desde la estación de trabajo usando el comando de cuchillo como se muestra a continuación:
#cuchillo subir libro de cocina learn_chef_httpd
[root@chefwork cookbooks]# knife cookbook upload learn_chef_httpd
Uploading learn_chef_httpd [0.2.0]
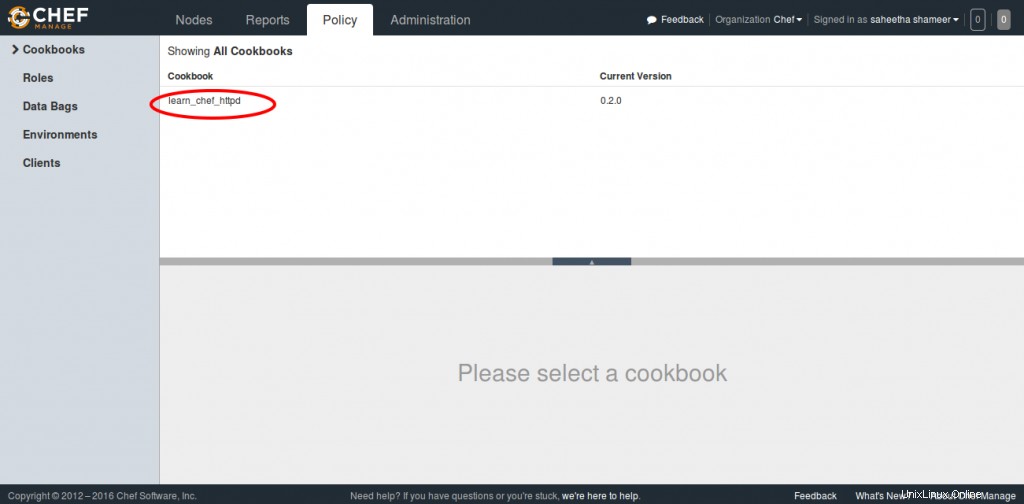
Uploaded 1 cookbook.Verifique el libro de recetas desde la consola de administración de Chef Server.
Agregar un nodo
Este es el paso final en la implementación de Chef. Hemos configurado una estación de trabajo, un servidor Chef y ahora necesitamos agregar nuestros clientes al servidor Chef para la automatización. Estoy agregando mi chefnode al servidor usando el comando de arranque del cuchillo como se muestra a continuación:
[root@chefwork cookbooks]# knife bootstrap 45.33.76.60 --ssh-user root --ssh-password dkfue@321 --node-name chefnode
Creating new client for chefnode
Creating new node for chefnode
Connecting to 45.33.76.60
45.33.76.60 -----> Installing Chef Omnibus (-v 12)
45.33.76.60 downloading https://omnitruck-direct.chef.io/chef/install.sh
45.33.76.60 to file /tmp/install.sh.5457/install.sh
45.33.76.60 trying wget...
45.33.76.60 el 7 x86_64
45.33.76.60 Getting information for chef stable 12 for el...
45.33.76.60 downloading https://omnitruck-direct.chef.io/stable/chef/metadata?v=12&p=el&pv=7&m=x86_64
45.33.76.60 to file /tmp/install.sh.5466/metadata.txt
45.33.76.60 trying wget...
45.33.76.60 sha1 4def83368a1349959fdaf0633c4d288d5ae229ce
45.33.76.60 sha256 6f00c7bdf96a3fb09494e51cd44f4c2e5696accd356fc6dc1175d49ad06fa39f
45.33.76.60 url https://packages.chef.io/stable/el/7/chef-12.10.24-1.el7.x86_64.rpm
45.33.76.60 version 12.10.24
45.33.76.60 downloaded metadata file looks valid...
45.33.76.60 downloading https://packages.chef.io/stable/el/7/chef-12.10.24-1.el7.x86_64.rpm
45.33.76.60 to file /tmp/install.sh.5466/chef-12.10.24-1.el7.x86_64.rpm
45.33.76.60 trying wget...
45.33.76.60 Comparing checksum with sha256sum...
45.33.76.60 Installing chef 12
45.33.76.60 installing with rpm...
45.33.76.60 warning: /tmp/install.sh.5466/chef-12.10.24-1.el7.x86_64.rpm: Header V4 DSA/SHA1 Signature, key ID 83ef826a: NOKEY
45.33.76.60 Preparing... ################################# [100%]
45.33.76.60 Updating / installing...
45.33.76.60 1:chef-12.10.24-1.el7 ################################# [100%]
45.33.76.60 Thank you for installing Chef!
45.33.76.60 Starting the first Chef Client run...
45.33.76.60 Starting Chef Client, version 12.10.24
45.33.76.60 resolving cookbooks for run list: []
45.33.76.60 Synchronizing Cookbooks:
45.33.76.60 Installing Cookbook Gems:
45.33.76.60 Compiling Cookbooks...
45.33.76.60 [2016-05-20T15:36:41+00:00] WARN: Node chefnode has an empty run list.
45.33.76.60 Converging 0 resources
45.33.76.60
45.33.76.60 Running handlers:
45.33.76.60 Running handlers complete
45.33.76.60 Chef Client finished, 0/0 resources updated in 08 seconds
[root@chefwork chef-repo]#
Este comando también inicializará la instalación del Chef-cliente en el nodo Chef. Puede verificarlo desde la CLI en la estación de trabajo usando los siguientes comandos de cuchillo:
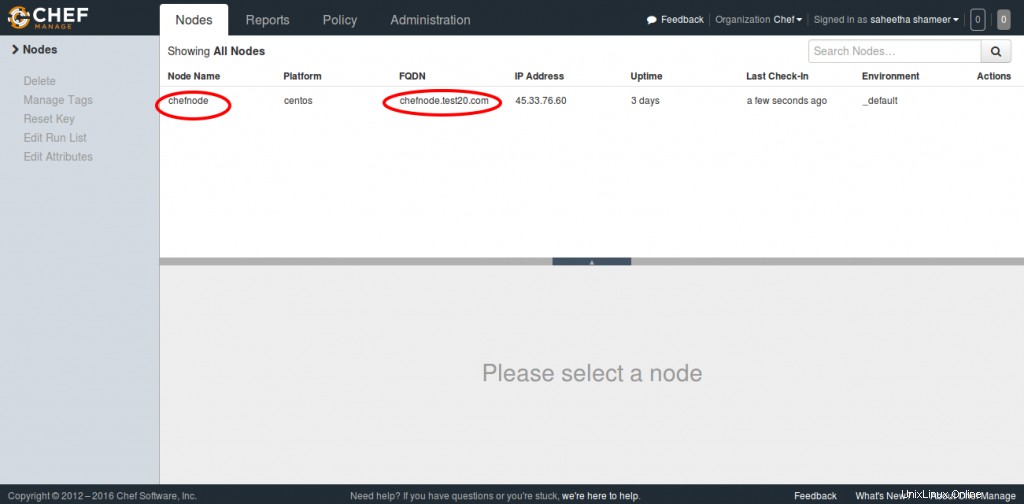
[root@chefwork chef-repo]# knife node list
chefnode

[root@chefwork chef-repo]# knife node show chefnode
Node Name: chefnode
Environment: _default
FQDN: chefnode.test20.com
IP: 45.33.76.60
Run List: recipe[learn_chef_httpd]
Roles:
Recipes:
Platform: centos 7.2.1511
Tags:
Verifying it from the Management console.
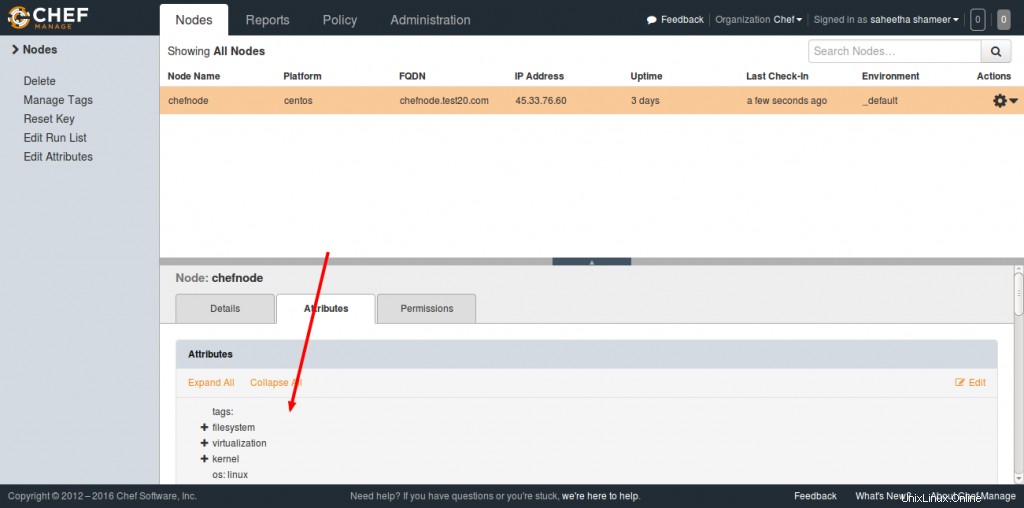
We can get more information regarding the added node by selecting the node and viewing the Attributes section.
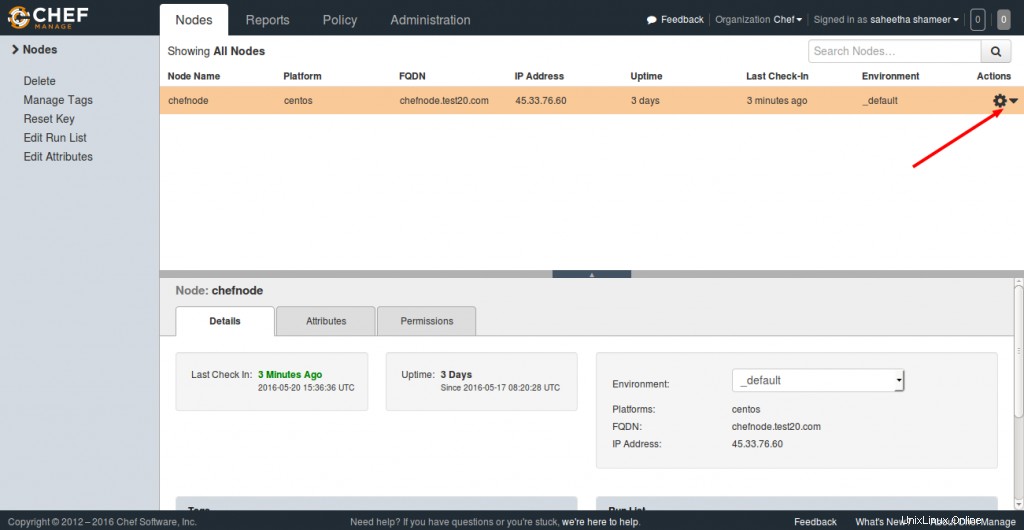
Managing Node Run List
Let's see how we can add a cookbook to the node and manage its runlist from the Chef server. As you see in the screenshot, you can click the Actions tab and select the Edit Runlist option to manage the runlist.
In the Available Recipes, you can see our learn_chef_httpd recipe, you can drag that from the available packages to the current run list and save the runlist.
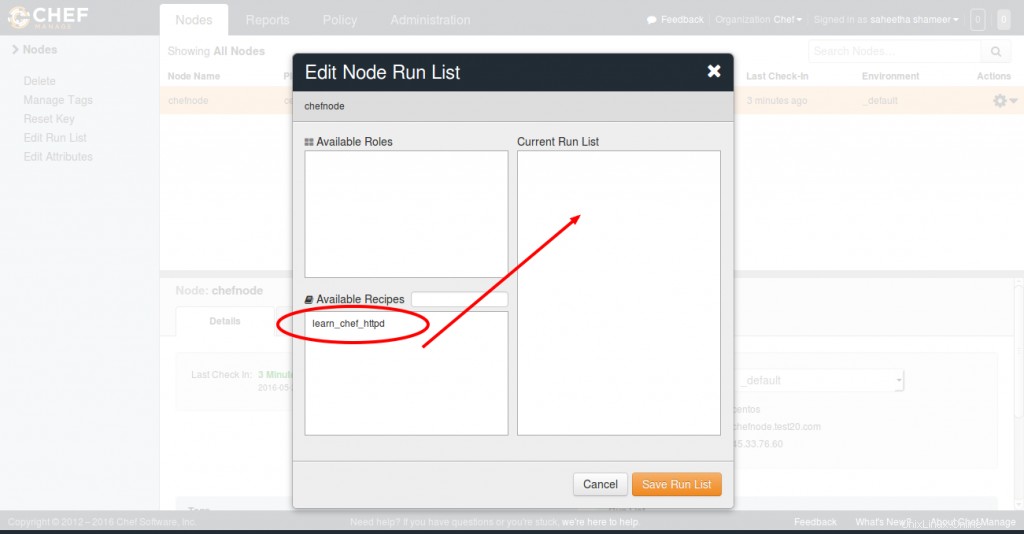
Now login to your node and just run the command chef-client to execute your runlist.
root@chefnode ~]# chef-client
Starting Chef Client, version 12.10.24
resolving cookbooks for run list: ["learn_chef_httpd"]
Synchronizing Cookbooks:
- learn_chef_httpd (0.2.0)
Installing Cookbook Gems:
Compiling Cookbooks...
Converging 4 resources
Recipe: learn_chef_httpd::default
* yum_package[httpd] action install
Similarly, we can add any number of nodes to your Chef Server depending on its configuration and hardware. I hope this article provided you with the basic understanding of Chef implementation. I would recommend your valuable comments and suggestions on this. Thank you for reading this :)
Happy Automation with Chef!!