Este tutorial describe la instalación de un servidor web, de correo electrónico, de base de datos y de DNS en clúster que se usará para redundancia, alta disponibilidad y equilibrio de carga en Debian 8 con el panel de control ISPConfig 3. La replicación MySQL Master/Master se usará para replicar las bases de datos del cliente MySQL entre los servidores, Unison se usará para sincronizar /var/www (sitios web) y los correos se sincronizarán con Dovecot.
1 Nota general
En esta configuración, habrá un servidor maestro (que ejecuta la interfaz del panel de control de ISPConfig) y un servidor esclavo que refleja los servicios web (apache), correo electrónico (postfix y dovecot), dns (bind) y base de datos (MySQL o MariaDB). del servidor maestro.
Para instalar la configuración en clúster, necesitamos dos servidores con una instalación mínima de Debian 8.4 y la misma versión de ISPConfig.
En mi ejemplo, utilizo los siguientes nombres de host y direcciones IP para los dos servidores:
Servidor maestro
Nombre de host:server1.example.tld
Dirección IP:192.168.0.105
Dirección IPv6:2001:db8::1
Servidor esclavo
Nombre de host:server2.example.tld
Dirección IP:192.168.0.106
Dirección IPv6:2001:db8::2
Siempre que aparezcan estos nombres de host o direcciones IP en los próximos pasos de instalación, deberá cambiarlos para que coincidan con las IP y los nombres de host de sus servidores.
Todos los comandos deben ejecutarse como usuario root. Si necesita realizar cambios en MySQL, inicie sesión en MySQL con la contraseña raíz para MySQL:
mysql -u root -p
2 Instalar el servidor maestro
Primero necesitamos instalar ISPConfig en el Master-Server. Si ya ha instalado ISPConfig en este servidor, puede omitir la instalación (asegúrese de que la instalación existente esté actualizada).
Instale ISPConfig en el servidor maestro de acuerdo con The Perfect Server - Debian 8.4 Jessie (Apache2, BIND, Dovecot, ISPConfig 3.1).
Agregue el servidor esclavo al archivo /etc/hosts
vi /etc/hosts
por lo que parece:
127.0.0.1       localhost
192.168.0.105   server1.example.tld server1
2001:db8::1     server1.example.tld server1
192.168.0.106   server2.example.tld
2001:db8::2     server2.example.tld

# The following lines are desirable for IPv6 capable hosts
::1     localhost ip6-localhost ip6-loopback
fe00::0 ip6-localnet
ff00::0 ip6-mcastprefix
ff02::1 ip6-allnodes
ff02::2 ip6-allrouters
ff02::3 ip6-allhosts
3 Prepare el servidor esclavo
Ejecute los pasos 1 a 19 desde The Perfect Server - Debian 8.4 Jessie (Apache2, BIND, Dovecot, ISPConfig 3.1).
No instale ISPConfig en el servidor 2 todavía.
Agregue el servidor maestro al archivo /etc/hosts
vi /etc/hosts
por lo que parece:
127.0.0.1       localhost
192.168.0.105   server1.example.tld
2001:db8::1     server1.example.tld
192.168.0.106   server2.example.tld server2
2001:db8::2     server2.example.tld server2

# The following lines are desirable for IPv6 capable hosts
::1     localhost ip6-localhost ip6-loopback
fe00::0 ip6-localnet
ff00::0 ip6-mcastprefix
ff02::1 ip6-allnodes
ff02::2 ip6-allrouters
ff02::3 ip6-allhosts
4 Inicio de sesión sin llave de Server1 a Server2
En el servidor2:
Permitimos temporalmente el inicio de sesión de root en server2 con una contraseña. Abra /etc/sshd_config:
vi /etc/ssh/sshd_config
y cambiar
PermitRootLogin without-password
a
PermitRootLogin yes
luego, reinicie el ssh-daemon:
service ssh restart
En el servidor1:
Cree un par de claves pública/privada:
ssh-keygen
Generating public/private rsa key pair.
Enter file in which to save the key (/root/.ssh/id_rsa): <-- ENTER
Created directory '/root/.ssh'.
Enter passphrase (empty for no passphrase): <-- ENTER
Enter same passphrase again: <-- ENTER
Your identification has been saved in /root/.ssh/id_rsa.
Your public key has been saved in /root/.ssh/id_rsa.pub.
The key fingerprint is:
f3:d0:62:a7:24:6f:f0:1e:d1:64:a9:9f:12:6c:98:5a [email protected]
The key's randomart image is:
+---[RSA 2048]----+
|                 |
|           .     |
|          +      |
|       + *       |
|      E S +      |
|     o O @ .     |
|    .   B +      |
|       o o       |
|        .        |
+-----------------+
Es importante que no ingrese una frase de contraseña; de lo contrario, la duplicación no funcionará sin la interacción humana, ¡simplemente presione ENTER!
A continuación, copiamos nuestra clave pública en server2.example.tld:
ssh-copy-id -i /root/.ssh/id_rsa.pub [email protected]
The authenticity of host '192.168.0.106 (192.168.0.106)' can't be established.
ECDSA key fingerprint is 25:d8:7a:ee:c2:4b:1d:92:a7:3d:16:26:95:56:62:4e.
Are you sure you want to continue connecting (yes/no)? <-- yes (you will see this only if this is the first time you connect to server2)
/usr/bin/ssh-copy-id: INFO: attempting to log in with the new key(s), to filter out any that are already installed
/usr/bin/ssh-copy-id: INFO: 1 key(s) remain to be installed -- if you are prompted now it is to install the new keys
[email protected]'s password: <- enter root password from server2
Ahora intente iniciar sesión en la máquina:
ssh [email protected]
Y verifique /root/.ssh/authorized_keys para asegurarse de que no hayamos agregado claves adicionales que no esperaba.
cat /root/.ssh/authorized_keys
ssh-dss AAAAB3NzaC1kc3MAAACBAPhiAexgEBexnw0rFG8lXwAuIsca/V+lhmv5lhF3BqUfAbL7e2sWlQlGhxZ8I2UnzZK8Ypffq6Ks+lp46yOs7MMXLqb7JBP9gkgqxyEWqOoUSt5hTE9ghupcCvE7rRMhefY5shLUnRkVH6hnCWe6yXSnH+Z8lHbcfp864GHkLDK1AAAAFQDddQckbfRG4C6LOQXTzRBpIiXzoQAAAIEAleevPHwi+a3fTDM2+Vm6EVqR5DkSLwDM7KVVNtFSkAY4GVCfhLFREsfuMkcBD9Bv2DrKF2Ay3OOh39269Z1rgYVk+/MFC6sYgB6apirMlHj3l4RR1g09LaM1OpRz7pc/GqIGsDt74D1ES2j0zrq5kslnX8wEWSHapPR0tziin6UAAACBAJHxgr+GKxAdWpxV5MkF+FTaKcxA2tWHJegjGFrYGU8BpzZ4VDFMiObuzBjZ+LrUs57BiwTGB/MQl9FKQEyEV4J+AgZCBxvg6n57YlVn6OEA0ukeJa29aFOcc0inEFfNhw2jAXt5LRyvuHD/C2gG78lwb6CxV02Z3sbTBdc43J6y [email protected]
No permitir el inicio de sesión de root con una contraseña. Abra /etc/sshd_config:
vi /etc/ssh/sshd_config
y cambiar
PermitRootLogin yes
a
PermitRootLogin without-password
luego, reinicie el ssh-daemon:
service ssh restart
Salir del servidor2:
exit
logout
Connection to 192.168.0.106 closed.
Ahora estamos de vuelta en el servidor 1.
5. Replicación maestro-maestro de MySQL
5.1 Preparar Servidor1
Inicie sesión en MySQL y cree una cuenta específica para la replicación en MySQL. Utilizo un usuario independiente para la replicación para minimizar la posibilidad de compromiso con otras cuentas (el nombre de usuario y la contraseña se almacenan en texto sin formato en el archivo o la tabla del repositorio de información maestra):
CREATE USER 'slaveuser2'@'server2.example.tld' IDENTIFIED BY 'slave_user_password';
CREATE USER 'slaveuser2'@'192.168.0.106' IDENTIFIED BY 'slave_user_password';
CREATE USER 'slaveuser2'@'2001:db8::2' IDENTIFIED BY 'slave_user_password';
y otorgue el privilegio ESCLAVO DE REPLICACIÓN:
GRANT REPLICATION SLAVE ON *.* TO 'slaveuser2'@'server2.example.tld';
GRANT REPLICATION SLAVE ON *.* TO 'slaveuser2'@'192.168.0.106';
GRANT REPLICATION SLAVE ON *.* TO 'slaveuser2'@'2001:db8::2';
QUIT;
Realice algunos cambios para la replicación de su MySQL-Config:
vi /etc/mysql/my.cnf
Busque la sección que comienza con [mysqld] y coloque las siguientes opciones (comentando todos los conflictos existentes). opciones):
[...]
[mysqld]
server-id                = 1
replicate-same-server-id = 0
auto-increment-increment = 2
auto-increment-offset    = 1
log_bin                  = mysql-bin.log
expire_logs_days         = 10
max_binlog_size          = 100M
binlog_format            = mixed
sync_binlog              = 1
relay-log                = slave-relay.log
relay-log-index          = slave-relay-log.index
slave_skip_errors        = 1007,1008,1050, 1396
bind-address             = ::
y reinicie MySQL después:
service mysql restart
Simplemente omito algunos errores de esclavo. Expliqué esto en mi blog:
- 1007 =No se puede crear la base de datos '%s'; la base de datos existe
- 1008 =No se puede eliminar la base de datos '%s'; la base de datos no existe
- 1050 =La tabla '%s' ya existe
- 1396 =La operación %s falló para %s - No se puede crear el usuario
puede encontrar la lista de códigos de error de MySQL aquí:Códigos y mensajes de error del servidor
5.2 Preparar Servidor2
Realice algunos cambios para la replicación de su MySQL-Config:
vi /etc/mysql/my.cnf
Busque la sección que comienza con [mysqld] y coloque las siguientes opciones (comentando todos los conflictos existentes). opciones):
[...]
[mysqld]
server-id                = 2
log_bin                  = mysql-bin.log
expire_logs_days         = 10
max_binlog_size          = 100M
binlog_format            = mixed
sync_binlog              = 1
slave_skip_errors        = 1007,1008,1050, 1396
5.3 Crear una instantánea de las bases de datos existentes en el servidor1
Volcar las bases de datos en servidor1 e ingrese la contraseña raíz de MySQL:
mysqldump -p --all-databases --allow-keywords --master-data --events --single-transaction > /root/mysqldump.sql
Copie el volcado al servidor2:
scp /root/mysqldump.sql [email protected]:/root
5.4 Importar el volcado en el servidor2
mysql -u root -p < /root/mysqldump.sql
Apague mysql en servidor2 :
service mysql stop
Copie el archivo predeterminado de MySQL del servidor1 al servidor2. Cambiar a servidor1 y corre
scp /etc/mysql/debian.cnf [email protected]:/etc/mysql/debian.cnf
Inicie MySQL en servidor2 :
service mysql start
e inicie sesión en MySQL para configurar el servidor maestro con:
CHANGE MASTER TO MASTER_HOST="server1.example.tld", MASTER_USER="slaveuser2", MASTER_PASSWORD="slave_user_password";
Inicie el esclavo:
START SLAVE;
y verifique el estado del esclavo con
MOSTRAR ESTADO DE ESCLAVO \G
El resultado será algo como
*************************** 1. row ***************************
               Slave_IO_State: Waiting for master to send event
                  Master_Host: server1.example.tld
                  Master_User: slaveuser2
                  Master_Port: 3306
                Connect_Retry: 60
              Master_Log_File: mysql-bin.000001
          Read_Master_Log_Pos: 109989
               Relay_Log_File: mysqld-relay-bin.000002
                Relay_Log_Pos: 110276
        Relay_Master_Log_File: mysql-bin.000001
             Slave_IO_Running: Yes
            Slave_SQL_Running: Yes
              Replicate_Do_DB:
          Replicate_Ignore_DB:
           Replicate_Do_Table:
       Replicate_Ignore_Table:
      Replicate_Wild_Do_Table:
  Replicate_Wild_Ignore_Table:
                   Last_Errno: 0
                   Last_Error:
                 Skip_Counter: 0
          Exec_Master_Log_Pos: 109989
              Relay_Log_Space: 110574
              Until_Condition: None
               Until_Log_File:
                Until_Log_Pos: 0
           Master_SSL_Allowed: No
           Master_SSL_CA_File:
           Master_SSL_CA_Path:
              Master_SSL_Cert:
            Master_SSL_Cipher:
               Master_SSL_Key:
        Seconds_Behind_Master: 0
Master_SSL_Verify_Server_Cert: No
                Last_IO_Errno: 0
                Last_IO_Error:
               Last_SQL_Errno: 0
               Last_SQL_Error:
  Replicate_Ignore_Server_Ids:
             Master_Server_Id: 1
               Master_SSL_Crl:
           Master_SSL_Crlpath:
                   Using_Gtid: No
                  Gtid_IO_Pos:
Si "Seconds Behind Master" no es 0, espere hasta que el esclavo haya leído todos los datos del maestro (simplemente repita el comando para obtener el valor actual). Asegúrese de que server2 utilice el registro maestro y la posición de registro correctos.
En servidor1 ejecutar en MySQL:
SHOW MASTER STATUS \G
*************************** 1. row ***************************
            File: mysql-bin.000991
        Position: 69185362
    Binlog_Do_DB:
Binlog_Ignore_DB:
1 row in set (0.00 sec)
Y compare las coordenadas del registro binario del maestro de replicación.
Estamos ejecutando MySQL Master-Slave-Replication donde server1 es el maestro y server2 el esclavo.
5.5 MySQL Master-Master-Replication
Cree el usuario de MySQL para la replicación y otorgue el privilegio en MySQL:
CREATE USER 'slaveuser1'@'server1.example.tld' IDENTIFIED BY 'slave_user_password';
CREATE USER 'slaveuser1'@'192.168.0.105' IDENTIFIED BY 'slave_user_password';
CREATE USER 'slaveuser1'@'2001:db8::1' IDENTIFIED BY 'slave_user_password';
GRANT REPLICATION SLAVE ON *.* TO 'slaveuser1'@'server1.example.tld';
GRANT REPLICATION SLAVE ON *.* TO 'slaveuser1'@'192.168.0.105';
GRANT REPLICATION SLAVE ON *.* TO 'slaveuser1'@'2001:db8::1';
QUIT;
Realice algunos cambios para la replicación de MySQL-Config en server2 :
vi /etc/mysql/my.cnf
Busque la sección que comienza con [mysqld] y coloque las siguientes opciones (comentando todos los conflictos existentes). opciones):
[...]
[mysqld]
[...]
replicate-same-server-id = 0
auto-increment-increment = 2
auto-increment-offset    = 2
relay-log                = slave-relay.log
relay-log-index          = slave-relay-log.inde
y reinicie MySQL:
service mysql restart
Inicie sesión en MySQL y obtenga las coordenadas del registro binario maestro:
SHOW MASTER STATUS \G
*************************** 1. row ***************************
            File: mysql-bin.000002
        Position: 326
    Binlog_Do_DB:
Binlog_Ignore_DB:
1 row in set (0.00 sec)
Inicie sesión en MySQL en servidor1 y configure el servidor maestro con
CHANGE MASTER TO MASTER_HOST="server2.example.tld", MASTER_USER="slaveuser1", MASTER_PASSWORD="slave_user_password", MASTER_LOG_FILE='mysql-bin.000002', MASTER_LOG_POS=326;
Inicie el esclavo:
START SLAVE;
y verifique el estado del esclavo con
MOSTRAR ESTADO DE ESCLAVO \G
Compruebe que el esclavo se está ejecutando:
Slave_IO_Running:Sí
Slave_SQL_Running:Sí
Si su replicación deja de funcionar, puede encontrar información adicional aquí:
- Cómo omitir ciertos errores en la replicación de MySQL
- reiniciar la replicación maestro-maestro de mysql
- mysql-replication:no se pudo analizar la entrada del evento de registro de retransmisión
6 Instalar ISPConfig en el servidor esclavo
Inicie sesión en MySQL y cree un usuario raíz para el servidor 2:
CREATE USER 'root'@'192.168.0.106' IDENTIFIED BY 'myrootpassword';
GRANT ALL PRIVILEGES ON * . * TO 'root'@'192.168.0.106' WITH GRANT OPTION MAX_QUERIES_PER_HOUR 0 MAX_CONNECTIONS_PER_HOUR 0 MAX_UPDATES_PER_HOUR 0 MAX_USER_CONNECTIONS 0 ;
CREATE USER 'root'@'server2.example.tld' IDENTIFIED BY 'myrootpassword';
GRANT ALL PRIVILEGES ON * . * TO 'root'@'server2.example.tld' WITH GRANT OPTION MAX_QUERIES_PER_HOUR 0 MAX_CONNECTIONS_PER_HOUR 0 MAX_UPDATES_PER_HOUR 0 MAX_USER_CONNECTIONS 0;
CREATE USER 'root'@'2a01:dddd::2' IDENTIFIED BY 'myrootpassword';
GRANT ALL PRIVILEGES ON * . * TO 'root'@'2001:db8::2' WITH GRANT OPTION MAX_QUERIES_PER_HOUR 0 MAX_CONNECTIONS_PER_HOUR 0 MAX_UPDATES_PER_HOUR 0 MAX_USER_CONNECTIONS 0;
QUIT;
La replicación cubre toda la base de datos. Copie las configuraciones de db para PHPMyAdmin y roundcube del servidor1 al servidor2.
En servidor1 :
scp /etc/dbconfig-common/phpmyadmin.conf [email protected]:/etc/dbconfig-common/phpmyadmin.conf
scp /etc/phpmyadmin/config-db.php [email protected]:/etc/phpmyadmin/config-db.php
scp /etc/dbconfig-common/roundcube.conf [email protected]:/etc/dbconfig-common/roundcube.conf
scp /etc/roundcube/debian-db.php [email protected]:/etc/roundcube/debian-db.php
En servidor2 :
Descargar ISPConfig 3.1:
cd /tmp
wget -O ISPConfig-3.1-beta.tar.gz  https://git.ispconfig.org/ispconfig/ispconfig3/repository/archive.tar.gz?ref=stable-3.1
tar xfvz xfz ISPConfig-3.1-beta.tar.gz
cd ispconfig3-stable-3.1*
cd install
e inicie el instalador con
php -q install.php
--------------------------------------------------------------------------------
 _____ ___________   _____              __ _         ____
|_   _/  ___| ___ \ /  __ \            / _(_)       /__  \
  | | \ `--.| |_/ / | /  \/ ___  _ __ | |_ _  __ _    _/ /
  | |  `--. \  __/  | |    / _ \| '_ \|  _| |/ _` |  |_ |
 _| |_/\__/ / |     | \__/\ (_) | | | | | | | (_| | ___\ \
 \___/\____/\_|      \____/\___/|_| |_|_| |_|\__, | \____/
                                              __/ |
                                             |___/
--------------------------------------------------------------------------------


>> Initial configuration

Operating System: Debian 8.0 (Jessie) or compatible

    Following will be a few questions for primary configuration so be careful.
    Default values are in [brackets] and can be accepted with <ENTER>.
    Tap in "quit" (without the quotes) to stop the installer.


Select language (en,de) [en]: <-- Hit Enter

Installation mode (standard,expert) [standard]: expert <-- expert

Full qualified hostname (FQDN) of the server, eg server1.domain.tld  [server2.example.tld]: <-- Hit Enter

MySQL server hostname [localhost]: <-- Hit Enter

MySQL server port [3306]: <-- Hit Enter

MySQL root username [root]: <-- Hit Enter

MySQL root password []: <-- Enter your MySQL root password

MySQL database to create [dbispconfig]: <-- dbispconfig2 (the local ispconfig database name of the master and slave must be different, as both servers share the same databases)

MySQL charset [utf8]: <-- Hit Enter

The next two questions are about the internal ISPConfig database user and password.
It is recommended to accept the defaults which are 'ispconfig' as username and a random password.
If you use a different password, use only numbers and chars for the password.

ISPConfig mysql database username [ispconfig]: <-- ispconfig2

ISPConfig mysql database password [06d434604a3371a706a100f9786aec9b]: <-- Hit Enter

Shall this server join an existing ISPConfig multiserver setup (y,n) [n]: <-- y

MySQL master server hostname []: <-- server1.example.tld

MySQL master server port []: <-- Hit Enter

MySQL master server root username [root]: <-- Hit Enter

MySQL master server root password []: <-- Enter the root password of the master server here

MySQL master server database name [dbispconfig]: <-- Hit Enter

Adding ISPConfig server record to database.

Configure Mail (y,n) [y]: <-- Hit Enter

Configuring Postgrey
Configuring Postfix
Generating a 4096 bit RSA private key
........................................................................++
....................++
writing new private key to 'smtpd.key'
-----
You are about to be asked to enter information that will be incorporated
into your certificate request.
What you are about to enter is what is called a Distinguished Name or a DN.
There are quite a few fields but you can leave some blank
For some fields there will be a default value,
If you enter '.', the field will be left blank.
-----
Country Name (2 letter code) [AU]: <-- Enter 2 letter country code
State or Province Name (full name) [Some-State]: <-- Enter the name of the  state
Locality Name (eg, city) []: <-- Enter your city
Organization Name (eg, company) [Internet Widgits Pty Ltd]: <-- Enter company name or press enter
Organizational Unit Name (eg, section) []: <-- Hit Enter
Common Name (e.g. server FQDN or YOUR name) []: <-- Enter the server hostname, in my case: server2.example.com
Email Address []: <-- Hit Enter
Configuring Mailman
Configuring Dovecot
Configuring Spamassassin
Configuring Amavisd
Configuring Getmail
Configuring Jailkit
Configuring Pureftpd
Configure DNS Server (y,n) [y]: <-- Hit Enter

Configuring BIND
Configure Web Server (y,n) [y]: <-- Hit Enter

Configuring Apache
Configuring vlogger
[WARN] autodetect for OpenVZ failed
Force configure OpenVZ (y,n) [n]: <-- Hit Enter

Skipping OpenVZ

Configure Firewall Server (y,n) [y]: <-- Hit Enter

Configuring Ubuntu Firewall
Configuring Metronome XMPP Server
writing new private key to 'localhost.key'
-----
Country Name (2 letter code) [AU]: <-- Enter 2 letter country code
Locality Name (eg, city) []: <-- Enter your city
Organization Name (eg, company) [Internet Widgits Pty Ltd]: <-- Enter company name or press enter
Organizational Unit Name (eg, section) []: <-- Hit Enter
Common Name (e.g. server FQDN or YOUR name) [server2.example.tld]: <-- Enter the server hostname, in my case: server2.example.tld
Email Address []: <-- Hit Enter

Install ISPConfig Web Interface (y,n) [n]: <-- Hit Enter


Configuring DBServer
Installing ISPConfig crontab
Detect IP addresses
Installation completed.
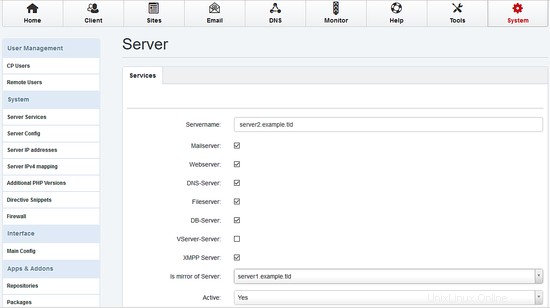
Inicie sesión en ISPConfig en el servidor 1 y vaya a Sistema / Servicios del servidor y elija server2.example.tld y configure Es espejo del servidor a servidor1.ejemplo.tld:
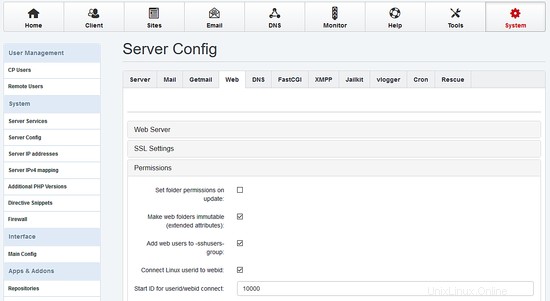
Ir a la configuración del servidor , seleccione la pestaña Web y establezca los permisos para ambos servidores:
Si ya tiene datos (sitios web, correo...) ejecutándose en el servidor 1, vaya a Herramientas / Resincronizar e inicie una resincronización completa (active todas las casillas de verificación).
7 Instalar Unísono
A continuación instalamos Unison. Unison se usa para sincronizar el directorio /var/www entre el servidor1 y el servidor2.
Instalar unísono en servidor1 y servidor2 con
apt-get install unison
Ahora instalamos un archivo de configuración unísono en servidor1 :
Cree un nuevo archivo /root/.unison/web:
mkdir /root/.unison
vi /root/.unison/web.prf
... y agregue el siguiente contenido:
# Roots of the synchronization
root = /var/www
root = ssh://192.168.0.106//var/www

# Paths to synchronize
#path = www
#path = vmail

# Some regexps specifying names and paths to ignore
#ignore = Path stats    ## ignores /var/www/stats
#ignore = Path stats/*  ## ignores /var/www/stats/*
#ignore = Path */stats  ## ignores /var/www/somedir/stats, but not /var/www/a/b/c/stats
#ignore = Name *stats   ## ignores all files/directories that end with "stats"
#ignore = Name stats*   ## ignores all files/directories that begin with "stats"
#ignore = Name *.tmp    ## ignores all files with the extension .tmp
ignore = Name sess_*
ignore = Name *access.log*
ignore = Name error.log
ignore = Name webalizer.conf

#          When set to true, this flag causes the user interface to skip
#          asking for confirmations on non-conflicting changes. (More
#          precisely, when the user interface is done setting the
#          propagation direction for one entry and is about to move to the
#          next, it will skip over all non-conflicting entries and go
#          directly to the next conflict.)
auto=true

#          When this is set to true, the user interface will ask no
#          questions at all. Non-conflicting changes will be propagated;
#          conflicts will be skipped.
batch=true

#          !When this is set to true, Unison will request an extra
#          confirmation if it appears that the entire replica has been
#          deleted, before propagating the change. If the batch flag is
#          also set, synchronization will be aborted. When the path
#          preference is used, the same confirmation will be requested for
#          top-level paths. (At the moment, this flag only affects the
#          text user interface.) See also the mountpoint preference.
confirmbigdel=true

#          When this preference is set to true, Unison will use the
#          modification time and length of a file as a `pseudo inode
#          number' when scanning replicas for updates, instead of reading
#          the full contents of every file. Under Windows, this may cause
#          Unison to miss propagating an update if the modification time
#          and length of the file are both unchanged by the update.
#          However, Unison will never overwrite such an update with a
#          change from the other replica, since it always does a safe
#          check for updates just before propagating a change. Thus, it is
#          reasonable to use this switch under Windows most of the time
#          and occasionally run Unison once with fastcheck set to false,
#          if you are worried that Unison may have overlooked an update.
#          The default value of the preference is auto, which causes
#          Unison to use fast checking on Unix replicas (where it is safe)
#          and slow checking on Windows replicas. For backward
#          compatibility, yes, no, and default can be used in place of
#          true, false, and auto. See the section "Fast Checking" for more
#          information.
fastcheck=true

#          When this flag is set to true, the group attributes of the
#          files are synchronized. Whether the group names or the group
#          identifiers are synchronizeddepends on the preference numerids.
group=true

#          When this flag is set to true, the owner attributes of the
#          files are synchronized. Whether the owner names or the owner
#          identifiers are synchronizeddepends on the preference
#          extttnumerids.
owner=true

#          Including the preference -prefer root causes Unison always to
#          resolve conflicts in favor of root, rather than asking for
#          guidance from the user. (The syntax of root is the same as for
#          the root preference, plus the special values newer and older.)
#          This preference is overridden by the preferpartial preference.
#          This preference should be used only if you are sure you know
#          what you are doing!
prefer=newer

#          When this preference is set to true, the textual user interface
#          will print nothing at all, except in the case of errors.
#          Setting silent to true automatically sets the batch preference
#          to true.
silent=true

#          When this flag is set to true, file modification times (but not
#          directory modtimes) are propagated.
times=false

#          When this flag is set, Unison will log all changes to the filesystems on a file.
log=false

#          When this flag is set to true, groups and users are synchronized numerically, rather than by name.
#          The special uid 0 and the special group 0 are never mapped via user/group names even if this
#          preference is not set.
numericids=true
Queremos automatizar la sincronización, así que creamos un pequeño script y creamos un cronjob en server1 :
mkdir /root/scripts
vi /root/scripts/unison.sh
y agregue el siguiente contenido:
#!/bin/sh
lockdir=/tmp
UNISON=/usr/bin/unison
LOGGER=/usr/bin/logger

if [ ! -f /$lockdir/unison ]; then
        touch $lockdir/unison

        $UNISON -testserver web
        rc=$?
        if [[ $rc != 0 ]] ; then
                echo "error"
                $LOGGER -d -t unison "web - error connecting remote"
        else
                $UNISON web
        fi

        rm $lockdir/unison
else
        $LOGGER -d -t unison "unison already running"
fi
hacer que el script sea ejecutable:
chmod 700 /root/scripts/unison.sh
Y ejecuta la primera sincronización. Para obtener algún resultado durante la sincronización, configure silent =false en /root/.unsion/web.prf. Luego, comienza al unísono:
/root/scripts/unison.sh
Finalmente, creamos el cronjob:
crontab -e
# unison
*  * * * *  /root/scripts/unison.sh > /dev/null
8 Sincronizar correos electrónicos con Dovecot
Desde Dovecot 2, es posible usar el dsync de Dovect para mantener sincronizada la base principal. Si ya tiene correos electrónicos en el servidor 1, se replicarán en el servidor 2 sin más interacción.
Debe utilizar el mismo puerto (4711 ) and the same password (replication_password ) on both servers.
server1:
Open /etc/dovecot/dovecot-sql.conf
vi /etc/dovecot/dovecot-sql.conf
and enable the iterate_query:
old:
#iterate_query = SELECT email as user FROM mail_user
new:
iterate_query = SELECT email as user FROM mail_user
Open /etc/dovecot/dovecot.conf
vi /etc/dovecot/dovecot.conf
and add the following content:
# Enable the replication plugin globally
mail_plugins = $mail_plugins notify replication quota

# Both the client and the server need to have a shared secret
doveadm_password = replication_password

# configure how many dsyncs can be run in parallel (10 by default)
replication_max_conns = 10

service aggregator {
        fifo_listener replication-notify-fifo {
                user = vmail
                mode = 0666
        }

        unix_listener replication-notify {
                user = vmail
                mode = 0666
        }
}

service replicator {
        unix_listener replicator-doveadm {
                mode = 0666
        }
}

service doveadm {
        user = vmail
        inet_listener {
                port = 4711
        }
}

service config {
        unix_listener config {
                user = vmail
        }
}

# use tcp:ip as the dsync target
plugin {
        replication_full_sync_interval = 1 hours
        mail_replica = tcp:192.168.0.106:4711
}

protocol imap {
        mail_plugins = quota imap_quota notify replication
}
restart Dovecot:
service dovecot restart
server2:
Open /etc/dovecot/dovecot-sql.conf
vi /etc/dovecot/dovecot-sql.conf
and enable the iterate_query:
old:
#iterate_query = SELECT email as user FROM mail_user
new:
iterate_query = SELECT email as user FROM mail_user
Open /etc/dovecot/dovecot.conf
vi /etc/dovecot/dovecot.conf
and add the following content:
# Enable the replication plugin globally
mail_plugins = $mail_plugins notify replication quota

# Both the client and the server need to have a shared secret
doveadm_password = replication_password

# configure how many dsyncs can be run in parallel (10 by default)
replication_max_conns = 10

service aggregator {
        fifo_listener replication-notify-fifo {
                user = vmail
                mode = 0666
        }

        unix_listener replication-notify {
                user = vmail
                mode = 0666
        }
}

service replicator {
        unix_listener replicator-doveadm {
                mode = 0666
        }
}

service doveadm {
        user = vmail
        inet_listener {
                port = 4711
        }
}

service config {
        unix_listener config {
                user = vmail
        }
}

# use tcp:ip as the dsync target
plugin {
        replication_full_sync_interval = 1 hours
        mail_replica = tcp:192.168.0.105:4711
}

protocol imap {
        mail_plugins = quota imap_quota notify replication
}
restart Dovecot:
service dovecot restart
You can check the replication on each server:
doveadm replicator status '*'
username                                                                                priority fast sync full sync failed
[email protected]                                                                     none     00:16:34  00:16:40  -
9 Additional Notes
When you want to activate a firewall on the master or slave server, ensure that you open port 3306 for MySQL, 22 for SSH and 4711 for Dovecot on both servers.
10 Links
- ISPConfig Website:http://www.ispconfig.org/
- ISPConfig Forum:https://www.howtoforge.com/forums/
- ISPConfig Bugtracker:http://bugtracker.ispconfig.org/