Hugo es un marco gratuito y de código abierto escrito en lenguaje Go que se puede usar para crear sitios web con facilidad. Es un generador de sitios estáticos simple, rápido y seguro, no necesita ninguna base de datos para ejecutarlo. Hugo admite tipos de contenido ilimitados, taxonomías, menús, contenido dinámico impulsado por API y más, todo sin complementos. Hugo viene con un amplio conjunto de características que incluyen una sólida administración de contenido, plantillas integradas, códigos abreviados, salidas personalizadas, multilingüe y muchas más.
En este tutorial, aprenderemos cómo instalar Hugo en el servidor Ubuntu 18.04 LTS.
Requisitos
- Un servidor con Ubuntu 18.04.
- Una dirección IP estática 136.243.240.39 está configurada en su servidor.
- Se ha configurado una contraseña de root para su servidor.
Cómo empezar
Antes de comenzar, deberá actualizar su sistema con la última versión. Puede hacerlo ejecutando el siguiente comando:
apt-get update -y
 apt-get upgrade -y
Una vez que su servidor esté actualizado, reinícielo para aplicar los cambios.
Instalar Hugo
De forma predeterminada, la última versión de Hugo no está disponible en el repositorio predeterminado de Ubuntu 18.04. Por lo tanto, deberá descargarlo del repositorio de Git. Puedes descargarlo con el siguiente comando:
wget https://github.com/gohugoio/hugo/releases/download/v0.58.2/hugo_0.58.2_Linux-64bit.deb
Una vez que se complete la descarga, instale Hugo con el siguiente comando:
dpkg -i hugo_0.58.2_Linux-64bit.deb
Si obtiene algún error de dependencia, ejecute el siguiente comando para resolver la dependencia:
apt-get install -f
A continuación, puedes comprobar la versión de Hugo con el siguiente comando:
hugo version
Deberías obtener el siguiente resultado:
Hugo Static Site Generator v0.58.2-253E5FDC linux/amd64 BuildDate: 2019-09-13T08:05:59Z
También puede ver una lista de opciones disponibles con Hugo ejecutando el siguiente comando:
hugo --help
Deberías obtener el siguiente resultado:
hugo is the main command, used to build your Hugo site.

Hugo is a Fast and Flexible Static Site Generator
built with love by spf13 and friends in Go.

Complete documentation is available at http://gohugo.io/.

Usage:
  hugo [flags]
  hugo [command]

Available Commands:
  config      Print the site configuration
  convert     Convert your content to different formats
  deploy      Deploy your site to a Cloud provider.
  env         Print Hugo version and environment info
  gen         A collection of several useful generators.
  help        Help about any command
  import      Import your site from others.
  list        Listing out various types of content
  mod         Various Hugo Modules helpers.
  new         Create new content for your site
  server      A high performance webserver
  version     Print the version number of Hugo

Flags:
  -b, --baseURL string         hostname (and path) to the root, e.g. http://spf13.com/
  -D, --buildDrafts            include content marked as draft
  -E, --buildExpired           include expired content
  -F, --buildFuture            include content with publishdate in the future
      --cacheDir string        filesystem path to cache directory. Defaults: $TMPDIR/hugo_cache/
      --cleanDestinationDir    remove files from destination not found in static directories
      --config string          config file (default is path/config.yaml|json|toml)
      --configDir string       config dir (default "config")
  -c, --contentDir string      filesystem path to content directory
      --debug                  debug output
  -d, --destination string     filesystem path to write files to
      --disableKinds strings   disable different kind of pages (home, RSS etc.)
      --enableGitInfo          add Git revision, date and author info to the pages
  -e, --environment string     build environment
      --forceSyncStatic        copy all files when static is changed.
      --gc                     enable to run some cleanup tasks (remove unused cache files) after the build
  -h, --help                   help for hugo
      --i18n-warnings          print missing translations
      --ignoreCache            ignores the cache directory
      --ignoreVendor           ignores any _vendor directory
  -l, --layoutDir string       filesystem path to layout directory
      --log                    enable Logging
      --logFile string         log File path (if set, logging enabled automatically)
      --minify                 minify any supported output format (HTML, XML etc.)
      --noChmod                don't sync permission mode of files
      --noTimes                don't sync modification time of files
      --path-warnings          print warnings on duplicate target paths etc.
      --quiet                  build in quiet mode
      --renderToMemory         render to memory (only useful for benchmark testing)
  -s, --source string          filesystem path to read files relative from
      --templateMetrics        display metrics about template executions
      --templateMetricsHints   calculate some improvement hints when combined with --templateMetrics
  -t, --theme strings          themes to use (located in /themes/THEMENAME/)
      --themesDir string       filesystem path to themes directory
      --trace file             write trace to file (not useful in general)
  -v, --verbose                verbose output
      --verboseLog             verbose logging
  -w, --watch                  watch filesystem for changes and recreate as needed
Una vez que haya terminado, puede continuar con el siguiente paso.
Crear un sitio web con Hugo
Hugo ahora está instalado, es hora de crear un sitio web y contenido con Hugo.
Puede crear un nuevo sitio web llamado test.example.com ejecutando el siguiente comando:
hugo new site test.example.com
Una vez que el sitio web se haya creado correctamente, debería obtener el siguiente resultado:
Congratulations! Your new Hugo site is created in /root/test.example.com. Just a few more steps and you're ready to go: 1. Download a theme into the same-named folder. Choose a theme from https://themes.gohugo.io/, or create your own with the "hugo new theme" command. 2. Perhaps you want to add some content. You can add single files with "hugo new / . ". 3. Start the built-in live server via "hugo server". Visit https://gohugo.io/ for quickstart guide and full documentation.
También puede enumerar todos los archivos creados en su sitio web con el siguiente comando:
ls test.example.com/
Debería ver el siguiente resultado:
archetypes config.toml content data layouts static themes
Crea una página Acerca de y una publicación de blog
Ahora, cambie el directorio a su sitio web y cree una página about.md con el siguiente comando:
cd test.example.com
 hugo new about.md
Debería ver el siguiente resultado:
/root/test.example.com/content/about.md created
A continuación, abra un archivo about.md y agregue algo de contenido:
nano content/about.md
Realice los siguientes cambios:
---
title: "About"
date: 2019-09-10T06:57:08Z
draft: false
---

I am hitesh jethva working as a technical writer.
Guarde y cierre el archivo cuando haya terminado. Luego, crea tu primera publicación con el siguiente comando:
hugo new post/first.md
Debería ver el siguiente resultado:
/root/test.example.com/content/post/first.md created
A continuación, abra el archivo first.md y agregue algo de contenido:
nano content/post/first.md
Realice los siguientes cambios:
---
title: "First"
date: 2019-09-10T06:58:51Z
draft: false
---

## This is my first blog post

Hi How are you!
Configura tu primer tema
Su página Acerca de y su publicación de blog ahora están creadas, es hora de configurar su primer tema.
Primero, cambia el directorio a themes y descarga hugo-strata-theme con el siguiente comando:
cd themes
 wget https://github.com/digitalcraftsman/hugo-strata-theme/archive/master.zip
Una vez descargado, extraiga el tema descargado con el siguiente comando:
unzip master.zip
A continuación, cambie el nombre del tema extraído como se muestra a continuación:
mv hugo-strata-theme-master hugo-strata-theme
A continuación, deberá copiar el contenido del archivo config.toml de ejemplo de themes/hugo-strata-theme al archivo config.toml de su sitio ubicado en /root/test.example.com/config.toml.
Puedes hacerlo con el siguiente comando:
cat hugo-strata-theme/exampleSite/config.toml > ../config.toml
A continuación, actualice la variable baseurl y también incluya su nueva página acerca de en la navegación de este tema en el archivo config.toml como se muestra a continuación:
nano ../config.toml
Actualice la URL base como se muestra a continuación:
baseurl = "/"
También agregue las siguientes líneas para incluir su nueva página acerca de:
 [[menu.main]]
  name = "About"
  url  = "about"
  weight = 5
Guarde y cierre el archivo cuando haya terminado.
A continuación, también deberá actualizar el diseño de su página de destino con el diseño de la plantilla del tema que se encuentra en themes/hugo-strata-theme/layouts/index.html. a test.example.com/layouts/index.html :
nano /root/test.example.com/layouts/index.html
Agrega el siguiente contenido:
{{ define "main" }}
        {{ if not .Site.Params.about.hide }}
                {{ partial "about" . }}
        {{ end }}

        {{ if not .Site.Params.portfolio.hide }}
                {{ partial "portfolio" . }}
        {{ end }}

        {{ if not .Site.Params.recentposts.hide }}
                {{ partial "recent-posts" . }}
        {{ end }}

        {{ if not .Site.Params.contact.hide }}
                {{ partial "contact" . }}
        {{ end }}
{{ end }}
Guarde y cierre el archivo cuando haya terminado.
Una vez que haya terminado, puede continuar con el siguiente paso.
Crea tu sitio web
Su tema ahora está configurado para su sitio web. Es hora de construir su sitio web. Para hacerlo, cambie el directorio a su sitio web y cree el sitio con el siguiente comando:
cd /root/test.example.com
 hugo
Debería ver el siguiente resultado:
                   | EN
+------------------+----+
  Pages            | 17
  Paginator pages  |  0
  Non-page files   |  0
  Static files     | 26
  Processed images |  0
  Aliases          |  5
  Sitemaps         |  1
  Cleaned          |  0

Total in 18 ms
Ahora, inicie su servidor Hugo y vincúlelo con la dirección IP de su servidor ejecutando el siguiente comando:
hugo server --bind=0.0.0.0 --baseUrl=http://136.243.240.39 -D -F
Una vez que el servidor se inició correctamente, debería ver el siguiente resultado:
                   | EN
+------------------+----+
  Pages            | 17
  Paginator pages  |  0
  Non-page files   |  0
  Static files     | 26
  Processed images |  0
  Aliases          |  5
  Sitemaps         |  1
  Cleaned          |  0

Total in 28 ms
Watching for changes in /root/test.example.com/{content,data,layouts,static,themes}
Watching for config changes in /root/test.example.com/config.toml
Serving pages from memory
Running in Fast Render Mode. For full rebuilds on change: hugo server --disableFastRender
Web Server is available at http://136.243.240.39:1313/ (bind address 0.0.0.0)
Press Ctrl+C to stop
Una vez que lo haya hecho, puede proceder a acceder a la interfaz web de Hugo.
Acceder al Servidor Hugo
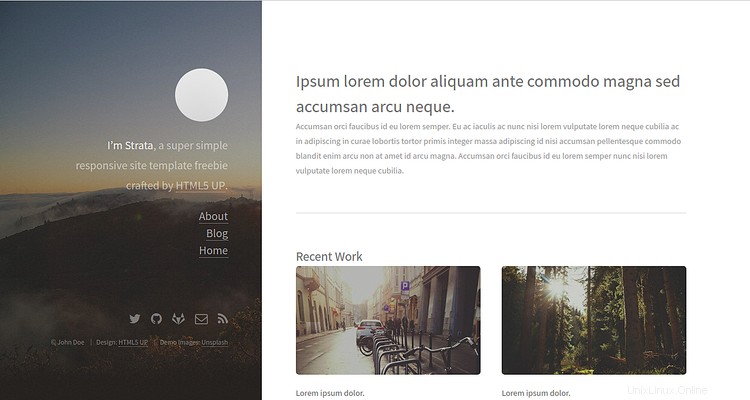
Su servidor Hugo ahora está iniciado y escuchando en el puerto 1313. A continuación, abra su navegador web y escriba la URL http://136.243.240.39:1313. Se le redirigirá al panel de control de su servidor Hugo como se muestra a continuación:

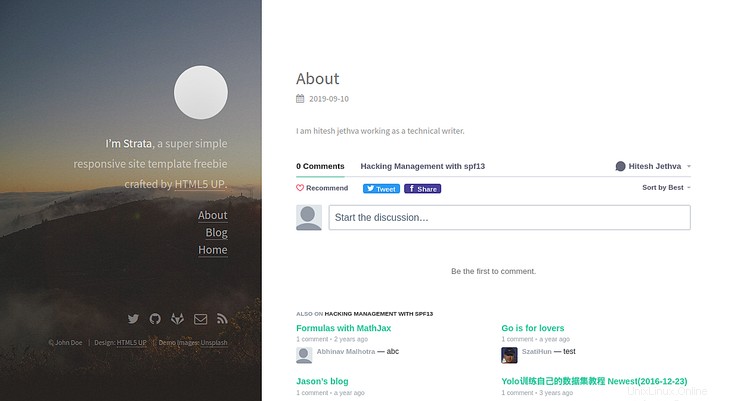
Ahora, haga clic en Acerca de en el panel izquierdo. Debería ver su página Acerca de en la siguiente imagen:

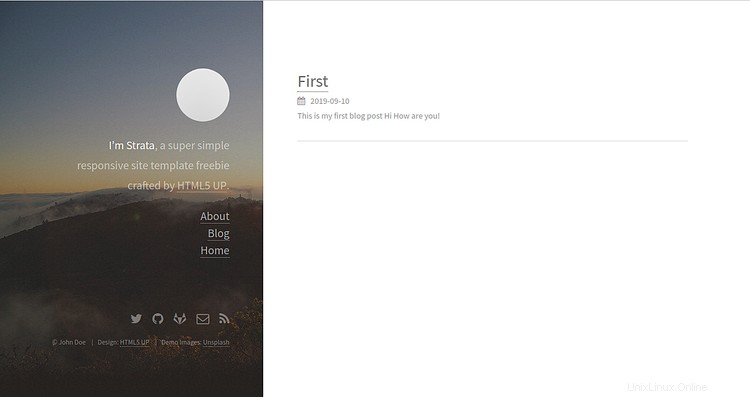
Ahora, haga clic en Blog botón en el panel izquierdo. Debería ver la entrada de su blog en la siguiente imagen:

Conclusión
En el tutorial anterior, aprendimos cómo instalar el servidor Hugo en el servidor Ubuntu 18.04. También hemos aprendido cómo crear un sitio con una página y un tema con Hugo. Para obtener más información sobre Hugo, puede visitar la documentación oficial de Hugo en Hugo Doc. No dude en preguntarme si tiene alguna pregunta.