GNU/Linux >> Tutoriales Linux >  >> Ubuntu

Usuarios virtuales y dominios con Postfix, Courier, MySQL y SquirrelMail (Ubuntu 8.04 LTS)

Este tutorial es Copyright (c) 2008 por Falko Timme. Se deriva de un tutorial de Christoph Haas que puede encontrar en http://workaround.org. Puede utilizar este tutorial bajo la licencia Creative Commons 2.5 o cualquier versión posterior.

Este documento describe cómo instalar un servidor de correo basado en Postfix que se basa en usuarios y dominios virtuales, es decir, usuarios y dominios que están en una base de datos MySQL. También demostraré la instalación y configuración de Courier (Courier-POP3, Courier-IMAP), para que Courier pueda autenticarse contra la misma base de datos MySQL que usa Postfix.

El servidor Postfix resultante es capaz de SMTP-AUTH y TLS y cuota (La cuota no está integrada en Postfix de forma predeterminada, le mostraré cómo parchear su Postfix de manera adecuada). Las contraseñas se almacenan en encriptadas formulario en la base de datos (la mayoría de los documentos que encontré trataban con contraseñas de texto sin formato, lo que es un riesgo de seguridad). Además de eso, este tutorial cubre la instalación de Amavisd , Asesino de spam y ClamAV para que los correos electrónicos sean escaneados en busca de spam y virus. También mostraré cómo instalar SquirrelMail como una interfaz de correo web para que los usuarios puedan leer y enviar correos electrónicos y cambiar sus contraseñas.

La ventaja de una configuración "virtual" de este tipo (usuarios y dominios virtuales en una base de datos MySQL) es que tiene mucho más rendimiento que una configuración basada en usuarios "reales" del sistema. Con esta configuración virtual, su servidor de correo puede manejar miles de dominios y usuarios. Además, es más fácil de administrar porque solo tiene que lidiar con la base de datos MySQL cuando agrega nuevos usuarios/dominios o edita los existentes. No más comandos postmap para crear archivos db, no más recargas de Postfix, etc. Para la administración de la base de datos MySQL, puede usar herramientas basadas en web como phpMyAdmin, que también se instalará en este tutorial. La tercera ventaja es que los usuarios tienen una dirección de correo electrónico como nombre de usuario (en lugar de un nombre de usuario + una dirección de correo electrónico) que es más fácil de entender y tener en cuenta.

Este howto pretende ser una guía práctica; no cubre los antecedentes teóricos. Se tratan en muchos otros documentos en la web.

¡Este documento viene sin garantía de ningún tipo! Quiero decir que esta no es la única forma de establecer un sistema de este tipo. Hay muchas maneras de lograr este objetivo, pero este es el camino que tomo. ¡No emito ninguna garantía de que esto funcione para usted!

1 nota preliminar

Este tutorial se basa en el servidor Ubuntu 8.04 (Hardy Heron), por lo que debe configurar una instalación básica del servidor Ubuntu 8.04 antes de continuar con este tutorial (por ejemplo, como se muestra en las páginas 1 - 3 de este tutorial:El servidor perfecto - Ubuntu Hardy Garza (servidor Ubuntu 8.04 LTS)). El sistema debe tener una dirección IP estática. Uso 192.168.0.100 como mi dirección IP en este tutorial y server1.example.com como nombre de host.

Asegúrese de haber iniciado sesión como raíz (escriba

sudo su

para convertirse en root), porque debemos ejecutar todos los pasos de este tutorial como usuario root.

Es muy importante que haga de /bin/sh un enlace simbólico a /bin/bash...

ln -sf /bin/bash /bin/sh

... y que deshabilites AppArmor:

/etc/init.d/apparmor stop
update-rc.d -f apparmor eliminar


2 Instale Postfix, Courier, Saslauthd, MySQL, phpMyAdmin

Para instalar Postfix, Courier, Saslauthd, MySQL y phpMyAdmin, simplemente ejecutamos

apt-get install postfix postfix-mysql postfix-doc mysql-client mysql-server courier-authdaemon courier-authlib-mysql courier-pop courier-pop-ssl courier-imap courier-imap-ssl postfix-tls libsasl2-2 libsasl2-modules libsasl2-modules-sql sasl2-bin libpam-mysql openssl phpmyadmin apache2 libapache2-mod-php5 php5 php5-mysql libpam-smbpass

Se le harán algunas preguntas:

Nueva contraseña para el usuario "root" de MySQL:<-- yourrootsqlpassword
Repetir la contraseña para el usuario "root" de MySQL:<-- yourrootsqlpassword
¿Crear directorios para administración basada en web? <-- No
Tipo general de configuración de correo:<-- Sitio de Internet
Nombre de correo del sistema:<-- server1.example.com
Certificado SSL requerido <-- Ok
Servidor web para reconfigurar automáticamente:<-- apache2

3 Aplicar el parche de cuota a Postfix

Tenemos que obtener las fuentes de Postfix, parchearlo con el parche de cuota, crear nuevos paquetes .deb de Postfix e instalar esos paquetes .deb:

apt-get install build-essential dpkg-dev fakeroot debhelper libgdbm-dev libldap2-dev libpcre3-dev libssl-dev libsasl2-dev postgresql-server-dev-8.2 po-debconf dpatch libmysqlclient15-dev lsb-release libcdb-dev libdb-dev

cd /usr/src
apt-get source postfix

(Asegúrese de usar la versión correcta de Postfix en los siguientes comandos. Tengo Postfix 2.5.1 instalado. Puede encontrar su versión de Postfix ejecutando

 postconf -d | grep mail_version

La salida debería verse así:

[correo electrónico protegido]:/usr/src# postconf -d | grep mail_version
mail_version =2.5.1
milter_macro_v =$mail_name $mail_version
[email protected]:/usr/src#

)

wget http://vda.sourceforge.net/VDA/postfix-2.5.1-vda-ng.patch.gz
gunzip postfix-2.5.1-vda-ng.patch.gz
cd postfix -2.5.1
parche -p1 <../postfix-2.5.1-vda-ng.patch
dpkg-buildpackage

Es posible que vea una advertencia como esta al final del comando dpkg-buildpackage:

dpkg-buildpackage: warning: Failed to sign .dsc and .changes file

Puede ignorar este mensaje.

Ahora subimos un directorio, ahí es donde se han creado los nuevos paquetes .deb:

cd ..

El comando

ls -l

te muestra los paquetes disponibles:

[email protected]:/usr/src# ls -l
total 5804
drwxr-sr-x 19 root src    4096 2008-05-15 00:36 postfix-2.5.1
- rw-r--r--  1 root src  235739 2008-05-15 00:35 postfix_2.5.1-2ubuntu1.diff.gz
-rw-r--r--   1 root src     787 2008-05- 15 00:35 postfix_2.5.1-2ubuntu1.dsc
-rw-r--r--  1 root src    2236 2008-05-15 00:37 postfix_2.5.1-2ubuntu1_i386.changes
-rw- r--r--  1 root src 1165838 2008-05-15 00:37 postfix_2.5.1-2ubuntu1_i386.deb
-rw-r--r--   1 root src 3153629 2008-02-26 03:04 postfix_2.5.1.orig.tar.gz
-rw-r--r--  1 root src   57952 2008-03-24 01:51 postfix-2.5.1-vda-ng.patch
- rw-r--r--  1 root src   39796 2008-05-15 00:37 postfix-cdb_2.5.1-2ubuntu1_i386.deb
-rw-r--r--  1 root src 139888 2008-05- 15 00:37 postfix-dev_2.5.1-2ubuntu1_all.deb
-rw-r--r--  1 root src  916386 2008-05-15 00:37 postfix-doc_2.5.1-2ubuntu1_all.deb
-rw-r--r--  1 root src   46694 2008-05-15 00:37 postfix-ldap_2.5.1-2ubuntu1_i386.deb
-rw-r--r--  1 root src   4 1730 2008-05-15 00:37 postfix-mysql_2.5.1-2ubuntu1_i386.deb
-rw-r--r--  1 root src   41530 2008-05-15 00:37 postfix-pcre_2.5.1-2ubuntu1_i386 .deb
-rw-r--r--  1 root src   41796 2008-05-15 00:37 postfix-pgsql_2.5.1-2ubuntu1_i386.deb
[email protected]:/usr/src#

Elija los paquetes postfix y postfix-mysql e instálelos así:

dpkg -i postfix_2.5.1-2ubuntu1_i386.deb
dpkg -i postfix-mysql_2.5.1-2ubuntu1_i386.deb

4 Crea la base de datos MySQL para Postfix/Courier

Ahora creamos una base de datos llamada correo:

mysqladmin -u root -p create mail

A continuación, vamos al shell de MySQL:

mysql -u root -p

En el shell de MySQL, creamos el usuario mail_admin con la contraseña mail_admin_password (reemplácela con su propia contraseña) que tiene privilegios SELECCIONAR, INSERTAR, ACTUALIZAR, ELIMINAR en la base de datos de correo. Este usuario será utilizado por Postfix y Courier para conectarse a la base de datos de correo:

CONCEDER SELECCIONAR, INSERTAR, ACTUALIZAR, ELIMINAR EN EL CORREO.* A 'mail_admin'@'localhost' IDENTIFICADO POR 'mail_admin_password';
CONCEDER SELECCIONAR, INSERTAR, ACTUALIZAR, ELIMINAR EN EL CORREO.* A 'mail_admin'@'localhost. localdomain' IDENTIFICADO POR 'mail_admin_password';
PRIVILEGIOS DE DESCARGA;

Todavía en el shell de MySQL, creamos las tablas que necesitan Postfix y Courier:

USE mail;

CREATE TABLE dominios (
domain varchar(50) NOT NULL,
PRIMARY KEY (domain) )
TYPE=MyISAM;

Reenvíos CREATE TABLE (
origen varchar(80) NOT NULL,
destino TEXT NOT NULL,
PRIMARY KEY (origen) )
TYPE=MyISAM;

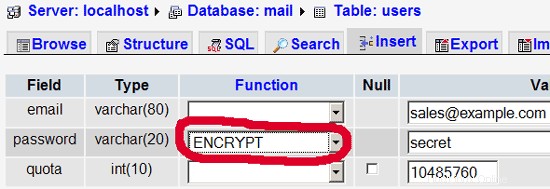
CREATE TABLE usuarios (
email varchar(80) NOT NULL,
password varchar(20) NOT NULL,
quota INT(10) DEFAULT '10485760',
CLAVE PRIMARIA (email )
) TYPE=MiISAM;

CREATE TABLE transport (
dominio varchar(128) NOT NULL predeterminado '',
transport varchar(128) NOT NULL predeterminado '',
CLAVE ÚNICA dominio (dominio)
) TIPO =MiISAM;

quit;

Como habrás notado, con la renuncia; hemos dejado el shell de MySQL y estamos de vuelta en el shell de Linux.

Los dominios la tabla almacenará cada dominio virtual para el que Postfix debería recibir correos electrónicos (por ejemplo, example.com ).

Los reenvíos la tabla es para crear un alias de una dirección de correo electrónico a otra, p. reenviar correos electrónicos para [email protected] a [email protected] .

dominio
ejemplo.com

Los usuarios La tabla almacena todos los usuarios virtuales (es decir, las direcciones de correo electrónico, porque la dirección de correo electrónico y el nombre de usuario son los mismos) y las contraseñas (en formato cifrado). form!) y un valor de cuota para cada casilla de correo (en este ejemplo, el valor predeterminado es 10485760 bytes, lo que significa 10 MB).

fuente destino
[correo electrónico protegido] [correo electrónico protegido]

El transporte La tabla es opcional, es para usuarios avanzados. Permite reenviar correos para usuarios individuales, dominios completos o todos los correos a otro servidor. Por ejemplo,

correo electrónico contraseña cuota
[correo electrónico protegido] No9.E4skNvGa. ("secreto" en forma encriptada) 10485760

reenviaría todos los correos electrónicos para example.com a través del protocolo smtp al servidor con la dirección IP 1.2.3.4 (los corchetes [] significa "no realizar una búsqueda del registro MX DNS" (lo que tiene sentido para las direcciones IP...). Si usa un nombre de dominio completo (FQDN) en su lugar, no usaría los corchetes).

Por cierto, (supongo que la dirección IP de su sistema de servidor de correo es 192.168.0.100) puede acceder a phpMyAdmin en http://192.168.0.100/phpmyadmin/ en un navegador e iniciar sesión como mail_admin. A continuación, puede echar un vistazo a la base de datos. Más tarde puede usar phpMyAdmin para administrar su servidor de correo.

5 Configurar postfijo

Ahora tenemos que decirle a Postfix dónde puede encontrar toda la información en la base de datos. Por lo tanto, tenemos que crear seis archivos de texto. Notará que le digo a Postfix que se conecte a MySQL en la dirección IP 127.0.0.1 en lugar de localhost. Esto se debe a que Postfix se está ejecutando en una cárcel chroot y no tiene acceso al socket MySQL, que intentaría conectar si le dijera a Postfix que use localhost. Si utilizo 127.0.0.1, Postfix utiliza la red TCP para conectarse a MySQL, lo que no supone ningún problema incluso en un chroot jail (la alternativa sería mover el socket de MySQL al chroot jail, lo que provoca otros problemas).

Asegúrese de que /etc/mysql/my.cnf contenga la siguiente línea:

vi /etc/mysql/my.cnf
dominio transporte
ejemplo.com smtp:[1.2.3.4]

Si tuvo que modificar /etc/mysql/my.cnf, reinicie MySQL ahora:

/etc/init.d/mysql restart

Ejecutar

netstat -tap | grep mysql

para asegurarse de que MySQL esté escuchando en 127.0.0.1 (localhost.localdomain):

[correo electrónico protegido]:/usr/src# netstat -tap | grep mysql
tcp        0      0 localhost.localdo:mysql *:*                     ESCUCHAR      6177/mysqld
[email protected]:/usr/src#

Ahora vamos a crear nuestros seis archivos de texto.

vi /etc/postfix/mysql-virtual_domains.cf
[...]
bind-address            = 127.0.0.1
[...]
vi /etc/postfix/mysql-virtual_forwardings.cf
user = mail_admin
password = mail_admin_password
dbname = mail
query = SELECT domain AS virtual FROM domains WHERE domain='%s'
hosts = 127.0.0.1
vi /etc/postfix/mysql-virtual_mailboxes.cf
user = mail_admin
password = mail_admin_password
dbname = mail
query = SELECT destination FROM forwardings WHERE source='%s'
hosts = 127.0.0.1
vi /etc/postfix/mysql-virtual_email2email.cf
user = mail_admin
password = mail_admin_password
dbname = mail
query = SELECT CONCAT(SUBSTRING_INDEX(email,'@',-1),'/',SUBSTRING_INDEX(email,'@',1),'/') FROM users WHERE email='%s'
hosts = 127.0.0.1
vi /etc/postfix/mysql-virtual_transports.cf
user = mail_admin
password = mail_admin_password
dbname = mail
query = SELECT email FROM users WHERE email='%s'
hosts = 127.0.0.1
vi /etc/postfix/mysql-virtual_mailbox_limit_maps.cf
user = mail_admin
password = mail_admin_password
dbname = mail
query = SELECT transport FROM transport WHERE domain='%s'
hosts = 127.0.0.1

Luego cambie los permisos y el grupo de estos archivos:

chmod o=/etc/postfix/mysql-virtual_*.cf
chgrp postfix /etc/postfix/mysql-virtual_*.cf

Ahora creamos un usuario y un grupo llamados vmail con el directorio de inicio /home/vmail. Aquí es donde se almacenarán todos los buzones de correo.

groupadd -g 5000 vmail
useradd -g vmail -u 5000 vmail -d /home/vmail -m

A continuación hacemos algo de configuración de Postfix. ¡Asegúrese de reemplazar server1.example.com con un FQDN válido, de lo contrario, su Postfix podría no funcionar correctamente!

postconf -e 'minombre de host =servidor1.ejemplo.com'
postconf -e 'midestino =servidor1.ejemplo.com, localhost, localhost.dominiolocal'
postconf -e 'misredes =127.0.0.0/8'
postconf -e 'virtual_alias_domains ='
postconf -e 'virtual_alias_maps =proxy:mysql:/etc/postfix/mysql-virtual_forwardings.cf, mysql:/etc/postfix/mysql-virtual_email2email.cf'
postconf -e 'virtual_mailbox_domains =proxy:mysql:/etc/postfix/mysql-virtual_domains.cf'
postconf -e 'virtual_mailbox_maps =proxy:mysql:/etc/postfix/mysql-virtual_mailboxes.cf'
postconf -e 'virtual_mailbox_base =/home/vmail'
postconf -e 'virtual_uid_maps =static:5000'
postconf -e 'virtual_gid_maps =static:5000'
postconf -e ' smtpd_sasl_auth_enable =yes'
postconf -e 'broken_sasl_auth_clients =yes'
postconf -e 'smtpd_sasl_authenticated_header =yes'
postconf -e 'smtpd_recipient_restrictions =permit_mynetworks, permit_sasl_authenticated, rechazó_unauth_destination'
-e 'smtpd_use_tls =yes'
postconf -e 'smtpd_tls_cert_file =/etc/postfix/smtpd.cert'
postconf -e 'smtpd_tls_key_file =/etc/postfix/smtpd.key'
postconf -e 'transport_maps =proxy:mysql:/etc/postfix/mysql-virtual_transports.cf'
postconf -e 'virtual_create_maildirsize =yes'
postconf -e 'virtual_maildir_extended =yes'
postconf - e 'virtual_mailbox_limit_maps =proxy:mysql:/etc/postfix/mysql-virtual_mailbox_limit_maps.cf'
postconf -e 'virtual_mailbox_limit_override =yes'
postconf -e 'virtual_maildir_limit_message ="El usuario al que intenta comunicarse es por encima de la cuota."'
postconf -e 'virtual_overquota_bounce =yes'
postconf -e 'proxy_read_maps =$local_recipient_maps $mydestination $virtual_alias_maps $virtual_alias_domains $virtual_mailbox_maps $virtual_mailbox_domains $relay_recipient_maps $relay_domains $canonical_maps $canonical_maps_sender_canonical mapas_reubicados $transport_maps $mynetworks $virtual_mailbox_limit_maps'

Luego creamos el certificado SSL que se necesita para TLS:

cd /etc/postfix
openssl req -new -outform PEM -out smtpd.cert -newkey rsa:2048 -nodes -keyout smtpd.key -keyform PEM -days 365 -x509

Nombre del país (código de 2 letras) [AU]:<-- Ingrese el nombre de su país (por ejemplo, "DE").
Nombre del estado o provincia (nombre completo) [Algún estado]:<-- Ingrese su estado o Nombre de la provincia.
Nombre de la localidad (p. ej., ciudad) []:<-- Ingrese su ciudad.
Nombre de la organización (p. ej., empresa) [Internet Widgits Pty Ltd]:<-- Ingrese el nombre de su organización (p. ej., el nombre de su empresa).
Nombre de la unidad organizativa (p. ej., sección) []:<-- Ingrese el nombre de su unidad organizativa (p. ej., "Departamento de TI").
Nombre común (p. ej., SU nombre) []:<-- Ingrese el nombre de dominio completo del sistema (por ejemplo, "servidor1.ejemplo.com").
Dirección de correo electrónico []:<-- Ingrese su dirección de correo electrónico.

Luego cambie los permisos de smtpd.key:

chmod o= /etc/postfix/smtpd.key

6 Configurar Saslauthd

Primera ejecución

mkdir -p /var/spool/postfix/var/run/saslauthd

Luego edite /etc/default/saslauthd. Establezca START en sí y cambie la línea OPTIONS="-c -m /var/run/saslauthd" a OPTIONS="-c -m /var/spool/postfix/var/run/saslauthd -r":

vi /etc/default/saslauthd
user = mail_admin
password = mail_admin_password
dbname = mail
query = SELECT quota FROM users WHERE email='%s'
hosts = 127.0.0.1

Luego cree el archivo /etc/pam.d/smtp. Debe contener solo las siguientes dos líneas (asegúrese de completar los detalles correctos de su base de datos):

vi /etc/pam.d/smtp
#
# Settings for saslauthd daemon
# Please read /usr/share/doc/sasl2-bin/README.Debian for details.
#

# Should saslauthd run automatically on startup? (default: no)
START=yes

# Description of this saslauthd instance. Recommended.
# (suggestion: SASL Authentication Daemon)
DESC="SASL Authentication Daemon"

# Short name of this saslauthd instance. Strongly recommended.
# (suggestion: saslauthd)
NAME="saslauthd"

# Which authentication mechanisms should saslauthd use? (default: pam)
#
# Available options in this Debian package:
# getpwent  -- use the getpwent() library function
# kerberos5 -- use Kerberos 5
# pam       -- use PAM
# rimap     -- use a remote IMAP server
# shadow    -- use the local shadow password file
# sasldb    -- use the local sasldb database file
# ldap      -- use LDAP (configuration is in /etc/saslauthd.conf)
#
# Only one option may be used at a time. See the saslauthd man page
# for more information.
#
# Example: MECHANISMS="pam"
MECHANISMS="pam"

# Additional options for this mechanism. (default: none)
# See the saslauthd man page for information about mech-specific options.
MECH_OPTIONS=""

# How many saslauthd processes should we run? (default: 5)
# A value of 0 will fork a new process for each connection.
THREADS=5

# Other options (default: -c -m /var/run/saslauthd)
# Note: You MUST specify the -m option or saslauthd won't run!
#
# See /usr/share/doc/sasl2-bin/README.Debian for Debian-specific information.
# See the saslauthd man page for general information about these options.
#
# Example for postfix users: "-c -m /var/spool/postfix/var/run/saslauthd"
#OPTIONS="-c -m /var/run/saslauthd"
OPTIONS="-c -m /var/spool/postfix/var/run/saslauthd -r"

A continuación, cree el archivo /etc/postfix/sasl/smtpd.conf. Debería verse así:

vi /etc/postfix/sasl/smtpd.conf
auth    required   pam_mysql.so user=mail_admin passwd=mail_admin_password host=127.0.0.1 db=mail table=users usercolumn=email passwdcolumn=password crypt=1
account sufficient pam_mysql.so user=mail_admin passwd=mail_admin_password host=127.0.0.1 db=mail table=users usercolumn=email passwdcolumn=password crypt=1

A continuación, agregue el usuario de Postfix al grupo sasl (esto garantiza que Postfix tenga permiso para acceder a saslauthd):

adduser postfix sasl

Luego reinicie Postfix y Saslauthd:

/etc/init.d/postfix reiniciar
/etc/init.d/saslauthd reiniciar

7 Configurar mensajería

Ahora tenemos que decirle a Courier que debe autenticarse en nuestra base de datos MySQL. Primero, edite /etc/courier/authdaemonrc y cambie el valor de authmodulelist para que diga:

vi /etc/courier/authdaemonrc
pwcheck_method: saslauthd
mech_list: plain login
allow_plaintext: true
auxprop_plugin: mysql
sql_hostnames: 127.0.0.1
sql_user: mail_admin
sql_passwd: mail_admin_password
sql_database: mail
sql_select: select password from users where email = '%u'

Luego haga una copia de seguridad de /etc/courier/authmysqlrc y vacíe el archivo antiguo:

cp /etc/courier/authmysqlrc /etc/courier/authmysqlrc_orig
cat /dev/null> /etc/courier/authmysqlrc

Luego abra /etc/courier/authmysqlrc y coloque las siguientes líneas:

vi /etc/courier/authmysqlrc
[...]
authmodulelist="authmysql"
[...]

Luego reinicie Courier:

/etc/init.d/courier-authdaemon restart
/etc/init.d/courier-imap restart
/etc/init.d/courier-imap-ssl restart
/etc/ reinicio de init.d/courier-pop
/etc/init.d/reinicio de courier-pop-ssl

Al correr

telnet localhost pop3

puede ver si su servidor POP3 está funcionando correctamente. Debería devolver +OK Hola. (Escriba quit para volver al shell de Linux).

[email protected]:/etc/postfix# telnet localhost pop3
Probando 127.0.0.1...
Conectado a localhost.localdomain.
El carácter de escape es '^]'.
+OK Hola.
salir
+OK Mejor suerte la próxima vez.
Conexión cerrada por host externo.
[email protected]:/etc/postfix#

8 Modificar /etc/aliases

Ahora deberíamos abrir /etc/aliases. Asegúrese de que postmaster apunte a root y root a su propio nombre de usuario o su dirección de correo electrónico, p. así:

vi /etc/aliases
MYSQL_SERVER localhost
MYSQL_USERNAME mail_admin
MYSQL_PASSWORD mail_admin_password
MYSQL_PORT 0
MYSQL_DATABASE mail
MYSQL_USER_TABLE users
MYSQL_CRYPT_PWFIELD password
#MYSQL_CLEAR_PWFIELD password
MYSQL_UID_FIELD 5000
MYSQL_GID_FIELD 5000
MYSQL_LOGIN_FIELD email
MYSQL_HOME_FIELD "/home/vmail"
MYSQL_MAILDIR_FIELD CONCAT(SUBSTRING_INDEX(email,'@',-1),'/',SUBSTRING_INDEX(email,'@',1),'/')
#MYSQL_NAME_FIELD
MYSQL_QUOTA_FIELD quota

o así (si el administrador es su propio nombre de usuario):

[...]
postmaster: root
root: [email protected]
[...]

Siempre que modifique /etc/aliases, debe ejecutar

newaliases

después y reinicie Postfix:

/etc/init.d/postfix restart  

9 Instale amavisd-new, SpamAssassin y ClamAV

Para instalar amavisd-new, spamassassin y clamav, ejecute el siguiente comando:

apt-get install amavisd-new spamassassin clamav clamav-daemon zoo unzip bzip2 unzoo libnet-ph-perl libnet-snpp-perl libnet-telnet-perl nomarch lzop pax

Posteriormente debemos configurar amavisd-new. La configuración se divide en varios archivos que residen en el directorio /etc/amavis/conf.d. Eche un vistazo a cada uno de ellos para familiarizarse con la configuración. La mayoría de las configuraciones están bien, sin embargo, debemos modificar tres archivos:

Primero debemos habilitar ClamAV y SpamAssassin en /etc/amavis/conf.d/15-content_filter_mode descomentando las líneas @bypass_virus_checks_maps y @bypass_spam_checks_maps:

vi /etc/amavis/conf.d/15-content_filter_mode

El archivo debería verse así:

[...]
postmaster: root
root:   administrator
[...]

Y luego debería echar un vistazo a la configuración de spam y las acciones para spam-/virus-mails en /etc/amavis/conf.d/20-debian_defaults. No es necesario cambiar nada si la configuración predeterminada le parece bien. El archivo contiene muchas explicaciones, por lo que no es necesario explicar la configuración aquí:

vi /etc/amavis/conf.d/20-debian_defaults
use strict;

# You can modify this file to re-enable SPAM checking through spamassassin
# and to re-enable antivirus checking.

#
# Default antivirus checking mode
# Uncomment the two lines below to enable it back
#

@bypass_virus_checks_maps = (
   \%bypass_virus_checks, \@bypass_virus_checks_acl, \$bypass_virus_checks_re);


#
# Default SPAM checking mode
# Uncomment the two lines below to enable it back
#

@bypass_spam_checks_maps = (
   \%bypass_spam_checks, \@bypass_spam_checks_acl, \$bypass_spam_checks_re);

1;  # ensure a defined return

Finalmente, edite /etc/amavis/conf.d/50-user y agregue la línea $pax='pax'; en el medio:

vi /etc/amavis/conf.d/50-user
[...]
$QUARANTINEDIR = "$MYHOME/virusmails";
$quarantine_subdir_levels = 1; # enable quarantine dir hashing

$log_recip_templ = undef;    # disable by-recipient level-0 log entries
$DO_SYSLOG = 1;              # log via syslogd (preferred)
$syslog_ident = 'amavis';    # syslog ident tag, prepended to all messages
$syslog_facility = 'mail';
$syslog_priority = 'debug';  # switch to info to drop debug output, etc

$enable_db = 1;              # enable use of BerkeleyDB/libdb (SNMP and nanny)
$enable_global_cache = 1;    # enable use of libdb-based cache if $enable_db=1

$inet_socket_port = 10024;   # default listening socket

$sa_spam_subject_tag = '***SPAM*** ';
$sa_tag_level_deflt  = 2.0;  # add spam info headers if at, or above that level
$sa_tag2_level_deflt = 6.31; # add 'spam detected' headers at that level
$sa_kill_level_deflt = 6.31; # triggers spam evasive actions
$sa_dsn_cutoff_level = 10;   # spam level beyond which a DSN is not sent

$sa_mail_body_size_limit = 200*1024; # don't waste time on SA if mail is larger
$sa_local_tests_only = 0;    # only tests which do not require internet access?

[...]
$final_virus_destiny      = D_DISCARD;  # (data not lost, see virus quarantine)
$final_banned_destiny     = D_BOUNCE;   # D_REJECT when front-end MTA
$final_spam_destiny       = D_BOUNCE;
$final_bad_header_destiny = D_PASS;     # False-positive prone (for spam)
[...]

Luego, ejecute estos comandos para agregar el usuario clamav al grupo amavis y reiniciar amavisd-new y ClamAV:

adduser clamav amavis
/etc/init.d/amavis restart
/etc/init.d/clamav-daemon restart
/etc/init.d/clamav-freshclam restart

Ahora tenemos que configurar Postfix para canalizar el correo electrónico entrante a través de amavisd-new:

postconf -e 'content_filter =amavis:[127.0.0.1]:10024'
postconf -e 'receive_override_options =no_address_mappings'

Luego agregue las siguientes líneas a /etc/postfix/master.cf:

vi /etc/postfix/master.cf
use strict;

#
# Place your configuration directives here.  They will override those in
# earlier files.
#
# See /usr/share/doc/amavisd-new/ for documentation and examples of
# the directives you can use in this file
#

$pax='pax';

#------------ Do not modify anything below this line -------------
1;  # ensure a defined return

Luego reinicie Postfix:

/etc/init.d/postfix restart  

Ahora corre

netstat -tap

y debería ver Postfix (maestro) escuchando en el puerto 25 (smtp) y 10025, y amavisd-new en el puerto 10024:

[email protected]:/etc/postfix# netstat -tap
Conexiones activas de Internet (servidores y establecidos)
Proto Recv-Q Send-Q Dirección local            Dirección extranjera         Estado       PID/Nombre del programa
tcp 0 0 localhost.localdo:10024*:*Escuchar 15645 /amavisd (mast
tcp 0 0 localhost.localdo:10025*:*escuchar 16677 /maestro
tcp 0 0 localhost.localdo:mysql*:* Escuchar 6177 /mysqld
tcp 0 0*:www*:*escuchar 5367 /apache2
tcp 0 0*:smtp*:*escuchar 16677 /maestro
tcp6 0 0 [::]:iMaps [::]:*Escuchar 14020 /Couriertcpd
tcp6 0 0 [::]:pop3s [::]:*Escuchar 14088 /Couriertcpd
tcp6 0 0 [::]:pop3 [::]:*                  ESCUCHA      14051/c ouriertcpd
tcp6 0 0 [::]:imap2 [::]:*escucha 13983 /couriertcpd
tcp6 0 0 [::]:ssh [::]:*escucha 4006 /sshd
tcp6       0     52 server1.example.com:ssh 192.168.0.210%8191:3340 ESTABLECIDO 4059/0
[correo electrónico protegido]:/etc/postfix#


10 Instale Razor, Pyzor y DCC y configure SpamAssassin

Razor, Pyzor y DCC son filtros de spam que utilizan una red de filtrado colaborativo. Para instalar Razor y Pyzor, ejecute

apt-get install razor pyzor

DCC no está disponible en los repositorios de Ubuntu 8.04, por lo que lo instalamos de la siguiente manera:

cd /tmp
wget http://launchpadlibrarian.net/11564361/dcc-server_1.3.42-5_i386.deb
wget http://launchpadlibrarian.net/11564359/dcc-common_1.3.42-5_i386. deb
dpkg -i dcc-common_1.3.42-5_i386.deb
dpkg -i dcc-server_1.3.42-5_i386.deb

Ahora tenemos que decirle a SpamAssassin que use estos tres programas. Edite /etc/spamassassin/local.cf y agréguele las siguientes líneas:

vi /etc/spamassassin/local.cf
[...]
amavis unix - - - - 2 smtp
        -o smtp_data_done_timeout=1200
        -o smtp_send_xforward_command=yes

127.0.0.1:10025 inet n - - - - smtpd
        -o content_filter=
        -o local_recipient_maps=
        -o relay_recipient_maps=
        -o smtpd_restriction_classes=
        -o smtpd_client_restrictions=
        -o smtpd_helo_restrictions=
        -o smtpd_sender_restrictions=
        -o smtpd_recipient_restrictions=permit_mynetworks,reject
        -o mynetworks=127.0.0.0/8
        -o strict_rfc821_envelopes=yes
        -o receive_override_options=no_unknown_recipient_checks,no_header_body_checks
        -o smtpd_bind_address=127.0.0.1

Luego debemos habilitar el complemento DCC en SpamAssassin. Abra /etc/spamassassin/v310.pre y quite el comentario de loadplugin Mail::SpamAssassin::Plugin::DCC line:

vi /etc/spamassassin/v310.pre
[...]
#dcc
use_dcc 1
dcc_path /usr/bin/dccproc

#pyzor
use_pyzor 1
pyzor_path /usr/bin/pyzor

#razor
use_razor2 1
razor_config /etc/razor/razor-agent.conf

#bayes
use_bayes 1
use_bayes_rules 1
bayes_auto_learn 1

You can check your SpamAssassin configuration by executing:

spamassassin --lint

It shouldn't show any errors.

Restart amavisd-new afterwards:

/etc/init.d/amavis restart

Now we update our SpamAssassin rulesets as follows:

sa-update --no-gpg

We create a cron job so that the rulesets will be updated regularly. Ejecutar

crontab -e

to open the cron job editor. Create the following cron job:

[...]
# DCC - perform DCC message checks.
#
# DCC is disabled here because it is not open source.  See the DCC
# license for more details.
#
loadplugin Mail::SpamAssassin::Plugin::DCC
[...]

This will update the rulesets every second day at 4.23h.

11 Quota Exceedance Notifications

If you want to get notifications about all the email accounts that are over quota, then do this:

cd /usr/local/sbin/
wget http://puuhis.net/vhcs/quota.txt
mv quota.txt quota_notify
chmod 755 quota_notify

Open /usr/local/sbin/quota_notify and edit the variables at the top. Further down in the file (towards the end) there are two lines where you should add a % sign:

vi /usr/local/sbin/quota_notify
23 4 */2 * * /usr/bin/sa-update --no-gpg &> /dev/null

Ejecutar

crontab -e

to create a cron job for that script:

[...]
my $POSTFIX_CF = "/etc/postfix/main.cf";
my $MAILPROG = "/usr/sbin/sendmail -t";
my $WARNPERCENT = 80;
my @POSTMASTERS = ('[email protected]');
my $CONAME = 'My Company';
my $COADDR = '[email protected]';
my $SUADDR = '[email protected]';
my $MAIL_REPORT = 1;
my $MAIL_WARNING = 1;
[...]
           print "Subject: WARNING: Your mailbox is $lusers{$luser}% full.\n";
[...]
           print "Your mailbox: $luser is $lusers{$luser}% full.\n\n";
[...]

12 Test Postfix

To see if Postfix is ready for SMTP-AUTH and TLS, run

telnet localhost 25

After you have established the connection to your Postfix mail server type

ehlo localhost

If you see the lines

250-STARTTLS

y

250-AUTH LOGIN PLAIN

everything is fine:

[email protected]:/usr/local/sbin# telnet localhost 25
Trying 127.0.0.1...
Connected to localhost.localdomain.
Escape character is '^]'.
220 server1.example.com ESMTP Postfix (Ubuntu)
ehlo localhost
250-server1.example.com
250-PIPELINING
250-SIZE 10240000
250-VRFY
250-ETRN
250-STARTTLS
250-AUTH LOGIN PLAIN
250-AUTH=LOGIN PLAIN
250-ENHANCEDSTATUSCODES
250-8BITMIME
250 DSN
quit
221 2.0.0 Bye
Connection closed by foreign host.
[email protected]:/usr/local/sbin#

Type

quit

to return to the system shell.

13 Populate The Database And Test

To populate the database you can use the MySQL shell:

mysql -u root -p
USE mail;

At least you have to create entries in the tables domains and users :

INSERT INTO `domains` (`domain`) VALUES ('example.com');
INSERT INTO `users` (`email`, `password`, `quota`) VALUES ('[email protected]', ENCRYPT('secret'), 10485760);

(Please take care that you use the ENCRYPT syntax in the second INSERT statement in order to encrypt the password!)

If you want to make entries in the other two tables, that would look like this:

INSERT INTO `forwardings` (`source`, `destination`) VALUES ('[email protected]', '[email protected]');
INSERT INTO `transport` (`domain`, `transport`) VALUES ('example.com', 'smtp:mail.example.com');

To leave the MySQL shell, type

quit;

For most people it is easier if they have a graphical front-end to MySQL; therefore you can also use phpMyAdmin (in this example under http://192.168.0.100/phpmyadmin/ or http://server1.example.com/phpmyadmin/) to administrate the mail database. Again, when you create a user, go sure that you use the ENCRYPT function to encrypt the password:

I do not think I have to explain the domains and users table further.

The forwardings table can have entries like the following:

0 0 * * * /usr/local/sbin/quota_notify &> /dev/null

The transport table can have entries like these:

source destination  
[email protected] [email protected] Redirects emails for [email protected] to [email protected]
@example.com [email protected] Creates a Catch-All account for [email protected] All emails to example.com will arrive at [email protected], except those that exist in the users table (i.e., if [email protected] exists in the users table, mails to [email protected] will still arrive at [email protected]).
@example.com @anotherdomain.tld This redirects all emails to example.com to the same user at anotherdomain.tld. E.g., emails to [email protected] will be forwarded to [email protected]
[email protected] [email protected], [email protected] Forward emails for [email protected] to two or more email addresses. All listed email addresses under destination receive a copy of the email.

See

man transport 

for more details.

Please keep in mind that the order of entries in the transport table is important! The entries will be followed from the top to the bottom.

Important: Postfix uses a caching mechanism for the transports, therefore it might take a while until you changes in the transport table take effect. If you want them to take effect immediately, run

postfix reload 

after you have made your changes in the transport table.

14 Send A Welcome Email For Creating Maildir

When you create a new email account and try to fetch emails from it (with POP3/IMAP) you will probably get error messages saying that the Maildir doesn't exist. The Maildir is created automatically when the first email arrives for the new account. Therefore it's a good idea to send a welcome email to a new account.

First, we install the mailx package:

apt-get install mailx 

To send a welcome email to [email protected], we do this:

mailx [email protected]

You will be prompted for the subject. Type in the subject (e.g. Welcome), then press ENTER, and in the next line type your message. When the message is finished, press ENTER again so that you are in a new line, then press CTRL+D; if you don't want to cc the mail, press ENTER again:

[email protected]:/usr/local/sbin# mailx [email protected]
Subject:Welcome <-- ENTER
Welcome! Have fun with your new mail account. <-- ENTER
<-- CTRL+D
Cc:<-- ENTER
[email protected]:/usr/local/sbin#

15 Installing SquirrelMail

SquirrelMail is a webmail interface that will let your users send and receive emails in a browser. This chapter shows how to install it and adjust it to our setup so that users can even change their email account password from the SquirrelMail interface.

To install SquirrelMail, we run:

apt-get install squirrelmail php-pear

Next we copy the Apache configuration that comes with the SquirrelMail package to the /etc/apache2/conf.d directory and restart Apache:

cp /etc/squirrelmail/apache.conf /etc/apache2/conf.d/squirrelmail.conf
/etc/init.d/apache2 restart

SquirrelMail comes with some pre-installed plugins, unfortunately none of them is capable of letting us change our email password in our MySQL database. But there's the Change SQL Password plugin which we can install manually:

The plugin depends on the Pear-DB package so we install it:

pear install DB

Then we install the Change SQL Password plugin itself:

cd /usr/share/squirrelmail/plugins
wget http://www.squirrelmail.org/countdl.php?fileurl=http%3A%2F%2Fwww.squirrelmail.org%2Fplugins%2Fchange_sqlpass-3.3-1.2.tar.gz
tar xvfz change_sqlpass-3.3-1.2.tar.gz
cd change_sqlpass
cp config.php.sample config.php

Now we must edit config.php and adjust it to our setup. Please adjust the $csp_dsn, $lookup_password_query, $password_update_queries, $password_encryption, $csp_salt_static, and $csp_delimiter variables as follows and comment out $csp_salt_query:

vi config.php
domain transport  
example.com : Delivers emails for example.com locally. This is as if this record would not exist in this table at all.
example.com smtp:mail.anotherdomain.tld Delivers all emails for example.com via smtp to the server mail.anotherdomain.com.
example.com smtp:mail.anotherdomain.tld:2025 Delivers all emails for example.com via smtp to the server mail.anotherdomain.com, but on port 2025, not 25 which is the default port for smtp.
example.com

smtp:[1.2.3.4]
smtp:[1.2.3.4]:2025
smtp:[mail.anotherdomain.tld]

The square brackets prevent Postfix from doing lookups of the MX DNS record for the address in square brackets. Makes sense for IP addresses.
.example.com smtp:mail.anotherdomain.tld Mail for any subdomain of example.com is delivered to mail.anotherdomain.tld.
* smtp:mail.anotherdomain.tld All emails are delivered to mail.anotherdomain.tld.
[email protected] smtp:mail.anotherdomain.tld Emails for [email protected] are delivered to mail.anotherdomain.tld.

The complete file looks as follows:

[...]
$csp_dsn = 'mysql://mail_admin:[email protected]/mail';
[...]
$lookup_password_query = 'SELECT count(*) FROM users WHERE email = "%1" AND password = %4';
[...]
$password_update_queries = array('UPDATE users SET password = %4 WHERE email = "%1"');
[...]
$password_encryption = 'MYSQLENCRYPT';
[...]
$csp_salt_static = 'LEFT(password, 2)';
[...]
//$csp_salt_query = 'SELECT salt FROM users WHERE username = "%1"';
[...]
$csp_delimiter = '@';
[...]

The Change SQL Password plugin also depends on the Compatibility plugin which we install as follows:

cd /usr/share/squirrelmail/plugins
wget http://www.squirrelmail.org/countdl.php?fileurl=http%3A%2F%2Fwww.squirrelmail.org%2Fplugins%2Fcompatibility-2.0.11-1.0.tar.gz
tar xvfz compatibility-2.0.11-1.0.tar.gz

Now we must go into the SquirrelMail configuration and tell SquirrelMail that we use Courier as our POP3 and IMAP server and enable the Change SQL Password and the Compatibility plugins:

/usr/sbin/squirrelmail-configure

You'll see the following menu. Navigate through it as indicated:

SquirrelMail Configuration : Read: config.php (1.4.0)
---------------------------------------------------------
Main Menu --
1.  Organization Preferences
2.  Server Settings
3.  Folder Defaults
4.  General Options
5.  Themes
6.  Address Books
7.  Message of the Day (MOTD)
8.  Plugins
9.  Database
10. Languages

D.  Set pre-defined settings for specific IMAP servers

C   Turn color on
S   Save data
Q   Quit

Command >> <-- D


SquirrelMail Configuration : Read: config.php
---------------------------------------------------------
While we have been building SquirrelMail, we have discovered some
preferences that work better with some servers that don't work so
well with others.  If you select your IMAP server, this option will
set some pre-defined settings for that server.

Please note that you will still need to go through and make sure
everything is correct.  This does not change everything.  There are
only a few settings that this will change.

Please select your IMAP server:
    bincimap    = Binc IMAP server
    courier     = Courier IMAP server
    cyrus       = Cyrus IMAP server
    dovecot     = Dovecot Secure IMAP server
    exchange    = Microsoft Exchange IMAP server
    hmailserver = hMailServer
    macosx      = Mac OS X Mailserver
    mercury32   = Mercury/32
    uw          = University of Washington's IMAP server

    quit        = Do not change anything
Command >> <-- courier


              imap_server_type = courier
         default_folder_prefix = INBOX.
                  trash_folder = Trash
                   sent_folder = Sent
                  draft_folder = Drafts
            show_prefix_option = false
          default_sub_of_inbox = false
show_contain_subfolders_option = false
            optional_delimiter = .
                 delete_folder = true

Press any key to continue... <-- press some key


SquirrelMail Configuration : Read: config.php (1.4.0)
---------------------------------------------------------
Main Menu --
1.  Organization Preferences
2.  Server Settings
3.  Folder Defaults
4.  General Options
5.  Themes
6.  Address Books
7.  Message of the Day (MOTD)
8.  Plugins
9.  Database
10. Languages

D.  Set pre-defined settings for specific IMAP servers

C   Turn color on
S   Save data
Q   Quit

Command >> <-- 8


SquirrelMail Configuration : Read: config.php (1.4.0)
---------------------------------------------------------
Plugins
  Installed Plugins

  Available Plugins:
    1. abook_take
    2. administrator
    3. bug_report
    4. calendar
    5. change_sqlpass
    6. compatibility
    7. delete_move_next
    8. demo
    9. filters
    10. fortune
    11. info
    12. listcommands
    13. mail_fetch
    14. message_details
    15. newmail
    16. sent_subfolders
    17. spamcop
    18. squirrelspell
    19. test
    20. translate

R   Return to Main Menu
C   Turn color on
S   Save data
Q   Quit

Command >> <-- 6 (or whatever number the compatibility plugin has - it's needed by the change_sqlpass plugin)


SquirrelMail Configuration : Read: config.php (1.4.0)
---------------------------------------------------------
Plugins
  Installed Plugins
    1. compatibility

  Available Plugins:
    2. abook_take
    3. administrator
    4. bug_report
    5. calendar
    6. change_sqlpass
    7. delete_move_next
    8. demo
    9. filters
    10. fortune
    11. info
    12. listcommands
    13. mail_fetch
    14. message_details
    15. newmail
    16. sent_subfolders
    17. spamcop
    18. squirrelspell
    19. test
    20. translate

R   Return to Main Menu
C   Turn color on
S   Save data
Q   Quit

Command >> <-- 6 (the number of the change_sqlpass plugin)


SquirrelMail Configuration : Read: config.php (1.4.0)
---------------------------------------------------------
Plugins
  Installed Plugins
    1. compatibility
    2. change_sqlpass

  Available Plugins:
    3. abook_take
    4. administrator
    5. bug_report
    6. calendar
    7. delete_move_next
    8. demo
    9. filters
    10. fortune
    11. info
    12. listcommands
    13. mail_fetch
    14. message_details
    15. newmail
    16. sent_subfolders
    17. spamcop
    18. squirrelspell
    19. test
    20. translate

R   Return to Main Menu
C   Turn color on
S   Save data
Q   Quit

Command >> <-- S


SquirrelMail Configuration : Read: config.php (1.4.0)
---------------------------------------------------------
Plugins
  Installed Plugins
    1. compatibility
    2. change_sqlpass

  Available Plugins:
    3. abook_take
    4. administrator
    5. bug_report
    6. calendar
    7. delete_move_next
    8. demo
    9. filters
    10. fortune
    11. info
    12. listcommands
    13. mail_fetch
    14. message_details
    15. newmail
    16. sent_subfolders
    17. spamcop
    18. squirrelspell
    19. test
    20. translate

R   Return to Main Menu
C   Turn color on
S   Save data
Q   Quit

Command >> S

Data saved in config.php
Press enter to continue... <-- press some key


SquirrelMail Configuration : Read: config.php (1.4.0)
---------------------------------------------------------
Plugins
  Installed Plugins
    1. compatibility
    2. change_sqlpass

  Available Plugins:
    3. abook_take
    4. administrator
    5. bug_report
    6. calendar
    7. delete_move_next
    8. demo
    9. filters
    10. fortune
    11. info
    12. listcommands
    13. mail_fetch
    14. message_details
    15. newmail
    16. sent_subfolders
    17. spamcop
    18. squirrelspell
    19. test
    20. translate

R   Return to Main Menu
C   Turn color on
S   Save data
Q   Quit

Command >> <-- Q

Now you can type in http://server1.example.com/squirrelmail or http://192.168.0.100/squirrelmail in your browser to access SquirrelMail.

Log in with your email address (e.g. [email protected]) and your password:

You should find the welcome email in your inbox:

To change your password, go to Options and then select Change Password:

Type in your current password and then your new password twice:

SquirrelMail will tell you if the password has been changed successfully:

16 References

  • Tutorial:ISP-style Email Service with Debian-Sarge and Postfix 2.1:http://workaround.org/articles/ispmail-sarge/
  • Postfix + Quota:http://vhcs.net/new/modules/newbb/viewtopic.php?topic_id=3496&forum=17
  • Mail Passwords Encrypted using saslauthd:http://www.syscp.de/docs/public/contrib/cryptedmailpws

  • Postfix MTA:http://www.postfix.org/
  • Postfix Quota Patch:http://web.onda.com.br/nadal/
  • phpMyAdmin:http://www.phpmyadmin.net/
  • SquirrelMail:http://www.squirrelmail.org/
  • Ubuntu:http://www.ubuntu.com/

Ubuntu
  1. Usuarios virtuales y dominios con Postfix, Courier, MySQL y SquirrelMail (Ubuntu 14.04LTS)

  2. Usuarios virtuales y dominios con Postfix, Courier, MySQL y SquirrelMail (Ubuntu 13.10)

  3. Tutorial del servidor LAMP de Ubuntu 16.04 (LTS) con Apache, PHP 7 y MySQL

  4. Usuarios virtuales y dominios con Sendmail

  5. Servidor de correo con usuarios y dominios virtuales usando Postfix y Dovecot en un CentOS 6 VPS

Usuarios virtuales y dominios con Postfix, Courier, MySQL y SquirrelMail (Ubuntu 12.10)

Alojamiento virtual con vsftpd y MySQL en Ubuntu 12.10

Alojamiento virtual con Proftpd y MySQL (incluida la cuota) en Ubuntu 12.10

Usuarios virtuales y dominios con Postfix, Courier, MySQL y SquirrelMail (Debian Wheezy)

Usuarios virtuales y dominios con Postfix, Courier, MySQL y SquirrelMail (CentOS 6.3 x86_64)

Usuarios virtuales y dominios con Postfix, Courier, MySQL y SquirrelMail (Fedora 18 x86_64)

    <?php
    
    /**
      * SquirrelMail Change SQL Password Plugin
      * Copyright (C) 2001-2002 Tyler Akins
      *               2002 Thijs Kinkhorst <[email protected]>
      *               2002-2005 Paul Lesneiwski <[email protected]>
      * This program is licensed under GPL. See COPYING for details
      *
      * @package plugins
      * @subpackage Change SQL Password
      *
      */
    
    
       // Global Variables, don't touch these unless you want to break the plugin
       //
       global $csp_dsn, $password_update_queries, $lookup_password_query,
              $force_change_password_check_query, $password_encryption,
              $csp_salt_query, $csp_salt_static, $csp_secure_port,
              $csp_non_standard_http_port, $csp_delimiter, $csp_debug,
              $min_password_length, $max_password_length, $include_digit_in_password,
              $include_uppercase_letter_in_password, $include_lowercase_letter_in_password,
              $include_nonalphanumeric_in_password;


       // csp_dsn
       //
       // Theoretically, any SQL database supported by Pear should be supported
       // here.  The DSN (data source name) must contain the information needed
       // to connect to your database backend. A MySQL example is included below.
       // For more details about DSN syntax and list of supported database types,
       // please see:
       //   http://pear.php.net/manual/en/package.database.db.intro-dsn.php
       //
       $csp_dsn = 'mysql://mail_admin:[email protected]/mail';


       // lookup_password_query
       //
       // This plugin will always verify the user's old password
       // against their login password, but an extra check can also
       // be done against the database for more security if you
       // desire.  If you do not need the extra password check,
       // make sure this setting is empty.
       //
       // This is a query that returns a positive value if a user
       // and password pair are found in the database.
       //
       // This query should return one value (one row, one column), the
       // value being ideally a one or a zero, simply indicating that
       // the user/password pair does in fact exist in the database.
       //
       //   %1 in this query will be replaced with the full username
       //      (including domain), such as "[email protected]"
       //   %2 in this query will be replaced with the username (without
       //      any domain portion), such as "jose"
       //   %3 in this query will be replaced with the domain name,
       //      such as "example.com"
       //   %4 in this query will be replaced with the current (old)
       //      password in whatever encryption format is needed per other
       //      plugin configuration settings (Note that the syntax of
       //      the password will be provided depending on your encryption
       //      choices, so you NEVER need to provide quotes around this
       //      value in the query here.)
       //   %5 in this query will be replaced with the current (old)
       //      password in unencrypted plain text.  If you do not use any
       //      password encryption, %4 and %5 will be the same values,
       //      except %4 will have double quotes around it and %5 will not.
       //
       //$lookup_password_query = '';
       // TERRIBLE SECURITY: $lookup_password_query = 'SELECT count(*) FROM users WHERE username = "%1" AND plain_password = "%5"';
       //$lookup_password_query = 'SELECT count(*) FROM users WHERE username = "%1" AND crypt_password = %4';
       $lookup_password_query = 'SELECT count(*) FROM users WHERE email = "%1" AND password = %4';
    
    
       // password_update_queries
       //
       // An array of SQL queries that will all be executed
       // whenever a password change attempt is made.
       //
       // Any number of queries may be included here.
       // The queries will be executed in the order given here.
       //
       //   %1 in all queries will be replaced with the full username
       //      (including domain), such as "[email protected]"
       //   %2 in all queries will be replaced with the username (without
       //      any domain portion), such as "jose"
       //   %3 in all queries will be replaced with the domain name,
       //      such as "example.com"
       //   %4 in all queries will be replaced with the new password
       //      in whatever encryption format is needed per other
       //      plugin configuration settings (Note that the syntax of
       //      the password will be provided depending on your
       //      encryption choices, so you NEVER need to provide quotes
       //      around this value in the queries here.)
       //   %5 in all queries will be replaced with the new password
       //      in unencrypted plain text - BEWARE!  If you do not use
       //      any password encryption, %4 and %5 will be the same
       //      values, except %4 will have double quotes around it
       //      and %5 will not.
       //
    //   $password_update_queries = array(
    //            'UPDATE users SET crypt_password = %4 WHERE username = "%1"',
    //            'UPDATE user_flags SET force_change_pwd = 0 WHERE username = "%1"',
    //            'UPDATE users SET crypt_password = %4, force_change_pwd = 0 WHERE username = "%1"',
    //                                   );
       $password_update_queries = array('UPDATE users SET password = %4 WHERE email = "%1"');
    
    
       // force_change_password_check_query
       //
       // A query that checks for a flag that indicates if a user
       // should be forced to change their password.  This query
       // should return one value (one row, one column) which is
       // zero if the user does NOT need to change their password,
       // or one if the user should be forced to change it now.
       //
       // This setting should be an empty string if you do not wish
       // to enable this functionality.
       //
       //   %1 in this query will be replaced with the full username
       //      (including domain), such as "[email protected]"
       //   %2 in this query will be replaced with the username (without
       //      any domain portion), such as "jose"
       //   %3 in this query will be replaced with the domain name,
       //      such as "example.com"
       //
       //$force_change_password_check_query = 'SELECT IF(force_change_pwd = "yes", 1, 0) FROM users WHERE username = "%1"';
       //$force_change_password_check_query = 'SELECT force_change_pwd FROM users WHERE username = "%1"';
       $force_change_password_check_query = '';


       // password_encryption
       //
       // What encryption method do you use to store passwords
       // in your database?  Please use one of the following,
       // exactly as you see it:
       //
       //   NONE          Passwords are stored as plain text only
       //   MYSQLPWD      Passwords are stored using the MySQL password() function
       //   MYSQLENCRYPT  Passwords are stored using the MySQL encrypt() function
       //   PHPCRYPT      Passwords are stored using the PHP crypt() function
       //   MD5CRYPT      Passwords are stored using encrypted MD5 algorithm
       //   MD5           Passwords are stored as MD5 hash
       //
       //$password_encryption = 'MYSQLPWD';
       $password_encryption = 'MYSQLENCRYPT';
    
    
       // csp_salt_query
       // csp_salt_static
       //
       // Encryption types that need a salt need to know where to get
       // that salt.  If you have a constant, known salt value, you
       // should define it in $csp_salt_static.  Otherwise, leave that
       // value empty and define a value for the $csp_salt_query.
       //
       // Leave both values empty if you do not need (or use) salts
       // to encrypt your passwords.
       //
       // The query should return one value (one row, one column) which
       // is the salt value for the current user's password.  This
       // query is ignored if $csp_salt_static is anything but empty.
       //
       //   %1 in this query will be replaced with the full username
       //      (including domain), such as "[email protected]"
       //   %2 in this query will be replaced with the username (without
       //      any domain portion), such as "jose"
       //   %3 in this query will be replaced with the domain name,
       //      such as "example.com"
       //
       //$csp_salt_static = 'LEFT(crypt_password, 2)';
       //$csp_salt_static = '"a4"';  // use this format with MYSQLENCRYPT
       //$csp_salt_static = '$2$blowsomefish$';  // use this format with PHPCRYPT
       //$csp_salt_static = '';
       $csp_salt_static = 'LEFT(password, 2)';
    
       //$csp_salt_query = 'SELECT SUBSTRING_INDEX(crypt_password, '$', 1) FROM users WHERE username = "%1"';
       //$csp_salt_query = 'SELECT SUBSTRING(crypt_password, (LENGTH(SUBSTRING_INDEX(crypt_password, '$', 2)) + 2)) FROM users WHERE username = "%1"';
       //$csp_salt_query = 'SELECT salt FROM users WHERE username = "%1"';
       //$csp_salt_query = '';


       // csp_secure_port
       //
       // You may ensure that SSL encryption is used during password
       // change by setting this to the port that your HTTPS is served
       // on (443 is typical).  Set to zero if you do not wish to force
       // an HTTPS connection when users are changing their passwords.
       //
       // You may override this value for certain domains, users, or
       // service levels through the Virtual Host Login (vlogin) plugin
       // by setting a value(s) for $vlogin_csp_secure_port in the vlogin
       // configuration.
       //
       $csp_secure_port = 0;
       //$csp_secure_port = 443;


       // csp_non_standard_http_port
       //
       // If you serve standard HTTP web requests on a non-standard
       // port (anything other than port 80), you should specify that
       // port number here.  Set to zero otherwise.
       //
       // You may override this value for certain domains, users, or
       // service levels through the Virtual Host Login (vlogin) plugin
       // by setting a value(s) for $vlogin_csp_non_standard_http_port
       // in the vlogin configuration.
       //
       //$csp_non_standard_http_port = 8080;
       $csp_non_standard_http_port = 0;


       // min_password_length
       // max_password_length
       // include_digit_in_password
       // include_uppercase_letter_in_password
       // include_lowercase_letter_in_password
       // include_nonalphanumeric_in_password
       //
       // You can set the minimum and maximum password lengths that
       // you accept or leave those settings as zero to indicate that
       // no limit should be applied.
       //
       // Turn on any of the other settings here to check that the
       // new password contains at least one digit, upper case letter,
       // lower case letter and/or one non-alphanumeric character.
       //
       $min_password_length = 6;
       $max_password_length = 0;
       $include_digit_in_password = 0;
       $include_uppercase_letter_in_password = 0;
       $include_lowercase_letter_in_password = 0;
       $include_nonalphanumeric_in_password = 0;


       // csp_delimiter
       //
       // if your system has usernames with something other than
       // an "@" sign separating the user and domain portion,
       // specify that character here
       //
       //$csp_delimiter = '|';
       $csp_delimiter = '@';


       // debug mode
       //
       $csp_debug = 0;


    ?>